


M O T U P R O A U D I O C O N T R O L W E B A P P
14
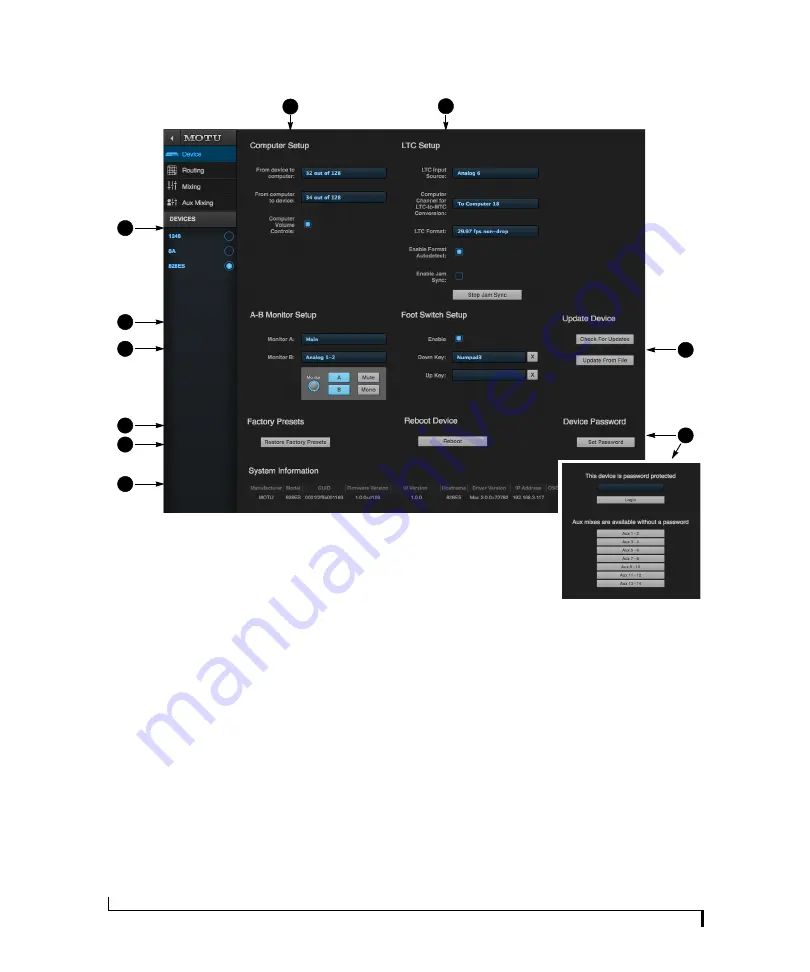
DEVICE TAB (CONTINUED)
27
Scroll down to view these additional
Device tab settings.
26. In the Computer Setup section, you
can specify how many audio
channels you would like to be able
to stream to and from your
computer, up to 128 channels each
way, simultaneously, over USB or
Thunderbolt. Map them as desired
in the Routing tab (page 15).
27. Your MOTU interface can resolve to
SMPTE time code, also referred to as
LTC (
Longitudinal Time Code
), by
choosing
LTC
from the Clock Mode
menu (item 13 on page 12). From
the
LTC Input Source
menu (27
above), choose the analog or digital
input that is receiving the time code.
If you would also like to send time
code (LTC) to the computer, where it
will be converted to MIDI Time Code
(MTC) for resolving your DAW or
other software to MTC via OS X Core
Audio (a Mac-only feature), choose
an audio channel you are not using
for other purposes from the
Computer Channel for LTC-to-MTC
Conversion
menu; otherwise, leave it
set to
None
. Choose the desired
frame format, or use the
Enable
Format Autodetect
to automatically
detect the frame format of the
incoming time code. When
Enable
Jam Sync
is turned on, your interface
will continue to operate under its
own clock and continue LTC-to-MTC
conversion, even after it stops
receiving time code. Click
Stop Jam
Sync
to exit this mode. For further
details about time code sync, see
“Syncing to SMPTE time code (LTC)”
on page 48 and “LTC-to-MTC conver-
sion” on page 69.
28. Use these buttons to manually check
for and install updates for your
MOTU interface. For complete
details, see Appendix D, “Updating
Firmware” page (113). Updating
from a file can be done off line from
your computer, using an update
you’ve obtained through MOTU’s
web site or tech support depart-
ment. The
Check For Updates
button
requires that the computer (or
device) you are using to view your
MOTU interface is connected to the
internet through a local network or
Wi-Fi. Updating from the internet is
easy and convenient.
29. Use
Set Password
to password-
protect the interface on the
network. All settings are blocked,
except for aux bus mixing, as shown
above (29). This allows musicians to
access their personal monitor (aux)
mixes from their mobile devices,
while all other device settings
remain blocked. To clear the
password, log in and then click
Clear
Password
. If you forget the
password, you can clear it in the
Settings menu in the front panel LCD
(see page 59) with either the
Clear
Password
setting or by doing a
factory reset with the
Factory
Default
setting.
30. The
System Information
section
displays information about your
MOTU device, including the
firmware version and network IP
address.
31. Use
Restore Factory Presets
to restore
your MOTU device’s factory presets.
32. Click
Reboot
to restart the interface.
33. Choose the outputs you would like
to use for the front panel monitor
controls (Monitor A/B switches,
Mute and Mono). You can also
control these functions here in the
web app with the controls provided.
See “Talkback” on page 60.
34. Enable the
Foot Switch
input here. In
each text box, type the keystroke
you wish to trigger from your foot
pedal. Click ‘X’ to clear the text box.
35. When the
Computer Volume Controls
option is enabled (a Mac only
feature), the Audio MIDI Setup
utility in OS X provides volume
control for each output channel to
your MOTU audio interface. In
addition, the volume controls for
your Mac (on your computer
keyboard) will control the channels
you’ve designated for computer
output in Audio MIDI Setup, if any.
Be careful when toggling this
setting because sudden changes in
your computer volume can result.
34
29
26
30
32
35
28
31
33
Содержание 828es
Страница 5: ...Part1 GettingStarted...
Страница 6: ......
Страница 8: ...8...
Страница 22: ...M O T U P R O A U D I O C O N T R O L W E B A P P 22...
Страница 28: ...P A C K I N G L I S T A N D S Y S T E M R E Q U I R E M E N T S 28...
Страница 32: ...S O F T W A R E I N S T A L L A T I O N 32...
Страница 51: ...Part2 Usingthe828es...
Страница 52: ......
Страница 62: ...F R O N T P A N E L O P E R A T I O N 62...
Страница 78: ...M I X E R E F F E C T S 78...
Страница 94: ...M O T U A U D I O T O O L S 94...
Страница 101: ...Part3 Appendices...
Страница 102: ......
Страница 108: ...A P P E N D I X B A U D I O S P E C I F I C A T I O N S 108...
Страница 109: ...APPENDIX 109 C Mixer Schematics MONO INPUT CHANNEL...
Страница 110: ...A P P E N D I X C M I X E R S C H E M A T I C S 110 STEREO INPUT CHANNEL...
Страница 111: ...A P P E N D I X C M I X E R S C H E M A T I C S 111 GROUP BUS...
Страница 112: ...A P P E N D I X C M I X E R S C H E M A T I C S 112 MONITOR BUS...
Страница 116: ...A P P E N D I X E O S C S U P P O R T 116...
Страница 120: ...I N D E X 120...


