


H A R D W A R E I N S T A L L A T I O N
40
SETUP FOR AVB ETHERNET AUDIO INTERFACE
OPERATION
Your MOTU hardware can serve as an Ethernet
audio interface when connected to a recent
generation AVB-equipped Mac. You can then use
your MOTU interface as a standard multi-channel
audio interface with any Core Audio compatible
host software running on the Mac.
For Ethernet audio interface operation, you need:
■
A recent Mac (any Mac that has a Thunderbolt
port on it)
■
OS X El Capitan (10.11) or later
■
Firmware version 1.2.5 or later in your MOTU
interface
Ethernet connection to the Mac
As shown on page 34, connect the network port
on your MOTU interface to the Ethernet port on
the Mac using a standard, high-grade (CAT-5e or
CAT-6) network cable up to 100 meters in length.
☛
If your Mac doesn’t have an Ethernet port,
you can connect your MOTU interface via
Ethernet using a Thunderbolt-to-Ethernet
adapter. Ethernet might be preferable over
Thunderbolt because the Ethernet cable can be up
to 100 meters long, using standard Ethernet
cabling (which is very affordable).
☛
USB-to-Ethernet adapters cannot be used
because the Mac’s USB chip set does not support
AVB Ethernet.
Alternately, you can connect both the Mac and the
interface to an AVB-compatible Ethernet switch.
Web app setup
To set up your MOTU device as an AVB Ethernet
audio interface:
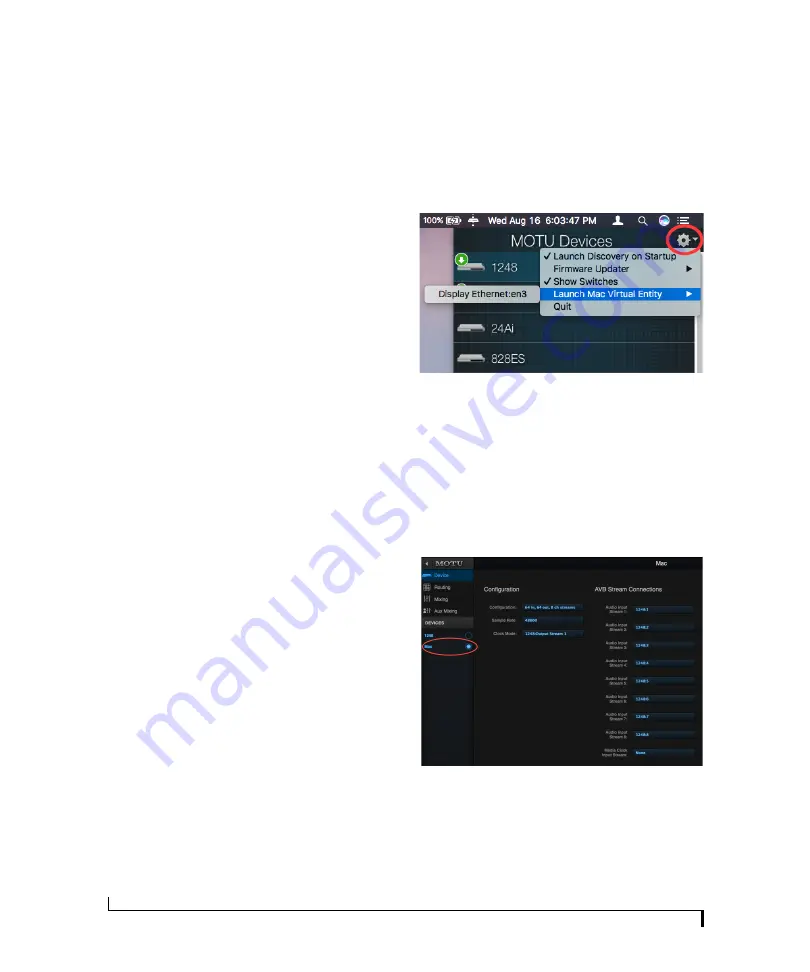
1
Launch the MOTU Discovery app. From the
Settings menu (circled in red below), choose
Launch Mac Virtual Entity
, and from the sub-
menu choose the Ethernet port to which your
MOTU interface is connected. It should now be
checked.
Figure 5-6: Enabling AVB connectivity to the Mac.
2
After completing step #1 above, the Mac will
appear in the AVB device list in the MOTU Pro
Audio Control web app, as shown below. PLEASE
NOTE: it may take several minutes for the Mac to
appear in the list, the first time you set this up.
After the first time, though, you won’t experience
any delays.
Figure 5-7: Accessing the AVB settings for the Mac in the MOTU web
app.
3
From the Configuration menu (Figure 5-7),
choose the channel mode for the Mac that best fits
your workflow.
Содержание 828es
Страница 5: ...Part1 GettingStarted...
Страница 6: ......
Страница 8: ...8...
Страница 22: ...M O T U P R O A U D I O C O N T R O L W E B A P P 22...
Страница 28: ...P A C K I N G L I S T A N D S Y S T E M R E Q U I R E M E N T S 28...
Страница 32: ...S O F T W A R E I N S T A L L A T I O N 32...
Страница 51: ...Part2 Usingthe828es...
Страница 52: ......
Страница 62: ...F R O N T P A N E L O P E R A T I O N 62...
Страница 78: ...M I X E R E F F E C T S 78...
Страница 94: ...M O T U A U D I O T O O L S 94...
Страница 101: ...Part3 Appendices...
Страница 102: ......
Страница 108: ...A P P E N D I X B A U D I O S P E C I F I C A T I O N S 108...
Страница 109: ...APPENDIX 109 C Mixer Schematics MONO INPUT CHANNEL...
Страница 110: ...A P P E N D I X C M I X E R S C H E M A T I C S 110 STEREO INPUT CHANNEL...
Страница 111: ...A P P E N D I X C M I X E R S C H E M A T I C S 111 GROUP BUS...
Страница 112: ...A P P E N D I X C M I X E R S C H E M A T I C S 112 MONITOR BUS...
Страница 116: ...A P P E N D I X E O S C S U P P O R T 116...
Страница 120: ...I N D E X 120...


