background image

2 - 20 MC45 User Guide

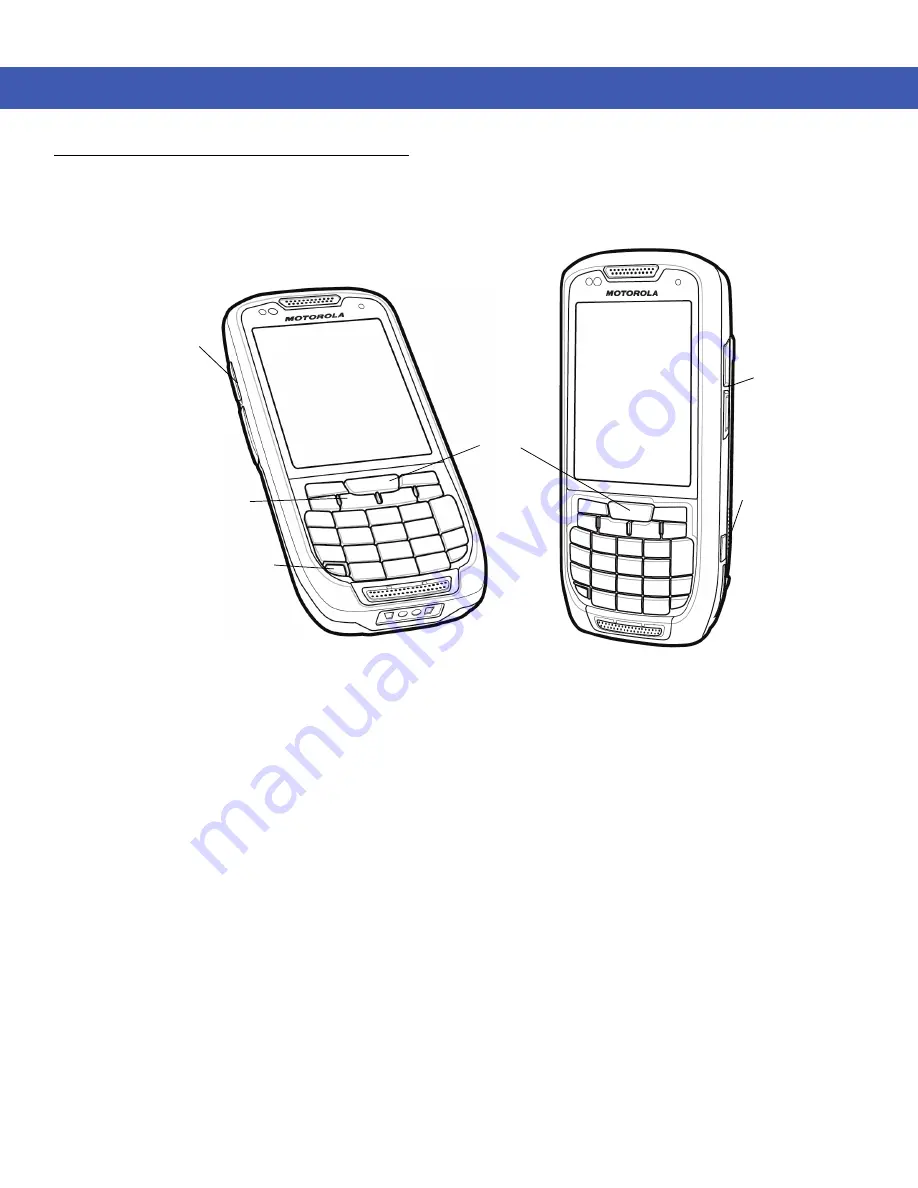
Function Buttons

The MC45’s buttons perform certain functions.

Figure 2-17    

Function Buttons

Power

: Press the red 

Power

 button to turn the MC45 screen on and off. The MC45 is in suspend mode when 

the screen is off. For more information, see 

Powering On the MC45 on page 1-8

. Also use th

Power

 button 

to reset the MC45 by performing a warm or cold boot. See 

Resetting the MC45 on page 2-17

.

Scan:

 Press to scan bar codes or capture images. See 

Chapter 3, Data Capture

Or, press to open an application or perform a function. See the 

Microsoft

®

 Applications for Windows 

Embedded Handheld 6.5 User Guide 

to set an application to open.

Up/Down

: Press to increase or decrease the MC45’s volume.

Volume Buttons

Programmable 
Button (Camera)

Power Button

Programmable

Button (Scan)

Up/Down Button

Scan Button

Содержание MC45

Страница 1: ...b MC45 USER GUIDE ...

Страница 2: ......

Страница 3: ...MC45 User Guide 72E 164159 01 Rev A December 2012 ...

Страница 4: ...rate any form or portion of a licensed program with other program material create a derivative work from a licensed program or use a licensed program in a network without written permission from Motorola The user agrees to maintain Motorola s copyright notice on the licensed programs delivered hereunder and to include the same on any authorized copies it makes in whole or in part The user agrees n...

Страница 5: ...iii Revision History Changes to the original manual are listed below Change Date Description 01 Rev A 12 2012 Initial release ...

Страница 6: ...iv MC45 User Guide ...

Страница 7: ... Installing the Micro Secure Digital microSD Card 1 3 Installing the mini SIM Card 1 4 Installing the Battery 1 5 Charging the Battery 1 6 Charging the Battery 1 6 Charging Spare Batteries 1 7 Charging Temperature 1 7 Powering On the MC45 1 8 Calibrating the Screen 1 8 Checking Battery Status 1 8 Replacing the Battery 1 8 First time Network Activation 1 9 GSM UMTS Activation 1 9 Network Activation...

Страница 8: ... 20 Stylus 2 21 Entering Data 2 21 Display Orientation 2 22 Taking Photos 2 23 Recording Video 2 23 Viewing Photos and Videos 2 23 Chapter 3 Data Capture Introduction 3 1 Laser Scanning 3 1 Scanning Considerations 3 1 Bar Code Scanning 3 2 Adaptive Scanning 3 2 Color Digital Camera 3 3 Digital Camera Scanning 3 3 DataWedge 3 4 Chapter 4 Using the Phone Introduction 4 1 Accessing the Phone Dialer 4...

Страница 9: ...g to a Text Message 4 22 MMS Messaging 4 22 Creating and Sending MMS Messages 4 23 Viewing an MMS Message 4 23 Replying to an MMS Message 4 24 Blocking Incoming MMS Messages 4 24 Voice Commander 4 24 Call 4 25 Find 4 26 Redial 4 26 Callback 4 26 Start 4 27 Appointments 4 27 Read 4 27 What time is it 4 27 Call History 4 27 Voice Play Music 4 27 What can I say 4 28 Goodbye 4 28 Chapter 5 Using WLAN ...

Страница 10: ...aring 7 9 Hands free Services 7 10 Serial Port Services 7 11 ActiveSync Using Serial Port Services 7 11 Phone Book Access Profile Services 7 13 Dial Up Networking Services 7 13 Connect to a HID Device 7 14 A2DP AVRCP Services 7 14 Chapter 8 Accessories Introduction 8 1 Communication with Host Computer 8 3 Charging the MC45 Battery 8 4 Charging Temperature 8 5 Vehicle Charge Cradle 8 6 Windshield I...

Страница 11: ...ectors 9 4 Cleaning Frequency 9 5 Troubleshooting 9 5 MC45 9 5 Single Slot Charge Cradle 9 8 Multi Slot Universal Charge Only Cradle 9 9 Vehicle Charge Cradle 9 9 Four Slot Battery Charger 9 10 Cables 9 11 Appendix A Technical Specifications MC45 Technical Specifications A 1 MC45 Accessory Specifications A 4 Single Slot Charge Cradle A 4 Multi Slot Universal Charge Only Cradle A 5 Four Slot Batter...

Страница 12: ...x MC45 User Guide ...

Страница 13: ...ribes how to get the MC45 up and running MC45 User Guide describes how to use the MC45 MC45 Integrator Guide describes how to set up the MC45 and accessories MC45 Regulatory Guide provides all regulatory service and EULA information for the MC45 Enterprise Mobility Developer Kit EMDK Help File provides API information for writing applications NOTE Screens and windows pictured in this guide are sam...

Страница 14: ...b The second line lists the operating system version and the build number The last part of the build number represents the AKU number Build 29102 5 3 12 13 indicates that the device is running AKU version 5 3 12 13 Configuration Radios Display Memory Data Capture Operating System Keypads MC4587 WWAN GSM HSDPA 3 2 QVGA16 Bit Color 256 MB RAM 1 GB Flash Camera Microsoft Windows Embedded Handheld 6 5...

Страница 15: ...Version To determine the OEM software version Tap Start Settings System folder System Info icon System tab Fusion Software To determine the Fusion software version Tap Start Wireless Companion icon Wireless Status icon Versions ...

Страница 16: ...r or camera Chapter 4 Using the Phone provides basic instructions for using the MC45 phone Chapter 5 Using WLAN explains the WLAN functionality on the MC45 Chapter 6 Using GPS Navigation provides information about GPS navigation with the MC45 Chapter 7 Using Bluetooth explains Bluetooth functionality on the MC45 Chapter 8 Accessories describes the available accessories and how to use them with the...

Страница 17: ...s Key names on a keypad Button names on a screen Bullets indicate Action items Lists of alternatives Lists of required steps that are not necessarily sequential Sequential lists e g those that describe step by step procedures appear as numbered lists Related Documents MC45 Quick Start Guide p n 72 164157 xx MC45 Regulatory Guide p n 72 164158 xx MC45 Integrator Guide p n 72E 164160 xx Enterprise M...

Страница 18: ...pe and version number Motorola responds to calls by email telephone or fax within the time limits set forth in support agreements If your problem cannot be solved by Motorola Solutions Global Customer Support you may need to return your equipment for servicing and will be given specific directions Motorola is not responsible for any damages incurred during shipment if the approved shipping contain...

Страница 19: ...atteries replace the strap and power on the MC45 for the first time Figure 1 1 MC45 Front View Keypad Charging Connector Microphone Charging Battery Status LED Scan Button Power Button Up Down Button Touch Screen with Screen Protective Film Receiver Micro USB port Programmable Button Scan Ambient Light Sensor Proximity Sensor ...

Страница 20: ... Screen Protector Regulatory Guide Quick Start Guide Inspect the equipment for damage If any equipment is missing or damaged contact the Motorola Solutions Global Customer Support center immediately See page xvi for contact information Getting Started To start using the MC45 for the first time Install microSD card optional Scan Window Stylus Handstrap Mount Tether Point Camera Battery Cover Batter...

Страница 21: ...SD card 1 Slide the mini SIM card holder to the right to unlock 2 Lift the mini SIM card holder Figure 1 3 microSD Card Installation 3 Slide the microSD card holder down to unlock 4 Lift up the microSD card holder 5 Insert the card with the card contacts facing down and lower the microSD card holder 6 Slide the microSD card holder up to lock 7 Lower the mini SIM card holder 8 Slide the mini SIM ca...

Страница 22: ...contain the following information Mobile phone service provider account details Information regarding service access and preferences Contact information which can be moved to Contacts on the MC45 Any additional services to which you have subscribed To install the mini SIM card 1 Slide the mini SIM card holder to the right to unlock 2 Lift the mini SIM card holder Figure 1 5 Lifting the mini SIM Ca...

Страница 23: ... button b Ensure Phone is on c Make a call to verify cellular connection Installing the Battery To install the battery 1 Insert the battery bottom first into the battery compartment in the back of the MC45 2 Press the battery down into the battery compartment NOTE For detailed information about WWAN activation and settings refer to the MC45 Integrator Guide NOTE When installing the battery for the...

Страница 24: ...Battery Status LED remains lit see Table 1 1 on page 1 7 for charge status indications To charge the MC45 use the USB Rapid Charge Cable or a cradle with the appropriate power supply For information about the accessories available for the MC45 see Chapter 8 Accessories To charge the battery use either a USB Rapid Charge Cable or a cradle For USB Rapid Charge Cable or cradle setup and charging proc...

Страница 25: ...04 F Charging is intelligently controlled by the MC45 To accomplish this for small periods of time the MC45 or accessory alternately enables and disables battery charging to keep the battery at acceptable temperatures The MC45 or accessory indicates when charging is disabled due to abnormal temperatures via its LED See Table 1 1 NOTE The MC45 Battery Cover must be in place and closed properly for ...

Страница 26: ...e screen 4 Repeat as the target moves around the screen Checking Battery Status To check the charge status of the main battery or backup battery in the MC45 tap Start Settings Power icon to display the Power window Replacing the Battery To replace the battery 1 Press the red Power button to wake the device 2 Hold down the red Power button for 3 seconds and release A screen appears Tap the Power Of...

Страница 27: ...was installed in the MC45 the MC45 performs the activation process 2 The Phone Network GSM UMTS Setup dialog box displays 3 Tap Yes and then OK For some carriers the MC45 resets 4 If during start up no update connection settings message appears tap Start Settings Connections Phone Network Setup and tap Update Connection Settings button 5 If the network is unsupported a message appears with links f...

Страница 28: ...ck box and select a value from the drop down list 3 Select ok Changing the Backlight Keylight Settings To change the backlight settings in order to conserve more battery power 1 Tap Start Settings System tab Backlight Keylight icon Battery Power tab 2 Select the Disable backlight if device is not used for check box and select a value from the drop down list 3 Select the Brightness tab 4 Tap the Di...

Страница 29: ...Getting Started 1 11 Figure 1 12 Tapping the Connectivity Icon Figure 1 13 Opening Wireless Manager Select Wireless Manager Status bar ...

Страница 30: ...r disable a wireless connection tap the specific button To enable or disable all wireless connections tap the All button To configure settings for a connection tap Menu Figure 1 15 Wireless Manager Menu NOTE Wireless connection options vary depending upon configurations ...

Страница 31: ...wering on and resetting the MC45 and entering and capturing data The MC45 factory default radio states are WLAN OFF Bluetooth OFF Phone ON Home Screen The Home contains the Status Bar at the top of the screen the Today screen in the center and the Soft Keys at the bottom of the screen Each of these are described below NOTE The WLAN feature is only applicable for the MC4597 ...

Страница 32: ...e instant messages were received Notification that one or more e mail text messages were received Notification that one or more voice messages were received Speakerphone is on There are more notification icons than can be displayed Tap to display remaining icons Indicates a reminder of an upcoming calendar event One or more Email messages were received Receiving MMS message Sending MMS message MMS...

Страница 33: ...N available WLAN in use HSDPA available 3G available GPRS available EGPRS available Call missed WAN Dialing while no SIM card is installed Voice call in progress Calls are forwarded Call on hold Antenna signal icon wireless on good signal Antenna signal icon wireless off Antenna signal icon no service or searching HSDPA connecting HSDPA in use 3G connecting 3G in use GPRS connecting GPRS in use Ta...

Страница 34: ... 2 2 Icon Bar EGPRS connecting EGPRS in use Roaming SIM Card not installed Audio All sounds are on All sounds are off Vibrate is on Battery Battery is charging Battery has a full charge Battery has a high charge Battery has a medium charge Battery has a low charge Battery has a very low charge Table 2 1 Status Icons Continued Icon Description ...

Страница 35: ... hold the Information Status bar and move it up and down over an application name Remove your finger and the Information Status bar and application name center in the screen Table 2 2 Bar Icons Icon Name Description Magnify Enlarges the screen Bluetooth Displays the Bluetooth dialog box WLAN Displays the Network Detection dialog box Voicemail Dials Voicemail Notifications Indicates that notificati...

Страница 36: ...ize the Today screen tap Start Settings Today icon Use the Appearance tab to customize the background and the Items tab to change the display format Classic Today Screen The user can change the Today screen to the classic layout that is used in Windows Mobile 6 5 3 Application Icon Application Information ...

Страница 37: ...ap OK The task bar at the bottom of the screen can contain the task tray icons listed in Table 2 3 Soft Key Bar Status Bar Today Screen Task Tray NOTE The task bar is only visible in the classic view Table 2 3 Task Tray Icons Icon Name Description Wireless connection status Indicates WLAN signal strength ActiveSync Active serial connection between the MC45 and the host computer DataWedge Provides ...

Страница 38: ...t programs and folders listed on the Start screen Figure 2 8 Start Screen Table 2 4 Programs and Folders on the Start Screen Icon Name Description Icon Name Description Today Close the Start menu and display the Today screen E mail Send an Email Text Send an SMS text message Contacts Keep track of friends and colleagues Calendar Keep track of appointments and create meeting requests Internet Explo...

Страница 39: ...our tasks File Explorer Organize and manage files on your device ActiveSync Synchronize information between the MC45 and a host computer or the Exchange Server Office Mobile Use the complete suite of Microsoft Office applications for your mobile device Excel Mobile OneNote Mobile PowerPoint Mobile Word Mobile Internet Sharing Connect a notebook computer to the Internet using the MC45 s data connec...

Страница 40: ...grator Guide for more information Rapid Deployment Client Facilitates software downloads from a Mobility Services Platform Console FTP server to the MC45 Refer to the MC45 Integrator Guide for more information DEMO Launches the DEMO applications This icon appears after the DEMO applications have been installed Alarms Sets the clock to the date and time of your locale Alarms can also be set at spec...

Страница 41: ...e below Home Customize the appearance of the Today screen and the information to display on it Personal Folder Contains personal applications see below Bluetooth Open the Bluetooth application set the MC45 to visible mode and scan for other Bluetooth devices in the area System Folder Contains system applications see below Connections Folder Beam Set the MC45 to receive incoming IrDA beams Connecti...

Страница 42: ...e information about certificates installed on the MC45 Backlight Keylight Set the display backlight and keylight time out and adjust brightness Customer Feedback Submit feedback on the Windows Mobile 6 software Error Reporting Enable or disable the device s error reporting function When this function is enabled and a program error occurs technical data about the state of the program and your compu...

Страница 43: ...eck the device memory allocation status and memory card information and stop currently running programs Regional Settings Set the regional configuration to use including the format for displaying numbers currency date and time on the MC45 Remove Programs Remove programs that you installed on the MC45 System Info Displays the MC45 s software and hardware information Screen Change the screen orienta...

Страница 44: ... the Speaker icon The Volume dialog box appears Figure 2 9 Volume Dialog Box 2 Tap and move the slide bar to adjust the volume 3 Select the On or Off radio button to turn the volume on or off You can also adjust the system volume using the Sounds Notifications window or use the Up Down button on the side of the MC45 ...

Страница 45: ...icates the status and a battery dialog box appears indicating the status of the battery The Battery icon always appears in the navigation bar when the Today screen is visible The icon indicates the battery power level The message displays until the Dismiss button is pressed Figure 2 10 Battery Icon on the Title Bar Also view the battery status using the Power window Figure 2 11 Battery Status ...

Страница 46: ...ry in MC45 is fully charged Fast Blinking Red Charging error Off Not charging Single Blink Green when Power button pressed Start up commenced Charging Battery Status LED NOTE During an over temperature error condition the Charging Error indication will only appear if the condition exists for more than 30 minutes NOTE For information about scanning decoding see Chapter 3 Data Capture For informatio...

Страница 47: ... are configurable and the factory default settings are shown in are subject to change update To change the wake up conditions tap Start Settings Power Wakeup Figure 2 13 Wake up Device Window Locking the MC45 Use the Device Lock feature to prevent use of the device Note that when locked the MC45 does not respond to screen or keypad input To lock the MC45 tap Start Lock or press the Power button fo...

Страница 48: ...x to enable password protection 3 From the drop down list select a time value for the protection to take affect after non use 4 From the Password type drop down list select either Simple PIN or Strong alphanumeric 5 For a simple password enter a four digit password in the Password field For a stronger password NOTE If the device is configured to connect to a network use a strong difficult to figur...

Страница 49: ... 9 Tap OK When the MC45 is not used for a period of time and the user tries to access the device the Password window appears This also appears when the MC45 is connected to a host computer with either a cradle or communication cable Figure 2 16 Enter Password Windows Enter the password to un lock the device Tap the Unlock button to unlock the device and go to the Today screen or tap the Contact bu...

Страница 50: ...he Power button to reset the MC45 by performing a warm or cold boot See Resetting the MC45 on page 2 17 Scan Press to scan bar codes or capture images See Chapter 3 Data Capture Or press to open an application or perform a function See the Microsoft Applications for Windows Embedded Handheld 6 5 User Guide to set an application to open Up Down Press to increase or decrease the MC45 s volume Volume...

Страница 51: ... item On the pop up menu that appears tap the action to perform Drag Hold the stylus on the screen and drag across the screen to select text and images Drag in a list to select multiple items Entering Data When entering data on the keypad use either the single hand method or the two hand method as shown in Figure 2 18 Figure 2 18 Entering Data on the Keypad CAUTION To prevent damage to the screen ...

Страница 52: ...en portrait and landscape modes manually To change the orientation of the screen tap Start Settings System Screen General tab and select between three different types of orientations Potrait Landscape right handed Landscape left handed Figure 2 19 Display Orientation Window ...

Страница 53: ... video clip 1 Press the side Camera button or tap Start Pictures Videos and then tap Camera on the Command bar 2 Tap Camera on the command bar 3 Tap Menu Video to set shooting mode to video The available recording time displays on the screen 4 Press the OK key or the side Camera Button to begin recording Recording stops when you press the OK key or the side Camera Button again Viewing Photos and V...

Страница 54: ...2 24 MC45 User Guide ...

Страница 55: ...y point and shoot operation Adaptive Scanning Scanning Considerations Typically scanning is a simple matter of aim scan and decode and a few quick trial efforts master it However consider the following to optimize scanning performance Range Any scanning device decodes well over a particular working range minimum and maximum distances from the bar code This range varies according to bar code densit...

Страница 56: ...Release the scan button Adaptive Scanning The MC45 contains the adaptive scanning feature that automatically adjusts the scan beam width for rapid and easy scanning of bar codes from near contact to more than 200 inches away By default the MC45 is set to wide scan beam width When the user presses the scan button the MC45 determines the distance from the bar code For close bar codes the MC45 sets a...

Страница 57: ...pes Advanced intuitive aiming for easy point and shoot operation Digital Camera Scanning 1 Ensure that a scan enabled application is loaded on the MC45 2 Aim the camera lens on the back of the MC45 at a bar code 3 Press and hold the scan button In the image window align the camera over the barcode Figure 3 4 Digital Camera Scanning 4 The Scan Decode LED lights green and a beep sounds by default to...

Страница 58: ...0 Back 8 Tap 0 Exit 9 Tap OK 10 Tap the Running option to start the DataWedge prcoess The DataWedge Status changes to Ready 11 Tap OK To disable DataWedge 1 Tap Start Settings System DataWedge 2 Tap the Running option to end the DataWedge process The DataWedge Status changes to Stopped 3 Tap OK NOTE The camera decode feature is set by default to automatically decode the bar code when read This fea...

Страница 59: ...over High Speed Downlink Packet Access HSDPA using Cellular Line or using the modem specified by the mobile operator For more information or to customize the MC45 phone by changing phone settings see the MC45 Integrator Guide Accessing the Phone Dialer Access the dialer regardless of the program in use Applications on the MC45 can be in use during a call Figure 4 1 Phone Dialer NOTE Dialers vary d...

Страница 60: ...e Phone On and Off Windows Embedded Handheld 6 5 devices include Wireless Manager which provides a simple method of enabling and disabling the phone To open Wireless Manager tap the Connectivity icon Figure 4 2 Opening Wireless Manager Select Wireless Manager The Wireless Manager window appears To toggle on or off the phone tap blue Phone bar To configure settings for a connection tap Menu Phone S...

Страница 61: ...an use a Bluetooth headset for audio communication when using an audio enabled application See Chapter 7 Using Bluetooth for information on connecting a Bluetooth headset to the MC45 Set the MC45 s volume appropriately before putting the headset on When a Bluetooth headset is connected the speakerphone is muted It is recommended for phone conversations to use the Bluetooth Hands free profile inste...

Страница 62: ...ger when not in a call and the audio volume when in a call Figure 4 5 Phone Volume Slider To adjust the volume tap the Speaker icon in the Title bar Move the slider up or down to adjust the volume Phone Volume Slider Ringer Volume Slider NOTE Adjust the conversation phone volume during a call Adjusting the volume while not in a call affects the ring and notification sound levels ...

Страница 63: ...onnects the name or number appears in the Call Line To place the call on hold press To return to the call press again 6 Tap or press to end the call Using Contacts Use Contacts to make a call without looking up or entering the phone number To make a call from Contacts 1 Tap Start Contacts 2 From the contact list tap and hold the contact name NOTE You can make emergency calls even when the MC45 is ...

Страница 64: ...1 Tap Start Phone or press 2 From the Phone dialer tap Figure 4 7 Call Log Window 3 Tap on the desired Contacts name to begin dialing and return to the phone dialer 4 Press to stop dialing or end the call NOTE To make a call from an open contact tap the number to call See On Device Help for more information about Contacts Call Log ...

Страница 65: ...IM card must be inserted in your phone in order to use the numbers stored on it See your service provider for additional information See Installing the mini SIM Card on page 1 4 for SIM card installation procedures When the alpha numeric keypad phone is locked press the Orange key twice to set the keypad to numeric mode and then enter the emergency number Answering a Call A dialog box appears on t...

Страница 66: ...ut a call on hold to call another number press or tap the green Call Line To move from one call to another press on the MC45 or tap the green Call Line Smart Dialing Smart Dialing makes it easy to dial a phone number When you start entering numbers or characters Smart Dialing automatically searches and sorts the contact entries on the SIM card in Contacts and the phone numbers in Call History incl...

Страница 67: ...ich is associated with d e f the matching list is narrowed down to the following names Smith Bernard Adams John and Parks Celine Figure 4 10 Finding a Contact To make a call or send a text message using Smart Dialing 1 Begin entering the first few numbers or characters 2 In the Smart Dialing panel use the up and down arrows on the keypad to navigate to the desired contact or phone number 3 When th...

Страница 68: ...rs with a single tap Before creating a speed dial entry ensure the phone number exists in Contacts Adding a Speed Dial Entry To add a speed dial entry from the phone keypad 1 Ensure the contact and phone number are in the Contacts list 2 Tap Start Phone or press 3 Tap Figure 4 11 Contacts 4 Tap the desired contact name and number in the list 5 Tap Add to Speed Dial ...

Страница 69: ...lect an available location to assign as the new speed dial entry The first speed dial location is reserved for voice mail 7 Tap OK to add the contact to the speed dial list To add a speed dial entry from the Contacts window 1 Tap Start Contacts Figure 4 13 Contacts 2 Tap a contact name 3 Tap Menu Add to Speed Dial ...

Страница 70: ...t Phone or press 2 Tap 3 Tap the desired contact name in the list 4 Tap Edit Speed Dial 5 In the Location drop down list select a different available location to assign as the new speed dial entry The first speed dial location is reserved for voice mail 6 Tap OK to change the speed dial list 7 Tap OK to exit the Edit Contacts window 8 Tap X to exit the Contacts window Deleting a Speed Dial Entry T...

Страница 71: ... reset the call timer and delete calls to manage the calls stored in Call Log Changing the Call Log View 1 Tap Start Phone or press and then tap to open the Call Log window 2 Tap on the top right corner to show the Call Log menu 3 Tap Filters and select a view type from the menu to display only received calls outgoing calls incomplete calls or missed calls NOTE Deleting names and phone numbers in ...

Страница 72: ...dow 4 Tap to exit the Call Log window Deleting All Call Log Items 1 Tap Start Phone or press to display the Phone dialer 2 From the Phone dialer tap 3 Tap Delete call logs Figure 4 16 Call Log Delete Call Logs Menu 4 Select All call logs Call Log ...

Страница 73: ... Tap Start Phone or press to display the Phone dialer 2 From the Phone dialer tap 3 Tap an item to call the number or tap to open the Options window for that item The Call Log Options window appears Figure 4 18 Viewing Call Status 4 Select an applicable option from the list 5 Tap to exit the Options window 6 Tap to close the Call Log window ...

Страница 74: ...mber or tap to open the Options window for that item The Call Log Options window appears Figure 4 19 Call Log Option 4 Select an applicable item from the menu as needed 5 Depending on the item selected the appropriate window displays For example select Send Text Message to display the Inbox window 6 Tap to exit the Options window 7 Tap to close the Call Log window NOTE When more than one call is o...

Страница 75: ...3 Tap 4 Tap The dialer re appears 5 Enter the second number and tap Send 6 When the call connects the first call is placed on hold and the second call is active Figure 4 20 Creating a Conference Call 7 Tap call Line 1 to make that call active The second call goes on hold 8 Tap to create a conference call three callers NOTE Conference Calling and the number of conference calls allowed may not be av...

Страница 76: ...ure 4 21 Two Merged Calls 9 To add a third caller tap The dialer appers When the call connects the new call is active and the conference is on hold Figure 4 22 Adding a Third Call 10 To add the new caller to the conference tap ...

Страница 77: ...rom the conference tap the caller and then tap next to the caller or press 13 To end the conference call tap next to the Call Line or press Call Completed screen appears and then the dialer displays NOTE To speak privately with one party during a conference call tap and then tap next to the caller To include all parties again tap ...

Страница 78: ...ounter lets you see and control the size of the message as you compose If you want to know if your text message was received tap Message Options then select the Request message delivery notification check box 5 Tap to send the message If the phone is turned on your text message is sent If it s off you are prompted to turn on the phone If you do so the message is sent otherwise when you tap OK the ...

Страница 79: ...e Notification The Caller Identification feature matches incoming text message numbers with those stored in Contacts so you know who is sending you a message Furthermore the New Text Message dialog box gives you the option to call the sender or save dismiss or delete the message Figure 4 27 New Text Message Options When the phone function is off you can still view received text message in Messagin...

Страница 80: ...g to a Text Message To reply to a text message 1 Tap Start Text 2 In the message list tap a text message The window displays previous text conversations 3 Enter text in the reply field 4 Tap to send the reply MMS Messaging MMS Messaging allows the user to send a pictures videos audio files and other file types to another mobile computer Tap to View Text Messages Enter reply here ...

Страница 81: ... addresses pre defined text contact information and calendar information Tap Done after adding information 6 Tap to attach a picture or video stored on the MC45 to the message 7 Tap to attach a sound file stored on the MC45 to the message 8 Tap to take a picture and attach it to the message 9 Tap to capture video and attach it to the message 10 Tap to record a message and attach it to the message ...

Страница 82: ... message or tap Menu Reply via SMS to reply with a text message Blocking Incoming MMS Messages To block incoming MMS messages from a specific sender 1 Open and view the MMS message 2 Tap Menu Show Contact Details 3 Tap Menu Save to Blacklist 4 Tap Done To unblock a sender 1 Tap Start Text 2 Tap Menu MMS Options Blacklist 3 Tap and hold the phone number 4 Select Delete from the pop up menu 5 Tap OK...

Страница 83: ...esponds with Call Michael Archer work is it correct 3 Say Yes MC45 responds with Dialing To call a person at a location 1 Initiate Voice Commander The MC45 responds with Say command 2 Say Call Mary Smith at home The MC45 responds with Call Mary Smith home is it correct 3 Say Yes The MC45 responds with Dialing To call a person with more that one phone number 1 Initiate Voice Commander The MC45 resp...

Страница 84: ...d 2 Say Find Michael Archer at home 3 MC45 responds with Michael Archer has no home number Redial To redial a previous number 1 Initiate Voice Commander The MC45 responds with Say command 2 Say Redial The MC45 responds with Call Mary Smith at home is it correct 3 Say Yes The MC45 responds with Dialing Callback 1 Initiate Voice Commander The MC45 responds with Say command 2 Say Callback The MC45 re...

Страница 85: ...u have 3 SMS and reads the SMS messages What time is it To find out the time of day 1 Initiate Voice Commander The MC45 responds with Say command 2 Say What time is it The MC45 responds with The time is 3 p m Call History To view the call history window 1 Initiate Voice Commander The MC45 responds with Say command 2 Say Call History The MC45 responds with Call history 3 The Call History page displ...

Страница 86: ...nd 2 Say What can I say The help file displays Alternatively tap Menu Help to open the help file Goodbye To exit the Voice Commander application Say Goodbye The MC45 responds with Goodbye and the application terminates Voice Commander can be also terminated manually by tapping Menu Exit Note that goodbye will not be accepted during voice digit dialing operation NOTE User can say Pause or Resume to...

Страница 87: ...ce your chosen WLAN security scheme use the Fusion or Wireless Zero Config WZC software to configure the MC45 to match Fusion Overview The Fusion software contains applications with which to create wireless profiles Each profile specifies the security parameters to use for connecting to a particular WLAN as identified by its ESSID The Fusion software also allows the user to control which profile o...

Страница 88: ...sion is enabled and a profile is configured 2 Tap Start Settings Connections WLAN 3 In the My network card Connects to drop down list select The Internet 4 Tap OK Wireless Zero Config Overview WZC is a Microsoft wireless connection management utility that dynamically selects a wireless network to connect to based on a user s preferences and various default settings Switching Between Fusion and WZC...

Страница 89: ...s Manage Certs Invokes the Certificate Manager application which allows you to manage certificates used for authentication Yes Yes Manage PACs Invokes the PAC Manager application which helps you manage the list of Protected Access Credentials used with EAP FAST authentication Yes No Options Invokes the Options application which allows you to configure the Fusion option settings Yes Yes Wireless St...

Страница 90: ...dow appears 3 In the Profile Name text box enter a name for the profile 4 In the ESSID text box enter the ESSID Figure 5 2 Profile ID Dialog Box 5 Tap Next The Operating Mode dialog box displays 6 In the Operating Mode drop down list select Infrastructure or Ad hoc Figure 5 3 Operating Mode Dialog Box 7 Tap Next The Security Mode dialog box displays 8 In the Security Mode drop down list select Leg...

Страница 91: ... indicate whether a pass phrase or hexadecimal keys will be entered on the next page 13 Select the For added security Mask characters entered check box to hide characters entered Deselect this to show characters entered 14 Tap Next Figure 5 6 WEP 40 WEP Keys Dialog Box 15 In the Edit Key drop down list select the key to enter 16 In the Key field enter 10 hexadecimal characters 17 In the Confirm fi...

Страница 92: ...age dialog box appears 23 In the Battery Usage Mode dialog box select a power consumption option Figure 5 8 Battery Usage Dialog Box 24 Tap Save Wireless Zero Config Setup To setup WLAN using WZC 1 Tap Start Wireless Launcher Wireless Zero Config NOTE Obtain the proper WLAN configuration information from your system administrator prior to performing the WZC setup procedures The following setup pro...

Страница 93: ...ess networks in the area and displays them in the window 3 Tap a network name Figure 5 10 Configure Wireless Network Window 4 In the Connects to drop own list select either The Internet or Work 5 Check the This is a hidden network checkbox if the network is a hidden network 6 Tap Next ...

Страница 94: ...tion is selected enter an encryption key in the Network key text box 10 Tap Next Figure 5 12 Configure Network Authentication Window 11 If required select Use IEEE 802 1x network access control check box 12 In the EAP type drop down list box select the EAP type 13 Tap Finish More Information on WZC For more information on Microsoft Wireless Zero Config see the Microsoft Software Developer Network ...

Страница 95: ...the application is compatible with the MC45 Refer to the application s user guide for application installation and setup information MC45 GPS Setup By default the MC45 has the following settings 1 Tap Start Settings System External GPS icon 2 In the Programs tab the GPS program port is set to COM6 3 In the Hardware tab the GPS hardware port is set to None Multiple programs can simultaneously acces...

Страница 96: ... the left to lock Answering a Phone Call While Using GPS If you receive a phone call while using your GPS navigation software 1 Answer the phone call by pressing the Answer button 2 Once you end the phone call press the End Call button to resume the audio on the GPS software Losing the GPS Signal While in a Vehicle GPS performance on the MC45 may be affected if the vehicle has thermal glass window...

Страница 97: ...faster and more reliably The GPS Assist application provides the ability to modify the settings associated with obtaining GPS data Tap Start Connections GPS Assist icon Figure 6 1 GPS Assistance Window To set the source of the data tap Source and select one of the options Any default None To set the frequency of updating the data tap Update Frequency and select one of the options On Demand default...

Страница 98: ...6 4 MC45 User Guide ...

Страница 99: ...ty Developer Kit EMDK Help Adaptive Frequency Hopping Adaptive Frequency Hopping AFH is a method of avoiding fixed frequency interferers and can be used with Bluetooth voice All devices in the piconet Bluetooth network must be AFH capable in order for AFH to work There is no AFH when connecting and discovering devices Avoid making Bluetooth connections and discoveries during critical 802 11b commu...

Страница 100: ...d by creating an initialization key that is used to authenticate the devices and create a link key for them Entering a common PIN number in the devices being paired generates the initialization key The PIN number is never sent over the air By default the Bluetooth stack responds with no key when a key is requested it is up to user to respond to the key request event Authentication of Bluetooth dev...

Страница 101: ...ice Bluetooth Power States Suspend When there is an active Bluetooth connection the Bluetooth radio goes into low power mode maintaining the active connection When there is no active connection the Bluetooth radio turns off Resume When the MC45 resumes Bluetooth turns on if it was on prior to suspend NOTE If there is an active Bluetooth connection between the MC45 and another Bluetooth device and ...

Страница 102: ...e Bluetooth radio to exchange information with other Bluetooth devices within range Communicate only with Bluetooth radios in close proximity Enabling Bluetooth To enable Bluetooth 1 Tap Wireless Manager and then tap the Bluetooth bar or Tap Start Settings Connections Wireless Manager Bluetooth bar Figure 7 1 Wireless Manager Window 2 Tap on the Bluetooth bar to turn on Bluetooth NOTE To achieve t...

Страница 103: ... MC45 and a bonded device exchange information automatically when you turn the Bluetooth radio on To find Bluetooth devices in the area 1 Ensure that Bluetooth is enabled on both devices 2 Ensure that the Bluetooth device to discover is in discoverable and connectable modes 3 Ensure that the two devices are within 30 feet 10 meters of one another 4 Tap Start Settings Connections Wireless Manager M...

Страница 104: ...Devices 6 Select a device from the list Figure 7 4 Select a Bluetooth Device 7 Tap Next The Enter Passcode window appears NOTE If Smart pairing is configured and the device is requesting one of the pre defined PINs the Enter Passcode window does not appear ...

Страница 105: ...ce to enter the same passcode Enter the created passcode to establish a paired connection If you entered a passcode from the device you shouldn t have to do anything on the other device 10 When the connection is complete a list of matching and supported services on the device appears 11 Select the services you want to use and tap Finish The services on the new devices have to be selected or else t...

Страница 106: ...within 30 feet 10 meters of one another 3 Tap Start File Explorer 4 Navigate to the file to transfer 5 Tap and hold on the filename until the pop up menu appears Figure 7 7 File Explorer Window 6 Select Beam File The MC45 searches for Bluetooth devices in the area 7 Tap Tap to send next to the Bluetooth device to send the file to The MC45 communicates with the device and send the file When complet...

Страница 107: ...ap and hold on the contact until the pop up menu appears Figure 7 9 Contact Window 6 Select Send Contact Beam The MC45 searches for Bluetooth devices in the area 7 Tap Tap to send next to the Bluetooth device to send the file to The MC45 communicates with the device and send the contact When completed Tap to send changes to Done Internet Sharing Internet Sharing allows the user to connect a comput...

Страница 108: ... a Bluetooth headset 1 Ensure that Bluetooth is enabled and discoverable on both devices 2 Ensure that the two devices are within 30 feet 10 meters of one another 3 Tap Start Settings Connections Wireless Manager Menu Bluetooth Settings Devices 4 Tap New device The MC45 searches for Bluetooth devices in the area 5 Select the headset name and tap Next The Passcode window appears 6 Enter the headset...

Страница 109: ...ect a COM port from the drop down list 15 Tap Finish ActiveSync Using Serial Port Services Use the wireless Bluetooth serial port connection for ActiveSync just as you would a physical serial cable connection You must configure the application that will use the connection to the correct serial port To set up a Bluetooth ActiveSync connection Before setting up a Bluetooth ActiveSync connection conf...

Страница 110: ...orts tab click Add 7 Select the Incoming device initiates the connection option then click OK Note the number of the COM port that was added 8 Click OK 9 Click Start All Programs Microsoft ActiveSync 10 Click File Connection Settings Figure 7 11 ActiveSync Connection Settings 11 On the Allow connections to one of the following drop down list select the COM port with the number you noted earlier 12...

Страница 111: ... device such as a Car Kit 5 Select a device from the list 6 Tap Next The Enter Passcode window appears 7 Enter the Passcode and the tap Next The device is added to the Bluetooth list 8 A dialog box appears requesting if you want to transfer contacts to the car kit 9 Select Yes or No 10 If Yes is selected contacts from the MC45 are transferred to the car kit Dial Up Networking Services Dial up netw...

Страница 112: ...ce to discover is in discoverable and connectable modes 3 Ensure that the two devices are within 30 feet 10 meters of one another 4 Tap Start Settings Bluetooth Devices 5 Tap Add new device The MC45 begins searching for discoverable Bluetooth devices in the area 6 Select a stereo headset from the list 7 Tap Next The Enter Passcode window appears Refer to the device s User Manuals for more informat...

Страница 113: ...ends using this to minimize wear and tear Screen protectors enhance the usability and durability of touch screen displays Benefits include Protection from scratches and gouges Durable writing and touch surface with tactile feel Abrasion and chemical resistance Glare reduction Keeping the device s screen looking new Quick and easy installation The touch sensitive screen of the MC45 is polycarbonate...

Страница 114: ...creen displays To remove the screen protector lift the corner using a thin plastic card such as a credit card then carefully lift it off the display Figure 9 1 Removing the Screen Protector Lift Screen Protector Corner CAUTION Do not use a sharp object to remove the protector Doing so can damage the display NOTE Not using a screen protector can affect warranty coverage To purchase replacement prot...

Страница 115: ...ard surface could cause the battery to overheat Do not short circuit a battery or allow metallic or conductive objects to contact the battery terminals Do not modify or remanufacture attempt to insert foreign objects into the battery immerse or expose to water or other liquids or expose to fire explosion or other hazard Do not leave or store the equipment in or near areas that might get very hot s...

Страница 116: ...ttery door 3 Dip the cotton portion of the cotton tipped applicator in isopropyl alcohol 4 Rub the cotton portion of the cotton tipped applicator back and forth across the connector on the bottom of the MC45 Do not leave any cotton residue on the connector 5 Repeat at least three times 6 Use the cotton tipped applicator dipped in alcohol to remove any grease and dirt near the connector area 7 Use ...

Страница 117: ...equency is up to the customer s discretion due to the varied environments in which the mobile devices are used They may be cleaned as frequently as required However when used in dirty environments it may be advisable to periodically clean the scanner exit window to ensure optimum scanning performance Troubleshooting MC45 CAUTION Do not point nozzle at yourself and others ensure the nozzle or tube ...

Страница 118: ...etting for a longer delay before the automatic shutoff feature activates Battery is depleted Recharge or replace the battery Battery is not inserted properly Insert the battery properly See Installing the Battery on page 1 5 Tapping the window buttons or icons does not activate the corresponding feature Screen is not calibrated correctly Re calibrate the screen See Calibrating the Screen on page 1...

Страница 119: ...talled properly Re install SIM card and ensure that it is seated properly See Installing the mini SIM Card on page 1 4 Error message SIM Error Cannot save info to SIM appears when copying contacts to a SIM card Feature not supported on some SIM cards If error appears while creating a new contact add at least one number e g 0 to the Work Phone field If error appears while copying one contact reboot...

Страница 120: ...ngs Power Battery is faulty Verify that other batteries charge properly If so replace the faulty battery The MC45 is not fully seated in the cradle Remove and re insert the MC45 into the cradle ensuring it is firmly seated Ambient temperature of the cradle is too warm Move the cradle to an area where the ambient temperature is between 0 C 32 F and 35 C 95 F Extreme battery temperature Battery does...

Страница 121: ...der Start Settings Power Battery is faulty Verify that other batteries charge properly If so replace the faulty battery The MC45 is not fully seated in the cradle Remove and re insert the MC45 into the cradle ensuring it is firmly seated Ambient temperature of the cradle is too warm Move the cradle to an area where the ambient temperature is between 0 C 32 F and 35 C 95 F Extreme battery temperatu...

Страница 122: ...ymptom Possible Cause Action LEDs do not light when MC45 is inserted Charger is not receiving power Ensure the power cable is connected securely to both the charger and to AC power MC45 battery is not seated firmly in the charger Remove and re insert the MC45 battery into the charging well ensuring it is firmly seated MC45 battery is not charging Battery was removed from the charger or charger was...

Страница 123: ...es charge properly If so replace the faulty battery The MC45 is not fully attached to power Detach and re attach the power cable to the MC45 ensuring it is firmly connected During data communication no data transmits or transmitted data was incomplete Cable was disconnected from MC45 during communications Re attach the cable and retransmit Incorrect cable configuration See the system administrator...

Страница 124: ...9 12 MC45 User Guide ...

Страница 125: ...MC45 devices simultaneously or four MC45 devices when configured with a Four Slot Battery Charger Includes 5 Charger Cups Power Supply sold separately Vehicle Charge Cradle VCD45XX 1000R Installs in a vehicle and charges the MC45 battery Chargers Four Slot Battery Charger SAC45XX 4000CR Charges four MC45 batteries simultaneously Cables Auto Charge Cable VCA400 01R Charges the MC45 using a vehicle ...

Страница 126: ...0R Charger cup for the Multi Slot Universal Charge Only Cradle Blank Slot Cover CUPUNICVR 5000R Package of 5 blank slot covers for the Multi Slot Universal Charge Only Cradle charge slot Four Slot Battery Charger Cup Adapter CUPUNIBTRY 1000R Mounts the Four Slot Battery Charger onto the Multi Slot Universal Charge Only Cradle Handstrap SG MC45 STRAP 01R Single pivot handstrap Soft Holster SG MC45 ...

Страница 127: ...uter To communicate with a host computer 1 Ensure ActiveSync is installed and configured on the host computer See ActiveSync on page 8 13 for more information 2 Connect USB Rapid Charge cable to the micro USB port on the side of the MC45 3 Connect the USB connector of the USB Rapid Charge Cable to the USB Port on the host computer 4 The USB Connect dialog box appears 5 Tap ActiveSync RNDIS or Acti...

Страница 128: ...ingle Slot Charge Cradle 1 Place the MC45 into the cradle The MC45 s LED indicates the status of the battery charging in the MC45 See Table 1 1 on page 1 7 for charging status indications The 3080mAh battery fully charges in less than six hours at room temperature of approximately 25 C 77 F Charging time may vary at different temperatures ...

Страница 129: ...plish this for small periods of time the MC45 or accessory alternately enables and disables battery charging to keep the battery at acceptable temperatures The MC45 or accessory indicates when charging is disabled due to abnormal temperatures via its LED See Table 1 1 on page 1 7 NOTE The Multi Slot Universal Charge Only Cradle charges five MC45 devices simultaneously or four MC45 devices when con...

Страница 130: ...r surface using the supplied mounting disc Windshield Installation 1 Fix the suction cup mount to the selected area with the suction lever facing up Figure 8 4 Install on Windshield 2 Flip the lever down to create a vacuum between the suction cup and the mounting surface WARNING Some countries prohibit the mounting of any electronic device in any location on the vehicle dashboard Be sure to check ...

Страница 131: ...ceeding to the next step Install the MC45 To install the MC45 into the Vehicle Charge Cradle 1 Place the MC45 bottom first into the cradle 2 Push the MC45 back until it snaps into place Figure 8 6 Insert MC45 into Vehicle Charge Cradle 3 Position the MC45 for best viewing 4 Tighten the nuts to lock the cradle in place ...

Страница 132: ...ghten Nut Connect Power To connect power to the Vehicle Charge Cradle 1 If required connect the micro USB connector of the auto charger to the input power connector in the Vehicle Charge Cradle Figure 8 8 Commercial Grade Auto Charger ...

Страница 133: ...the other end to the cigarette lighter socket The LED indicator flashes green indicating the MC45 is charging Remove the MC45 To remove the MC45 from the Vehicle Charge Cradle lift the MC45 up and then remove from the bottom of the cradle Figure 8 10 Remove MC45 from Vehicle Charge Cradle ...

Страница 134: ... battery charging well See Table 8 2 for charging status indications The 3080 mAh battery fully charges in less than six hours at room temperature of approximately 25 C 77 F Charging time may vary at different temperatures Charging Temperature Charge batteries in temperatures from 0 C to 40 C 32 F to 104 F Charging is intelligently controlled by the Four Slot Battery Charger To accomplish this for...

Страница 135: ...ng Green Spare battery is charging Solid Green Charging complete Fast Blinking Red Charging error NOTE The micro USB Adapter can only be connected to the MC45 and not the Single Slot Charge Cradle The micro USB Adapter is intended to provide extension of the MC45 micro USB port Use the micro USB Adapter to minimize mechanical wear and failures of the MC45 CAUTION Do not connect a USB device that d...

Страница 136: ... the palm of your hand To install the handstrap 1 Remove the 2 screws securing the existing tether plate from the MC45 2 Untie the tether from the tether plate 3 Tie the tether to the handstrap plate 4 Install the handstrap plate to the MC45 Figure 8 13 Installing the Handstrap 1 2 3 4 ...

Страница 137: ...ize continually while the mobile computer is connected to the host computer or set to only synchronize on command Selects the types of information to synchronize and control how much data is synchronized Installing ActiveSync To install ActiveSync on the host computer download version 4 5 or higher from the Microsoft web site at http www microsoft com Refer to the installation procedures included ...

Страница 138: ...lick Next 3 Select the appropriate settings and click Next and then click Finish During the first synchronization information stored on the MC45 is copied to the host computer When the copy is complete and all data is synchronized the MC45 can be disconnected from the host computer For more information about using ActiveSync start ActiveSync on the host computer then see ActiveSync Help NOTE Assig...

Страница 139: ...backlight TFT LCD 65K colors 240 W x 320 L QVGA size Touch Panel Polycarbonate analog resistive touch Backlight LED backlight Battery Rechargeable Lithium Ion 3 7V 3080 mAh battery Expansion Slot User accessible microSD slot with UHS I SDHC support up to 32GB Network Connections USB 2 0 High Speed host and client WLAN WWAN and Bluetooth Notification Vibrator and audible tone plus multi color LED K...

Страница 140: ...rge 8kVdc direct discharge 8kVdc indirect discharge Sealing IP64 per applicable IEC sealing specifications Vibration 04g2 Hz Random Non Operating 1 hour duration per axis Termal Shock 40 C to 70 C rapid transition Wireless WAN Data and Voice Communications Radio GSM and UMTS HSDPA Frequency Band GSM All Models Quad Band 850 900 1800 1900 MHz UMTS HSDPA MC4597 A and MC4587 A 2100 MHz UMTS HSDPA MC4...

Страница 141: ...lor camera Laser 1D Scanner SE965 Specifications Optical Resolution 0 005 in minimum element width Roll 30 from vertical Pitch Angle 65 from normal Skew Tolerance 40 from normal Ambient Light Tolerant to typical artificial indoor and natural outdoor direct sunlight lighting conditions Fluorescent Incandescent Mercury Vapor Sodium Vapor LED 450 Ft Candles 4 844 Lux Sunlight 8000 Ft Candles 86 111 L...

Страница 142: ...2 D Bar Codes Australian Postal Aztec Composite AB Composite C Data Matrix Dutch Postal Image Japan Postal Linked Aztec Macro Micro PRF Micro PDF Micro QR PDF QR Code Signature UK Postal UK Intellimail US Planet US Postnet Table A 3 Single Slot Charge Cradle Technical Specifications Feature Description Dimensions Length 9 6 cm 3 8 in Width 8 30 cm 3 3 in Height 6 8 cm 2 7 in Weight 245 g 8 6 oz In...

Страница 143: ...Length 12 0 cm 4 7 in Width 45 0 cm 17 7 in Height 7 7 cm 3 0 in Dimensions Base with 4 Charger Cups and 1 Four Slot Battery Charger Cup Adapter Length 12 0 cm 4 7 in Width 45 0 cm 17 7 in Height 7 7 cm 3 0 in Weight Base only 910 g 32 10 oz 930 g 32 80 oz with 5 rubber caps Weight Base with 5 Charger Cups 1190 g 41 98 oz Weight Base with 4 Charger Cups and 1 Four Slot Battery Charger Cup Adapter ...

Страница 144: ...eight 9 4 cm 3 7 in Weight 366 g 12 91 oz Input Power 12 VDC Power Consumption 25 1 watts Operating Temperature 0 C to 40 C 32 F to 104 F Storage Temperature 40 C to 70 C 40 F to 158 F Charging Temperature 0 C to 40 C 32 F to 104 F Humidity 5 to 95 non condensing Drop 76 cm 30 0 in drops to vinyl tiled concrete at room temperature Electrostatic Discharge ESD 15 kV air 8 kV contact ...

Страница 145: ...he keypad is color coded to indicate the alternate function key blue values Note that an application can change keypad functions so the MC45 s keypad may not function exactly as described See Table B 1 for key and button descriptions and Table B 2 on page B 4 for the keypad s special functions Figure B 1 MC45 Numeric Keypad ...

Страница 146: ...ys mode This displays the following icon at the bottom of the screen Press the Orang key twice then press the Shift key to add a permanent shift that applies until the Shift is pressed again This displays the following icon at the bottom of the screen Press the Orange key again to return to the normal state Talk Start Menu Talk Green Phone press to display the phone keypad window or to dial a phon...

Страница 147: ...ess and release the SHIFT key and then press the 4 key once to produce the letter G press and release the Orange key press and release the SHIFT key and then press the 4 key three times to produce the letter I Pound SPACE Produces a pound number in default state Produces a space when pressed with the Orange key BACKSPACE Produces a backspace SHIFT Press and release the SHIFT key to activate the ke...

Страница 148: ...able B 2 Numeric Keypad Input Modes Key Numeric Mode Orange Key Alpha Lowercase Mode Orange Shift Keys Alpha Uppercase Mode Blue Key SHIFT Key 1st Press 2nd Press 3rd Press 4th Press 1st Press 2nd Press 3rd Press 4th Press 1 1 F1 2 2 F2 a b c A B C 3 3 F3 d e f D E F 4 4 F4 g h i G H I 5 5 F5 j k l J K L 6 6 F6 m n o M N O 7 7 F7 p q r s P Q R S 8 8 F8 t u v T U V 9 9 F9 w x y z W X Y Z 0 0 F10 Up...

Страница 149: ...Keypads B 5 l L n N o O p P r R s S t T u U y Y z Z _ Table B 3 Special Characters Continued Key Special Characters Key Special Characters ...

Страница 150: ...B 6 MC45 User Guide ...

Страница 151: ...esents numeric or alphanumeric data in machine readable form The general format of a bar code symbol consists of a leading margin start character data or message character check character if any stop character and trailing margin Within this framework each recognizable symbology uses its own unique format See Symbology Bar Code Density The number of characters represented per unit of measurement e...

Страница 152: ... remaining 6 are narrow Code 93 An industrial symbology compatible with Code 39 but offering a full character ASCII set and a higher coding density than Code 39 COM port Communication port ports are identified by number e g COM1 COM2 Cradle A cradle is used for charging the terminal battery and for communicating with a host computer and provides a storage place for the terminal when not in use D D...

Страница 153: ...f five bars and five interleaved spaces Interleaving provides for greater information density The location of wide elements bar spaces within each group determines which characters are encoded This continuous code type uses no intercharacter spaces Only numeric 0 to 9 and START STOP characters may be encoded Internet Protocol Address See IP IP Internet Protocol The IP part of the TCP IP communicat...

Страница 154: ...utside according to their bias They use little electricity and react relatively quickly They require external light to reflect their information to the user M MC Mobile Computer MDN Mobile Directory Number The directory listing telephone number that is dialed generally using POTS to reach a mobile unit The MDN is usually associated with a MIN in a cellular telephone in the US and Canada the MDN an...

Страница 155: ...ks and supports the required protocols for packet filtering Routers are typically used to extend the range of cabling and to organize the topology of a network into subnets See Subnet S Scanner An electronic device used to scan bar code symbols and produce a digitized pattern that corresponds to the bars and spaces of the symbol Its three main components are 1 Light source laser or photoelectric c...

Страница 156: ...n organization or around the world hence its use in the worldwide Internet Every client and server in a TCP IP network requires an IP address which is either permanently assigned or dynamically assigned at startup Terminal See Mobile Computer Tolerance Allowable deviation from the nominal bar or space width Transmission Control Protocol Internet Protocol See TCP IP U UDP User Datagram Protocol A p...

Страница 157: ...with tether kit 8 2 USB rapid charge cable 1 6 8 1 8 3 vehicle charge cradle 1 6 8 1 8 6 ActiveSync 2 9 8 13 icon 2 7 installing 8 13 setting up a connection 8 14 synchronization 8 14 adaptive frequency hopping 7 1 adaptive scanning 3 2 adjusting audio volume 4 4 adjusting volume 2 14 Adobe Reader 2 10 AFH 7 1 AirBEAM 2 10 alarms 2 10 answering a call 4 7 assisted GPS 6 3 audio 4 4 audio icon 2 4 ...

Страница 158: ...ning 9 1 command bar icons 2 5 2 7 conference call 4 17 4 19 configuration xii Configure 1 3 connectivity icon 2 3 Contacts 2 8 contacts 2 8 contacts application 4 5 conventions notational xv cradles multi slot universal charge only cradle 1 6 8 1 8 5 multi slot universal charge only cradle with five MC45 cups installed 8 1 single slot charge cradle 1 6 8 1 8 4 vehicle 1 6 8 1 8 6 D data capture x...

Страница 159: ...nput modes B 4 key descriptions B 2 numeric B 1 orange key B 2 pound space B 3 scan B 2 SHIFT B 3 special character key B 4 star backlight key B 3 talk B 2 L laser scanning See data capture 3 1 LEDs battery status 2 16 charging 2 16 8 10 indicators 2 16 scan and decode 3 2 3 3 left and right key B 2 lithium ion battery 1 2 locking MC45 2 17 password locking 2 18 M maintenance 9 1 marketplace 2 9 m...

Страница 160: ...e desktop 2 9 replacing battery 1 8 reset 2 17 resetting the MC45 2 17 resume 7 3 S scan button 2 20 scan decode 2 16 scanning button 2 20 See data capture 3 1 screen 1 8 calibrate 1 8 calibration 1 8 screen protector 8 2 9 2 search phone 2 9 security Bluetooth 7 2 service information xvi settings 2 8 2 11 about 2 12 backlight 2 12 beam 2 11 Bluetooth 2 11 buttons 2 12 certificates 2 12 clock alar...

Страница 161: ...ttings 2 8 SMS Staging 2 10 task manager 2 9 tasks 2 9 text 2 8 today 2 8 toolbox 2 10 videos 2 8 Windows Live 2 9 wireless companion 2 9 starting the MC45 1 8 status icon 2 2 audio 2 4 battery 2 4 2 15 connectivity 2 3 notifications 2 2 speaker 2 14 WAN 2 3 Streaming Player 2 10 Stylus 2 21 stylus 1 2 2 21 stylus with tether kit 8 2 subscriber identification module 1 4 suspend 2 20 7 3 synchroniz...

Страница 162: ...volume 4 4 W wakeup conditions 2 17 waking the MC45 2 17 WAN icon 2 3 Windows Live 2 9 Windows Live Messenger 2 9 Wireless 1 10 4 2 wireless companion 2 9 wireless connection status icon 2 7 Wireless Manager 1 10 4 2 wireless manager 2 12 Wireless Zero Config 5 2 WLAN 2 12 802 11a b g xii WWAN GSM HSDPA xii ...

Страница 163: ......

Страница 164: ...U S A http www motorolasolutions com MOTOROLA MOTO MOTOROLA SOLUTIONS and the Stylized M Logo are trademarks or registered trademarks of Motorola Trademark Holdings LLC and are used under license All other trademarks are the property of their respective owners 2012 Motorola Solutions Inc All Rights Reserved ...

Отзывы: