


oder zugelassen ist für den Empfang von einem ex-
ternen Alarmmelder. Soll der Alarm-Eingang zuge-
lassen werden, den Alarmkontakttyp wählen:
„NO“ (normally open)
bedeutet Kontakttyp „Schließer“;
„NG“ (= NC = normally closed)
bedeutet Kontakttyp „Öffner“.
1. Mit der Taste
oder
oder mit der entspre-
chenden Nummerntaste den gewünschten Alarm-
eingang anwählen.
2. Taste SET drücken.
3. Mit der Taste
oder
„NO“, „NG“ oder „AUS“
einstellen.
4. Taste SET drücken.
Zum Verlassen der Seite mit der Taste MENU in das
Hauptmenü zurückspringen.
8.8
Menüpunkt 7: Alarm einrichten
Auf der Menüseite „ALARM EINRICHTEN“ werden
Einstellungen zum Verhalten des Geräts im Alarm-
fall vorgenommen.
Der Multiplexer verfügt über drei verschiedene
Alarmfunktionen (Nähere Informationen zu den
Alarmfunktionen, siehe Kap. 7):
– Externer Alarm (Zeile „External“)
– „Activity Detection“-Alarm (Zeile „DSS“)
– Bildverlust-Alarm (Zeile „VLOSS“)
Die folgenden Parameter lassen sich separat für
jede der drei Alarmfunktionen festlegen:
Über „Möglich“ läßt sich die jeweilige Alarmfunk-
tion einschalten („ON“) oder ausschalten. („OFF“).
Über „RLY“ läßt sich für die jeweilige Alarmfunktion
bestimmen, ob im Alarmfall das Alarmrelais an-
spricht („ON“) oder nicht („OFF“).
Hinweis: Ist für die Alarmfunktion „DSS“ das Relais
auf „OFF“ gestellt, schaltet das Gerät im
Alarmfall nicht auf den in Menü 4 (Kap. 8.5)
unter „Alarmbetrieb“ gewählten Alarmauf-
nahmemodus um.
Über „SUM“ läßt sich für die jeweilige Alarmfunktion
einstellen, ob im Alarmfall ein Signalton zu hören
sein soll („ON“) oder nicht („OFF“).
Über „HPT“ wird für die jeweilige Alarmfunktion be-
stimmt, ob der Hauptmonitor im Alarmfall auf Alarm-
anzeige wechselt („ON“) oder ob er sein gegenwär-
tige Anzeigeformat beibehält („OFF“).
Über „HLF“ wird für die jeweilige Alarmfunktion be-
stimmt, ob der Spot-Monitor im Alarmfall auf Alarm-
anzeige wechselt („ON“) oder ob er sein gegenwär-
tige Anzeigeformat beibehält („OFF“).
„AUF“ (nur für die Alarmfunktionen „External“ und
„DSS“) gibt für die jeweilige Alarmfunktion das Auf-
zeichnungsformat im Alarmfall an. Folgende Einstel-
lungen sind möglich:
„INT“ (= „interleave“):
Die Bilder der Kameras, für die ein Alarm anliegt,
werden mit erhöhter Häufigkeit gegenüber den
übrigen Kamerabildern an den Videorecorder ge-
sendet. Ist die aufzuzeichnende Bildsequenz
z. B. im Normalfall je ein Bild der Kameranum-
mern 1, 3, 4, 6, 8, 9, 1, 3, 4, 6 usw. wird die Bild-
folge bei Alarm für die Kameras 1 und 3 in 1, 3, 4,
1, 3, 6, 1, 3, 8, 1, 3, 9, 1, 3, 4, 1, 3 usw. geändert.
„ONY“: (= „only“)
Es werden für die Dauer des Alarms nur die Ka-
meras aufgezeichnet, für die ein Alarm ausgelöst
wurde. Diese Einstellung wird nicht empfohlen, da
für die Dauer des Alarms die übrigen Kamerabil-
der nicht mit aufgenommen werden.
Hinweis: Ist für beide Alarmfunktionen „External“
und „DSS“ die Option „ONY“ eingestellt,
werden sowohl die Kameras aufgezeich-
net, für die durch externe Alarmmelder
Alarm ausgelöst wurde, als auch die Ka-
meras, für die durch den internen Bewe-
gungsmelder Alarm ausgelöst wurde.
„UCD“ (= „unchanged“):
Die Zusammensetzung des Video-Multiplex-Si-
gnals für die Videorecorderaufzeichnung ändert
sich im Alarmfall nicht.
1. Mit
der
Taste oder die
jeweilige
Alarmfunk-
tion („External“, „DSS“ oder „VLOSS“) anwählen.
2. Taste SET drücken.
3. Mit der Taste
oder
nacheinander die Para-
meter der Alarmfunktion anwählen, und mit der Ta-
ste
oder
die gewünschten Werte einstellen.
4. Taste SET drücken.
Weitere Alarm-Einstellungen auf dieser Menüseite:
„Alarm Display“ gibt das Anzeigeformat für den
Hauptmonitor im Alarmfall an. Es kann gewählt wer-
den zwischen den folgenden Einstellungen:
„4x4“:
Alle 16 Kamerabilder werden gleichzeitig
auf dem Bildschirm dargestellt.
„VOLL“: Bei einem Einzelalarm wird die betroffene
Kamera im Vollbild-Format gezeigt. Bei
einem Mehrfachalarm schaltet das Gerät
kontinuierlich mit dem unter „Alarm Dauer“
eingestellten Schaltintervall zwischen den
Vollbildern der betroffenen Kameras um.
Die Kameras werden dabei in aufsteigen-
der Reihenfolge durchlaufen.
1. Mit der Taste
oder
„Alarm Display“ anwäh-
len.
2. Taste SET drücken.
3. Mit
der
Taste oder „4x4“
oder
„VOLL“
ein-
stellen.
4. Taste SET drücken.
„Alarm Dauer“ gibt das Schaltintervall an, mit dem
bei einem Mehrfachalarm zwischen den betroffenen
Kameras umgeschaltet wird. (Damit im Alarmfall eine
Vollbild-Umschaltung für den Hauptmonitor erfolgt,
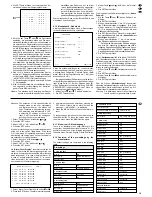
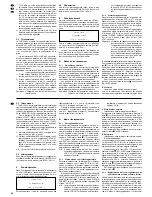
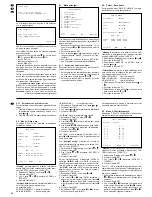
Alarms Setup
Möglich RLY SUM HPT HLF AUF
External: ON ON ON ON ON INT
DSS: ON OFF OFF OFF OFF INT
VLOSS: ON ON ON OFF OFF
Alarm Display: 4x4
Alarm Dauer: 03s
Extern Pause: 20s
Alarm Klinke: OFF
Pause Ohne Video: 20s
Videoverlustverschluss: OFF
Further alarm settings on this menu page:
“Alarm Display” indicates the display format for the
main monitor in case of alarm. It is possible to select
between the following settings:
“4 x 4”:
All 16 camera pictures are displayed on
the screen at the same time.
“FULL”: In case of an individual alarm the camera
concerned is displayed in full screen pic-
ture format. In case of a multiple alarm the
unit switches continuously between the
full screen pictures of the cameras con-
cerned with the switching interval adjusted
under “Alarm Dwell”. The cameras are run
through in ascending order.
1. Select “Alarm Display” with button
or
.
2. Press the SET button.
3. Adjust “4 x 4” or “FULL” with button
or
.
4. Press the SET button.
“Alarm Dwell” indicates the switching interval by
which the unit switches between the cameras con-
cerned in case of a multiple alarm. (The option
“FULL” must be adjusted under “Alarm Display” so
that a full screen switching for the main monitor is
made in case of alarm.) The adjustable range is
1 – 99 s.
1. Select “Alarm Dwell” with button
or
.
2. Press the SET button.
3. Adjust the desired value with button
or
.
4. Press the SET button.
Via “External Hold” it is possible to select the hold
time for an external alarm. The adjustable range is
0 – 99 s.
1. Select “External Hold” with button
or
.
2. Press the SET button.
3. Adjust the desired value with button
or
.
4. Press the SET button.
“Alarm latch” indicates if an external alarm is still to
be displayed beyond the alarm duration adjusted
under “External Hold”.
If this option is activated (“ON”), the alarm relay,
the alarm buzzer, the alarm display mode, and the
alarm recording mode are reset again after the
alarm hold time has elapsed. However, the screen
insertion “ALARM” in the corresponding camera pic-
ture and the blinking of the LED above the corre-
sponding numerical key can only be reset again by
calling the screen menu.
1. Select “Alarm Latch” with button
or
.
2. Press the SET button.
3. Adjust “ON” or “OFF” with button
or
.
4. Press the SET button.
Via “Video Loss Hold” the hold time of a video loss
alarm – after a valid video signal is present again –
can be adjusted. The adjustable range is 0 – 99 s.
1. Select “Video Loss Hold” with button
or
.
2. Press the SET button.
3. Adjust the desired value with button
or
.
4. Press the SET button.
“Video Loss Latch” indicates if a video loss alarm,
after a valid video signal is presemnt again, is still to
be displayed beyond the alarm duration adjusted
under “Video Loss Hold”.
If this option is activated (“ON”), the alarm relay,
the alarm buzzer, and the alarm display mode are
reset again after the alarm hold time has elapsed.
However, the screen insertion “VLOSS” in the cor-
responding camera picture and the blinking of the
LED above the corresponding numerical key can
only be reset again by calling the screen menu.
1. Select “Video Loss Latch” with button
or
.
2. Press the SET button.
3. Adjust “ON” or “OFF” with button
or
.
4. Press the SET button.
To leave the page, jump back to the main menu with
the MENU button.
8.9
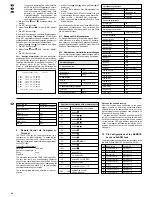
Menu item 8: Activity Detection Setup
On the menu page “ACTIVITY DETECTION” the
settings of the integrated motion detector are made.
Under “Activity Camera” the activity detection can
be switched on or off separately for each camera. If
it is switched on, the camera number is shown. If it
is switched off, there is an asterisk instead of the
number.
1. Select “Activity Camera” with button
or
.
2. Press the SET button.
3. Switch on or switch off the activity detection for
the cameras by pressing the corresponding nu-
merical keys.
4. Press the SET button.
Via “Activity Select” the activity detection can be
switched off (“OFF”) or switched on (“ON”).
Attention! If the option “OFF” is selected, there is no
activity detection for any camera, even if
individual cameras have been selected
for the activity detection via the option
“Activity Camera”.
1. Select “Activity Select” with button
oder
.
2. Press the SET button.
3. Adjust “OFF” or “ON” with button
or
.
4. Press the SET button.
Via “Activity Hold Time” it is possible to select the
hold time for an alarm triggered by the integrated
motion detector. Times of 1 to 99 s can be adjusted.
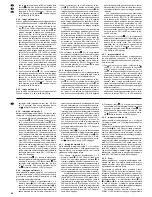
ACTIVITY DETECTION
Activity Camera:
1 2 3 4 * * * *
* * * * * * 15 16
Activity Select: ON
Activity Hold Time: 05 Seconds
Activity Grids: Camera 1
↑ ↓
MENU SET CAM(1–16)
17
GB
D
A
CH