


13. FILE DISPLAY AND COPY (PROGRAM/DATA CONTROL)
13.2 Various Data Control
13 - 79
9
UTILIT
Y
FUNCTION
10
C
O
MM
UNICA
TIO
N
IN
TE
RF
AC
E S
ETTING
(CO
M
MUN
ICA
TION
S
ETTIN
G
)
11
DI
SPL
A
Y
AN
D
OPERA
T
ION S
E
TTINGS
(G
OT SE
T UP)
12
C
LOC
K SET
TI
N
GS
AN
D
BA
TT
ER
Y ST
AT
U
S D
IS
PL
AY
(T
IM
E SET
TI
N
G
A
N
D
D
ISPL
AY)
13
FILE
D
ISP
LA
Y A
N
D
C
O
PY
(P
RO
GR
AM
/D
A
TA
CONTR
O
L
)
14
GO
T
SE
LF
CHE
CK
(DEB
UG AND
S
E
LF
CHECK)
15
CLEA
NING DISPL
A
Y
SE
CT
ION (CLE
AN)
16
INST
ALLA
TION OF
C
O
REOS, BOOT
OS
A
N
D
ST
AN
DA
RD
MO
NI
T
O
R
OS
(d)
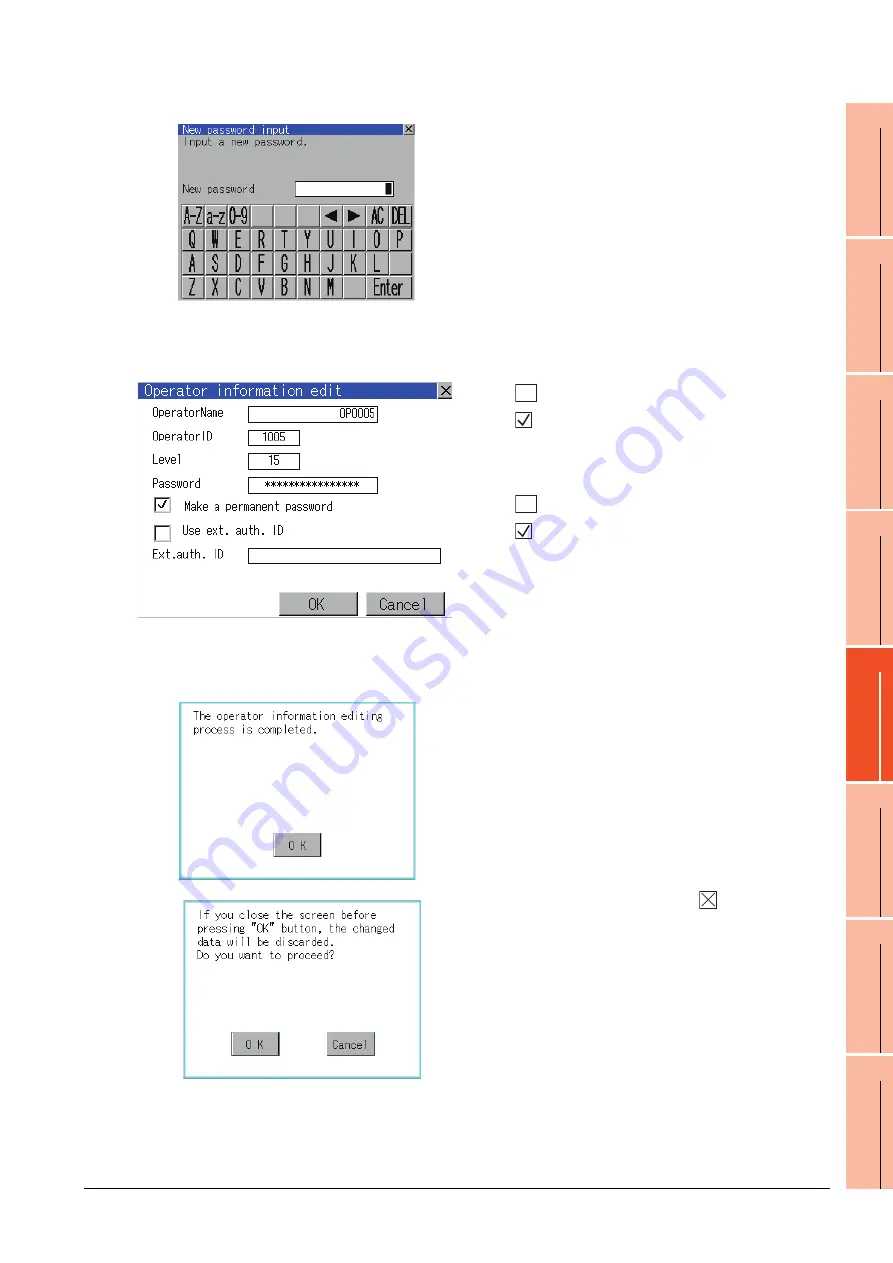
For changing passwords during editing, touch the
password.
The New password input dialog box is displayed,
and then input a password.
When the input is completed, touch the [Enter] key.
When the password input is completed, the New
password input confirmation dialog box is
displayed.
Input the same password.
(e)
For enabling the setting of [Make a permanent
password], touch the check box for [Make a
permanent password], and then the setting is
switched.
: Disabled
: Enabled
(f)
For using the external authentication ID, touch the
check box "Use ext. auth. ID" and switch the
setting.
: The external authentication ID is not used.
: The external authentication ID is used.
(g)
Touch Ext.auth ID to display the external
authentication ID input dialog box, and enter the
external recognition ID. When the input is
completed, touch the [Enter] key.
When the authentication method is set to
"Fingerprint auth" or "External auth (general)", the
external authentication ID can be input with the
external authentication device.
3.
Touch the [OK] button after all items are input, and
then the dialog box shown left is displayed and the
input operator information is added.
Touch the [Cancel] button or the
button, and then
the dialog box shown left is displayed.
Содержание Got 1000
Страница 1: ......
Страница 2: ......
Страница 14: ...A 12 ...
Страница 26: ...1 4 1 OVERVIEW 1 1 Features ...
Страница 34: ...2 8 2 SYSTEM CONFIGURATION 2 2 System Equipment ...
Страница 38: ...3 4 3 SPECIFICATIONS 3 3 Power Supply Specifications ...
Страница 42: ...4 4 4 PARTS NAME 4 3 Rear Face ...
Страница 54: ...6 6 6 INSTALLATION 6 5 Installation Procedure ...
Страница 104: ...10 18 10 COMMUNICATION INTERFACE SETTING COMMUNICATION SETTING 10 3 Ethernet Setting ...
Страница 134: ...12 4 12 CLOCK SETTINGS AND BATTERY STATUS DISPLAY TIME SETTING AND DISPLAY 12 1 Time Setting and Display ...
Страница 226: ...13 92 13 FILE DISPLAY AND COPY PROGRAM DATA CONTROL 13 2 Various Data Control ...
Страница 250: ...15 2 15 CLEANING DISPLAY SECTION CLEAN ...
Страница 264: ...16 14 16 INSTALLATION OF COREOS BOOTOS AND STANDARD MONITOR OS 16 5 CoreOS ...
Страница 272: ...17 8 17 MAINTENANCE AND INSPECTION 17 5 Backlight Shutoff Detection ...
Страница 298: ...App 6 APPENDICES Appendix 1 External Dimensions ...
Страница 302: ...App 10 APPENDICES Appendix 3 Transportation Precautions ...
Страница 306: ...REVISIONS 2 ...
Страница 309: ......
Страница 310: ......


