


Buffer Memory Details: CANopen
Mode
Detailed Description of the Module
MELSEC-L Series – CANopen
Module ME3CAN1-L
3 – 25
3.5.18
Command Interface (Un\G1000–Un\G1066)
The Command Interface (CIF) can be used to access the Object Dictionary of the local node or a net-
work node. The access is performed by commands for SDO read/write, Emergency Messages, etc.
After writing the command parameter, turn ON Y(n+1)7 to execute the command. If the command
execution is finished, X(n+1)7 will be turned ON (refer to section 3.3.2).
This command uses SDO communication. If the NMT Startup Master is active it can happen that the NMT Startup Master
has already occupied the SDO connection to the remote Node.
During the first initial network startup the NMT Startup Master occupies up to 126 SDO connections at the same time. If an
NMT Slave fails after the initial Network Startup the NMT Startup Master occupies the SDO connection to the specific NMT
Slave. If the NMT Startup master is active for one or more NMT slaves, bit 14 in Un\G25 is ON (Refer to section 3.5.5).
NOTES
The addresses will not be cleared after command execution. The former written transmit data will
be displayed by making new write accesses or using the Display current parameter command
(Refer to section 5.3).
Before a write access to the CIF (command interface), always check if Un\G1000 does not display
FFFF
H
(CIF Busy).
If a write access is made during the CIF (command interface) busy display, a "Command or
Parameter change while CIF was busy" error is generated (Refer to section 5.4.2).
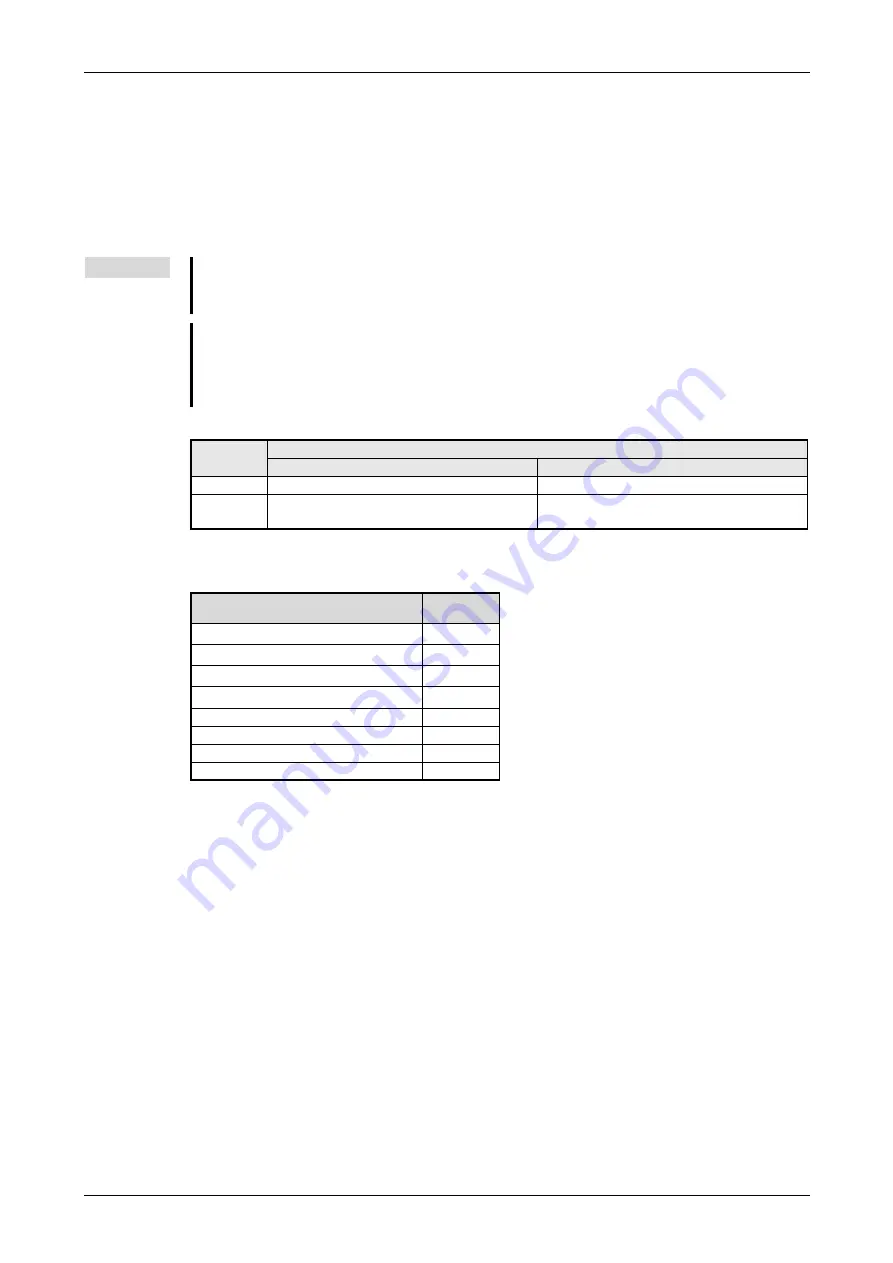
Address
(Decimal)
Description
Transmit message
Receive message
1000
Command code (trigger for command execution)
Command execution result code
1001–1066
Command parameter
Command parameter read back or detailed error
information
Tab. 3-20:
Buffer memory addresses allocated to the Command Interface
Command Interface
Reference
(Section)
Tab. 3-21:
Commands
SDO read
���
SDO multi read
���
SDO write
���
SDO multi write
���
Send an Emergency Message
Display current parameter
Clear/Reset the "CIF was busy" error
Sending Layer 2 Message
Содержание CANopen ME3CAN1-L
Страница 2: ......
Страница 4: ......
Страница 6: ......
Страница 10: ...IV ...
Страница 18: ...Abbreviations and Generic Terms Overview MELSEC L Series CANopen Module ME3CAN1 L 1 4 ...
Страница 22: ...System Configuration System Equipment 2 4 MITSUBISHI ELECTRIC ...
Страница 66: ...Detailed Description of the Module Buffer Memory Details Layer 2 Message Mode 3 44 MITSUBISHI ELECTRIC ...
Страница 144: ...Programming CANopen PDO Communication using Function Blocks 7 6 MITSUBISHI ELECTRIC Fig 7 6 Example Program 2 ...
Страница 146: ...Programming CANopen PDO Communication using Function Blocks 7 8 MITSUBISHI ELECTRIC Fig 7 8 Example Program 4 ...
Страница 148: ...Programming CANopen PDO Communication using Function Blocks 7 10 MITSUBISHI ELECTRIC Fig 7 10 Example Program 6 ...
Страница 150: ...Programming CANopen PDO Communication using Function Blocks 7 12 MITSUBISHI ELECTRIC Fig 7 12 Example Program 8 ...
Страница 152: ...Programming CANopen PDO Communication using Function Blocks 7 14 MITSUBISHI ELECTRIC Fig 7 14 Example Program 10 ...
Страница 154: ...Programming CANopen PDO Communication using Function Blocks 7 16 MITSUBISHI ELECTRIC Fig 7 16 Example Program 12 ...
Страница 156: ...Programming CANopen PDO Communication using Function Blocks 7 18 MITSUBISHI ELECTRIC Fig 7 18 Example Program 14 ...
Страница 158: ...Programming CANopen PDO Communication using Function Blocks 7 20 MITSUBISHI ELECTRIC Fig 7 20 Example Program 16 ...
Страница 160: ...Programming Layer 2 Communication 7 22 MITSUBISHI ELECTRIC Local Label Setting Fig 7 22 Local Label for this example 1 ...
Страница 161: ...Layer 2 Communication Programming MELSEC L Series CANopen Module ME3CAN1 L 7 23 Fig 7 23 Local Label for this example 2 ...
Страница 162: ...Programming Layer 2 Communication 7 24 MITSUBISHI ELECTRIC Program Fig 7 24 Example Program 1 ...
Страница 163: ...Layer 2 Communication Programming MELSEC L Series CANopen Module ME3CAN1 L 7 25 Fig 7 25 Example Program 2 ...
Страница 164: ...Programming Layer 2 Communication 7 26 MITSUBISHI ELECTRIC Fig 7 26 Example Program 3 ...
Страница 165: ...Layer 2 Communication Programming MELSEC L Series CANopen Module ME3CAN1 L 7 27 Fig 7 27 Example Program 4 ...
Страница 166: ...Programming Layer 2 Communication 7 28 MITSUBISHI ELECTRIC Fig 7 28 Example Program 5 ...
Страница 167: ...Layer 2 Communication Programming MELSEC L Series CANopen Module ME3CAN1 L 7 29 Fig 7 29 Example Program 6 ...
Страница 172: ...Programming Layer 2 Communication 7 34 MITSUBISHI ELECTRIC Fig 7 39 Example Program 2 Set message parameter to module ...
Страница 178: ...Layer 2 Communication Programming MELSEC L Series CANopen Module ME3CAN1 L 7 40 ...
Страница 184: ...Troubleshooting Error Code and Error Message Summary 8 6 MITSUBISHI ELECTRIC ...
Страница 187: ......


