background image

57

ST

ANDARD SCAN UTILITY

Correcting color with the tone curve

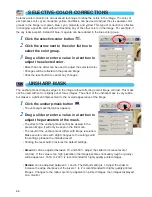
By selecting individual color channels on the tone curve, adjustments to the overall color of an
image can be made. This can be used to eliminate unnatural color casts or add warmth to a picture. 

If the image is too red, green, or blue, simply drag the corresponding color-channel curve down until
the color is appears natural. If the color cast is predominantly one of the secondary colors, cyan,
magenta, or yellow, move the curve of the complementary color up. For example, if the image is too
yellow, move the blue curve up. For more on secondary and complementary colors, see page 54.

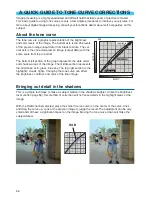
When daylight film is used under fluorescent lighting without a flash, the resulting photograph has a
green cast. To correct the image, display the green channel tone curve. Click on the center of the
curve and move it down. Use the prescan image to judge the results.

G

Increasing the contrast of an image

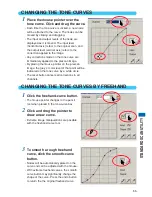
The contrast of an image can be changed. The light blue 45° line on the tone curve chart repre-
sents the original contrast of the scanned image. Making the angle of the tone curve greater than
45° will increase the contrast of the image. Making the angle less than 45° will reduce the contrast.

With the RGB channel selected, click on the tone curve near the top and bottom to add two nodes.
Slightly move the top node up and the bottom node down. This will increase the angle of the central
portion of the tone curve and increase the contrast of the image without making an overall change
in image brightness.

RGB

Содержание Dimage Scan Elite II

Страница 1: ...INSTRUCTION MANUAL E GETTING STARTED EASY SCAN UTILITY STANDARD SCAN UTILITY APPENDIX...

Страница 2: ...GEM PRO CESSING 28 9 CONFIRMING THE SCANNER SETTINGS 28 10 SCANNING AND SAVING THE IMAGE 28 Turning off the scanner 29 STANDARD SCAN UTILITY 30 1 LAUNCHING THE STANDARD SCAN UTILITY 31 Windows LAUNCH...

Страница 3: ...CT REGISTRATION 97 INDEX 98 CROPPING APS IMAGES 51 OTHER DISPLAYS IN THE PRESCAN WINDOW 51 Frame number 51 RGB display 51 7 IMAGE CORRECTION 52 IMAGE CORRECTION TAB 52 TONE CURVES AND HISTOGRAM 53 RGB...

Страница 4: ...e examples when using Macintosh or other Windows operating systems Microsoft Windows Windows 98 Windows 2000 and Windows Me are registered trademarks of the Microsoft Corporation Macintosh Apple Power...

Страница 5: ...following conditions 1 This device may not cause harmful interference and 2 this device must accept any interference received including interference that may cause undesired operation To meet FCC regu...

Страница 6: ...jury through fire or electric shock Discontinue use if an object enters the product FOR PROPER AND SAFE USE Power supply Use only the specified AC adapter Delta Electronics ADP 20LB REV B within the v...

Страница 7: ...80 humidity A sudden change in temperature can cause condensation inside the product which may result in electric shock or fire When the product is subjected to a drastic change in tem perature allow...

Страница 8: ...NTS The following is included in this package 35mm Shape of input plug varies with destination USA Canada and Taiwan European continent and Australia United Kingdom and Hong Kong DiMAGE Scan Elite II...

Страница 9: ...onnect 4300 PROCOMP SpeedDemon 400P or Preinstalled OHCI compatible IEEE1394 port 640 x 480 monitor capable of display ing High Color 16 bit is required 1024 x 768 monitor is recommended A minimum of...

Страница 10: ...ute the following procedure 1 Initiate the run routine on the start menu 2 Click Browse in the run dialog box 3 Select the CD ROM drive DS Elite II D from the look in box in the browse dialog box 4 Cl...

Страница 11: ...K 6 Select the components to be installed then click Next Normally only the TWAIN data source option needs to be selected The rest of the descriptions in this manual assume the TWAIN data source setup...

Страница 12: ...2 installer The installer s start up screen will appear 6 Click Continue on the installer screen to begin the installation routine 7 The end user license agreement will appear If you accept the terms...

Страница 13: ...11 A screen confirming the successful installation of the software will appear Click Restart to exit the installation program and restart the computer To exit the installer without restarting the comp...

Страница 14: ...cept to continue the installation routine Read the entire agreement carefully before continuing the setup If you don t agree to the terms of the agreement click Decline to exit the setup program 5 Cli...

Страница 15: ...nt will appear If you accept the terms of the agreement click Accept to continue the installation routine Read the entire agreement carefully before continuing the setup If you do not agree to the ter...

Страница 16: ...formation is correct click Yes To correct the information click Back to return to the user information screen 13 Confirm the contents of the installation Click Next to install Adobe Elements 14 The SV...

Страница 17: ...Adobe Photoshop Elements screen will appear Click Continue 6 Use the drop down menu to select the preferred language Click Continue 7 The end user license agreement will appear If you accept the term...

Страница 18: ...he custom install option click the check box of the files to be installed 11 Fill in all the fields on the user information screen Click Next The serial number is found on the back of the CD ROM case...

Страница 19: ...st from entering the unit APS adapter mark Pull down the front door to this position when inserting the optional APS adapter Indicator lamp This lamp indicates when the scanner is on The lamp will bli...

Страница 20: ...e connected to the IEEE 1394 port on the scanner or computer USB Cable Plug the A connector of the USB cable into the com puter s USB port and the B connector of the USB cable into the scanner s USB p...

Страница 21: ...disconnect the cable while the computer is starting up or shutting down The computer or scanner may not operate properly The scanner should be connected directly to the computer s IEEE 1394 or USB po...

Страница 22: ...nctions are automatically set when using the Easy Scan Utility Autofocusing with each 35mm frame or with first APS frame only Index scan priority speed setting Automatic shutdown of the utility at the...

Страница 23: ...the tab near the number six frame 2 Place the film in the film holder with the emulsion down If the frame numbers on the edge of the film near the sprocket holes are reversed the film s emulsion side...

Страница 24: ...r release toward the top of the adapter until the film chamber door opens The film chamber release does not return to its original position until the film chamber door is closed 2 Insert the film cass...

Страница 25: ...ator lamp glows steadily when initialization is completed Inserting the Film Holder FH U1 or Slide Mount Holder SH U1 1 Open the front door of scanner until the top of the door lines up with the 35mm...

Страница 26: ...ght the item with the mouse and then click it to make the selection With the round or square check boxes simply click on the box to select the item To return to a previous screen click the Back button...

Страница 27: ...s mul tiple uses repeat the easy scan procedure for each use of the image 6 SELECTING THE IMAGE TO BE SCANNED The images to be scanned are selected on this screen Multiple or single images can be chos...

Страница 28: ...effect of film grain See pages 69 to 73 for more about Digital ICE ROC and GEM Scanning time increases with the number of image pro cessing routines used 9 CONFIRMING THE SCANNER SETTINGS Check the sc...

Страница 29: ...the rewind motor has stopped 2 Close the front door 3 Press the main switch to turn off the scanner Unplug the scanner when cleaning or when the product is not in use for extended periods When using...

Страница 30: ...to control basic scanner operation can be made Settings to control the index scan can be made This step is unnecessary if the index scan is not needed This step is unnecessary if the prescan is not n...

Страница 31: ...is scanned The utility can also be used as a stand alone application that can process and save an image with out the need of any other software Launching the Utility with Photoshop Elements 1 Turn on...

Страница 32: ...on the file menu The Standard Scan Utility will start up and the main window will appear see page 33 Launching the Utility Software 1 Double click on the DS Elite2 utility icon The Standard Scan Util...

Страница 33: ...To make automated scan settings see page 83 Status bar Describes the button or function on which the mouse pointer is located Help button Digital GEM button To reduce the effect of film grain see pag...

Страница 34: ...commended The auto focus function increases the scanning time Close utility after scanning check box Checking this option closes the Standard Scan Utility after the final scan when using the scanner w...

Страница 35: ...dex thumbnails are created with this setting The scanner will make separate scans when prescans are required The autofocus function is disabled when scanning the index thumbnails Quality An index thum...

Страница 36: ...ING THE FILM FORMAT AND TYPE 1 Select the film format from the drop down list 35mm or APS film formats can be selected The default setting is 35mm 2 Select the film type from the drop down list 35mm C...

Страница 37: ...o view the index scan window INDEX TAB Rotate left button To rotate the image 90 counterclockwise see page 39 Rotate right button To rotate the image 90 clockwise see page 39 Fit to window button To a...

Страница 38: ...er right corner of Index window The cursor shape changes to a double arrow The window size can be resized by dragging with the mouse The index frames are arranged according the window shape The size o...

Страница 39: ...E INDEX FRAMES Click the appropriate button to rotate or flip the prescan image Rotate 90 counterclockwise Rotate 90 clockwise Flip horizontally Flip vertically Flipping the image vertically creates a...

Страница 40: ...frame order button When the reverse frame order button is clicked again the frame order follows the film holder frame order SAVING THE INDEX THUMBNAILS The displayed thumbnail images can be saved in o...

Страница 41: ...save index file button 2 Enter the file name and select the file destination Click Save The displayed index images can be saved regardless if the film holder is in the scanner or not The index image...

Страница 42: ...page 46 Manual focus button To manually focus the scanner see page 50 Auto cropping button To crop the final image see page 43 CHP button for APS film only To crop the image to the C H or P formats s...

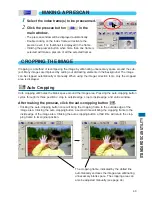
Страница 43: ...ally When using the image correction tools only the cropped area is displayed Auto Cropping Auto cropping eliminates the blank space around the image area Pressing the auto cropping button cycles thro...

Страница 44: ...the center of the cropping frame the pointer will change to a four pointed arrow figure B Simply click and drag the entire frame over the image area To define a new cropping frame When the pointer is...

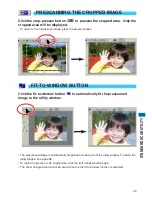
Страница 45: ...GE FIT TO WINDOW BUTTON Click the fit to window button to automatically fit the prescanned image to the utility window The prescanned image is automatically magnified or reduced to fit the utility win...

Страница 46: ...te button to rotate or flip the prescan image Rotate the image 90 counterclockwise Rotate the image 90 clockwise Flip the image horizontally Flip the image vertically Flipping the image vertically cre...

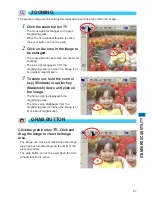
Страница 47: ...rom the magnifying glass icon when the image is at its greatest magnification 3 To zoom out hold the control key Windows or option key Macintosh down and click on the image The minus sign is displayed...

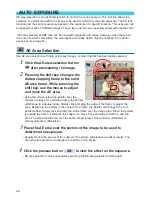
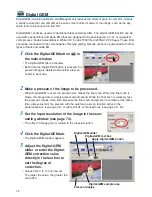
Страница 48: ...AE area frame While pressing the shift key use the mouse to adjust and move the AE area Using the mouse place the pointer over the corners or sides of the AE area frame the pointer will change to a d...

Страница 49: ...escan and final scan will be made with the locked exposure settings until the AE lock is canceled or the scanner is reinitialized POINT AF AUTOFOCUS The DiMAGE Scan Elite II s autofocus system uses th...

Страница 50: ...Click on the area of image to be used for focus The focus meter window will appear 3 Adjust the slider using the mouse until the black and white bars are at their longest extension for sharpest focus...

Страница 51: ...tions made to the displayed prescan B 167 187 Blue channel original scan value current corrected value For more about making cor rections to the scanned image see pages 52 to 73 51 STANDARD SCAN UTILI...

Страница 52: ...ncels all corrections see page 67 Save image correction Job button To store all correction settings see page 68 Load image correction Job button To apply saved image correction settings to the display...

Страница 53: ...button Channel list box Freehand curve button Smooth curve button Tone curve White point button Gray point button Black point button Apply button Histogram Input shadow gamma highlight text box Input...

Страница 54: ...red green The primary and secondary colors are grouped in complementary pairs red and cyan green and magenta and blue and yellow Knowing the complementary colors is very important in color bal ancing...

Страница 55: ...tton to return the the original freehand curve CHANGING THE TONE CURVES 1 Place the mouse pointer over the tone curve Click and drag the curve Each time the tone curve is clicked a new node will be at...

Страница 56: ...ctice to master This basic guide to using tone curves covers a few simple procedures to improve your pictures For more about digital image processing consult your local book dealer about self help gui...

Страница 57: ...uorescent lighting without a flash the resulting photograph has a green cast To correct the image display the green channel tone curve Click on the center of the curve and move it down Use the prescan...

Страница 58: ...ightest neutral area of the image to define it as the white point The values of the image will be adjusted based on the selected point The default level for the white point is 255 for each RGB channel...

Страница 59: ...alues Click OK With the point value setting dialog box open the mouse pointer can be used to measure the color of any point on the prescan image Press the shift key Windows or command key Macintosh to...

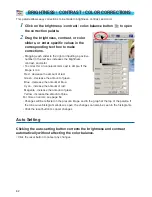
Страница 60: ...mma slider allows the brightness of the image to be adjusted without loosing image information The input highlight slider sets the white level As the slider is moved to the left an apparent increase i...

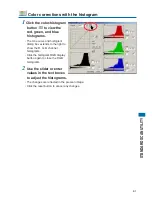
Страница 61: ...ram dialog box extends to the right to show the R G B channel histograms Click the histogram RGB display button again to close the RGB histograms 2 Use the slider or enter values in the text boxes to...

Страница 62: ...tural color cast is simple If the image is too Red decrease the amount of red Green decrease the amount of green Blue decrease the amount of blue Cyan increase the amount of red Magenta increase the a...

Страница 63: ...is similar but with many more hues Unlike the brightness control in the brightness contrast color balance palette the lightness control does not change the apparent density of the colors equally With...

Страница 64: ...th a slight color correction are displayed around a thumbnail of the uncorrected pres can image 1 Drag the variation step slider or enter the correction step into the variation step text box to set th...

Страница 65: ...w images corrected by the designated step This procedure can be repeated until the desired correction is obtained Click the reset button to cancel any changes Saturation variation Two images with a sl...

Страница 66: ...ith soft or slightly out of focus images The effect of the unsharp mask is very subtle but makes a significant improvement to the overall appearance of the image 1 Click the unsharp mask button The un...

Страница 67: ...tion When the undo button is clicked the last image correction is canceled Redoing a canceled image correction When the redo button is clicked the canceled image correction is reap plied Resetting all...

Страница 68: ...ttings are saved as an image correction Job Loading an image correction Job 1 Click the load image correction Job button The select image correction Job dialog box appears 2 Select the image correctio...

Страница 69: ...space Pentium 166MHz or later 128MB 500MB or more Pentium III or later 256MB 1GB or more Minimum system requirements Recommended system requirements CPU Memory Hard disk space CPU Memory Hard disk sp...

Страница 70: ...films The Digital ICE function can be used with special black and white films that are designed to be developed in a C 41 or equivalent color process see the list below These films should be scanned...

Страница 71: ...4 When Digital ROC is activated the auto expose for slides setting in the preferences box see page 34 color matching see page 88 and the AE lock and AE area selection functions see page 48 are disable...

Страница 72: ...nother prescan needs to be made 2 Make a prescan of the image to be processed When Digital GEM is used the prescan also makes the final scan When the final scan is made the image data is simply proces...

Страница 73: ...click and drag to define a new sample area To extend the area over the entire image press control A Windows or command A Macintosh 7 Click the apply Digital GEM button to preview the Digital GEM effec...

Страница 74: ...sed on the final use of the image Click the prescan or index scan tab to view the scan setting window The scan setting dialog box is located on the left of the tab Job name list box Input resolution l...

Страница 75: ...re displayed on the right side of selection window The Job names can be listed chronologically or alphabetically Click the name or date option radio button to sort the Job files When the Job file is l...

Страница 76: ...photo CD format Uses an output resolution of 300 dpi Image size can be selected among 2048 x 3072 1024 x 1536 and 512 x 768 pixels Web page For use on the world wide web Uses an output resolution of 7...

Страница 77: ...e pixel is selected in the unit list box Magnification text box The image magnification can be set in this box This value equals the input resolution divided by the output resolution or is the output...

Страница 78: ...output print is 150mm x 100mm at the resolution of 150 dpi The input image is from 35mm film image size 36mm x 24mm The magnification can be calculated as follows Output size 100mm print approx 4 time...

Страница 79: ...t size in this example enter 148 for the width and 100 for the height Click on the output size lock button to fix the values 4 Use the mouse to adjust the cropping frame over the prescan image to defi...

Страница 80: ...ve the settings from the drop down menu 3 Enter the Job file name Click OK to save the settings The Job file name can contain up to 24 characters DELETING A JOB FILE A Job file can be deleted 1 Click...

Страница 81: ...the Photoshop Elements file menu When using the utility software only 1 Click the scan button in the main window 2 On the save as dialog box enter the file name and select the file destination and fi...

Страница 82: ...n be selected when saving The higher the compression ratio the the smaller the file size and the more deterioration to the image quality TIFF this high resolution bitmap can be opened on any computer...

Страница 83: ...be entered See details on page 36 The frame s to be selected can be checked by checking the radio box 4 On the film dialog box select the film format film type and frame number s of the images to be...

Страница 84: ...e area Outside edge cropping crops the image to the outside limit of the image area Inside edge cropping is recommended for mounted slides The auto cropping function will take priority over any scan s...

Страница 85: ...older while it is moving When using the optional APS Adapter the scanner automatically rewinds the film when the eject button is pressed Do not remove the adapter until the rewind motor has stopped 3...

Страница 86: ...or shutting down The computer or scanner may not operate properly The scanner should be connected directly to the computer s IEEE 1394 or USB port Attaching the computer to an IEEE or USB hub may pre...

Страница 87: ...ialog box will appear 4 Select Minolta DiMAGE Scan Elite 2 and click Stop A confirmation screen will appear 5 On the confirmation screen confirm the device to be stopped Click OK to stop the device 6...

Страница 88: ...anning time The DiMAGE Scan Elite II color matching function matches the scanned color with specified color spaces The color matching system can use the monitor s ICC profile to display the image as a...

Страница 89: ...cause the color space is wider than sRGB it is commonly used in the production of printed material SMPTE C This is the current standard used in television broadcasting in the United States PAL SECOM T...

Страница 90: ...lor space With an application with a monitor correction display function such as Adobe Photoshop Ver 5 to 6 Output Color Space Select the same color space as set in the application With Photoshop ver...

Страница 91: ...r matching with profile to profile conversions in sophisticat ed image processing or DTP applications When using these profiles the color reproduced may not be the same as the color matching system in...

Страница 92: ...r Help folder Job folder 1 Profile folder Extensions folder MFSLib2888 MFSBaseLib2888 DICEMLT002 Library DRAGMLT002 Library MCM Library DS MFSFWDriver MFSFWFamily MFSFWExpLoader MFSUSBDriver ColorSync...

Страница 93: ...Photo3x5 1103 300 367 mm 34 61 24 25 OFF 127 89 ON WebPage 1240x836 878 72 1219 pixel 1240 836 OFF 1240 836 ON 1112x750 787 72 1093 pixel 1112 750 OFF 1112 750 ON 984x663 696 72 966 pixel 984 663 OFF...

Страница 94: ...4x663 974 72 1352 pixel 984 663 OFF 984 663 ON 792x534 785 72 1090 pixel 792 534 OFF 792 534 ON 760x512 752 72 1044 pixel 760 512 OFF 760 512 ON 600x404 594 72 825 pixel 600 404 OFF 600 404 ON 320x240...

Страница 95: ...USB 1 1 Power supply AC Adapter AC U10 100 240 volts AC 50 60 Hz for North America The shape of input plug varies with the destination Power consumption Max 20 W Dimensions W x H x D 145 x 100 x 325...

Страница 96: ...n error occurred during film transporta tion or An error occurred during film rewind message appears The film holder was hindered during the prescan or final scan Turn off the scanner and restart the...

Страница 97: ...your computer Available application RAM Other connected IEEE 1394 or USB devices DS Elite II utility version number Symptoms Message that appears on the screen when the problem occurs Frequency of oc...

Страница 98: ...ry 76 Deleting a Job file 80 Digital GEM 28 69 72 Digital GEM button 33 72 Digital GEM sample display 72 Digital GEM sample area 72 Digital GEM slider 72 Digital GEM text box 72 Digital ICE 28 69 70 D...

Страница 99: ...Zoom button 42 47 Input resolution list box 74 77 Input shadow gamma highlight slider 53 60 Input shadow gamma highlight text box 53 60 Input size lock button 74 77 Input size text box 74 77 Insertin...

Страница 100: ...dex file button p 41 Load image correction Job button p 68 Load Job button p 75 Save Job button p 75 Image correction tab page 42 Load image correction Job button p 68 Fit to window button p 45 Save i...

Страница 101: ...the amount of blue Cyan increase the amount of red Magenta increase the amount of green Yellow increase the amount of blue Adding or subtracting equal parts of red green and blue will have no affect o...

Страница 102: ...ed 7 Tanners Drive Blakelands Milton Keynes MK14 5BU England Minolta Austria Ges m b H Amalienstrasse 59 61 A 1131 Wien Austria Minolta Camera Benelux B V Zonnebaan 39 P O Box 6000 NL 3600 HA Maarssen...

Отзывы: