USER GUIDE
6
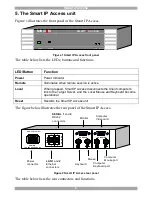
Connector
Function
Computer KVM
Connect a computer or KVM switch
Console KVM
Connect a keyboard, video and mouse to operate the Smart IP
Access locally
Serial 1
and
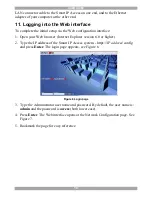
2 RS232
Connect to an RS232 device
LAN 1
and
2
Connect to 10/100 Mbit Ethernet
6. Pre-installation guidelines
Place cables away from fluorescent lights, air conditioners, and machines that are
likely to generate electrical noise.
Place the Smart IP Access on a flat, clean and dry surface.
The Smart IP Access is not intended for connection to exposed outdoor lines
6.1 Avoiding general rack mounting problems
Elevated operating ambient temperature
The operating ambient temperature of the rack environment may be greater than
the room ambient when installing into a closed or multi-unit rack assembly. So
install the equipment in an environment compatible with the maximum rated
ambient temperature.
Reduced airflow
Install the equipment in a rack in such a way that the amount of airflow required
for safe operation is not compromised. Leave a gap of at least 5cm/2” each side of
the Smart IP Access.
Mechanical loading
Mount the equipment in the rack in such a way that a hazardous condition is not
achieved due to uneven mechanical loading.
Circuit overloading
When connecting the equipment to the supply circuit, consider the effect that
overloading of circuits might have on over-current protection and supply wiring.
Reliable earthing of rack-mounted equipment should be maintained. Give attention
to supply connections other than direct connections to the branch circuit (e.g. use of
power strips).

