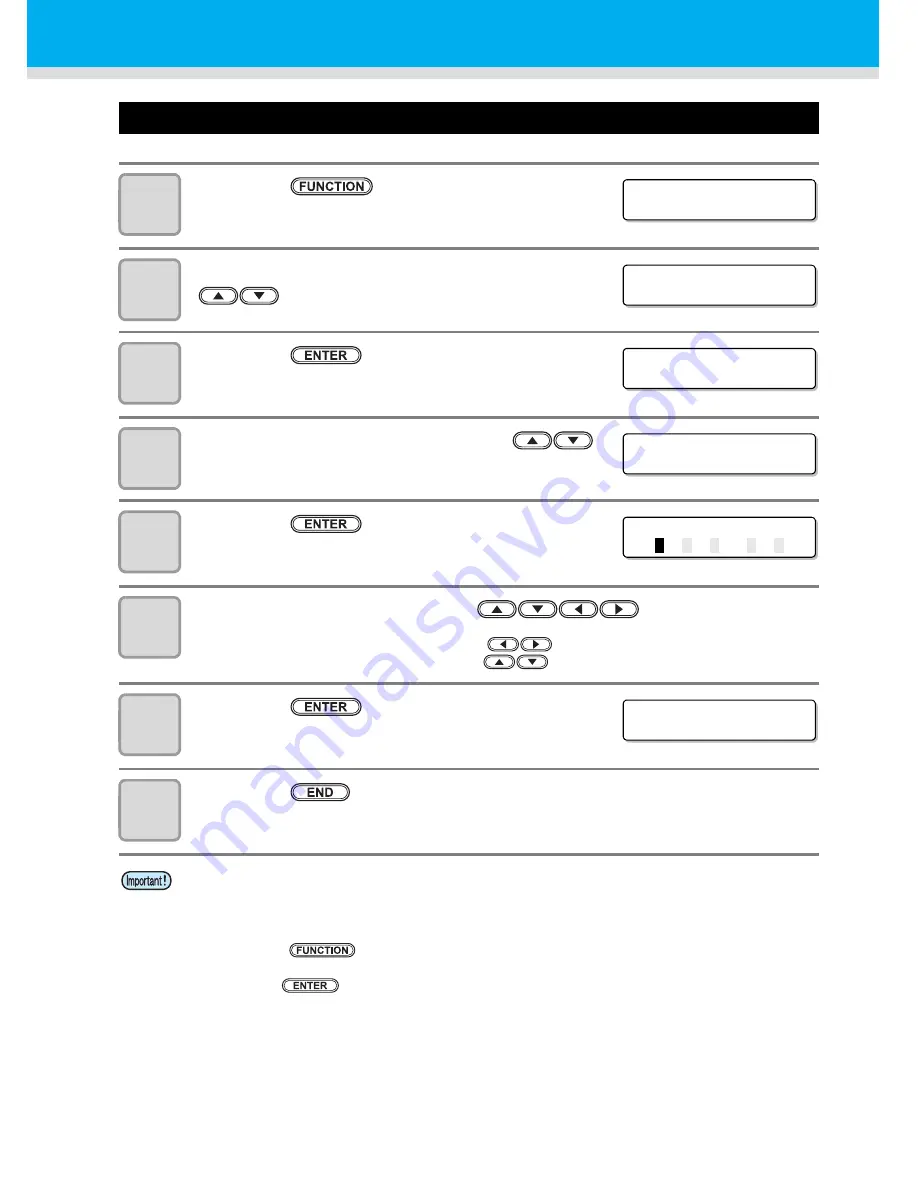
MIMAKI TS3-1600 Скачать руководство пользователя страница 104

3-40

Setting time

1

Press the 

 key in the local mode.

2

Select [MACHINE SETUP 2] by pressing the 

 keys.

3

Press the 

 key.

4

Select [TIME SET] by pressing the 


keys.

5

Press the 

 key twice.

6

Input time by the pressing the 

 keys.

Year/Month/Day/Time selecting

: by the

 keys.

Year/Month/Day/Time inputting

:by the

 keys.

7

Press the 

 key.

• The input time is indicated.

8

Press the 

 key several times to end.

• The setting of past time is settable only for time up to 8 hours earlier than the presently 

indicated time.

• If future time is set by mistake, the previously set time can be set back by the following 

operations in step 7.

(1)

Press the 

 key in step 7. (The input time and the previously set time are

indicated.)

(2)

Press the 

 key.

Only one change of previous setting can be set back. The time before changed is proceeding 
by the elapsed time.

FUNCT I ON
SE TUP

< ENT >

F UNC T I ON

MACH I NE S E T UP 2 < EN T >

MACH I NE S E T UP 2

CONF I RM . F EED

< e n t >

MACH I NE S E T UP 2

T I ME SE T

< e n t >

T I ME SE T
2 0 1

2

. 1 0 . 0 5

1 5 : 3 0 : 0 0

T I ME SE T
2 0 1 2 . 1 0 . 0 5

1 5 : 3 0 : 0 0

Содержание TS3-1600

Страница 1: ...MIMAKI ENGINEERING CO LTD URL http www mimaki co jp D201937 15...

Страница 2: ...machine 1 3 Names of Parts and Functions 1 4 Front 1 4 Rear Sides 1 5 Operation Panel 1 6 Heater 1 7 Media sensor 1 7 Carriage 1 8 Cutter blade and cutting line 1 8 Capping station 1 9 Pinch rollers a...

Страница 3: ...rs 2 18 Changing temperature settings of Heater 2 18 Confirming the Heater temperature 2 19 Test printing 2 20 Perform test printing with the normal test pattern 2 21 Perform test printing with the te...

Страница 4: ...tting Logical seek 3 15 Setting WhiteLay Print 3 16 Setting drying time 3 18 Setting margins 3 19 Setting Priority 3 20 Setting Auto cleaning 3 22 Setting cleaning while printing 3 24 Setting media de...

Страница 5: ...8 Washing of Head nozzle 4 10 Cleaning the ink discharge passage PUMP TUBE WASH 4 12 When not using for a long term CUSTODY WASH 4 14 Cleaning heads and surroundings parts 4 16 When Nozzle clogged af...

Страница 6: ...HAPTER 5 Troubleshooting Troubleshooting 5 2 Power does not turn on 5 2 The machine does not start printing 5 2 Media get jammed media is soiled 5 3 HEAT or CONSTANT LED does not light up 5 3 Image qu...

Страница 7: ...vi...

Страница 8: ...radio frequency energy and if not installed and used in accordance with the Operation manual may cause harmful interference to radio communications Operation of this equipment in a residential area is...

Страница 9: ...the firmware V4 60 and later On This Operation manual This Operation manual is describing the operations and maintenance of Color inkjet printer TS3 1600 called as this machine hereafter Read this Op...

Страница 10: ...to a solvent so that this ink is made by the ecological design friendly to human and environment and suitable for a designer and operator who cares about odor SS21 is suitable for outdoor signs and su...

Страница 11: ...ositioning can be done by a light point of the LED pointer equipped on the carriage Printing information can be checked The print length can be displayed on the LCD panel during printing and the infor...

Страница 12: ...notes thoroughly to operate the machine properly Useful information is given with this symbol Refer to the information to operate the machine properly Indicates the reference page for related content...

Страница 13: ...tion where it produces smoke or strange smell can result in fire or electric shocks If such an abnormality is found be sure to turn off the power switch immediately and unplug the cable from the wall...

Страница 14: ...sible The ink contains organic solvent If ink settles on the skin or clothes immediately wash it off with detergent and water only when solvent is used Heater Do not spill liquid on the platen as this...

Страница 15: ...g so may cause damage to the print circuit board Waste ink is equivalent to waste oil of industrial waste Request an industrial waste disposal company for disposal of waste ink Never open the front co...

Страница 16: ...e to wear the attached gloves Further when the solvent ink is used it is necessary to wear the attached goggles Perform wiping removal of dust and paper powder of the capping station and wiper frequen...

Страница 17: ...ont 1 4 Rear Sides 1 5 Operation Panel 1 6 Heater 1 7 Media sensor 1 7 Carriage 1 8 Cutter blade and cutting line 1 8 Capping station 1 9 Pinch rollers and Feed rollers 1 9 Connecting cables 1 10 Conn...

Страница 18: ...f but also for printing operation Working environmental temperature Use this machine in an environment of 20 to 35 C to ensure reliable printing Depending on the ambient temperature the heater tempera...

Страница 19: ...Do not push the cover to move this machine since the cover may be broken 3 Lock the caster When this machine is to be moved to any place other than on the same step free floor contact your distributo...

Страница 20: ...is machine Take up device Automatically winds up the roll media printed Maintenance cover Open the cover in maintenance Even when the power switch is off keep all covers closed Platen The printed medi...

Страница 21: ...ers are available for the 2 inches and 3 inches core of the roll media AC inlet Connect the power cable to the AC inlet Clamp lever rear Interlocks with the clamp lever in the font of this machine USB...

Страница 22: ...them to select an item of printing conditions key Use this key to display function setting menu key Cancels the last input value or returns the setting menu to the immediate higher level of the hiera...

Страница 23: ...he platen is very hot When the front cover is to be opened or media is to be replaced lower the heater temperatures and wait until the platen temperature drops otherwise you can get burned When the me...

Страница 24: ...also provided to adjust the height of Head in 2 stages according to the thickness of media P 2 6 Cutter blade and cutting line The carriage is provided with a cutter unit for cutting off the media tha...

Страница 25: ...place the wiper with a new one Pinch rollers and Feed rollers This machine retains the media with the pinch rollers and feed rollers During printing operation the feed rollers feed the media forward B...

Страница 26: ...repeater cables available on the market Notes on peripheral devices in USB high speed mode When a peripheral device USB memory or USB HDD to be operated in USB high speed mode is con nected to the sa...

Страница 27: ...fore outputting it for printing Connecting the power cable 1 Insert the power cable into an inlet of the machine 2 Secure a cable band Secure the cable with the cable band attached to this machine 3 I...

Страница 28: ...en INK END or INK NEAR END is displayed on the display When INK END is displayed 1 Pull out an ink cartridge to be replaced 2 Insert a new ink cartridge paying attention to the direction of IC chip Wh...

Страница 29: ...nuine ink cartridges for this machine This machine functions by recognizing the genuine ink cartridges In case of troubles caused by modified ink cartridges or the like it shall be out of the warranty...

Страница 30: ...ime first perform spot color maintenance to prevent color heterogeneity due to settling down of pig ments P 2 26 Perform spot color maintenance If you have left ink for a long time the warning message...

Страница 31: ...able high quality printing Set the heater temperature to meet the characteristics of the media Set the temperature of the Pre heater Print heater and Post heater according to the type and characterist...

Страница 32: ...the temperature of the heaters Pressing the key to check the remaining amount of ink the description of the cartridge error the model name the firmware version and so on Pressing the key to switch bet...

Страница 33: ...n 2 16 Preparing Heaters 2 18 Changing temperature settings of Heater 2 18 Confirming the Heater temperature 2 19 Test printing 2 20 Perform test printing with the normal test pattern 2 21 Perform tes...

Страница 34: ...sing the key Set items Reference page Set items Reference page Setting Media compensation P 3 5 Setting of Refreshing P 3 28 Changing the set value of Heater P 3 8 Setting of Adsorption Setting Print...

Страница 35: ...OFF 2 3 Setting medias 4 Preparing Heaters 5 Test printing Drawing data Referring to Turning the power ON OFF P 2 4 Referring to Setting medias P 2 6 Referring to Preparing Heaters P 2 18 Referring to...

Страница 36: ...prevention function is periodically operated even when the power switch is OFF if the main power switch keeps being ON The power switch blinks in green 1 Turn the main power switch ON Set the main pow...

Страница 37: ...is operated If the main power switch is OFF the sleep function such as the flushing function does not work and this may cause nozzle clogging Keep the front cover and the maintenance cover closed If t...

Страница 38: ...the position of the lever referring to For the adjusting lever and the range Set the height adjusting lever to the highest stage or the lowest stage Setting it to the intermediate height a printing fa...

Страница 39: ...office for switching L H by field person Thick heavy weight 3mm H range Transfer type printing Thin light weight 4mm Thick heavy weight 5mm Set the lever to Thick when a thicker media such as a tarpa...

Страница 40: ...so when the media is set It may cause an injury due to the media The roll stopper arm works with the clamp lever Do not push the clamp lever down while roll stopper is caught between the roll stopper...

Страница 41: ...ll the way seated 6 Loosen the screw of the right side roll holder then insert the holder into the core of the roll media 7 Raise the clamp lever in the front of this machine Roll Holder Set Position...

Страница 42: ...he front of the machine 3 Push down the clamp lever from the back of this machine The media is held 9 Pull out the roll media out 1 Open the front cover 2 Raise the clamp lever from the back of this m...

Страница 43: ...edia remaining amount is displayed after detecting the media width Do not set media at the position which the media press touches the side plate on the right As media may tilt and be lifted it could b...

Страница 44: ...such condition that the roll media is pulled to right and left evenly and then stick the tape Entering the media remaining amount When MEDIA RESIDUAL of the maintenance function is ON P 4 35 the scree...

Страница 45: ...ter The take up torque can be adjusted with the torque limiter The torque limiter is set at the maximum value when shipped from the factory If the tension is too strong to use a thin sheet of media lo...

Страница 46: ...media so that no media sticks out from the right end pinch roller to the right side 4 Hold the media with the media press gently Set the media so that no media sticks out from the right end pinch roll...

Страница 47: ...the right As media may tilt and be lifted it could break the head If a media is misaligned to the right more than fixed position a warning is displayed Set the media again MED I A SE L ECT ROL L L EA...

Страница 48: ...changing position by pressing the keys Select the carriage and media moving the point with the keys 3 After determining the origin press the key The printing origin is changed The origin position set...

Страница 49: ...X is positioned at about 40 mm rearward from the cutting line The printing origin in the scanning direction Y is positioned at 15 mm from the right end of the media The value in the scanning directio...

Страница 50: ...the set temperature 5 Press the key to end It returns to the local mode The Heater temperature is registrable beforehand according to the media to be used P 3 2 Registering the drawing conditions toge...

Страница 51: ...of confirmation It returns to the local mode Type of ink ES3 ink SS21 ink Type of media Glossy chloroethylene Tarpaulin FF All medias Set of the Pre heater 40 C 40 C 40 C 35 C Set of the Print heater...

Страница 52: ...y printing a test pattern on a white media print this test pattern Test pattern for checking white ink When you use a white media and wish to check discharging status of white ink print this test patt...

Страница 53: ...of the first test printing For the detail of the deployment direction of the test printing see P 3 36 2 Press the key This machine starts printing the test pattern After performing test printing this...

Страница 54: ...ttern daubed with black 2 Dry the pattern for thirty seconds 3 Return the media automatically and print the test pattern 4 Check the printed test pattern Finish the operations when it is in normal Exe...

Страница 55: ...into the waiting for test printing status 2 Press the key to select the type of the test printing 3 Press the key Print the test pattern 1 A fortnight after clearance of the warning message or mainte...

Страница 56: ...lver ink or white ink of ES3 ink available for the firmware Ver 4 60 and later Pigments of silver ink and white ink of ES3 ink have nature of settling down when they are left for a long time without b...

Страница 57: ...ed even by NORMAL or SOFT cleaning 3 Press the key The rest of the cleaning time is indicated at the lower of the display On completion of cleaning this machine returns to LOCAL mode 4 Perform test pr...

Страница 58: ...ver Perform maintenance only for silver ink White Perform maintenance only for white ink Silver white Perform maintenance for silver ink and white ink at the same time 5 Press the key 6 Remove the ink...

Страница 59: ...the cartridge 8 Press the key 9 Set the cartridge After the cartridge is set filling starts When filling is completed the screen returns to LOCAL If you shake it too strong the pack inside may be dama...

Страница 60: ...nte nance by following the procedures below 1 If the warning message is displayed press the key If you do not wish to perform spot color maintenance press the key to cancel the operation 2 Press the k...

Страница 61: ...ink flows inside the cartridge 5 Press the key 6 Set the cartridge After the cartridge is set filling starts When filling is completed the screen returns to LOCAL If you shake it too strong the pack i...

Страница 62: ...re 5 This machine starts printing The printing speed may vary due to the set media width or the position of print origin even when the same data is printed depending on resolution When a roll media is...

Страница 63: ...a sending at the PC side during the data is sent from the PC Printing restarts from the interrupted data by repressing the key Erasing the received data Data clear Erase only the received data to stop...

Страница 64: ...to the position to cut by pressing the key 2 Press the key 3 Press the key This machine cuts the media It returns to the local mode after cutting is completed Pay attention so that printed surface do...

Страница 65: ...g time 3 18 Setting margins 3 19 Setting Priority 3 20 Setting Auto cleaning 3 22 Setting cleaning while printing 3 24 Setting media detection 3 26 Other settings 3 28 Initializing the settings 3 30 M...

Страница 66: ...tering Type 1 Press the key in the local mode 2 Press the key 3 Select the type 1 4 by pressing the keys then the key 4 Select and set each item of the list of SET UP functions For the detailed settin...

Страница 67: ...WhiteLay Print OFF ON LEVEL 1 3 INK LAYERS P 3 28 1 9 Sets the number of layers in which ink is to be applied DRYING TIME P 3 18 SCAN 0 0 19 9 sec Sets the time to wait for ink drying Draw END 0 999...

Страница 68: ...EVEL AUTO CLEANING P 3 22 ON INTERVAL 10 1000 10000 mm Sets the auto cleaning of the print head every completion of printing TYPE NORMAL SOFT HARD OFF Print CLEANING P 3 24 ON INTERVAL 10 1000 10000 m...

Страница 69: ...e sure that the CONSTANT lamps light and the preset temperatures have been reached and then start correction On completion of MEDIA COMP during use of a roll media the media returns to the printing or...

Страница 70: ...rection that a spacing between two lines is getting closer The band moves by approx 0 1mm every when the compensative value is changed by 20 8 Press the key Print and check the compensation pattern on...

Страница 71: ...ill be reflected on the correction amount immediately 4 Press the key The value entered here will be invalid when pressing key in stead of key 5 Press the key The changed value is registered The value...

Страница 72: ...e heater temperature begins to drop to the preheat temperature Set value NONE 0 90min 10min unit The preheat temperature is preset and cannot be changed If the machine receives data at the preheat tem...

Страница 73: ...ressing the keys Item selecting by the keys Time setting by the keys 12 Press the key 13 Press the key several times to end It returns to the local mode Use this machine at 20 35 C to ensure reliable...

Страница 74: ...oated media or media on which ink is slow to dry set the heater temperatures so that the ink fixing and drying characteristics will be improved Wait until the CONSTANT lamps light up Set the heater te...

Страница 75: ...ity of 100 magenta area signifies that media feeding has been adjusted properly In the blue area 100 magenta 100 cyan however speckled patterns and banding occur This banding is a result of beading If...

Страница 76: ...ors after printing with SS21 white ink Setting of the print quality 1 Press the key in the local mode 2 Press the key 3 Select the type 1 4 by pressing the keys then press the key 4 Select PRINT MODE...

Страница 77: ...elect the number of passes referring to Combinations of Settable factors 10 Press the key several times to end Combinations of Settable factors DRAFT quality FINE quality Resolution dpi 4 colors 6 col...

Страница 78: ...e key 4 Select the scanning direction by pressing the keys Set value Uni D Bi D 5 Press the key 6 Press the key several times to end 1 PR I NT MODE DRAF T QUA L I TY e n t 1 PR I NT MODE SCAN D I RECT...

Страница 79: ...key 4 Select ON OFF by pressing the keys 5 Press the key 6 Press the key several times to end UNI DIRECTIONAL BI DIRECTIONAL Movement of heads when LOGICAL seek is OFF Movement of heads when LOGICAL...

Страница 80: ...arger number is set for LEVEL 1 to 3 time interval between printing with white ink and printing with color ink becomes long If a large number is set for LEVEL drying property of white ink goes up but...

Страница 81: ...Setting print mode 3 17 3 Convenient use 5 Press the key 6 Press the key several times to end 1 PR I NT MODE Wh i t e L a y P r t e n t...

Страница 82: ...g 1 Press the key in the local mode 2 Press the key 3 Select the type 1 4 by pressing the keys then press the key 4 Select DRYING TIME by pressing the keys 5 Press the key 6 Set the drying time by pre...

Страница 83: ...sing the keys 5 Press the key 6 Set a right and left margin by pressing the keys Item selecting by the keys Margin setting by the keys 7 Press the key 8 Press the key several times to end Pay attentio...

Страница 84: ...by pressing the keys then press the key 4 Select PRIORITY by pressing the keys 5 Press the key 6 Select the set value by pressing the keys Set value INDIVIDUALLY ALL HOST ALL PANEL Proceed to the ste...

Страница 85: ...en items Be sure to press the key to register the setting 10 Set other items by the same operations as the step 8 and 9 11 Press the key several times to end Even when setting has been made to give pr...

Страница 86: ...uent cleaning is performed every printing on the specified length of media When operation interval is 1000 mm example 1 Press the key in the local mode 2 Press the key 3 Select the type 1 4 by pressin...

Страница 87: ...9 Press the key 10 Press the key several times to end This function does not operate when ink near end occurs Solve the ink near end referring to P 1 12 Depending on the conditions of the heads etc t...

Страница 88: ...pressing the keys then press the key 4 Select Print CLEANING by pressing the keys 5 Press the key 6 Select ON by pressing the keys Proceed to the step 9 when OFF is selected 7 Press the key 8 Set an...

Страница 89: ...ral times to end This function does not operate when ink near end occurs Solve the ink near end referring to P 1 12 Depending on the conditions of the heads etc the defective printing could not be rec...

Страница 90: ...7 Select the set value by pressing the keys SELECT Select either a roll media or leaf media by pressing the keys when the media is detected WIDTH The width of media is only detected without any key i...

Страница 91: ...he keys Set value BOTH EDGE LEFT EDGE RIGHT EDGE NONE 12 Press the key 13 Press the key several times to end If the set value is set to others than BOTH EDGE in CUTTING DETECT although the cutting tim...

Страница 92: ...the key 4 Select an item for setting by pressing the keys Select it referring to the list of settings 5 Press the key 6 Select the set value by pressing the keys Select it referring to the list of se...

Страница 93: ...before printing ON OFF Setting of Margins Setting a left margin on the media Refer to P 3 19 Setting a right margin on the media Setting of Color patterns Setting whether color patterns are printed a...

Страница 94: ...cuted per type 1 Press the key in the local mode 2 Press the key 3 Select the type 1 4 by pressing the keys then press the key 4 Select SETUP RESET by pressing the keys 5 Press the key 6 Press the key...

Страница 95: ...CAN DIR Setting the deployment direction of the test pattern when performing test printing repeatedly CART PRIORITY 3 3 This function is valid only when the 4 color ink set is used INK LEVEL EXP DATE...

Страница 96: ...ys 3 Press the key twice 4 Select the item to be set by pressing the keys STOP TIME Setting the time from the completion of printing until the exhaust fan is stopped RENEW Select this to operate the f...

Страница 97: ...in the local mode 2 Select MACHINE SETUP by pressing the keys 3 Press the key 4 Select DRYNESS FEED by pressing the keys 5 Press the key 6 Select ON OFF by pressing the keys 7 Press the key 8 Press t...

Страница 98: ...local mode 2 Select MACHINE SETUP by pressing the keys 3 Press the key 4 Select STAMP SETUP by pressing the keys 5 Press the key 6 Select ON OFF by pressing the keys 7 Press the key 8 Press the key s...

Страница 99: ...3 35 Machine settings 3 Convenient use Examples of Output...

Страница 100: ...he key 6 Select the set value by pressing the keys FEED DIR Deployed in the feed longitudinal direction of the media setting at the time of purchase SCAN DIR Deployed in the scan crosswise direction o...

Страница 101: ...3 37 Machine settings 3 Convenient use 7 Press the key 8 Press the key several times to end...

Страница 102: ...R The error message is displayed for a moment and printing starts Wait arrival After the error message is displayed wait until the room temperature reaches the proper value Then printing starts 7 Pres...

Страница 103: ...to the step 7 when OFF is selected 5 Press the key to set BACK FEED 6 Select ON OFF by pressing the keys When the media return feeding is set ON the media fed by the confirmation feeding is slightly...

Страница 104: ...settable only for time up to 8 hours earlier than the presently indicated time If future time is set by mistake the previously set time can be set back by the following operations in step 7 1 Press t...

Страница 105: ...he key 4 Select UNIT SETUP by pressing the keys 5 Press the key 6 Select the unit by pressing the keys Item selecting by the keys Unit setting by the keys 7 Press the key 8 Press the key several times...

Страница 106: ...e keys 3 Press the key 4 Select MACHINE NAME by pressing the keys 5 Press the key 6 Select the machine name 01 99 by pressing the keys 7 Press the key 8 Press the key several times to end FUNCT I ON S...

Страница 107: ...g the keys 5 Press the key 6 Select ON OFF by pressing the keys 7 Press the key 8 Press the key several times to end A buzzer sound at Error Warning Operation completion cannot be cancelled even when...

Страница 108: ...that is once set YES for extension cannot be changed the setting To extend multiple inks expiry month at a time set the expired ink cartridges and then set the extension Extension of ink expiry month...

Страница 109: ...Printable continuously Not printable continuously Not printable Unusable A message Expiration 2MONTH or COMPLETELY EXPIRED appears on the display and the cartridge lamp lights in red A message Expira...

Страница 110: ...essing the keys INK LEVEL Low ink cartridge is used first EXP DATE Close to date ink cartridge is used first 7 Press the key 8 Press the key several times to end When expired ink cartridge is set the...

Страница 111: ...ess the key 4 Press the key It enters in the LOCAL or the REMOTE mode Usually when both an ink cartridge and the bulk ink system MBIS are set in the supply path of the same color the ink in the bulk i...

Страница 112: ...preventing color material settling is displayed to inform you of it When the time to shake the ink cartridge has come When you use MBIS it is not displayed When the time to perform ink filling This me...

Страница 113: ...cannot be beaten enough Tilt the cartridge until it becomes vertical If you shake the ink cartridge too strong it may damage the inside pack and it may cause ink leakage Be careful about it When the...

Страница 114: ...3 Press the key 4 Press to set the operation time Set value OFF disabled or 12 to 120 hours 5 Press the key 6 Press the key several times to end the setting When you use sublimation transfer ink Sb52...

Страница 115: ...or at turning on the power supply When you press the key the message goes out You can check the current head height with the procedures below 1 Press the key in LOCAL 2 Press the key several times to...

Страница 116: ...be displayed one by one in the order of occurrence MAINTE HISTORY Displays the records of the date and time when maintenance functions were used It displays chiefly manual cleaning functions or automa...

Страница 117: ...of maintenance VERSION Displaying the version information such as F W or the like PRT modeHISTORY Displaying the resolution the length printed or the like Displaying the date printed Serial Dealer No...

Страница 118: ...3 54...

Страница 119: ...logged after cleaning 4 18 Filling up ink 4 18 DISCHARGE WASH 4 19 Initial ink fill up 4 21 If dots misalign 4 23 Preventing nozzle clogging while power off 4 25 Setting refreshing interval in Sleep m...

Страница 120: ...ine amount of ink flushing periodically while printing output is suspended for an extended period of time When printing is to be suspended for a long time turn off only the power switch in the front o...

Страница 121: ...lint paper dust or the like caused by cutting medias For a conspicuous stain wipe it off with a soft hair brush a dry cloth a paper towel or the like If it is stained with ink wipe it off with a paper...

Страница 122: ...of the head is cleaned move the carriage to the left end by the operations of step 1 of P 4 16 Cleaning the heads and their surrounding parts and then clean it Cleaning the media press Media feeding m...

Страница 123: ...e the wiper Pull out the wiper by holding the projections at both ends Tools required for Maintenance Cleaning solution When solvent ink is used Cleaning solution MS2 ES3 HS kit SPC 0369 When sublimat...

Страница 124: ...d the wiper cover off with a clean stick dipped in the cleaning solution 8 Close the front cover then press the key After performing the initial operation the machine returns to LOCAL mode Performing...

Страница 125: ...w wiper Install the wiper by holding the projections at both ends 6 Close the front cover then press the key After performing the initial operation the machine returns to LOCAL mode The wiper to be ne...

Страница 126: ...ling of the cleaning solution is started When the following messages are indicated check the waste ink tank and then operate it referring to P 4 39 If Waste ink tank confirming message is displayed ac...

Страница 127: ...g the keys 4 Press the key 2 Select MaintWashLiquid by pressing the keys 3 Press the key 4 Select DISCHARGE by pressing the keys 5 Press the key Proceed to the step 7 when the cartridge has been remov...

Страница 128: ...g solution For sublimination dye ink SPC 0137 For solvent ink SPC 0369 3 Insert it in the original position by holding the projections at both ends of the wiper 5 Press the key Make sure the following...

Страница 129: ...e screen on the right is displayed only for the duration set in the step 8 It returns to the local mode after the duration When nozzle missing is not cleared even after this washing is carried out sev...

Страница 130: ...the cap with the cleaning solution The cleaning solution is applied by drops when the is pressed When the is pressed again drops stop During the idle absorbing is interrupted repeat the drops several...

Страница 131: ...the idle absorbing is performed for 30 seconds Perform the followings unless the cleaning solution has been filled in the machine 1 Perform the operations until the step 4 2 Fill the cap with the cle...

Страница 132: ...or solvent ink SPC 0369 3 Insert it in the original position by holding the projections at both ends of the wiper Check the followings in advance Is NEAR END or NEAR END displayed The cleaning solutio...

Страница 133: ...tion of the nozzle cleaning the head moves to above the platen 10 Open the front cover 11 Press the key to fill the cap with the cleaning solution The cleaning solution is applied to the cap by drops...

Страница 134: ...hine body 2 Open the maintenance cover 1 Turn four screws that fix the maintenance cover to the left and remove them 2 Remove the maintenance cover If the maintenance cover is hard to remove use the s...

Страница 135: ...press the key It returns to the local mode after the initial operation When SS21 ink is used the ink sticks around the wiper easily Clean the wiper and surroundings about twice in a week it varies de...

Страница 136: ...t MAINTENANCE by pressing the keys then press the key 3 Select HD MAINTENANCE by pressing the keys 4 Press the key 2 Press the key Ink filling is automatically started It returns to the display on the...

Страница 137: ...tion Absorbing of the cleaning solution is started The display on the right is displayed after absorbing To use this function the dedicated cleaning solution P 4 2 Notes on cleaning solution is requir...

Страница 138: ...artridge The ink left in the head or tube is discharged to the waste ink tank The right display on the right is displayed after discharging Check the condition of waste ink tank and then select whethe...

Страница 139: ...owing BOOT 2 Select the ink type to be filled by pressing the keys To check the state of the cartridge press the key P 5 5 3 Select the ink set a filling color to be filled by pressing the keys You ca...

Страница 140: ...ND INK END or other ink errors occur it does not start ink filling If ink filling is not started in step 5 1 Press the key to go back to the display of step 2 2 Press the key to check the state of the...

Страница 141: ...ct DROP POSITION by pressing the keys 4 Press the key 3 Press the key to start the pattern printing Plural pattern types are printed in order of printed called as Pattern 1 2 3 4 Correct the dot posit...

Страница 142: ...If dots misalign 4 24 6 As the same as the step 4 correct the dot position of the from pattern 2 then press the key 7 Press the key several times to end...

Страница 143: ...essing the keys Set value OFF 1 168 hours 5 Press the key 6 Press the key several times to end Function name Descriptions REFRESH Set the interval at which refreshing operation is to be performed peri...

Страница 144: ...ys 4 Press the key 2 Select PUMP TUBE WASH by pressing the keys 3 Press the key 4 Set the tube washing interval by pressing the keys Set value OFF 1 168 hours 5 Press the key 6 Press the key several t...

Страница 145: ...the keys then press the key 3 Select SLEEP SETUP by pressing the keys 4 Press the key 2 Select CLEANING by pressing the keys 3 Press the key 4 Set the cleaning interval by pressing the keys Set value...

Страница 146: ...g temperature of the print heater and the ambient temperature is the more easily ink can condense 1 Select ROUTINE SETUP of the maintenance menu 1 Press the key in the local mode 2 Select MAINTENANCE...

Страница 147: ...emperature difference by pressing the keys The ROUTINE WIPING function is activated when the setting temperature of the print heater is higher than the ambient temperature and the difference is larger...

Страница 148: ...pressing the keys then press the key 3 Select ROUTINE SETUP by pressing the keys 4 Press the key 2 Select REFRESH by pressing the keys 3 Press the key 4 Set the refreshing interval by pressing the ke...

Страница 149: ...ing the keys 3 Press the key 4 Set the tube washing interval by pressing the keys Set value OFF 1 168 hours 5 Press the key 6 Press the key several times to end This function is operable only under th...

Страница 150: ...the key The selection display of the cleaning type is displayed 6 Select the cleaning type by pressing the keys Set value NORMAL SOFT HARD 7 Press the key This function does not operate when the erro...

Страница 151: ...Setting Routine operations 4 33 4 Routine Maintenance 8 Press the key several times to end...

Страница 152: ...ing the keys 2 Press the key 3 Set the wiper level by pressing the keys Set value 1 10 10 10 4 Press the key 5 Press the key several times to end 10 10 Displays the wiper replacement warning when wipi...

Страница 153: ...ining amount display is turned to ON The media remaining amount is displayed in the remote mode The print length is displayed when a leaf media is used When the media remaining amount display is turne...

Страница 154: ...n to the Step 2 screen When pressing key it will return to the local mode 4 Press the key Start printing of the media remaining amount When the printing completes it will return to the local mode Set...

Страница 155: ...zle cleaning function 1 2 Performs cleaning 2 1 The operation is the same as the CUSTODY WASH of ST MAINTENANCE Leaving time three minutes 2 The operation equivalent of Hard cleaning of the head clean...

Страница 156: ...is removed the white ink remaining in the machine is discharged After discharging the screen shown on the right appears 8 Set the white ink cartridge 9 White ink filling starts Filling time of LEVEL2...

Страница 157: ...Select Exchange by pressing the key The ink discharging amount is reset When the waste ink tank has room 1 Select Continue by pressing the key The ink discharging amount is not reset In this case the...

Страница 158: ...key in the local mode 2 Select MACHINE SETUP by pressing the keys then press the key 3 Select Waste Ink Warning by pressing the keys 4 Press the key 2 Select OFF by pressing the keys 3 Press the key...

Страница 159: ...e waste ink tank guard then release a lock 2 Open the waste ink tank guard frontward 2 Pull it frontward to remove by holding the waste ink tank handle Put a cap on the waste ink tank removed 3 Replac...

Страница 160: ...enu 1 Press the key in the local mode 2 Select MAINTENANCE by pressing the keys then press the key 3 Select Ink Tank Exchange by pressing the keys 6 Press the key The ink discharging amount that is co...

Страница 161: ...ink color To replace white ink of SS21 from SS21W to SS21W 2 follow the exhibit Before using new White Ink SS21 W2 D201848 When washing use a special cleaning solution cartridge sold separately Wash...

Страница 162: ...ter unit 3 Mount a new cutter unit 4 Fasten the screw of the cutter unit to secure the cutter unit The blade is sharp Be careful not to hurt yourself or anyone else Keep the cutter blades away from th...

Страница 163: ...Replacing the cutter blade 4 45 4 Routine Maintenance 4 Close the front cover 5 Press the key The machine returns to LOCAL mode...

Страница 164: ...4 46...

Страница 165: ...on the LCD Troubleshooting 5 2 Power does not turn on 5 2 The machine does not start printing 5 2 Media get jammed media is soiled 5 3 HEAT or CONSTANT LED does not light up 5 3 Image quality is poor...

Страница 166: ...hine properly It can also occur when the printing function does not work properly or the media is not set correctly Has the power cable been connected between the machine and a power plug socket Secur...

Страница 167: ...he basic operation Is a recommended media used Use recommended media Is the media not curled or bent ends Avoid using any media with curls or bent ends Yes Is the media hanging down along the platen U...

Страница 168: ...direction of travel of the heads 1 Execute the head cleaning P 2 24 2 Perform maintenance of the inside of the station P 4 5 3 Execute the MEDIA COMP function P 3 5 4 If any pieces of paper or dust i...

Страница 169: ...by the following operations P 5 7 1 Press the key in the local mode 2 Press the key When two or more cartridge troubles occur warnings can be displayed in turn by pressing the or key Press the key or...

Страница 170: ...ogging observed perform the operations of P 4 10 Washing of Head nozzle A heater is disconnected This example shows that pre heater is disconnected Contact your local distributor to call for service T...

Страница 171: ...ce and install it again If the same warning message still appears contact your local distributor to call for service The ink of the ink cartridge is different in type from the ink currently supplied C...

Страница 172: ...n of pigment is displayed Perform spot color maintenance The waste ink tank is nearly full Replace the waste ink tank then execute MAINTENANCE Ink Tank Exchange P 4 41 The cleaning liquid cartridge is...

Страница 173: ...ircuit board system SD RAM An error in heads was detected Abnormal temperature was detected An error in heads was detected Abnormal voltage was detected An error occurred in the linear encoder Countin...

Страница 174: ...communication between the host computer and the interface board for USB2 0 connection An error occurred in communication between the host computer and the machine for USB2 0 connection Improper opera...

Страница 175: ...e and turn it on after a while If the same error message appears again contact your local distributor to call for service The head is not connected An error occurred on the head slider board The head...

Страница 176: ...r message appears again contact your local distributor to call for service The head heater is disconnected Trouble has occurred with the thermistor of the head heater An error was detected during scan...

Страница 177: ...ttaches a list of the specifications and a list of the functions of this printer Machine specifications 6 2 Ink specifications 6 4 Sheet for inquiry 6 5 Warning labels 6 6 Function Flowchart 6 8 CHAPT...

Страница 178: ...lled White 2x220cc cartridges 440cc 1 color Other colors 1x440cc cartridge for each color 440cc 1 color 4 color set installed 440cc 2 cartridges for each color 880cc 1 color Dedicated sublimina tion d...

Страница 179: ...ce supplied as a standard accessory switching possible between face in and face out Waste ink tank Bottle type 2 000 cc Interface USB 2 0 Command MRL III Noise during standby Less than 58 dB FAST A Fr...

Страница 180: ...ridge Sb52 ink cartridge is used Ink capacity 220cc 440cc per cartridge Shelf life SS21 Ink 1 year from the date of manufacture at room temperature ES3 Ink Two years from the date of manufacture at ro...

Страница 181: ...the following necessary items and then fax the sheet to our sales office Company name Person in charge Telephone number machine model Operating OS Machine information 1 1 Refer to Confirming machine i...

Страница 182: ...achine Be sure to fully understand the warning given on the labels If a warning label is illegible due to stains or has come off purchase a new one from a distributor or our sales office When the fron...

Страница 183: ...Warning labels 6 7 6 Appendix No Reorder Label 1 M901549 2 M903239 3 M903330 4 M903405 5 M904810...

Страница 184: ...FEED DIR WHITE CHK OR I G I N SE TUP 0 0 OR I G I N SETUP OR I G I N MED I A CUT ENT PRE PRT POST 3 5 C 4 0 C 5 0 C 4 0 C 4 0 C 5 0 C OF F OF F OF F TEST DRAW SCAN D I R e n t TEST DRAW CL EAN I NG T...

Страница 185: ...6 9 Function Flowchart 6 Appendix MED I A RES I DUA L DRAW ENT Only when MEDIA RESIDUAL is ON Shake the cartridge fifth or sixth times Remove the cartridge Set the cartridge...

Страница 186: ...6 10 ES 3 MMCCYYKK REMA I N 3 4 5 6 7 8 9 9 HEAD HE I GHT TH I N MED I A WI DTH 1 0 0 0mm TS 3 1 6 0 0 V 1 0 0 MRL I I I V 1 0 0 USER TYPE CHANGE TYPE 1 2 e n t From P6 8...

Страница 187: ...WRONG I NK I C M C K K i n d o f I NK M C K Co l o r o f I NK M C K WRONG CARTR I DGE M C K NO CARTR I DGE M C K E x p i r a t i o n 2MONTH M C K I NK REMA I N ZERO M C K I NK END M C K I NK NEAR END...

Страница 188: ...an ent Portugues ent FUNCT I ON I NFORMAT I ON ENT INFORMATION FUNCT I ON D I SP L AY ENT D I SP L AY J a p a n e s e e n t FUNCT I ON SETUP ENT SETUP FUNCT I ON MACH I NE SETUP 2 ENT MACHINE SET 2 FU...

Страница 189: ...6 13 Function Flowchart 6 Appendix To P 6 14 To P 6 20 To P 6 26 To P 6 27 To P 6 28...

Страница 190: ...MED I A COMP e n t SETUP 1 MED I A COMP PR I NT START e n t 1 HEATER e n t 1 HEATER SET TEMP e n t 1 PR I NT MODE e n t 1 PR I NT MODE DRA F T QUA L I TY e n t 1 PR I NT MODE F I NE QUA L I TY e n t 1...

Страница 191: ...SCAN H i SPEED 1 DRAF T QUA L I TY 5 4 0 x 9 0 0 e n t 1 DRAF T QUA L I TY PASS 2 0 SCAN H i SPEED 1 DRAF T QUA L I TY 5 4 0 x 1 0 8 0 e n t 1 DRAF T QUA L I TY PASS 1 2 SCAN N o r mSPD STD FAST FINE...

Страница 192: ...n t L EF T R I GHT 0mm 0mm ON OFF 1 COLOR PAT TERN e n t 1 COLOR PAT TERN SETUP ON LEVEL 0 3 1 REFRESH e n t 1 REFRESH SETUP LEVE L 3 OFF WEAK Little WEAK STRONG STANDARD 1 VACUUM e n t 1 VACUUM SETUP...

Страница 193: ...6 17 Function Flowchart 6 Appendix OFF LEVEL 1 3 1 Wh i t e L a y P r t SE L OF F...

Страница 194: ...CL EAN I NG SETUP ON ON OFF 1 P r i n t CL EAN I NG e n t 1 P r i n t C L EAN I NG SETUP ON 1 MED I A DETECT e n t 1 MED I A DETECT DETECT METHOD e n t 1 MED I A DETECT CUT T I NG DE TECT e n t 1 FEED...

Страница 195: ...R I OR I TY REFRESH HOST 1 PR I OR I TY VACUUM HOST 1 PR I OR I TY FEED SPD L EVE L HOST HOST PANEL HOST PANEL HOST PANEL HOST PANEL HOST PANEL HOST PANEL HOST PANEL HOST PANEL HOST PANEL HOST PANEL H...

Страница 196: ...E e n t ST MA I NTENANCE COMP L ETED e n t ST MA I NTENANCE NOZ Z L E WASH e n t WI PER CL EAN I NG COMP L ETED NEXT e n t ST MA I NTENANCE PUMP TUBE WASH e n t ST MA I NTENANCE COMP L ETED e n t ST M...

Страница 197: ...i d COMP L ETED NEXT e n t ST MA I NTENANCE L EAV I NG T I ME 1m i n C l o s e a c o v e r C l o s e a c o v e r RESTART Close a cover C l o s e a c o v e r RESTART Close a cover Close a cover RESTART...

Страница 198: ...UP I NK e n t F I L L I NG UP NOW 0 0 0 0 MA I NTENANCE DROP POS I T I ON e n t DROP POS I T I ON PR I NT START e n t PR I NT I NG P L EASE WA I T MA I NTENANCE S L EEP SETUP e n t S L EEP SETUP REFR...

Страница 199: ...0 0 0 R emo v e C a r t r i d g e s 1 2 3 4 5 6 7 8 D I SCHARGE 0 0 0 0 SE L ECT END R e Wa s h End the printing DROP POS I T I ON PA T TERN1 0 0 40 0 40 Ma i n t Wa s h L i q u i d T h e r e i s a C...

Страница 200: ...OF F OFF 1 168 h MA I NTENANCE WI PER L EVE L e n t WI PER L EVE L L EVE L 1 0 1 0 MA I NTENANCE I n k T a n k E x c h a n g e e n t I n k T a n k E x c h a n g e EXCHANGE e n t 9 10 1 10 MA I NTENANC...

Страница 201: ...RMAL SOFT HARD Settable except for OFF L v 3 NOZ Z L E WASH 0 3 0 0 REMOVE I NK CARTR I DGE _W_W_ _ _ _ L v 3 D I SCHARGE 0 1 3 0 SET I NK CARTR I DGE _W_W_ _ _ _ L v 2 F I L L I NG UP 0 0 3 0 L v 3 C...

Страница 202: ...T e s t D r awA r r a n g e e n t T e s t D r awA r r a n g e SETUP FEED D I R MACH I NE SE TUP DEODOR I ZE FAN e n t DEODOR I ZE FAN STOP T I ME e n t MACHINE SETUP DEODOR I ZE FAN STOP T I ME 1 2 0...

Страница 203: ...FEED BACK FEED ON TEMP C F LENGTH mm inch ON OFF T I ME SET 2 0 1 2 1 0 0 5 1 5 3 0 0 0 T I ME SET 2 0 1 2 1 0 0 5 1 5 3 0 0 0 MACH I NE SE TUP 2 UN I T SETUP e n t TEMP L ENGTH C mm MACH I NE SE TUP...

Страница 204: ...V 1 0 0 I NFOMAT I ON ERROR H I STORY e n t ERROR H I STORY 0 1 0 5 0 9 2 9 0 8 1 8 INFOMATION 0 1 0 5 0 9 2 9 0 8 1 8 CARR I AGE OUT I NFOMAT I ON PR I NTmo d e H I ST e n t 0 1 7 2 0 x 1 0 8 0 1 2 B...

Страница 205: ...D201937 15 17022012...

Страница 206: ...NH FW 5 3 Printed in Japan MIMAKI ENGINEERING CO LTD 2012...

Отзывы: