


OWNER’S
INFORMATION
7
Fireplace Control Devices
Your fi replace is operated by a
remote control handset which can be
programmed to function automatically—
see pages 8–9.
How to Turn Your Fireplace OFF
(including pilot)
Remove the cast fret or the bottom cover. Locate the
gas valve under the fi rebox.
1. Set the Flame Adjustment Knob clockwise
as far
as possible.
2. Push in the Gas Control Knob slightly and turn it
clockwise
to OFF. Do not force.
In the unlikely event that you cannot turn off your
fi replace with the remote control handset, turn off gas
supply and call your dealer for service assistance.
How to Ensure Your Fireplace Cannot
Be Turned ON Inadvertently
The best way to ensure your fi replace will not turn on
is to turn it off , including pilot—see above.
If you wish to maintain the pilot only without the main
burner coming on, turn the Gas Control Knob to Pilot
position.
Your Fireplace’s Vent Safety Switch
This appliance is equipped with a vent safety switch
which, when activated, will turn off the burner and
pilot if the vent is blocked, disconnected, or if there is
excessive down draught.
If the safety switch is activated, wait for it to cool off
before trying to light the appliance again. The safety
switch will cool off and reset itself automatically after
25 to 30 minutes.
In the event that the safety switch is activated
again, contact a qualifi ed service technician for
inspection.
Should the safety switch require replacement, only
use parts supplied by Miles Industries.
Operating Your Fireplace
WARNING
RISKS OF SEVERE BURNS! SURFACES OF
THE FIREPLACE ARE VERY HOT DURING
OPERATION!
Be very careful and wear gloves to
access controls.
!
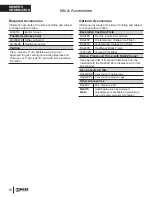
Thermostatic Remote
Control
ON: parallel to pipe
OFF:
perpendicular
to pipe
Turn gas valve buttons clockwise
to turn fi replace OFF.
Flame
Adjustment
Knob
Gas
Control
Knob


