


30
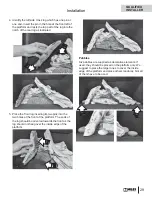
Refi t Window
1. Hook the glass window to the fi rebox then fasten the
four studs pushing and turning them 90 degrees.
Verify that each stud is properly hooked by
feeling with your fi ngers and ensuring the pin of
the bolt is hooked to the fi replace’s fl ange.
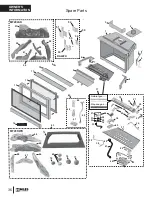
Install Remote Control
1. Connect the wiring harness to the receiver box, by pushing the wire connector on to the
receiver circuit board. The plug will only go on one way so please ensure that the wires
are pointing up and slot in the board is in line with the tab on the wiring harness plug.
2. Connect wires as shown. Please note that the “L” connectors are diff erent sizes, the smaller one fi ts to the
lower connection and the larger one the top connection on the top left hand side of the valve. The other two wire
connectors can be fi tted to either terminal located to the left of the fl ame control button.
3. Remove the remote control receiver lid.
4. Fit four AA 1.5 V alkaline batteries.
5. Place the remote control receiver on the base
of the fi replace beside the valve.
6. Fit the 9 V alkaline battery to the handset
transmitter.
Remote control operating instructions are on
pages 8–9 of this manual.
Receiver
GV34 Valve
Push-on
Connector
CAUTION
DO NOT PUT BATTERIES IN THE REMOTE CONTROL RECEIVER until the
wires are connected to the burner control unit as short-circuit could result
in the destruction of the electrical components.
CAUTION
DO NOT USE
a screwdriver or other metallic object to remove the batteries from the
receiver or the handset! This could cause a short circuit to the receiver.
Installation
Hot Glass Plate
x 4
2.
If the Hot Glass Warning plate has been removed
from the front lower corner of the window,
reinstall it by sliding it between the glass and
the frame as indicated.
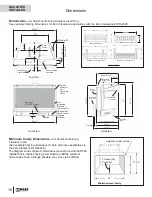
QUALIFIED
INSTALLER


