


23
Installation
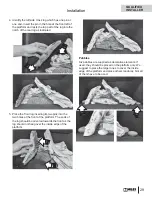
Re-install Support Legs (if removed)
With the fi rebox recessed behind the smoke curtain
of the existing fi replace, raise the fi rebox and place
the individual support legs under the fi rebox. Placing
a temporary shim under the fi rebox, such as a 2” x 4”,
may help while positioning the support legs. Tabs are
provided on the support legs to help position them.
Fasten the support legs at the points indicated by the
arrows using the bolts provided (2 per side).
Raise left hand side of firebox and slip
LH support leg under. Fasten with
2 bolts as indicated.
Raise right side of firebox and slip
RH support leg under. Fasten with
2 bolts as indicated.
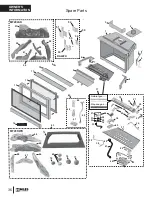
Connect Vent LIner to Appliance
The vent plate will ultimately locate approximately 19”
above the base of the fi replace once inserted.
1. Trim the liner accordingly so it will not be too long
once the fi rebox in raised.
2. Connect the liner to the vent plate using the gear
clamp provided.
3. Stretch the liner down and slide the fi rebox onto the
vent plate.
4. Secure the vent plate to the fi rebox using 2 screws
through the front tab.
NOTE
: When installing into larger fi replaces, the RF24
may be connected to the liner while sitting out on the
hearth or inside the fi replace without removing the vent
plate.
The support legs may also be left in place if the
fi replace is large enough.
If the liner is connected to the fi rebox on the hearth, it
will be necessary to pull the slack liner up from the top
of the chimney after the fi rebox is installed.
Slide Firebox onto
Vent Plate
Secure Vent Plate
using 2 screws at
Front
Firebox with Legs and
Burner Removed
Approx. 19”
above base
of fireplace
Vent Plate
Trim Liner and Connect
Vent Plate to Liner using
Gear Clamp provided
QUALIFIED
INSTALLER


