


OWNER’S
INFORMATION
34
Warranty
WARR
AN
TY
PR
OG
RAM
WARR
AN
TY
PR
OG
RAM
VA
LOR
CO M FO
R
T
VA
LOR
CO M FO
R
T
VA
LOR
CO M FO
R
T
1. Extended Warranty Coverage
For a period of up to ten (10) years, Miles Industries Ltd., (the “Company”) or its appointed distributor will at its option pay the initial
owner for the repair of, or will exchange the following parts or components which are found to be defective in material or workmanship
under normal conditions of use and service:
2. Two-Year Parts Warranty
In addition, for two (2) years from the date of purchase, the Company, at its option, can repair or exchange all parts and components
not listed above but that are found to have a
bona
fi
de
defect in material or workmanship under normal conditions of use.
3. Conditions and Limitations
a) The warranty registration card must be completed by the initial owner and returned to the Company within 90 days of purchase.
Alternatively, the warranty registration form may be fi lled out online at www.valorfi replaces.com.
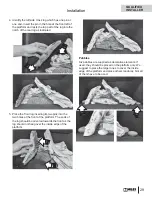
b) Installation and maintenance must be performed by an authorized and trained dealer in accordance with the Company’s installation
instructions.
c) This warranty is void where installation of the unit does not conform to all applicable codes including national and local gas
appliance installation codes and building and fi re codes.
d) The owner must comply with all operating instructions.
e) The Company is not responsible for the labor costs to remove defective parts or re-install repaired or replacement parts.
f) The initial owner of the unit will be responsible for any shipping charges for replacement parts as well as travel time incurred by the
dealer to perform the warranty work.
g) This warranty applies to non-commercial use and service and is void if it is apparent that there is abuse, misuse, alteration,
improper installation, accident or lack of maintenance to the unit.
h) This warranty does not cover damage to the unit due to:
i)
Improper installation, operational or environmental conditions.
ii)
Inadequate ventilation in the area or competition for air from other household equipment or appliances.
iii) Chemicals, dampness, condensation, or sulphur in the fuel supply lines which exceeds industry standards.
i) This warranty does not cover glass, log breakage or damage to the unit while in transit.
j) The Company does not allow anyone to extend, alter or modify this warranty and assumes no responsibility for direct, indirect or
consequential damages caused by the unit. State or provincial laws where the fi rst purchaser or user resides may provide specifi c
rights to extend this warranty and, if so, the Company’s sole obligation under this warranty is to provide labor and/or materials in
accordance with those laws.
4. Discharge of Liability
After two (2) years from the date of purchase, the Company may, at its option, fully discharge all obligations under this warranty by
paying to the fi rst owner the wholesale price of any defective parts.
5. No Other Warranty
All obligations to repair this unit are defi ned in this warranty. Some states or provinces may specifi cally mandate additional warranties
on the part of manufacturers, but in the absence of such specifi c legislation, there is no other warranty or obligation expressed or
implied.
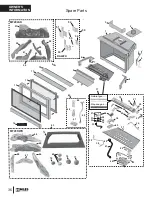
Part or Component
Defect Covered
Maximum Warranty Period
Exterior steel casing
Corrosion
10 years
Glass
Loss of structural integrity
10 years
Cast iron parts
Corrosion
10 years
Firebox and heat exchanger
Corrosion (but not discoloration) causing
loss of structural integrity
10 years
If you have a problem with this unit, please contact your dealer or
supplier immediately. Under no circumstances should you attempt
to service the unit in any way by yourself. The warranties in para-
graphs 1 and 2 are provided only to the initial owner of this unit,
are not transferable and are subject to the conditions and limita-
tions in paragraphs 3, 4 and 5. Please review the conditions and
limitations carefully and strictly follow their requirements.


