


A-1
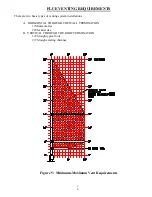
MINIMUM RISE THROUGH-THE-WALL VENTING:
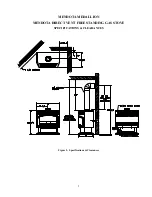
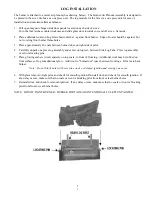
The minimum vertical rise for vent installation through the wall is 30" from the top of the stove to the
centerline of the 90
º
elbow. This distance can be achieved by using a 24" length of vent pipe between the
stove collar and the elbow (see Figure 2: Specifications & Clearances, page 5). NOTE: We recommend
always using the most vertical rise the installation will allow. This maximizes efficiency and flame
appearance. This is especially true for LP gas installations and for installations at higher altitudes.
ALWAYS MAINTAIN 1 1/2 " CLEARANCES FROM VENT PIPE TO COMBUSTIBLES. Do not fill
air spaces with insulation or other material.
The Medallion Stove must be installed by a qualified Mendota approved service person.
1. Position stove in desired location. See page 7 for guidelines on proper vent cap placement on the
exterior of home. Check to determine if wall studs are in the way when venting system is attached. If
this is the case, you may want to adjust the stove location.
2. Measure up 30" from top of Stove or 60 5/8" from finished floor. (See Figure 2: Specifications &
Clearances, Page 5) and mark wall directly at the center of where the vent pipe will penetrate the wall.
3. Cut and frame a 10" x 10" opening in the wall. The hole must be positioned so the vent system will run
level or have a ¼ " rise AND be perpendicular to the wall. The height of the opening must be located to
meet all local and national building codes and not allow the termination to be easily blocked or
obstructed. If wall being penetrated is non-combustible material, i.e. masonry block, brick, etc., a
7-inch diameter hole is acceptable.
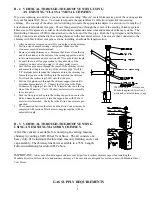
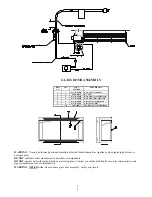
4. Assemble the components to the stove adapter with pipe seams oriented toward the wall or floor - as
much out of view as possible. Be sure all component connections are in their fully twist-locked, leak
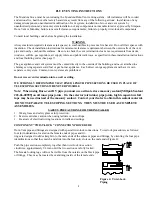
tight position. (See page 8, "
TWIST LOCK CONNECTION PROCEDURE
") Be sure Millpak 2000°
sealant (#65-06-00909) is used on the inner pipe joints of all adjustable (telescoping) pipe sections.
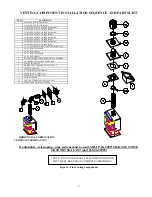
5.
IMPORTANT: REFER TO DRAWINGS ON PAGES 9 & 10 WHILE FOLLOWING THESE INSTRUCTIONS.
*NOTE: DO NOT SEPARATE TELESCOPING SECTIONS USE AS COMPLETE ASSEMBLIES
5. The length of the horizontal piece that fits through the wall will be determined by the thickness of
the wall. When installed, the end of the horizontal piece must be flush with the exterior wall of the
home. There MUST be a minimum of 1 1/2" air space clearance to combustibles from all vent pieces.
6. Before connecting the horizontal run of vent pipe to the vent terminator, slide the black decorative wall
thimble cover over the vent pipe on the inside of the wall.
7. From the exterior of the home, slide the horizontal vent cap over the end of the horizontal pipe and
tightly secure the cap to the wall with screws. Seal with a high quality caulking.
NOTE: Do not recess vent termination cap into the wall or siding.
1
1
Содержание MEDALLION
Страница 21: ...Log Fire View Figure 9 Log Module 2 0...
Страница 32: ...TAPE SHUT POSTAGE NEEDED JOHNSON GAS APPLIANCE COMPANY 520 E AVENUE N W CEDAR RAPIDS IA 52405 3 1...
Страница 33: ...NOTES NOTES 3 2...
Страница 34: ...MENDOTA EXTENDED LIFETIME PROTECTION AND LIMITED WARRANTY MENDOTA MEDALLION SDV40 DIRECT VENT GAS STOVE 3 3...