47
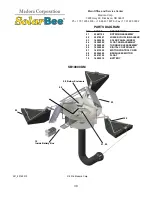
5. Disassembly Of Major Components
TOOLS:
Metric Socket and Wrench Set (10mm, 13mm,
& 19mm)
Marker (Sharpie)
Once the SolarBee is on shore, it is ready
for disassembly to make it ready to store or
transport.
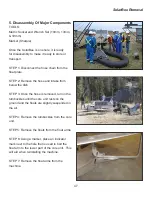
STEP 1: Disconnect the hose chain from the
float plate.
STEP 2: Remove the hose and intake from
below the dish.
STEP 3: Once the hose is removed, turn in the
turnbuckles until the core unit rests on the
ground and the floats are slightly suspended in
the air.
STEP 4: Remove the turnbuckles from the core
unit.
STEP 5: Remove the floats from the float arms.
STEP 6: Using a marker, place an indicator
mark next to the hole that is used to bolt the
float arm to the lower part of the core unit. This
will aid when reinstalling the machine.
STEP 7: Remove the float arms from the
machine.
SolarBee Removal
Содержание SolarBee SB10000DM
Страница 2: ...1 Carefully read safety information when you see any safety symbols...
Страница 31: ...30 Maintenance and Field Adjustment...
Страница 38: ...37...

