


8
| DMR HD3 User Manual 1.0
APRIL, 2015
Use this option with caution as you are changing the
default of this configuration file and will implement the
settings from the file.
If the dmx_ip_conf.txt file is intentionally left blank
with no text of any type within the body of the file, the
HD3 will write its network settings to this file. This is
an easy way to obtain the unit’s network settings.
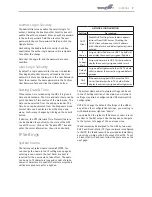
SMTP Mail
The HD3 has the ability to send emails. To send the
emails you must enable the SMTP configuration. After
enabling it, enter the address of the SMTP server in
the appropriate text box and the e-mail account that
you use to send emails in the appropriate box. Confirm
any changes to the SMTP mail configuration by clicking
Submit.
Telnet (TCP/IP)
The Telnet port by default is not enabled. To turn on
Telnet control, set the Telnet port number (typically
Port 23) and check the TCP/IP port enable check box.
A password for the Telnet session can be activated by
entering a password in the Password for TCP/IP connec-
tion text box. If a password is not desired on the Telnet
session, leave the text box blank.
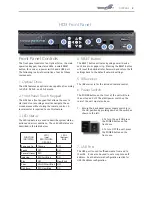
RS-232
On the back of the HD3 there is a serial control port
configured as a DTE that supports the RS-232 protocol. A
Null-Modem cable should be used between the HD3 and
the COM port on your PC.
Terminal session settings required for RS-232 control
are: 9600, 8, None, 1 with No Flow Control.
There is no password protection on this interface and,
by default the RS-232 port is enabled. The administra-
tor has the ability to disable the port by unchecking the
COM port enable check box.
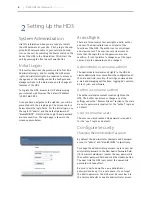
Configuring a Static IP Address
1. On your Internet browser, enter the current
IP address of the HD3. (Note: If the unit has
factory settings, the default static IP address is:
192.168.1.253)
2. Login to the HD3 using the procedure shown in the
Logging In section.
3. Navigate to the network settings page by selecting
IP Settings.
4. To change to a Fixed or Static IP address, set the
DHCP Client check box to “Disable”. Fill in the
IP Address, IP Subnet Mask and Default Gateway
fields.
5. Once you have completed all of the above steps,
select the Apply Changes button. You will receive a
pop-up window warning you to use this option with
caution as you are changing the default address
and should remember the new settings.
Configuring a DHCP IP Address
1.
Follow the first three steps above.
2. To enable the HD3 to pick up an IP address, set the
DHCP Client check box to “Enable”.
3. If you have made any changes to the network
settings, select the Apply Changes button. You will
receive a pop-up window warning you to use this
option with caution as you are changing the default
address and should remember the new settings.
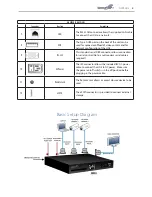
USB Network Configuration
This section describes how to configure the HD3 using a
USB memory stick. The network parameters of the HD3
can be set via a special configuration text file on a USB
memory stick. Insert the memory stick into one of the
HD3 USB ports at any time. The unit will look for the
presence of this configuration file and will implement
the settings from the file. Use a simple ASCII text editor
to create the file named dmx_ip_conf.txt.
dhcp=(bool)
0
dns_1=(string)
192.168.0.2
dns_2=(string)
192.168.0.3
ethernet=(string)
auto
gateway=(string)
192.168.1.1
ipaddress=(string)
192.168.1.253
netmask=(string)
255.255.255.0


