DMR HD3
7
Author Login Security
The Administrator can enable the security login for
author. Checking the Enable Author Security box will
enable the author password. Enter an author password
in the author password field then reenter the new
password in the confirm password field and click the
Update button.
Unchecking the Enable Author Security check box
deactivates the author login password. Press Update
to confirm the change.
Note that the Login ID and the password are case
sensitive.
User Login Security
By default, a login password for the user is disabled.
Checking Enable User Security will enable the User
password. Enter a user password in the User Password
field, then reenter the same password in the Confirm
User Password field and click the Update button.
Setting Date & Time
When content is recorded using the HD3 it is given a
time and date stamp. The time and date stamp can be
set in the Date & Time section of the main menu. The
date can be selected from the pop-up calendar. The
Time Zone can be selected from the drop down menu.
Current time can be selected from the drop down
menu. Confirm any changes by clicking on the Submit
button.
If desired, the NTP (Network Time Protocol) feature
can be enabled to synchronize the clock of the HD3
to an NTP server; click on the “Enable NTP” box and
enter the server information, then click on Submit.
IP Settings
System Name
The factory set system name is MediaPOINTE. You
can change the name in the IP setting menu page by
entering a new name in the text field. A reboot is
required for the new name to take effect. The name
can be up to 15 characters long and consist of alpha-
numeric characters. No special characters or symbols
will be accepted except for a hyphen.
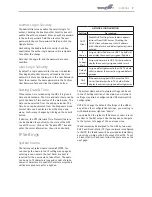
NETWORK CONFIGURATION
Setting
Description
DHCP
Client
Enable DHCP settings for automatic address
retrieval from DHCP Server. Disabling the
DHCP client will require a static IP address
(with subnet mask and default gateway) to be
entered.
IP
Address
Assign a static IP address to HD3. This field will
also display the currently assigned IP address
IP
Subnet
Mask
Assign subnet mask to HD3. This field will also
display the currently assigned subnet mask
Default
gateway
Assign a default gateway to the HD3. This field
will also display the currently assigned default
gateway
DNS
server
If the network supports DNS, enter the DNS
Server IP address(es) here. This field will also
display the currently assigned default gateway
The System Name and all network settings can be set
in the IP Settings section of the main menu. Network
settings may also be configured via USB memory stick
configuration.
NOTE
:
To change the default IP settings of the HD3 or
any of the other configuration settings, you must log in
with administrator rights as “admin”.
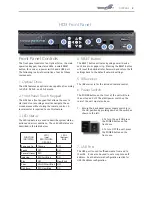
To quickly find the system’s IP Address, connect a local
monitor to the DVI output. Use the keypad to navigate
to the System Info page of the on screen menu.
IP addresses may be assigned to the HD3 by two ways:
DHCP and Fixed (Static) IP. If your network is configured
for DHCP, the IP address will be provided automatically
and will be visible on the DVI output of the HD3. To set
a Fixed (Static) IP address, follow the procedure on the
next page.


