25
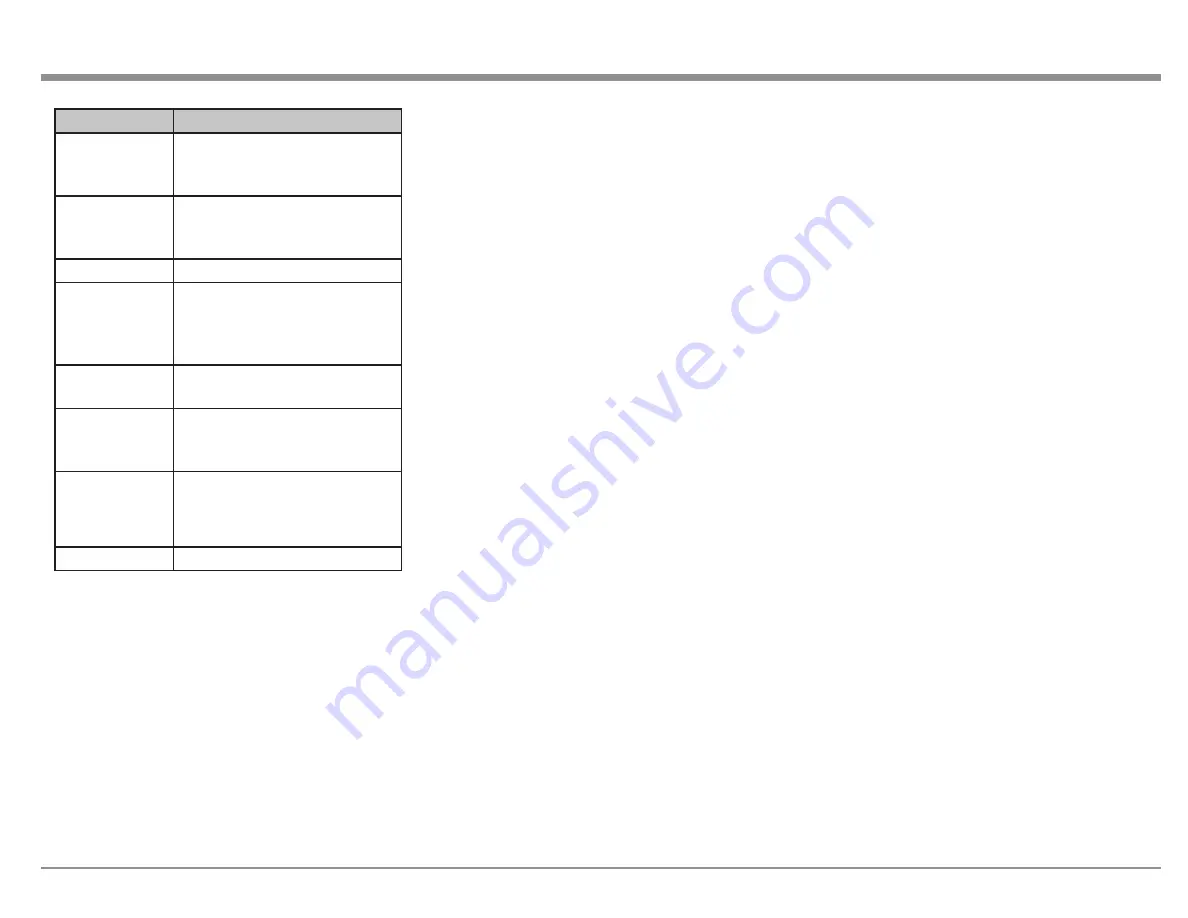
Menu Item
Zone Settings
Lch Level (Left
channel Output
Level)
-12dB to +12dB (Default 0dB)
Rch Level
(Right channel
Output Level)
-12dB to +12dB (Default 0dB)
Channel
Stereo (Default) / Mono
HDMI Audio
(Zone2 only)
Through (Default- HDMI audio
signal passed to ZONE2 device)
/ PCM (HDMI is converted to
PCM for ZONE2)
Volume Level
Variable / Fixed at a set volume
of 1 to 98 (-79dB to 18dB)
Volume Limit
(if Volume Level is
Variable)
Off (no max) / 60 (-20dB)
/70 (-10dB) / 80 (0dB)-sets a
maximum allowable volume
Power On
Volume
(if Volume Level is
Variable)
Initial power on volume
settings: Last (default) / Mute / 1
to 98 (-79dB to 18dB).
Mute Level
Full (default) / 40dB / -20dB
Zone Rename
allows you to set custom names of
up to 10 characters for each zone. Choosing the Set
Defaults button will return to factory default names.
Quick Select Names
allows you to set custom
names for the four Quick Select buttons. This
name will appear on the display. Choosing the Set
Defaults button will return to factory default names.
Trigger Out 1 and Trigger Out 2
menus allow
you to set conditions for activating each Trigger
Out. Inputs, Zones and monitors can be set to On to
activate the respective Trigger Out. If the selection
is set to
– – –
, the Trigger Out will not be activated
when that Zone, Input or HDMI monitor is chosen.
Auto Standby
sets when each zone enters standby
mode.
The MAIN ZONE can be set to go into standby
mode after 15, 30, or 60 minutes of no audio or
video signals. Setting Auto Standby to Off (which
is the default) will prevent the MAIN ZONE from
turning off.
ZONE2 and ZONE3 can be set to shut off after 2, 4
or 8 hours of no operation being performed. These
zones will shut off automatically even if there is
audio or video playing if no user input has been
detected for the set time period.
Front Display
provides options for the display
brightness and whether the front panel signal
display shows information for Input or Output.
The current mode of the signal display is shown by
either the IN or OUT Channel Indicators being lit.
Dimmer options are (in order of decreasing
brightness):
• Bright (Default)
• Dim
• Dark
•
Off (Display will turn off)
The Channel Indicator has two options:
• Input
• Output (default)
Information
shows the status of the following:
• Audio- indicates current Sound Mode, Input
Signal Type, Sample Rate, Channel Format,
Offset (the dialogue normalization correction
value)
• Video- shows HDMI Signal information
(Resolution, Color Space and Pixel Depth);
HDMI Monitor 1 (Interface and available
resolutions); HDMI Monitor 2 (Interface and
available resolutions)
• ZONE- has the option to display information
for the MAIN ZONE (Select Source, Name,
Sound Mode, Input Mode and Decode
Mode, Type and Number of Connections
-HDMI, Digital, Analog, Component Video
and Composite Video, Video Mode, Content
Type, Video Conversation, i/p Scaler) and for
ZONE2/3 (Power, Select Source and Volume
Level)
Setup Lock
can be set to On to protect the MX123
from inadvertent changes. When Setup Lock is
enabled, no other Setup options are displayed except
for Setup Lock. To access other Setup items, set
Setup Lock to Off (default).
Save & Load
Setup Menu>General>Save & Load
The Save & Load menu allows you to back up and
restore configurations for the MX123. If you spent
some time customizing your settings, it makes sense
to create a backup. You will need a compatible
USB memory device formatted to FAT32 with at
least 128 MB of free space. Insert the USB memory
device into the USB port labeled USB on the rear
of the unit (see “USB” on page 9). Choose Save
Configuration. Do not shut the power off until the
operation is complete. A file named config.avi will
be created. Do not change the name or it will not be
recognized for restoring the configuration.
To restore the saved configuration, insert the USB
memory device with the config.avi file and choose
Load Configuration. Do not shut the power off
during this process. When it is complete, “Loaded”
will appear on the display and the MX123 will
automatically restart.


