10
has not yet engaged and the rotors do not yet
rotate (the clutch engages at 1500 rpm). In order
to prevent slippage which might lead to rapid wear
of the clutch, firmly push the accelerator to reach
a value of 2500 rpm.
For more specific information on starting,
consult the engine instruction manual.
5.3.
Driving the Float Machine
Use the machine at reduced speed until
you have fully mastered controlling the
movements.
To drive the machine in the desired direction,
there are two control joysticks (Fig. 1 No. 10 &
11). Move the joysticks slowly and smoothly. To
stop the float machine movement, return the
joysticks to the rest position. The joystick control
positions and the relevant movements are
described on page 3 of this manual.
5.4.
Use
For
reasons
of
stability
it
is
recommended to use the machine on a
flat, stable and horizontal surface. Do
not use the machine on slopes of more
than a 4-5% gradient.
During
the
working
phases,
be
particularly careful not to lose control of
the float machine (for example, due to
too much water on the surface to be
worked).
Check that there are no obstacles or
obstructions on the working surface or
projecting parts which may hinder
rotation of the blades.
Preparing the Surface:
Use a mechanical vibrating float or manual float to
level the floor surface in order to obtain a well-
compacted concrete footing and thus prepare the
ideal surface for floating and finishing. The float
machine does not improve planarity of a badly
floated or levelled floor.
Floating Phase:
IMPORTANT:
Before starting the
floating operation, check that the floats
have been mounted correctly on the
blades (Par. 7.5).
The floor is ready for the first pass when the
imprint of the shoe heel sinks into the concrete by
about 2-3 mm when walking on it.
The floating pass intervals depend on the ambient
factor, temperature and atmospheric conditions
(cold or hot season). On average about 250-300
m
2
of surface are floated in 10 minutes.
When the concrete is still fresh, take care not to
work continuously on the same spot since,
considering the weight of the float machine, you
might cause damage to the planarity of the floor
surface.
During the floating phase the floats must not
bounce on the surface. If this occurs it might be
caused by dirt between the blades and the floats.
If necessary, clean them after you have finished
work by following the instructions given in the
paragraph on cleaning.
Finishing Phase
When floating has been completed, detach the
floats from the blades and clean the cement that
has collected during the floating phase off the
blades, the spider and the protection rim. Turn the
blade-lifting knob clockwise (Fig. 4 No.1 & 2) until
the blades are inclined by about 1 cm for the first
pass. For the subsequent smoothing operations,
continue increasing the blade inclination until
obtaining the desired finish.
Once again, the time between one pass and the
next is determined by the atmospheric conditions
(hot or cold season) and by the amount of water in
the concrete. If the concrete has hardened too
quickly in some areas, it can be moistened by
spraying a small amount of water using the button
(Fig. 1 No. 11) located on the control bars in order
to obtain the degree of finish desired.
IMPORTANT:
Turn off the engine after
each operation. Never leave the float
machine standing with the engine
running, especially during the floating
phase when the concrete is still fresh.
5.5.
Stopping
For
more
specific
information
on
stopping consult the engine instruction
manual.
To stop the float machine, move the accelerator
(Fig. 1 No. 5) to idle and release the two joysticks
(10 & 11). Close the fuel cock and remove the
start key from the control panel.
Содержание 1830041
Страница 3: ...3...
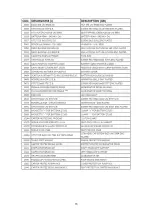
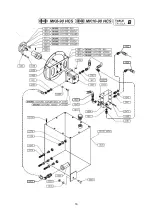
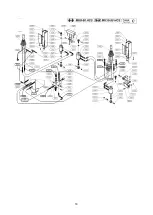
Страница 14: ...14 7 11 Parts List...
Страница 15: ...15...
Страница 16: ...16...
Страница 17: ...17...
Страница 18: ...18...
Страница 19: ...19...
Страница 20: ...20...
Страница 21: ...21...
Страница 22: ...22...
Страница 23: ...23...
Страница 24: ...24...
Страница 25: ...25...
Страница 26: ...26...
Страница 27: ...27...
Страница 28: ...28...
Страница 29: ...29...
Страница 30: ...30...
Страница 31: ...31...
Страница 32: ...32...
Страница 33: ...33...
Страница 34: ...34...
Страница 35: ...35...
Страница 36: ...36...
Страница 37: ...37...
Страница 38: ...38...
Страница 39: ...39...
Страница 40: ...40...
Страница 41: ...41...
Страница 42: ...42...
Страница 43: ...43...
Страница 44: ...44...
Страница 45: ...45...
Страница 46: ...46...
Страница 47: ...47...
Страница 48: ...48...
Страница 49: ...49...
Страница 50: ...50...
Страница 51: ...51...
Страница 52: ...52...
Страница 55: ...55 NOTES...


