background image

MBIT Technologies   


www.mbit.com.au

8

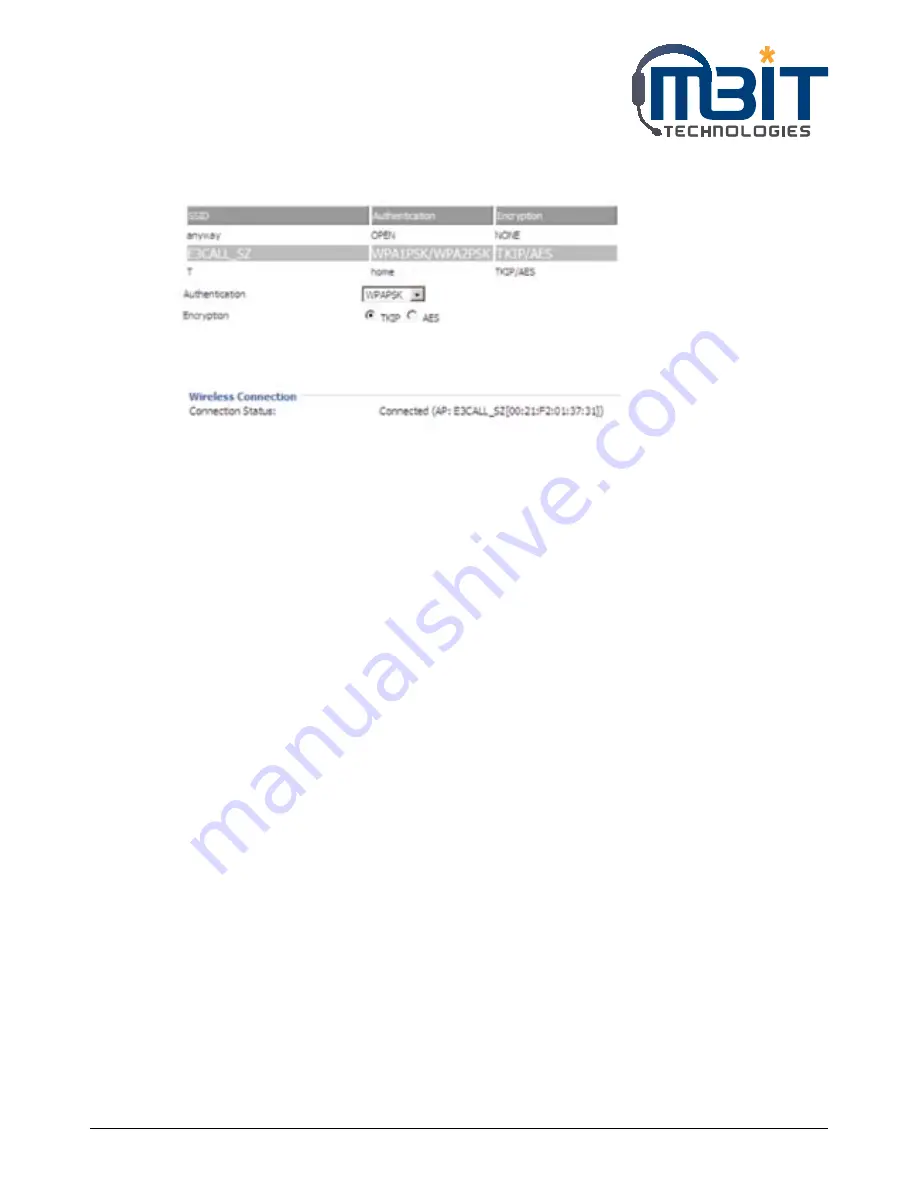
Step 4: If the Wi-Fi need authentication, choose the authentication and fill in the password, then choose 

the OK button to connection

Step 5: If the AP have connected, then connection status will change like following picture and the icon 

of wireless will display linked.

Содержание bb100

Страница 1: ...MBIT Technologies www mbit com au 1 Wireless Big Button IP Phone bb100 The Intelligent Communication Device for Next Generation Network User Manual ...

Страница 2: ...5 1 Using the Handset Speakerphone Headset 14 5 1 1 Using the Handset 14 5 1 2 Using the Speakerphone 14 5 2 Making Telephone Call 14 5 2 1 Place a Call 14 5 2 2 Using Redial Button 14 5 2 3 Dialing from Phonebook 14 5 2 4 Dialing from Call History 15 5 2 5 Using Speed Dial 15 5 2 6 Using Dial Plan 15 5 2 7 Using Delayed Hotline 15 5 2 8 Answering a Telephone Call 15 5 3 Adjusting Call Volume 16 5...

Страница 3: ... 27 7 4 Status 28 7 4 1 Basic 28 7 4 2 LAN Host 29 7 4 3 Syslog 29 7 5 Network 29 7 5 1 WAN 29 7 5 1 1 Internet Port WAN 30 7 5 2 LAN 31 7 5 3 MAC Clone 32 7 5 4 VPN 33 7 5 5 DMZ 33 7 5 6 Wireless 34 7 5 6 1 Wireless Settings 34 7 5 6 2 Wireless Connection 35 7 5 7 DDNS Setting 35 7 5 8 Routing 36 7 6 SIP Account 36 7 6 1 Line 1 36 7 6 1 1 Basic 36 7 6 1 2 Audio Configuration 37 7 6 1 3 Supplement...

Страница 4: ...8 1 1 Time Date 50 7 8 1 2 Password Reset 51 7 8 1 3 Web Access 52 7 8 1 4 System Log Setting 52 7 8 1 5 Factory Defaults 53 7 8 2 Firmware Upgrade 53 7 8 3 Provision 54 7 8 4 SNMP 55 7 8 5 TR069 56 7 8 6 Diagnoisis 56 7 8 7 Operation Mode 57 8 TROUBLE SHOOTING 58 8 1 No Operation after Power On 58 8 2 Long Time Stop at Initialising Network 58 8 3 No Dial Tone 58 8 4 Can not Make a Call 58 8 5 Can...

Страница 5: ...to place and receive calls and enjoy other features that traditional phone has but also it own many data services which you could not expect from traditional telephone This guide will help you easily use the various features and services available on your phone The bb100 which has a 3dB internal antenna for 802 11n 1T1R supports wireless 1 2 Package Contents Your package includes the following One...

Страница 6: ...mes that the correct connections have been made 1 Check whether the Internet port is well connected 2 Plug the AC power adapter into the electrical outlet Note Use only the adapter that came with the phone 3 The LCD will firstly display Welcome and all of the lights on the phone will flash 4 Next the LCD display Initialising Network 5 After the sequence the phone will display date time lines statu...

Страница 7: ...twork using the UP and DOWN button and press the softkey button under link to connect Note If the Wi Fi need authentication choose the authentication and fill in the password Step 4 Press the softkey button under ok to confirm connecting Step 5 If the AP has connected the wireless icon in LCD will display linked From webpage Step 1 Login the web and then open Network Wireless webpage Step 2 Highli...

Страница 8: ...Wi Fi need authentication choose the authentication and fill in the password then choose the OK button to connection Step 5 If the AP have connected then connection status will change like following picture and the icon of wireless will display linked ...

Страница 9: ...responding line and then user can make call or do other functions The LEDs under the keys used to display the status of each extension please refer to 3 3 LCD indicator No Part Name Description of Function 4 Soft keys These keys are used as soft keys These can be used for item selection or control on the LCD screen The softkey function depends on their corresponding content displayed on the LCD at...

Страница 10: ...iliar with LCD Name Description of Function Date To display the current date Date format is mm dd Time To display the current time Time format is mm ss A or P Phone Numbers To display the phone number of lines Lines To display the status of lines The icon means unregistered The icon mean registered Softkey Function To display the current softkey function Softkey Buttons You can use the softkey but...

Страница 11: ... latest 100 records of received message and sent message 4 3 SentBox 5 BlackList 5 1 NewEntry To configuration the blacklist max record is 100 6 Preferences 6 1 Call Waiting To enable or disable call waiting 6 2 Auto Answer To enable or disable auto answer 7 Ring Tone 7 1 Bell Type 1 Choose the ring tone from Bell Type1 Bell Type15 7 2 Bell Type 2 7 3 Bell Type 3 7 4 Bell Type 4 7 5 Bell Type 5 7 ...

Страница 12: ...n type or to change the Internet port connection type from Static DHCP and PPPoE 13 2 Current IP To view the current Internet port IP address or to change the Internet port IP address 13 3 Current Netmask To view the Current Netmask or to change the Current Netmask 13 4 Current Gateway To view the Current Gateway or to change the Current Gateway 13 5 DNS1 To view the DNS1 or to change the DNS1 13 ...

Страница 13: ... Default is null 20 LCD Contrast To view and change the contrast of LCD 21Login Logout Press it to logout LCD bb100 will memory the password if user has input the password when access to 9Accounts and bb100 will not request the password if user access to it again Press 20 Login Logout to erase memory and then user should input password when user access to 9Accounts again 4 2 How to configuration f...

Страница 14: ...ker button and dial phone number followed by the or wait 5 seconds bb100 will dial out the phone number 5 2 2 Using Redial Button To redial the last number called Lift the handset or press speakerphone or press headset and then press the redial button the number will be automatically dialed 5 2 3 Dialing from Phonebook Adding a phonebook Below are the steps to add a phonebook in menu User can also...

Страница 15: ...g one dial plan Step 1 Open Phone Dial Plan webpage Step 2 Add one dial plan user can refer to 7 7 3 Dial Plan Using dial plan to make call Dial the phone number according to one dial plan 5 2 7 Using Delayed Hotline Add the delayed hotline from SIP Account Account1 2 webpage User column below is one example Step 1 Open SIP Account Account1 2 webpage User column Step 2 Fill in the delayed hotline ...

Страница 16: ...e Exp Key 1 and Exp Key 2 and configuration as follows Step 2 Press Save Settings to save changes and user can see the corresponding LED is solid green Step 3 Press the Exp Key1 button to turn up volume press the Exp Key 2 button to turn down volume 5 4 Black List If user added a black list bb100 will forbid the phone number incoming Adding a black list There are two ways to add black list one is ...

Страница 17: ... transferring the call and speak to them before transferring the call Step 1 To initiate a transfer press the button during an active call This places the first call on hold and you will hear a dial tone Step 2 Dial the second person s telephone number Step 3 When the second person answers you can have a private conversation with the second person without the first person hearing it Step 4 To conn...

Страница 18: ...ng call waiting you should enable it firstly and default is enabling During an active call Step 1 If call waiting is enabled call waiting alerts you with ringing if there is another call is incoming and the associate line button will change to red blinking press the line key of the second call to answer the second call with the first call holding pressing the line button of the first call to back ...

Страница 19: ...p 1 Press button and then choose 4 Text Message by using the up button or the down button Step 2 Press the select softkey button to enter to 1 SEND item Step 3 Press the select softkey button to edit message Note When inputting text use the en softkey button to change the input method among numbers capital and lowercase English letters en stands lower case EN stands capital letter and num stands d...

Страница 20: ...eceived Box are messages have received from others including new messages and old messages The ones in Sent Box are messages have sent out Step 3 Press the select softkey button to access to the next item Choose the message you want to read by using the up button or the down button 5 14 DND Do Not Disturb Use the Do Not Disturb feature to prevent incoming calls from ringing your phone To enable Do...

Страница 21: ...r system administrator may configure your phone so that you can monitor other user s phones from your phone User can create BLF from Menu Multi functional key or from your PC in Phone Multi Functional Key webpage If this feature is configured some multi functional key buttons on your phone are assigned to display the status of another user s phone For example if your one multi functional key is co...

Страница 22: ... key 1 button to pickup the call 6 3 Shortcut Key The steps below described how to configuration the shortcut key from Webpage user can also configuration from MENU Creating Shortcut Key Step 1 Access to web and then open Phone Multi Functional Key webpage Step 2 Then configures the Exp keys to shortcut key and set as you need The following picture is a setting example Step 3 Press Save Settings b...

Страница 23: ... some telephone systems that allows a person to put a call on hold at one telephone set and continue the conversation from any other telephone set During an active call pressing one preprogrammed multi functional key button to transfer the current telephone conversation to an unused extension number and immediately puts the conversation on hold The telephone system will then display the extension ...

Страница 24: ...e Mail service must be available on your network to use this feature 6 6 1 Enable and configuration MSG There are two ways to enable MSG one is from menu and the other is from your PC to use bb100 s webpage From Menu Step 1 Press Menu button to enter menu items and then choose 12 Voice Mail Step 2 Highlight the line you want to configuration and then select it Step 3 And then use the softkey butto...

Страница 25: ...ton to choose the highlighted ringtone 6 9 Setting Your Phone s Date and Time The date and time for your phone normally come from the phone server However if you need to change some date and time parameters you can follow these steps Step 1 Press the button select Time Date Step 2 Choose date to adjust date enter the date in the following format mm dd yy Step 3 Choose time to adjust time enter the...

Страница 26: ...ite Step 1 Access to website open Administration Management webpage Step 2 Press the factory default button at the bottom of the webpage Step 3 Waiting about 5 seconds the red notice Please REBOOT to make the changes effective will appear and then press Reboot button to reboot bb100 Note If you choose factory default you will return the phone to the original factory settings and will erase all cur...

Страница 27: ...in or user for the User Name click on the Login button to access the configuration page There are two levels of web configuration one user ID level that can view just some portion in the web and the other admin ID level that can view and configure all settings in the web based configuration interface To use admin ID for login please contact your administrator supplier or service provider 7 3 Webpa...

Страница 28: ... REBOOT to make the changes effective will appear to notice user to reboot To cancel the changes Press it to reboot bb100 7 4 Status 7 4 1 Basic This webpage displays the basic status of your bb100 including the information about product information SIP account status network status VPN status PC port status and system status Click Refresh button to refresh the status ...

Страница 29: ...N port 7 4 3 Syslog This page displays the log of system User can press Clear button to clear all information Click Refresh button to refresh syslog Click Save button to save syslog 7 5 Network 7 5 1 WAN User can configuration the parameters of Internet Port PC port and Network Address Server Settings DHCP The details are as follows ...

Страница 30: ...t Default Gateway The default gateway of Internet port Primary DNS The primary DNS of Internet port Second DNS The second DNS of Internet port DHCP In DHCP mode IP phone is a DHCP client IP phone will get the IP Address Subnet Mask and Default Gateway from the DHCP server Field Name Description Internet Connection Type Choose Automatic Configuration DHCP DNS type Choose DNS type from Manual and Au...

Страница 31: ...one will get the Primary DNS and Second DNS from DHCP Server automatically Primary DNS The primary DNS of Internet port Second DNS The primary DNS of Internet port 7 5 2 LAN Field Name Description Local IP Address Enter the IP address of the router on the local area network all the IP addresses of the computers which are in the router s LAN must be in the same network segment with this address and...

Страница 32: ...e Time This option defines how long the address will be assigned to the computer within the network In that period the server does not assign the IP address to the other computer DNS Proxy Enable or disable If enabled the device will forward the DNS request of LAN side network to the WAN side network 7 5 3 MAC Clone Description MAC is the hardware address of network equipment Sometimes network pro...

Страница 33: ...Z bb100 provides a facility DMZ Host that maps ALL unsolicited data on any protocol to a single host in the LAN Regular web surfing and other such Internet activities from other clients will continue to work without inappropriate interruption DMZ Host allows a defined internal user to be totally exposed to the Internet which usually helps some special applications such as Netmeeting or Internet Ga...

Страница 34: ...e Description Internet Connection Type Choose Static IP IP Address The IP address of Internet port Subnet Mask The subnet mask of Internet port Default Gateway The default gateway of Internet port Primary DNS The primary DNS of Internet port Second DNS The second DNS of Internet port Field Name Description Internet Connection Type Choose Automatic Configuration DHCP DNS type Choose DNS type from M...

Страница 35: ...ay the authentication type of the AP Encryption Display the encryption type of the AP Status Display the status of the AP The icon stands for the IP542N have connected to the AP The icon stands for the signal strength of the AP Field Name Description Dynamic DNS Provider DDNS is enabled and select a DDNS service provider Account Enter the DDNS service account Password Enter the DDNS service accoun...

Страница 36: ...st Net Both Host and Net selection Gateway Gateway IP address Interface LAN WAN Custom three options and add the corresponding address Comment Comment Field Name Description Line Enable If or not enable Line 1 Peer to Peer If or not enable PEER to PEER If enable SIP 1 will not send register request to SIP server In System Status SIP 1 Status is Registered SIP 1 can make call out but others can not...

Страница 37: ...se the audio codec type from G 711U G 711A G 722 G 729 G 723 Audio Codec Type 2 Choose the audio codec type from G 711U G 711A G 722 G 729 G 723 Audio Codec Type 3 Choose the audio codec type from G 711U G 711A G 722 G 729 G 723 Audio Codec Type 4 Choose the audio codec type from G 711U G 711A G 722 G 729 G 723 Audio Codec Type 5 Choose the audio codec type from G 711U G 711A G 722 G 729 G 723 G 7...

Страница 38: ...domain name in the SIP URI Carry Port Information If or not carry Port information in the SIP URI Signal Port The local port of SIP protocol default is 5060 DTMF Type Choose the DTMF type from IN_band RFC2833 and SIP INFO RFC2833 Payload 96 User can use the default setting Register Refresh Interval The interval between two normal Register messages You can use the default setting RTP Port Set the p...

Страница 39: ... PING to Server periodically instead of sending hello packet The send interval is Keep alive interval Keep alive interval 10 60s The interval that IP Phone will send an empty packet to Proxy Field Name Description NAT Traversal If or not enable NAT bb100 supports STUN traversal choose STUN in the NAT Traversal Mode if you want traverse NAT Firewall STUN Server IP STUN server IP address default is ...

Страница 40: ...nput gain from 0 7 Handset Volume Gain Adjust the output gain from 0 7 Speakerphone Input Gain Adjust the speakerphone input gain from 0 7 Speaker Volume Adjust the speaker volume form 0 7 Ringer Volume Adjust the ringer volume form 0 7 Field Name Description Tone Type Choose tone type form China US Hong Kong and KR Min Jitter Delay ms The Min value of bb100 s jitter delay bb100 s jitter is an ada...

Страница 41: ...er immediately when there is an incoming call Cfwd Busy Dest The phone number which will be forwarded to when line is busy Cfwd No Ans Dest The phone number which will be forwarded to when there s no answer at your phone Cfwd No Ans Delay The seconds to delay forwarding calls if there is no answer at your phone Field Name Description Auto Answer If or not enable auto answer If enable bb100 will au...

Страница 42: ...kup code in Pickup Code if user wants to pickup the call when there is a new call coming in monitored phone Step 6 Press the Save button to save changes Step 7 Press the Reboot button to make changes effective Adding shortcut key Step 1 Choose one Exp Key to configuration Step 2 Select the shortcut key from the drop down list Step 3 Select the mode from the phonebook call history text message volu...

Страница 43: ...on Step 5 Press the Save button to save changes and you can see the status of corresponding LED is solid green Step 6 Press the Reboot button to make changes effective 7 7 3 Dial Plan 7 7 3 1 Parameters and Settings Field Name Description Dial Plan If or not enable dial rule Line Choose the call mode from line1 line2 Digit Map Fill in the sequence used to match input number The syntactic please re...

Страница 44: ...ss Save Settings button to save changes Editing one dial plan Step 1 Enable Dial plan Step 2 Choose one dial plan Step 3 Click Edit button and the configuration table like Picture 2 will appear Step 4 Change the value of parameters Step 5 Press OK button to end configuration Step 6 Press Save Settings button to save changes Deleting one dial plan Step 1 Enable Dial plan Step 2 Choose one dial plan...

Страница 45: ...tch to For example 01 can match 0 01 011 0111 01111 5 dialed substituted Replace dialed with substituted For example 8 1650 123456 input is 85551212 output is 16505551212 6 x y Make outside dial tone after dialing x stop until dialing character y For example 9 1xxxxxxxxxx bb100 make outside dial tone after inputting 9 stop tone until inputting 1 9 8 010x make outside dial tone after inputting 9 st...

Страница 46: ... Using line 1 if user dials 422xxxx or 522xxxx bb100 will call 22xxxx333 immediately 4 Example 4 Using line 2 if user dials 2622 or 26222 or 262222 or 2622222 or 2622222 bb100 will call 5622 or 56222 or 562222 or 5622222 or 56222222 immediately And bb100 will make outside dial tone after inputting 2 or 3 stop tone until inputting 6 5 Example 5 Using line 1 if user dials 777x8 bb100 will reject the...

Страница 47: ...Step 1 Choose one phone book Step 2 Click Edit button and the configuration table like Picture 3 will appear Step 3 Change the value of parameters Step 4 Press OK button to end configuration Step 5 Press Save Settings button to save changes Deleting one phone book Step 1 Choose one phone book Step 2 Click Delete button to delete the phone book Move one phone book to Black list Step 1 Choose one ph...

Страница 48: ...2 Click Edit button and the configuration table like Picture 2 will appear Step 3 Change the value of parameters Step 4 Press OK button to end configuration Step 5 Press Save Settings button to save changes Deleting one Black List Step 1 Choose one black list Step 2 Click Delete button to delete the black list Moving one Black List to phonebook Step 1 Choose one black list Step 2 Click Move to Pho...

Страница 49: ...Technologies www mbit com au 49 7 7 5 Call Log To view the call log information such as redial list incoming call answered call and missed call 7 7 5 1 Redial List 7 7 5 2 Answered Calls 7 7 5 3 Missed Call ...

Страница 50: ... Zone Choose the time zone Manual Time Adjust time by manual Alarm Enable If or not enable alarm Alarm Time Set alarm time Daylight Saving Time If or not enable daylight saving time Offset Offset time 60 means advancing 60miniter 60 means delaying 60minite Start Month Choose starting month Start Day of Week Choose starting day Start Day of Week Last in Month Choose starting week Start Hour of Day ...

Страница 51: ...ng Month Week Day Hour in Stop Month Stop Day of Week Last in Month Stop Day of Week Stop Hour of Day Step 4 Press Saving Settings button to save and press Reboot button to active changes 7 8 1 2 Password Reset Change the password of admin mode Steps Step 1 Choose the admin from the drop down list Step 2 Input original password default setting is null Step 3 Input a new password twice time in New ...

Страница 52: ...not enable user login WEB via Internet port If enable user can access Web to administration Web Login Port Set the port which used to login WEB via Internet port and PC port Default is 8080 that is why URL should have 8080 Web Idle Timeout Set the web idle timeout time The web page can be logged out after Web Idle Timeout without any operation Field Name Description SysLog Server Set the SysLog Se...

Страница 53: ...and press Reboot button to active changes Step 4 User can view syslog in syslog server and you can also view the syslog in Status Syslog webpage 7 8 1 5 Factory Defaults 7 8 2 Firmware Upgrade Description Press Factory Default button to set bb100 default Description Steps Step 1 Choose a upgrade file type from Upgrade Software Upgrade Ring Voice Upgrade Dial Plan and Upgrade Config File Step 2 Pre...

Страница 54: ...n Provision Enable If or not enable provision Resync on Reset If or not enable resync after restart Resync Random Delay sec Set the maximum delay for request the synchronization file default is 40 Resync Periodic sec If the last resync was failure bb100 will retry resync after the Resync Error Retry Delay time default is 3600s Resync Error Retry Delay rec Set the periodic time for resync default i...

Страница 55: ...rade Enable If or not enable firmware upgrade via provision Upgrade Error Retry Delay sec If the last upgrade fails bb100 will try upgrading again after Upgrade Error Retry Delay period default is 3600s Upgrade Rule URL of upgrade file Field Name Description SNMP Service If or not enable SNMP Trap Server Address Enter the trap server address Read Community Name String as an express password betwee...

Страница 56: ...ord The bb100 s password for connecting to TR069 server Periodic Inform Enable If or not enable periodic information Periodic Inform Interval The interval to send information to TR069 server User Name The TR069 server s user name for connecting to bb100 Password The TR069 server s password for connecting to bb100 SSL Key Fill in SSL key 1 Ping Test Enter the destination IP or host name and then cl...

Страница 57: ...MBIT Technologies www mbit com au 57 7 8 7 Operation Mode Choose the Operation Mode as Basic Mode or Advance Mode ...

Страница 58: ...eck if the DHCP server is working normally Check if the connection between the DHCP Server and bb100 is properly connected 8 3 No Dial Tone Solution Check if the handset cord is properly connected 8 4 Can not Make a Call Solution Check the status of your SIP registration status or contact your administrator supplier or ITSP for more information or assistance 8 5 Can not Receive Any Phone Call Solu...

Страница 59: ...r contact your administrator supplier or ITSP for more information or assistance 8 8 Forget the Password Default password of website and menu is null If user changed the password and then forgot you can not access to the configuration website or the menu items which need password Solution Factory default press button and choose 16Factory Default then a notice will appear choose OK by using the cor...

Отзывы: