background image

Maintenance

13

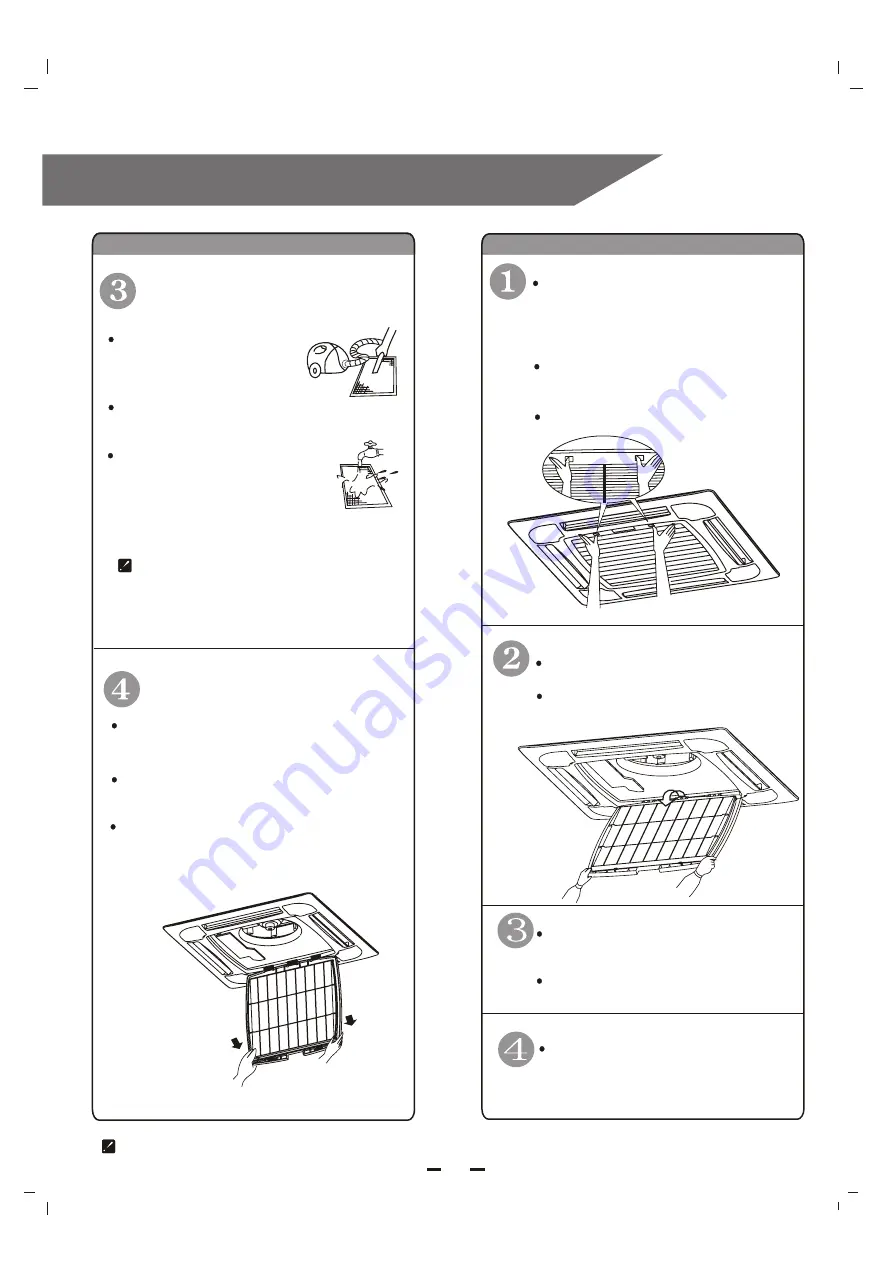
Air inlet grill cleaning

Air filter cleaning

Cut off power supply,  then 
approach the indoor unit
with a ladder or other safe 

Open the air inlet grill.

Grasp both sides of it and
remove it as shown below.

Reverse step 2 to reinstall
the air inlet grill..

Put the air filter back to the 
air inlet grill.

Lock  the four corners of 
the air filter.

Reinstall the air inlet grill
to the indoor unit.

Remove the dusts from 
the air filter with a 
vacuum cleaner.

Clean it with water and
 neutral detergent.

Dry it throughly in a cool 
and shaded place.

Wash it with water and neutral 
detergent.

Dry it  throughly in a cool
and shaded place .

way.

Press the button on the air inlet
grill with both hands.

Remove the air inlet grill.

Make sure to be safe enough before climbing up to clean the unit.

Do not put it beside high heat or fire, it
may cause aging, deformation or even
burning of the plastic parts.

Cleaning

Содержание CLK120H4C

Страница 1: ...EEL mode Timer operation mode Electric heating mode Sleep operation mode Safety Precautions Maintenance Protection Troubleshooting Installation instructions Select the installation locations Indoor un...

Страница 2: ...roken An electric shock or fire is probably caused by a broken power supply cord Never insert a stick or similar to the unit Since the fan rotates at high speed this may cause an injury Do not repair...

Страница 3: ...del Consequently the shape may differ from that of the air conditioner you have selected Air vanes Air outlet Electrical cover Note The condensate water drains at COOLING or Dry operation Drain hose P...

Страница 4: ...the electrical heater is in use and lights off when heater is off Receives signal from the remote controller Timer indicator Yellow Drain indicator Orange Electrical heater indicator Red Signal receiv...

Страница 5: ...igh fan speed medium fan speed low fan speed For adjusting room temperature Remote controller signal transmitter ON OFF button TIMER button HEATER button TIMER SET button MODE button FAN Speed button...

Страница 6: ...ones of the same tape To prevent liquid leakage take out all batteries when it is not going to be used for a long time After replacing batteries if the remote controller does not display take them ou...

Страница 7: ...ing temperature Press once to lower temperature by 1 Press once to raise temperature by 1 Range of available set temperature HEATING or COOLING DRY FAN unable to set room temperature Turning on Press...

Страница 8: ...covered with dust just wipe it off with a soft cloth It is better not to allow the air vanes tilt downward for a long time at COOLING or DRY operation mode to prevent dew from forming and dripping dow...

Страница 9: ...arts to function When temperature reaches a certain point the electric heater will stop automatically and restart once temperature decreases to a certain point Press the HEATER button in electric heat...

Страница 10: ...hours As time goes by LCD displays the remained time The previous set time is stored and the next set time begins with the previous set one On timer and off timer can not be set at the same time The...

Страница 11: ...for sleep The unit turns off automatically after 8 hours if SLEEP mode is set It is recommended to use SLEEP mode together with OFF TIMER to achieve a more economical and energy saving operation After...

Страница 12: ...ill Open the air inlet grill Grasp the bottom corners of the air filter and pull downward Remove the air filter Never use volatile substance such as gasoline or polishing powder to clean the unit shoc...

Страница 13: ...r Reinstall the air inlet grill to the indoor unit Remove the dusts from the air filter with a vacuum cleaner Clean it with water and neutral detergent Dry it throughly in a cool and shaded place Wash...

Страница 14: ...ing items Overheat of the power supply cord and plug or even a burned smell Abnormal operating sound or vibration Water leakage from indoor unit Metal cabinet electrified Stop the air conditioner if a...

Страница 15: ...check it before asking for service If strong interference from excessive static electricity discharge power supply voltage abnormality presents operation will be abnormal At this time disconnect from...

Страница 16: ...ng board 2m 3 5m above the ground Avoid installing it at the roadside where there is a risk of muddy water Where your neighbors would not be annoyed by operating noise and hot airflow discharged A fix...

Страница 17: ...ckets Cut an opening 880x880 on the ceiling board with assistance of the moulding board make sure to follow the same direction of the holes for roof bolts Fix the edges of the opening with the shaped...

Страница 18: ...suspending poles allow the bottom of the unit 8 13mm higher than that of the ceiling board as the above figure shown Then adjust each corner of the bottom horizontally with a leveling ruler Levelness...

Страница 19: ...pump here Wall hole Piping and cable connection Drill a wall hole if the pipes and cables through the wall The hole should tilt a little downward as shown below for easy drainage For cleanness of the...

Страница 20: ...edure should be done after leak test Wrap the all the joints well otherwise dew may form and drips The gas pipe and liquid pipe should be taped and wrapped separately Adjust the position of pipes and...

Страница 21: ...s from 2 and 3 way valves 4 Start vacuum pump for 10 15 minutes until reaching a vacuum of 10 mm Hg absolutes 6 Open 2 way valve 1 4 turn then close it after 10 seconds Check tightness of all joints u...

Страница 22: ...ner dia 25mm outer dia 32mm of the drain hose to the drain port of the main unit then clamp it well Measure the distance from the drain pipe to the outside of wall then cut a PVC tube of according to...

Страница 23: ...oor and outdoor units are too long use a cable of larger section area to avoid voltage decrease 2 2 The ground wire for the whole unit is 2 5mm which should be prepared by the user Keep the cables awa...

Страница 24: ...iring optionally Make sure to fix the wires well Incomplete connection or fixing of wire could result in a fire Power supply cord Electric heater power cord Defrost cable Terminal Control board Contro...

Страница 25: ...O r a n g e O r a n g e V i o l e t V i o l e t V i o l e t V i o l e t Yellow Green Blue Blue Brown R e d R e d R e d W hi te B l a c k 25 SINGLE PHASE MODEL SINGLE PHASE MODEL 3 PHASE MODEL 3 PHASE...

Страница 26: ...a ck Bla ck O r a n g e Y e l l o w O r a n g e Yellow V i o l e t V i o l e t Yellow Green Blue R e d R e d W h it e B la c k W hi te B l a c k 26 Installation instructions Electrical work For 41K Ou...

Страница 27: ...through a funnel Normally the floater switch can be seen floating up from the checking opening and the water pump starts to drain which can be seen through the transparent drain port If not check the...

Страница 28: ...he 4 corners until it adhere to the ceiling board tightly Restrict the sponge between the front panel and indoor unit to 5 8mm allowing each side of the unit fits well with the front panel to avoid ai...

Страница 29: ...t Do not let air enter the refrigeration system or discharge refrigerant when moving the air conditioner Testing run the air conditioner after finishing installation and record details of operation Ra...

Отзывы: