background image

PORTUGUÊS

ESP

AÑOL

ENGLISH

- 11 -

AJUSTE DE LAS CUCHILLAS


ADVERTENCIA

NO TOQUE LOS BORDES AFILADOS DE LAS CUCHILLAS. LAS CUCHILLAS 

ESTÁN EXTREMADAMENTE AFILADAS Y SON PELIGROSAS EN TODO 

MOMENTO. UTILICE SIEMPRE GUANTES PARA EVITAR LESIONES EN LAS 

MANOS Y LOS DEDOS.

Antes de manejar el cortasetos es necesario comprobar el ajuste de las cuchillas. Las 

cuchillas demasiado flojas pueden vibrar y no practicarán un corte limpio y sin 

problemas.


PRECAUCIÓN

LAS CUCHILLAS DEMASIADO APRETADAS PUEDEN OCASIONAR UNA 

SOBRECARGA QUE PUEDE A SU VEZ DAÑAR EL EQUIPO.

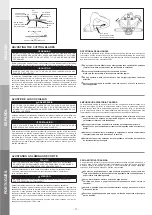
Para ajustar las cuchillas, consulte la ilustración y busque los tornillos. Afloje las tuercas. 

Gire lentamente los tornillos hasta apretarlos, a continuación aflójelos de un cuarto a la 

mitad. Apriete las tuercas mientras mantiene los tornillos en su sitio. Cubra las cuchillas 

con aceite ligero. Arranque el motor y haga funcionar el cortasetos a máxima velocidad 

durante al menos un minuto. Detenga el motor, y cuando las cuchillas se detengan, 

tóquelas con la mano. Deberían estar calientes, pero si lo están en exceso, gire 1/2 los 

tornillos aflojándolos.

EMPUÑADURA GIRATORIA TRASERA

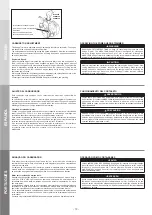
La empuñadura trasera se puede ajustar en cinco posiciones diferentes tirando de la 

palanca de bloqueo y girando la empuñadura trasera. Tire de la palanca de bloqueo 

directamente en línea con la empuñadura (siguiendo la flecha de la fig.), a continuación 

gire la empuñadura trasera. Es extremadamente importante que la empuñadura esté 

completamente colocada y correctamente bloqueada en la posición seleccionada.

No ajuste la empuñadura trasera en ninguna posición diferente a las cinco 

especificadas (La palanca de regulación de gases no funciona cuando la 

empuñadura trasera no está bloqueada).

Detenga el motor antes de cambiar la posición de la empuñadura trasera.

Asegúrese de que la empuñadura trasera esté bloqueada antes de arrancar el 

motor.

Durante el funcionamiento, mantenga la empuñadura trasera verticalmente 

independientemente de la dirección de la cuchilla.

Seleccione la posición adecuada de la empuñadura en función de la posición 

de funcionamiento más segura.

ADJUSTING THE CUTTING BLADES


WARNING

DO NOT TOUCH THE SHARPENED EDGES OF THE CUTTING BLADES. THE 

CUTTING BLADES ARE EXTREMELY SHARP AND DANGEROUS AT ALL TIMES. 

ALWAYS WEAR GLOVES TO HELP PROTECT YOUR HANDS AND FINGERS 

FROM INJURY.

Before operating the Hedge Trimmer it is necessary to check the adjustment of the cutting 

blades. Blades that are too loose may vibrate, and will not provide a clean, smooth cut.


CAUTION

BLADES THAT ARE TOO TIGHT CAN CAUSE OVERLOADING WHICH MAY 

DAMAGE THE EQUIPMENT

To adjust the cutting blades, refer to the illustration and locate the screws. Loosen the 

nuts. Gently turn the screws in until snug, then turn the screws back out onefourth to a 

half. While holding the screws in place, tighten the nuts. Liberally coat the cutting blades 

with light oil. Start the engine and operate the Hedge Trimmer at full speed for at least 

one minute. Stop the engine, and when the blades are motionless, touch the blades with 

your hand. The blades should be warm, but if they are too hot to touch, loosen the 

screws 1/2 turn.

ROTATIONAL REAR HANDLE

Rear handle is adjustable to five different positions by pulling the lock lever and turn the 

rear handle. Pull the lock lever directly in line with the handle (following the arrow in fig), 

then turn the rear handle. It is extremely important that the handle is completely located 

and correctly locked in the selected position.

Do not adjust the rear handle to any other position than specified five positions 

(Throttle lever does not work when the rear handle is unlocked).

Stop the engine before change the rear handle position. 

Make sure the rear handle is locked before start the engine.

During operation, hold the rear handle with upright regardless the blade 

direction.

Select the proper handle position to be always sure of a safe and secure 

operating position.

AJUSTANDO AS LÂMINAS DE CORTE


AVISO

NÃO TOQUE NOS GUMES AFIADOS DAS LÂMINAS DE CORTE. AS LÂMINAS

DE CORTE SÃO EXTREMAMENTE AFIADAS E PERIGOSAS. UTILIZE SEMPRE

LUVAS PARA EVITAR FERIMENTOS ÀS SUAS MÃOS E DEDOS.

Antes de trabalhar com a corta-sebes é necessário verificar o ajuste das lâminas

de corte. As lâminas que estiverem muito soltas podem vibrar e não farão um

corte correcto e suave.


ATENÇÃO

AS LÂMINAS MUITO APERTADAS PODEM CAUSAR ESFORÇO EXCESSIVO

QUE PODE DANIFICAR O EQUIPAMENTO.

Para ajustar as lâminas de corte, consulte a ilustração e localize os parafusos.

Desaperte as porcas. Aperte lentamente os parafusos até encostarem e


seguidamente 

desaperte-os até um quarto ou metade. Enquanto segura os parafusos no lugar, aperte 

as porcas. Passe bastante óleo leve sobre as lâminas de corte. Ponha o motor a 

funcionar e trabalhe com a corta-sebes em velocidade máxima durante um minuto, pelo 

menos. Páre o motor e quando as lâminas estiverem também paradas, toque-as com a 

mão.

Se as lâminas estiverem excessivamente quentes para serem tocadas com a mão, 

desaperte os parafusos em 1/2 de volta.

PEGA ROTATIVA TRASEIRA

A pega traseira é ajustável a cinco posições diferentes puxando a patilha de bloqueio e 

girando a pega. Puxe a patilha de bloqueio directamente em linha com a pega (seguindo 

a seta na figura) e em seguida gire a pega. É muito importante que a pega esteja bem 

colocada e correctamente travada na posição seleccionada.

Não ajuste a pega traseira para mais nenhuma posição que não seja uma das 

cinco especificadas (A alavanca da válvula reguladora não funciona quando a 

pega traseira está desbloqueada).

Páre o motor antes de alterar a posição da pega traseira. 

Certifique-se de que a pega traseira está travada antes de pôr o motor a 

funcionar.

Durante o trabalho, segure perpendicularmente na pega traseira sem olhar à 

direcção da lâmina.

Escolha a posição adequada para a pega em função da posição mais segura 

para o trabalho.

UPPER BLADE
CUCHILLA SUPERIOR
LÂMINA SUPERIOR

NUT
TUERCA
PORCA

NUT/ TUERCA/ PORCA

GUIDE BAR
BARRA GUIA
BARRA-GUIA

SCREW/ TORNILLOS/ PARAFUSO

SCREW/ TORNILLOS/ PARAFUSO

LOWER BLADE
CUCHILLA INFERIOR
LÂMINA INFERIOR

WASHER
ARANDELAS
ANILHA

LOCK LEVER
PALANCA DE BLOQUEO
PATILHA DE BLOQUEIO

Содержание HT237D

Страница 1: ...oduct Lea y entienda todo el manual antes de utilizar este producto Leia inteiramente este manual e procure compreendê lo antes de utilizar esta máquina HT237D HT238D HT238DL Owner s Operator s Manual Manual del propietario Operador Manual do proprietario Operador ...

Страница 2: ... de su nuevo cortasetos Es esencial que cualquier operador de este producto lea y entienda el contenido de este manual antes de utilizar el cortasetos El símbolo siguiente identificará las instrucciones de seguridad importantes El incumplimiento de las instrucciones de este manual puede provocar lesiones graves o la muerte Para más ayuda contacte con cualquier distribuidor local autorizado de MARU...

Страница 3: ...ES AJUSTE DE LAS CUCHILLAS AJUSTANDO AS LÂMINAS DE CORTE 11 ROTATIONAL REAR HANDLE EMPUÑADURA GIRATORIA TRASERA PEGA ROTATIVA TRASEIRA 11 STARTING AND STOPPING PROCEDURE PROCEDIMIENTO DE ARRANQUE Y DETENCIÓN DEL MOTOR PROCEDIMENTOS DE ARRANQUE E PARAGEM 12 BEFORE STARTING THE ENGINE ANTES DE ARRANCAR EL MOTOR ANTES DO ARRANQUE DO MOTOR 12 STARTING THE ENGINE CÓMO ARRANCAR EL MOTOR ARRANQUE DO MOTO...

Страница 4: ...ue causará lesiones graves o la muerte si no se siguen las recomendaciones ADVERTENCIA indica un peligro que puede provocar lesiones graves o la muerte si no se siguen las precauciones recomendadas PRECAUCIÓN indica un peligro que puede provocar lesiones moderadas o de poca importancia si no se siguen las recomendaciones También se utilizan otras dos palabras para resaltar la información Important...

Страница 5: ... máxima medida del motor Potência máxima medida do motor 0 77kW Warranted maximum engine power Potencia máxima garantizada del motor Potência máxima autorizada do motor 0 61kW Guaranteed Sound Power Level Nivel de potencia sonora garantizado Nível de potência sonora garantido pelo fabricante 10000rpm racing 10000rpm acelerado 10000rpm acelerado 109dB A 109dB A 109dB A Vibration Level Nivel de vibr...

Страница 6: ...ver 10 Tip guard DESCRIPCIÓN DEL PRODUCTO 1 Cuchilla 2 Motor 3 Empuñadura del Arrancador 4 Interruptor de Parada 5 Gatillo del Acelerador 6 Depósito de Combustible 7 Empuñadura Delantera 8 Empuñadura Trasera 9 Palanca de Bloqueo 10 Protección de la boguill DESCRIÇÃO DO PRODUTO 1 Lâmina 2 Motor 3 Pega do Arrancador 4 Comutador de Paragem 5 Gatilho Regulador 6 Depósito de Combustível 7 Pega Frontal ...

Страница 7: ...e EC aprovada 4 See SYMBOL EXPLANATION Consultar la EXPLICACIÓN DE LOS SÍMBOLOS Ver EXPLICAÇÃO DOS SÍMBOLOS 5 GUARANTEED SOUND POWER LEVEL NIVEL DE POTENCIA DE SONIDO GARANTIZADA NÍVEL DE POTÊNCIA SONORA GARANTIDO PELO FABRICANTE 6 CE marking Marcado CE Marcação CE 7 Lubricate 15H Lubrifique 15H Lubrifique 15H 8 See SYMBOL EXPLANATION Consultar la EXPLICACIÓN DE LOS SÍMBOLOS Ver EXPLICAÇÃO DOS SÍM...

Страница 8: ...ca ponha o motor a funcionar num local fechado Hot Surface Warning Contact may cause burns During use and for some time after stopping the engine the engine and the gearcase are very hot Do not touch engine components such a cylinder muffler and engine covers and gearcase until the engine has cooled to ambient temperature Advertencia Superficie caliente El contacto puede provocar quemaduras El mot...

Страница 9: ...os en los períodos recomendados y según los procedimientos detallados en el apartado Mantenimiento páginas 14 a 16 6 Si registra problemas de funcionamiento o una vibración excesiva detenga inmediatamente la unidad e inspecciónela para averiguar el motivo Si no puede determinar la causa o no es capaz de arreglarlo devuelva el cortasetos al distribuidor para que lo repare 7 Nunca utilice el cortase...

Страница 10: ...lo de día o con iluminación artificia adecuada 6 Inspeccione la zona de trabajo antes de comenzar Retire hilos cuerdas o materiales similares que se pueden enredar en las cuchillas del cortasetos 7 Evite peligros ocultos Mire si hay objetos ocultos en la zona de trabajo como alambradas de tela metálica cables alambres líneas telefónicas y de electricidad 8 Nunca use el cortasetos sin las proteccio...

Страница 11: ...la premezcla de combustible use únicamente un aceite de calidad diseñado para motores de dos tiempos refrigerados por aire MEZCLA DE COMBUSTIBLE TABLA Consulte la tabla de arriba INSTRUCCIONES DE MEZCLA Mezcle siempre el combustible y el aceite en un contenedor limpio aprobado para gasolina Marque el contenedor para identificarlo como mezcla de combustible para el cortasetos Utilice gasolina sin p...

Страница 12: ... the engine and when the blades are motionless touch the blades with your hand The blades should be warm but if they are too hot to touch loosen the screws 1 2 turn ROTATIONAL REAR HANDLE Rear handle is adjustable to five different positions by pulling the lock lever and turn the rear handle Pull the lock lever directly in line with the handle following the arrow in fig then turn the rear handle I...

Страница 13: ... the cord quickly and powerfully Pull the starter grip until the engine starts After the engine is started move the choke lever to the open position 5 After starting allow the engine to run a few minutes to warm it up before using NOTE 1 Do not pull the starter rope out completely 2 Do not release the starter rope from the fully extended position 3 Do not start the engine without rear handle locke...

Страница 14: ...s de haberlo hecho las cuchillas se mueven o el motor se cala deje de utilizar el cortasetos inmediatamente Si necesita ayuda u otros servicios contacte con el distribuidor autorizado local de MARUYAMA FUNCIONAMIENTO DEL CORTASETO ADVERTENCIA Lea las INSTRUCCIONES DE SEGURIDAD de la página 8 sobre el uso adecuado del cortasetos El cortasetos MARUYAMA está diseñado para cortar y recortar follaje y ...

Страница 15: ...ionamiento Mantenimiento El filtro del combustible está sujeto al extremo del tubo extractor de combustible dentro del depósito de combustible Para cambiar el filtro del combustible asegúrese primero de que el depósito de combustible está vacío Retire la tapa del depósito Con un gancho de alambre extraiga con cuidado el filtro de combustible a través de la boca del mismo Agarre el tubo del combust...

Страница 16: ...limpiar las aletas de refrigeración del cilindro después de cada 25 horas de funcionamiento o una vez a la semana lo que ocurra primero El aire debe fluir libremente alrededor y a través de las aletas de refrigeración del cilindro para evitar el recalentamiento del motor El depósito de hojas hierba suciedad y detritus en las aletas aumentará la temperatura de funcionamiento del motor Esto puede re...

Страница 17: ...nte superior a 25ºC ou durante longos períodos de trabalho contínuo a caixa de engrenagens e as lâminas devem ser lubrificadas de 2 em 2 horas Lubrifique a caixa de engrenagens pela respectiva abertura com uma boa massa de qualidade nº2 à base lítio Lubrifique as lâminas com um óleo leve nº10 Para armazenamento da corta sebes durante longos períodos retire o combustível do depósito e guarde o em c...

Страница 18: ... Inc 4 15 Uchi kanda 3 Chome Chiyoda ku Tokyo 101 0047 Japan December 3 2018 Managing Director Junichi Sugimoto Does comply with the provisions of the Machinery Directive 2006 42 EC Annex II A Does comply with the provisions of the Electromagnetic compatibility 2004 108 EC amended 2014 30 EU and applicable supplements Does comply with the provisions of the Noise emission in the environment by equi...

Страница 19: ... directiva 2006 42 CE Anexo II A Cumple con las cláusulas de Compatibilidad electromagnética directiva 2004 108 CE 2014 30 UE enmendado así también los accesorios afines Cumple con las cláusulas de Emision de sonido en el medio ambiente por equipos para uso al aire libre directiva 2000 14 CE Anexo V 2005 88 CE enmendado Cumple con las disposiciones de la REGLAMENTO UE 2016 1628 limites d émission ...

Страница 20: ...máquina Tipo Corta Sebes MARUYAMA As corta sebes manuais são equipadas com motor de combustão interna Número de série A000001 M999999 Modelo Uso Potência líquida instalada kw min 1 Nível de potência acústica medido dBA Nível de potência acústica garantido dBAG HT237D Corta Sebes 0 77 7500 107 109 HT238D Corta Sebes 0 77 7500 107 109 HT238DL Corta Sebes 0 77 7500 107 109 Cumpre com as disposições n...

Отзывы: