background image

MAINTENANCE

EVERY THREE TO FOUR MONTHS

Draining and Filling the Spa

The average spa needs to be drained every three to four months. After months of continually 
adding chemicals to the water and introducing body oils and lotions, the water can be difficult 
to manage and chemicals are not as effective as usual. You may also notice excessive foaming. 
More frequent draining may be required depending on use.
 

Draining the Spa

1.  Turn off the power to the spa.  
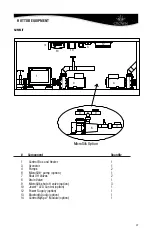
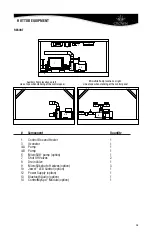
2.   Open the equipment compartment (see EQUIPMENT DIAGRAM). Remove the hose bib cap 

from the connection and attach a hose.

3.   Open the drain valve. Gravity causes the water to drain out of the hose.
4.   When the spa is empty, close the drain valve and remove the hose. Reinstall the hose bib 

plug.

NOTE: 

Keep the drain valve closed at all times except when draining the spa (do not rely on 

the cap to stop the flow of water). Not doing so could result in damage to the drain valve due 
to freezing water.


Replacing the Mineral Cartridge

The 

In-line mineral cartridge

 should be replaced every three to four months. You may still feel the 

“spent” minerals inside, but they are no longer effective and need to be replaced. (See ADJUST 
THE MINERAL CARTRIDGES, Blue Mineral Cartridge.)

Clean the DuraShell

®

 Interior

Once the spa is drained, clean the DuraShell interior thoroughly – especially at the water line. We suggest 
the 

Glove Sponge

 to clean without scratching.

Marquis

®

 Gloss & Guard or Spa Brite

 is the recommended cleaning agent for DuraShell – other 

products should be avoided except as stated below.

To maintain the high gloss and elegant look of DuraShell

®

, just follow these simple steps: For 

normal care and cleaning use a soft cloth or sponge and water. Rinse well and dry with a soft, 
clean cloth. Never use abrasive cleaners. Do not allow your acrylic surface to come into contact 
with products such as ammoinia (Windex) ketones or esters such as acetone or ethyl acetate 
(nail polish remover), Wintergreen oil (methyl salicylate), nail polish, dry cleaning solution or other 
chlorinated organic solvents, lacquer thinners, gasoline, aromatic solvents, citrus cleaners, pine 
oil, etc. Remove dust and dry dirt with a soft, damp cloth. Clean grease, oil, paint and ink stains 
with diluted isopropyl (rubbing) alcohol (do not let alcohol pool or remain on acrylic). Dry with 
a clean, soft cloth. Avoid using razor blades or other sharp instruments that might scratch the 
surface.

42

Содержание Crown Resort

Страница 1: ...____________________ Date of Purchase ________________________________________________________ Address _________________________________________________________________ City __________________________...

Страница 2: ...G YOUR HOT TUB 13 15 MARQUIS HOT TUB MODELS Summit 16 17 Resort 18 19 Spirit 20 21 MARQUIS SPA CONTROL OPERATION All Models 22 32 MARQUIS MESSAGES DIAGNOSTICS Messages 33 36 MARQUIS EQUIPMENT DIAGRAMS...

Страница 3: ...ic shock this connector should be bonded with a No 8 AWG 8 42mm2 No 6 AWG in Canada solid copper wire to any metal ladders water pipes or other metal within five feet 1 52m of the spa to comply with l...

Страница 4: ...ms or diabetes should consult a physician before using the spa Persons using medications should consult a physician before using a spa since some medi cation may induce drowsiness while other medicati...

Страница 5: ...cian before using a spa WARNING The use of alcohol drugs and medication can greatly increase the risk of fatal hyperthermia WARNING Before entering the spa or hot tub measure the water temperature wit...

Страница 6: ...x pour la sant de se plonger dans de l eau plus de 40 C AVERTISSEMENT L utilisation prolong e d une cuve de relaxation peut tre dangereuse pour la sant AVERTISSEMENT Les personnes atteintes de maladie...

Страница 7: ...pty or full of water Keep the water clean and sanitized with correct chemical care Turn on the jets when adding ANY chemicals to the spa water Clean the filter cartridge s monthly to remove debris and...

Страница 8: ...s for servicing the equipment above and or below any decks or floors Access is essential and must allow adequate room for service To facilitate repairs Marquis Corp or its agent may require access to...

Страница 9: ...me to the top 5 Lay a straight piece of lumber across the frame and level any high spots in the gravel by pushing the straight lumber across the frame Fill in any low areas with more gravel and re lev...

Страница 10: ...tructions in this manual see SUSPENDED USE OR WINTERIZING YOUR SPA OVERHEATING In the case of extended hot weather the spa water temperature may reach and maintain 104 F to 106 F 40 C to 41 C or highe...

Страница 11: ...s normal for the flow rates of the suction fittings to vary from strong to barely notice able ELECTRICAL REQUIREMENTS It is the responsibility of the spa owner to ensure that all electrical connection...

Страница 12: ...k hot wire connected to 3 on terminal block White neutral wire connected to 4 on terminal block Green ground wire routed through plastic enclosure and secured to exterior bonding lug Improperly wired...

Страница 13: ...p the flow of water Not doing so could result in damage to the drain valve due to freezing water 4 Install filter cartridges See INSTALLATION INSTRUCTIONS Filter Cartridges 5 Fill the spa with water t...

Страница 14: ...r temperature After you have manually exited the priming mode or allowed the spa to automatically exit the LCD window momentarily displays 100 F 38 C and then the display switches to F 11 The factory...

Страница 15: ...er the cover skirting between the spa and cover to break the cover s vacuum seal Do not use cover handles to break vacuum seal 3 Fold the front half of the cover over onto the back half NOTE Unlock an...

Страница 16: ...2g 4r 4r 6 4s 4s 2r 2r 2r 2r 4s 4s 4s 4s 4s 4s 4s 8 8 7 7 7 7 9 13 13 13 13a 13a 13a 13a 13a 13a 13a 13a 13a 13a 13a 13a 13a 4c 4c 4c 16 17 20 20 21 22 21 22 21 22 13 15 23 23 24 13a NOTES LIGHTS IN D...

Страница 17: ...SUMMIT THERAPY ZONES ZONE 1 ZONE 2 ZONE 3 ZONE 4 HK20 HK20 H O T ZONE REGAL THERAPY JETS 17...

Страница 18: ...2g 2g 2g 2g 2g 5c 5c 4c 4c 7 7 7 7 8 8 9 10 10 10 11 12 13 13a 14 16 17 18 18 19 19 13 13 13 13 13 20 21 20 21 20 21 13a 13a 13a 13a 13a 13a 13a 13a 13 22 8 22 23 15 2w 2w NOTES LIGHTS IN DFC VALVES...

Страница 19: ...RESORT THERAPY ZONES Neck jets operate in all zones RESORT THERAPY ZONES ZONE 1 ZONE 3 ZONE 2 ZONE 2 19...

Страница 20: ...11 16 20 2g 2g 5s 5s 5s 5s 4s 4s 4s 4s 4s 4s 4s 4s 4s 2s 2s 4r 4r 4r 4r 2g 2g 2g 2g 5c 5c 5c 2g 6 6 6 6 18 18 14 11 12 12a 7 7 1f 1z 9 9 16 17 10 20 19 20 19 20 8 12 12 12 12 12 12a 12a 12a 12a 12a 12...

Страница 21: ...SPIRIT THERAPY ZONES Zone 1 Zone 2 SPIRIT Therapy Control Zone Diagram 21...

Страница 22: ...system O Settings butting Touching this will open the Settings screen to allow adjustment to various user settable features P Invert button Touching this button will flip the operational screens 180...

Страница 23: ...rrow 1 On the home screen touch the Settings icon located on the bottom of the display 2 Touch the Time button Back button 3 To adjust the time use your finger to slide the scale up and down for hours...

Страница 24: ...ift to the center box E Press the water temperature display A to make the temperature menu disappear The Set Temperature is now 102 39 Can I change the Set Temperature with the Mini Player button Yes...

Страница 25: ...he number 4 Use your finger to slide the scale up or down to the desired hours minutes and AM PM Once selected press the check mark to lock the time in Should you decide to cancel the selection touch...

Страница 26: ...press the back button two times SETTING HEAT MODES Making changes to the heat settings will allow for a reduction in potential operating costs should you expect to not use your unit for extended peri...

Страница 27: ...a list of reminders that will become active if turned on Check Sanitizer Change Cartridge Clean Filter Change Filter To access the screen to turn reminders on or off please follow these instructions 1...

Страница 28: ...ocated on the bottom of the display 2 Touch the Language button 3 Touch inside the Language box to open the selection screen 4 Use your finger to scroll up or down through the various language choices...

Страница 29: ...ton 3 Touching the Screen sleeps after button will open a secondary window allowing you to choose between 1 and 5 minutes of screen on time Once the secondary window opens up use your finger to scroll...

Страница 30: ...ck button two times CONTROLLING SPA FUNCTIONS Access to spa functions are assembled on one easy to use screen Controlling the pumps lights and other features can be done as desired by the user in the...

Страница 31: ...ps to be resumed Light Touching this button will turn on the interior LED lights Touching this button repeatedly will cycle through an array of colors options ouch the button to turn off the lights at...

Страница 32: ...again will start the cycle over D Timer control Pressing this button will either speed up or slow down the transition of the light patterns Light patterns Beginning from the left color wheel Party or...

Страница 33: ...on has been detected or the Aux Freeze Switch has closed All water devices are activated In some cases pumps may turn on and off and the heater may operate during Freeze Protection This is an operatio...

Страница 34: ...message to restart heater start up See Flow Related Checks below The heater is too hot M030 One of the water temp sensors has detected 118 F about 48 C in the heater and the spa is shut down You must...

Страница 35: ...N when spa was last powered POWER DOWN THE SPA DO NOT ENTER THE WATER Contact your dealer or service organization REMINDER MESSAGES Reminder messages can be reset from the panel Press the Clear Icon t...

Страница 36: ...essage is powered On its time of day is initialized to 12 00 PM Setting the proper time of day is important for determining filtration times and other background features Communications error The cont...

Страница 37: ...umps 2 6 MicroSilk pump option 1 7 Shut Off Valves 2 8 Drain Valve 1 9 MicroSilk shut off valve option 3 10 Jewel LED Control option 1 12 Power Supply option 1 13 Bluetooth Audio option 1 14 ControlMy...

Страница 38: ...t off valves option 3 10 Jewel LED Control option 1 12 Power Supply option 1 13 Bluetooth Audio option 1 14 ControlMySpa Module option 1 b b a B alboa B luetooth A udio 1 7 7 4 A 10 12 13 14 3 8 4 B A...

Страница 39: ...ption 1 7 Shut Off Valves 2 8 Drain Valve 1 9 MicroSilk shut off valves option 3 10 Jewel LED Control option 1 12 Power Supply option 1 13 Bluetooth Audio option 1 14 ControlMySpa Module option 1 b b...

Страница 40: ...rage please note the spa must remain covered at all times when not in use Keep the water clear and balanced Water chemistry is another important part of spa ownership Please be sure to use only factor...

Страница 41: ...n Filter Cleaner monthly Removing the Filter 1 Remove filter cover 2 Twist filter counter clockwise and lift filter out Reinstalling the Filter Repeat above directions CAUTION Overtightening of the fi...

Страница 42: ...ide but they are no longer effective and need to be replaced See ADJUST THE MINERAL CARTRIDGES Blue Mineral Cartridge Clean the DuraShell Interior Once the spa is drained clean the DuraShell interior...

Страница 43: ...in the spa and potentially scratch the spa surface AS NEEDED MAINTENANCE Weather Shield Cover Care Weather Shield is a solution dyed polyester fabric designed to be flexible and easy for manufacturers...

Страница 44: ...R WINTERIZING THE SPA If you decide to discontinue the use of your spa for any extended period of time we suggest you follow the steps below NOTE During long periods of inactivity damage can occur to...

Страница 45: ...R CARE 3 Lock your spa cover in place with cover locks 4 Upon return shock sanitize water Long time periods 5 14 days 1 One day before leaving set the temperature to approximately 80 F 27 C 2 Adjust p...

Страница 46: ...ghout the spa 8 It is important to leave the spa cover open for 20 30 minutes while shock treating your spa to avoid damage Do not leave spa unattended while cover is open Damage such as discol oratio...

Страница 47: ...he pH When they are properly adjusted the pH will be stable and easy to maintain The pH is a measure of the relative acidity and basicity of the water The ideal pH range is 7 4 7 6 When the pH falls b...

Страница 48: ...H Alkalinity Decreaser Make any additions per the directions on the bottle and then test and repeat if necessary until all readings are in the desired range 3 Increase the calcium hardness if necessar...

Страница 49: ...s ADJUST THE MINERAL CARTRIDGE Remove the protective cellophane wrap from the In Line mineral cartridge While holding the bottom of the cartridge turn the top until the number six appears in the setti...

Страница 50: ...ace Replace the cap CAUTION Hand tighten only avoid over tightening avoid bending the holder to help prevent damage to the holder Damage caused due to improper removal or installation of chemical cart...

Страница 51: ...eed to shock as needed or monthly AS NEEDED PRODUCTS pH Increaser Alkalinity Increaser pH Alkalinity Decreaser These three products work to raise or lower the pH and alkalinity in the spa They are onl...

Страница 52: ...in clean and refill the spa Chemical Odor P Too many chloramines bromamines in the water S Treat water with Spa Shock then adjust sanitizer level as necessary P Dull looking water difficult to manage...

Страница 53: ...bromine added or dispensed into the spa S Remove spa cover and activate jets and air control Allow jets to run for 30 minutes Test water to see if desired level has been reached Adjust sanitizer cart...

Страница 54: ...e diagram With step mounting brackets facing outwards mark the two holes Using the bracket as a guide predrill two holes per bracket Attach the left and right brackets to the spa exterior base 1 The s...

Страница 55: ...ets or seals Electronic equipment is warranted against defects in materials and workmanship for five years Equipment includes PC boards pumps control panels heater and heat sensors MicroSilk system an...

Страница 56: ...providing a replacement part to you for installation in your spa a replacement part will be provided to you at no charge when you return the defective part All replacement parts assume the original wa...

Страница 57: ...m extent permitted by law Except as may be required by applicable law Marquis Corp shall not be liable for injury loss or damage to person or property however arising in connection with manufacture or...

Отзывы: