[3] DISASSEMBLY/ ASSEMBLY
[3]-1. Motor section (cont.)
R
epair
P
6
/
18
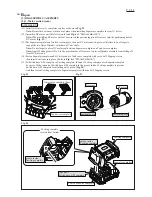
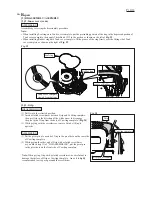
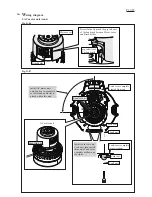
(1) Assemble the parts shown in
Fig. 14
.
Note:
Loosely tighten M8 Hex nut to Armature shaft.
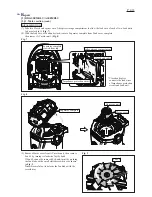
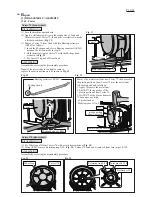
(2) Install Fan cover onto the assembly you made in step (1) as follows:
1. Put the assembly on 1R023 so that it stands on *the six protruding ribs of Base. (*See
Fig. 15
.)
2. Put Fan cover on the assembly.
3. Put 1R258 on Fan cover. (
Fig. 16
)
Note:
Do not to put 1R258 on the three mating bosses of Base, or you will break them.
4. Using arbor press, press-fit Fan cover onto Return vane. (
Fig. 16
)
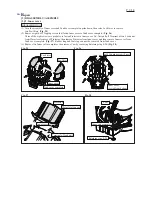
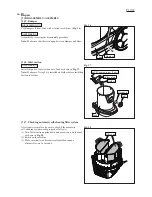
(3) Push Rubber ring 120 firmly into the groove of Base
with the groove side up as shown in
Fig. 17
.
Note:
When installing Separator complete in step (13)
of "
ASSEMBLING
", be sure to apply ThreeBond 1215
in the groove of Rubber ring 120 without gap.
(4) Attach Field to Endbell.
ASSEMBLING
Fig. 14
Base
Spacer
Armature assembly
Ball bearing
629DDW
Ball bearing
6200DDW
Return vane
O ring 30
Flange
Fan 125
Fan 125
M8 Hex nut
Flat washer 10
Fig. 16
Fig. 15
Fig. 17
Do not put 1R258 on
these three mating bosses.
1R258
1R023
Return vane
six protruding ribs
Base
Fan cover
Return vane
with the groove side up
Cross section of
Rubber ring 120
Rubber ring 120


