[3] DISASSEMBLY/ ASSEMBLY
[3]-2. Inner cover (cont.)
[3]-3. Grip
R
epair
P 1
0
/
18
Assemble by reversing the disassembly procedure.
Note:
•
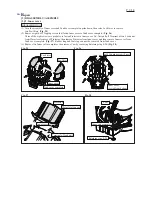
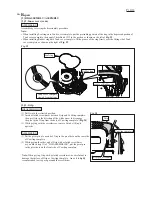
When installing Seal ring onto Tank cover complete, put the protruding portion of the ring in the depressed portion of
Tank cover complete, then apply ThreeBond 1215 to the portion as shown on the left of
Fig. 29
.
• When installing Rubber ring onto Tank cover complete, fit the groove of the ring firmly over the fitting rib of Tank
cover complete as shown on the right of
Fig. 29
.
ASSEMBLING
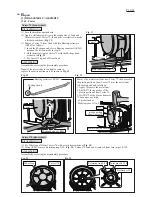
(1) Put the pivot pin of one end of Grip in the pivot hole on the rear side
of Cowling complete.
(2) While prying the other end of Grip with a slotted screwdriver
as you did in step (3) of "DISASSEMBLING", put the pivot pin
in the pivot hole on the front side of Cowling complete.
(1) Put Grip in the retracted position.
(2) Insert a slotted screwdriver between Grip and Cowling complete,
then pry Grip in the direction of the white arrow to disengage
the pivot pin of Grip from the hole of Cowling complete. (
Fig. 30
)
(3) While prying with the screwdriver, remove Grip by lifting it
upwards.
ASSEMBLING
Fig. 29
Tank cover complete,
viewed from bottom
Seal ring
Rubber ring
DISASSEMBLING
Fig. 30
Pivot pin of Handle
Cowling complete
Grip
Note:
When prying Grip with a slotted screwdriver, be careful not to
damage the surface of Grip or Cowling complete. An so it is highly
recommended to wrap a rag around the screwdriver.
groove of Rubber ring


