background image

4

2. Never recharge a fully charged battery cartridge. 

Overcharging shortens the battery service life.

3. Charge the battery cartridge with room temperature at 

10

°C

-40

°C

 (50

°F

-104

°F

). Let a heated battery 

cartridge cool down before charging it.

4. Charge the battery cartridge once in every six months 

if you do not use it for a long period of time.

Installing or removing the slide battery 
cartridge (Fig. 5)

WARNING:

Recharge only with the charger specified for the battery. 
Use of any other batteries may create a risk of fire.
• Always switch off the tool before installing or removing 

of the battery cartridge.

• To remove the battery cartridge, slide it from the tool 

while pressing the button on the front of the cartridge.

• To install the battery cartridge, align the tongue on the 

battery cartridge with the groove in the housing and slip 
it into place.

Always insert it all the way until it locks in place with a 
click. If you can see the red indicator on the upper side of 
the button, it is not locked completely. Install it fully until 
the red indicator cannot be seen. If not, it may accidentally 
fall out of the tool, causing injury to you or to someone 
around you.

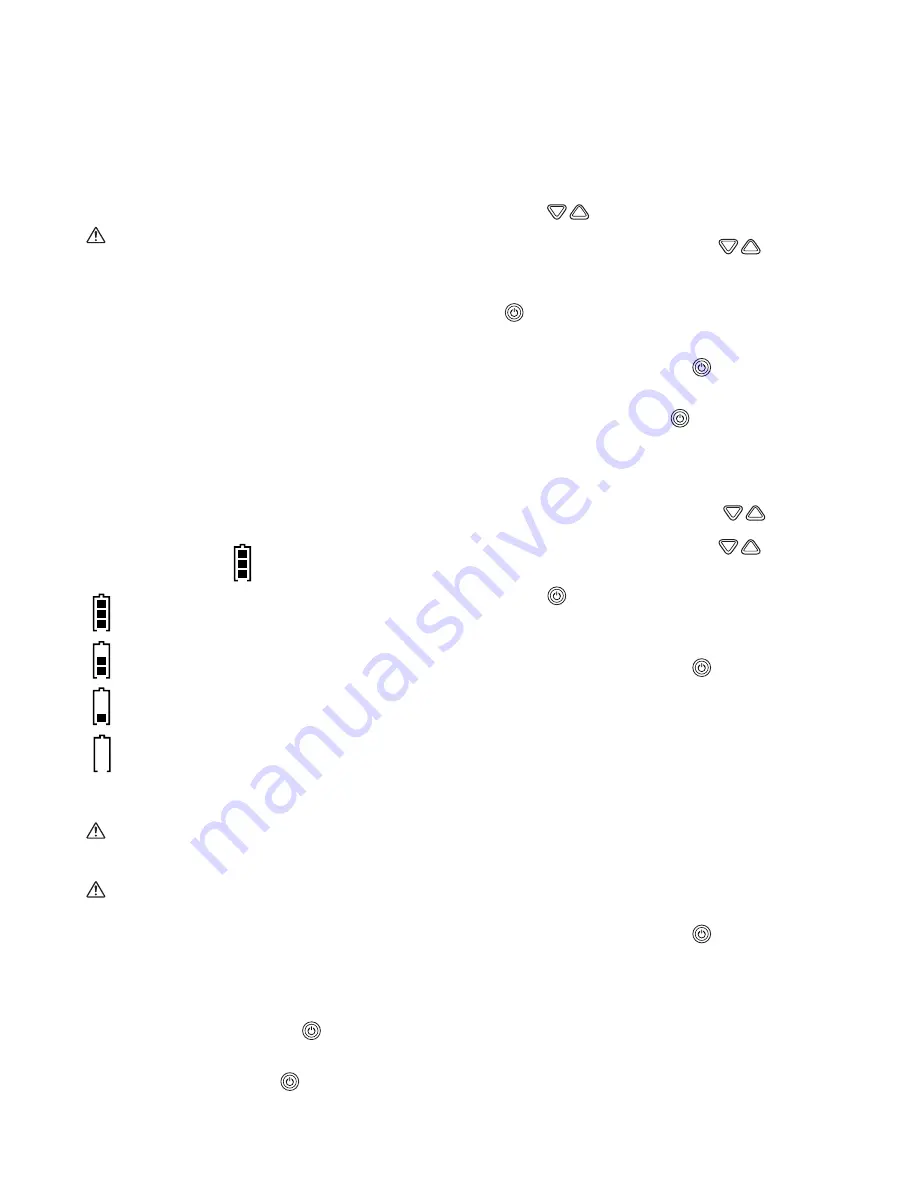
Battery life indication

There is a battery icon [

] on the LCD indicating the 

battery life.

(

): battery life is more than 30% 

(

): battery life is less than 30% 

(

): battery life is less than 10% 

(

): battery is almost dying out. You should charge the 

battery immediately

Operating the radio

WARNING:

Avoid using this unit in metal dust surrounding, as it will 
affect the quality of the speaker.

WARNING:

Do not soak the unit into water. It can only tolerate in the 
environment under 90% of humidity.

This unit equips with three tuning methods- Scan tuning, 
Manual tuning and Memory presets recall.

Scan tuning

1. Press the Radio power button [

] to turn on the 

radio.

2. Select the desired waveband (i.e. AM/FM) by brief 

pressing the Power button [

].

Note: 

Make sure the antenna has been extended for the best 
FM reception. For AM band, rotate the radio horizontally 
to get the best signal.

Important: 

Try to avoid operating the radio next to computer screen 
and other equipment which will cause interference to the 
radio.
3. Press and hold the Radio Station Tuning Up/Down 

button [

] over 0.5 seconds. The frequency will 

stop at the next available station.

4. Press the Volume Up/Down button [

] to get the 

optimal sound level. LCD display will show sound level 
changes (0-40 steps).

5. To turn off the radio, press and hold the Power button 

[

] until 

OFF

 is shown on the LCD display.

Manual tuning

1. Press the Radio power button [

] to turn on the 

radio.

2. Select the desired waveband (i.e. AM/FM) by brief 

pressing the Power button [

].

Note:

Make sure the antenna has been extended for the best 
FM reception. For AM (MW) band, rotate the radio to get 
the best signal.
3. Press the Tuning Up/Down Control [

] until the 

desired frequency shown on the display.

4. Press the Volume Up/Down button [

] to get the 

optimal sound level.

5. To turn off the radio, press and hold the Radio power 

button [

] until 

OFF

 is shown on the LCD display.

Storing stations in presets memories

There are 3 memory presets for each waveband.
1. Press the Radio power button [

] to turn on the 

radio.

2. Tune to desired station using the steps previously 

described. 

3. Press and hold the desired Preset button (approx. 

3 sec) until the preset number stop flashing on the 
display. The preset number will appear in the display 
and the station will be stored under chosen preset 
button.

4. Repeat this procedure for the remaining presets.

Note: 

Stations stored in preset memories can be overwritten by 
following above procedures.

Recall stations from preset memories

1. Press the Radio power button [

] to turn on the 

radio.

2. Select the desired waveband.
3. Press the desired Preset button, the preset number 

and station frequency will appear in the display.

System reset

If your radio fails to work properly, or some digits on the 
display are missing or incomplete, carry out the following 
procedure.  

Содержание LXRM01

Страница 1: ...GB Flashlight Radio Instruction manual F Lampe Torche Radio Manuel d instructions E Radio con Luz Manual de instrucciones LXRM01 ...

Страница 2: ...2 1 2 3 4 5 6 7 1 2 3 4 5 9 6 7 8 10 11 12 13 A B C D E F ...

Страница 3: ...ush with water If liquid contacts eyes additionally seek for medical help Liquid ejected from the battery may cause irritation or burns SPECIFIC SAFETY RULES SAVE THESE INSTRUCTIONS FOR BATTERY CARTRIDGE 1 Before using battery cartridge read all instructions and cautionary markings on 1 battery charger 2 battery and 3 product using battery 2 Do not disassemble battery cartridge 3 If operating time...

Страница 4: ...er button Note Make sure the antenna has been extended for the best FM reception For AM band rotate the radio horizontally to get the best signal Important Try to avoid operating the radio next to computer screen and other equipment which will cause interference to the radio 3 Press and hold the Radio Station Tuning Up Down button over 0 5 seconds The frequency will stop at the next available stat...

Страница 5: ...o desired position Allow the detent to snap into place Important Do not forcibly pivot the head LCD back light Press any control buttons LCD display will illuminate for approx 10 seconds Specifications Maintenance To maintain product safety and reliability repairs maintenance or adjustment should be carried out by a Makita Authorized Service Center Model LXRM01 Power source D C 14 4 V 18 V LED 1 4...

Страница 6: ...s métalliques tels que trombones pièces de monnaie clés clous vis ou autres petits objets métalliques conducteurs potentiels entre une borne et une autre Un court circuit entre les bornes de la batterie peut provoquer des brûlures ou un incendie 11 Dans des conditions d utilisation inadéquates de la batterie il peut y avoir fuite d électrolyte En cas de contact accidentel rincez avec beaucoup d ea...

Страница 7: ...urée de service de la batterie se trouve sur l écran LCD la durée de service de la batterie est supérieure à 30 la durée de service de la batterie est inférieure à 30 la durée de service de la batterie est inférieure à 10 la batterie est presque déchargée Vous devez recharger la batterie immédiatement Fonctionnement de la radio AVERTISSEMENT Évitez d utiliser cet appareil dans un environnement ave...

Страница 8: ...isation du système Si votre radio ne fonctionne pas correctement ou si certains chiffres sur l écran sont manquants ou incomplets procédez comme suit Remarque Pour réinitialiser le système vous devez mettre la radio en mode OFF 1 Appuyez sur l interrupteur de radio pour éteindre la radio 2 Appuyez sur la touche de préréglage 3 et sur l interrupteur de radio et maintenez les enfoncés pendant enviro...

Страница 9: ... W Puissance de sortie 18 V 3 W Radio uniquement Lampe uniquement Radio Lampe Temps de fonctionnement avec une puissance de sortie de radio de 100 mW BL1415 11 heures 3 5 heures 2 5 heures BL1430 25 heures 8 5 heures 6 heures BL1815 11 heures 3 5 heures 2 5 heures BL1830 25 heures 8 5 heures 6 heures Dimension avec batterie BL1430 263 mm x 75 mm x 196 mm 10 3 8 x 2 15 16 x 7 3 4 Poids net 0 95 kg ...

Страница 10: ...de metal los cuales pueden actuar creando una conexión entre las terminales de la batería Cerrar el circuito con las terminales de la batería puede causar quemaduras o incendios 11 En condiciones abusivas podrá escapar líquido de la batería evite tocarlo Si lo toca accidentalmente enjuague con agua Si hay contacto del líquido con los ojos acuda por atención médica Puede que el líquido expulsado de...

Страница 11: ...ida de la batería Hay un icono de batería en la pantalla LCD el cual indica la vida de la batería la vida de la batería es más del 30 la vida de la batería es menos del 30 la vida de la batería es menos del 10 la batería esta casi por agotarse Se debe recargar la batería ya Operación de la radio ADVERTENCIA Evite el uso de este dispositivo en entornos con polvo metálico pues esto afecta la calidad...

Страница 12: ... si algunos de los dígitos en la pantalla no aparecen o se muestran incompletos lleve a cabo el siguiente procedimiento Nota Para restaurar el sistema debe apagar la radio al ponerla en modo OFF apagado 1 Presione el botón de encendido de la radio para encenderla 2 Presione y mantenga presionado el botón de preajuste 3 y el botón de encendido de la radio por aproximadamente 5 segundos Cuando la pa...

Страница 13: ... FM 87 5 108 MHz Altavoz ø51 mm 8 3 W Energía saliente 18 V 3 0 W Radio solamente Luz solamente Radio Luz Tiempo de operación con energía saliente de la radio de 100 mW BL1415 11 horas 3 5 horas 2 5 horas BL1430 25 horas 8 5 horas 6 horas BL1815 11 horas 3 5 horas 2 5 horas BL1830 25 horas 8 5 horas 6 horas Dimensión con batería BL1430 263 mm x 75 mm x 196 mm 10 3 8 x 2 15 16 x 7 3 4 Peso neto 0 9...

Страница 14: ...14 ...

Страница 15: ...15 ...

Страница 16: ...ALA Makita Corporation 3 11 8 Sumiyoshi cho Anjo Aichi 446 8502 Japan 3A81UL5Z20000 BMR050 LXRM01 NA3 0711 www makita com ...

Отзывы: