background image

w w w . m a g u r a . c o m
s e r v i c e @ m a g u r a . d e

1.

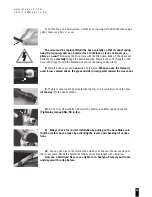
Repair of a HS 11 main hose with barbed adaptor connection. 

2.

To do this clamp the hose as shown with the help of the two clamping jaws into 

a vice. 1,5cm of the hose have to stick out of the clamp. Use a nylon mallet to tap the 
barbed fitting into the tubing. 

The barbed fitting must be installed as shown. Never

use a lighter or a heatgun to soften the hose.

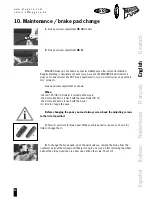
3. 

Screw the repaired hose into the prepared thread.

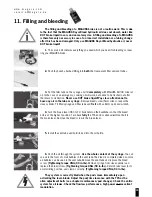
4.

Correctly installed repaired hose on an HS 11. The barbed fitting is 

flush

with 

the brake lever (arrow). The brake now has to be re-filled as described in the chapter 
‘filling and bleeding‘.

Further repair tips

In case of a damaged brake-cylinder crossover-hose, proceed as described above

from points 1 to 4.

Spare brake levers and slave cyclinders are delivered „dry“. If you have to replace 

a brake lever or slave cylinder, the MAGURA system has to be bled 

twice

after changing

the defective item. Activate the lever blade after the first bleed to chase all air bubbles 
and to make sure that the oil is well distributed in the new part.

Leaking brake levers and slave cylinders have to be replaced as complete

units. Due to product liability reasons MAGURA neither offers spare pistons nor
internal seal repair kits.

12. Repairs

Español     Italiano     Nederlands     Français     

English 

Deutsch 

15

Содержание MAGURA HYDRAULIC BRAKE

Страница 1: ...Deutsch English Fran ais Nederlands Italiano Espa ol printed in germany MAGURA 2003 All rights reserved W O R K S H O P 2004 w w w m a g u r a c o m...

Страница 2: ...ed view 18 19 Summary WARNING This symbol means possible danger for your health and even life if you do not follow the instructions given respectively if the necessary safety measures are not followed...

Страница 3: ...formation about the safe installation operation and maintenance of your MAGURA rim brakes We urge you to read it carefully become familiar with its contents and follow our recommendations to help make...

Страница 4: ...Take your bicycle to a safe area to learn the proper braking technique and operation of your new brakes and your bike 2 Check that the front brake is still actuated by the lever on the side you are us...

Страница 5: ...n the owner s manual of your bicycle Never use your bicycle if any of the points mentioned above relate to your bicycle Consult a professional bike mechanic if you feel unsure A faulty bicycle may res...

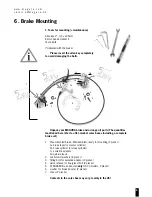
Страница 6: ...ack your MAGURA brake and arrange all parts The quantities mentioned here refer to after market sales boxes including a complete brake set 1 Preassembled brake filled and bled ready for mounting 2 pie...

Страница 7: ...black elbows arrow 1 are adjustable and point preferably downwards for better tire clearance They MUST ALWAYS block against the fork or frame 4 Loosen the bolts allen key 5mm slightly to adjust the sl...

Страница 8: ...LOSED 10 Former MAGURA models came with a silver elbow You need a 13mm open end wrench for correct adjustment arrow The black and silver elbows are not inter compatible 11 A perfect aligned MAGURA bra...

Страница 9: ...rque 4Nm 34 in lbs Begin with the LEFT slave cylinder 3 Place the RAT booster as shown against the adaptor 4 Mount the unit onto the canti stud 5 Tightening torque 6 Nm 51 in lbs 6 Proceed on the oppo...

Страница 10: ...ke pads Quick release tension is adjusted similar to standard version c f page 8 2 Close the quick release Push the brake cylinder back towards the fork Close the quick release by doing the same That...

Страница 11: ...included in the kit Measure the distance between both cablestops Due to shrinkage cut a length of heatshrink tube that is 10mm longer than the measured distance 4 Slide the fixed barrel of the carrie...

Страница 12: ...t and a new olive on the hose When you use the formerly used brass colored olives the grooved side arrow points toward the sleeve nut 9 The black olive cannot be mounted incorrectly as it is symetrica...

Страница 13: ...as shown When the red TPA HS 33 models is turned all the way in the 4mm allen bolt is in flush with the lever blade HS 11 the 2mm allen bolt is in flush with the barrel it is time to change the pads...

Страница 14: ...e cylinder Fit filled syringe and filler tube and fix it with an 8mm open end wrench 4 Turn the brake lever HS 33 11 horizontal on the handlebar so that the bleed bolt is at the highest position Turn...

Страница 15: ...e brake now has to be re filled as described in the chapter filling and bleeding Further repair tips In case of a damaged brake cylinder crossover hose proceed as described above from points 1 to 4 Sp...

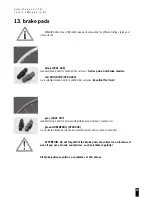
Страница 16: ...423 race oriented brake pad for polished rim surfaces Excellent for trials grey 0321 407 standard brake pad for hard anodized black and ceramic coated rims green GREENFROG 0720 439 race oriented brak...

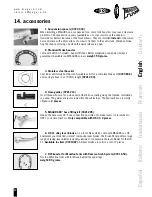
Страница 17: ...f Available as kit for a complete brake set 0720 846 and as single hose in a 1700mm length 0721 203 4 Hose guides 0721 214 for all those who care for a clean and esthetic hose routing along the toptub...

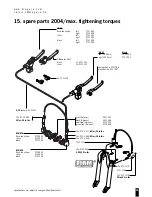
Страница 18: ...S 11 black left 1500mm 0721 083 right 1500mm 0721 082 M6 M6 Race line yellow 0720900 silver 0720902 black 0721238 M6 M8 Race line yellow 0720901 silver 0720903 black 0721239 grey 4 pieces 0321 407 bla...

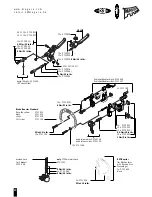
Страница 19: ...ided hose for 2 brakes 0720 846 10x 0720924 quick release black 0720784 quick release silver 0721158 10x 0721186 4Nm 34 in lbs 10x 0721188 10x 0720 934 6Nm 51 in lbs 2x 0721184 2x 0720 433 10x 0720 44...

Страница 20: ...International phone 06 6536 0901 fax 06 6536 0907 mcinter mx1 alpha web ne jp Korea MAGURA ASIA Inc phone 886 4 23283739 fax 886 4 23283734 service magura com tw Luxemburg Transmission phone 0032 10...

Отзывы: