background image


Chapter 5  Remote PlayBack System

5.2  Functions and Features of RPB Application 

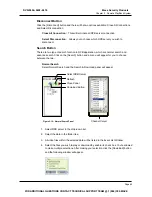
This section will describe the RPB application’s major function and features.    To start RPB 

application, click RemotePlayBack.exe in your workstation and the following screen will appear.   

RPB Playback Control Panel

Camera Layout Panel

RPB Function

Panel

Exit/Minimize

Button

Page Select

RPB View Window


  5.2.1 

Main 

Screen 

Functions 

This section will explain the major functions and tools of the RPB main screen. The RPB 

Function Panel and RPB Playback Control Panel will be explained in 5.2.2 and 5.2.3.


Camera Layout Panel   

The camera layout panel allows you to choose from 8 different display layout options.   

Page Select 

You may choose to go to previous page or next page.   

RPB View Window


Displays your selected video event.   

Exit Minimize Button   

Allow you to close the RPB application or minimize it in the Window’s task bar.   

Page 63 

DVR-9404~9408~9416

Mace Security Products

FOR ADDITIONAL QUESTIONS CONTACT TECHNICAL SUPPORT TEAM @ 1 (866) 392-MACE

Содержание DVR-9404

Страница 1: ......

Страница 2: ...tem Application 12 2 2 Uninstall Main System Application 14 Chapter 3 Main System Application 3 1 Main Screen Features 15 3 1 1 Status Panel 16 3 1 2 PTZ Control Panel 16 3 1 3 I O Control Panel 17 3...

Страница 3: ...4 1 1 Single Multi Channel Switch 52 4 1 2 Search Option 52 4 1 3 Playback Control Panel 54 4 1 4 View Log Function Panel 55 4 1 5 Video Merge with Audio 56 4 1 6 Playback Status Panel 56 4 1 7 Exit...

Страница 4: ...ation and Setup 86 6 2 2 Start and Stop IP Multicast System 87 6 2 3 Function and Features of IP Multicast System 88 6 3 GeoCenter 92 6 3 1 GeoCenter Installation and Setup 94 6 3 2 GeoCenter Setup 95...

Страница 5: ...Audio Video Files 128 8 3 Remote Backup 131 8 4 Delete Audio Video Files 132 8 5 Repair Database Utility 133 Chapter 9 Watermark Proof 9 1 Watermark Proof Functions 135 iv DVR 9404 9408 9416 Mace Secu...

Страница 6: ...g of two major components The video surveillance system and the remote monitoring system Video Surveillance System Consists the GV Series video capture card and the Main System Application This system...

Страница 7: ...OS Windows 98SE ME 2000 XP CPU PentiumIII 500 minimum PentiumIII 800 Minimum Memory 128 MB minimum 256 MB Minimum Hard Disk 10 GB min 20 GB min 40 GB min 40 GB min 80 GB min 80 GB min 80 GB min VGA N...

Страница 8: ...1 Plug in the USB camera into the USB port on your PC 2 Windows will automatically detect the device Now select the disk of USB camera to install the drive 1 1 2 GV 150 Installation The GV 150 suppor...

Страница 9: ...connect video extension card to the system 1 Power off the PC 2 Insert PCI card GV 250 into PCI slot 3 Turn on the PC power Windows will automatically detect the existing GV 250 card 4 Now select the...

Страница 10: ...t PCI card into PCI slots 3 Turn on PC power Windows will automatically detect the existing cards 4 Now select the driver path in the CD directory Driver GV250 600 650 700 750 800 to install the drive...

Страница 11: ...nsion to 8 12 and 16 ports 1 Power off the PC 2 Insert PCI card into PCI slots 3 Turn on PC power Windows will automatically detect the existing cards 4 Now select the driver path in the CD directory...

Страница 12: ...oard user s manual for the actual position GeoVision GV 600v2 GV 600 v2 Motherboard Front Panel Jumper PWSW LED HDD PC Reset Switch _ RST 1 3 Video Extension Card Installation The GV System comes stan...

Страница 13: ...ert the Real Time Display card into the PCI slot next to the GV Series video capture card 2 Use the supplied ribbon cable connect one end of the ribbon cable to the GV capture card and the other end t...

Страница 14: ...connector of your video capture card For model GV 600 the location of audio input connector is in the lower right corner of the capture card For model GV 650 GV 750 and GV 800 the audio input connecto...

Страница 15: ...Chapter 1 Hardware Installation Page 10 DVR 9404 9408 9416 Mace Security Products FOR ADDITIONAL QUESTIONS CONTACT TECHNICAL SUPPORT TEAM 1 866 392 MACE...

Страница 16: ...plication and Register Dynamic IP Application should be install in the video surveillance system The Remote View IP Multicast GeoCenter and Remote Playback are all remote monitoring applications and s...

Страница 17: ...he CD ROM drive of your GV System and run Setup exe in the CD ROM root directory 2 A setup dialog box will appear with 7 options for you to choose select GeoVision Main System and click Next 3 Select...

Страница 18: ...L and SECAM You can also change the video standard later in the configuration of the Main System Application 6 Click Browse if you wish to specify another destination directory otherwise click Next to...

Страница 19: ...st of the instruction to complete the installation 2 2 Uninstall Main System s Application To uninstall GV Series System click on the Uninstall icon from the folder The uninstall program will delete a...

Страница 20: ...first section will describe the function and features of the main screen while the second section describes the detail of main screen s function panel 3 1 Main Screen Features Status Panel PTZ Contro...

Страница 21: ...ok slightly different depending on the camera model you re using HUD Control Zoom Control Focus Control Auto Focus Auto Pan Address Select HUD Control Controls the up down left right action of your PT...

Страница 22: ...ending the output signals to the relays or alarms of module 1 to module 9 PT811 support output 1 8 GV IO support output 1 16 Module Number Output Device 3 1 4 Camera Select Panel Press the number of e...

Страница 23: ...o logout from the system Minimize Hide main screen in Windows status bar Exit Allows you to shutdown the system 3 1 7 System Location Display Location Name Allow you to add or edit the name or locatio...

Страница 24: ...r keyboard for shortcut Time Date Click to tag time and date in the snap shot image file Camera Click to tag camera numbers in the snap shot image file Location Click on this box to tag camera locatio...

Страница 25: ...allows you to select between start recording on all cameras or by individual camera To start recording on all cameras simply select Start All Monitoring option When in recording the camera caption wil...

Страница 26: ...dules I O Schedules Schedule List Window How to setup video surveillance schedules Before you can start a surveillance schedule you should have at least one schedule setup first Setting up a surveilla...

Страница 27: ...igger Output Click on the Output option to enable or disable sending output signals to the output pin during the surveillance schedule This option requires the optional GV IO hardware Step Three Set r...

Страница 28: ...ote You can add as many schedules as you wish to the schedule list For example if you wish to have a different surveillance schedule for Saturday and Sunday simply define another surveillance schedule...

Страница 29: ...setup Please follow the Weekly Schedule s setup procedures from Step One to Step Four and then follow the rest of the steps to complete the Holidays Schedule setup Step Five Day Select Click on the dr...

Страница 30: ...the I O device to be included in this surveillance schedule Step Three Select Date Select the days you with to be included in this schedule For example if you wish to apply this schedule from Monday t...

Страница 31: ...This section will explain each option in detail System Configuration The System Configuration window includes four types of configuration setup General Setting Camera Setting I O Device Setting and H...

Страница 32: ...p the system will initiate monitoring based on the I O device setup Network Server Choose which network server you would like to enable after system startup The network server includes Multicast Serve...

Страница 33: ...itch to the second disk for recording If Recycle option is selected then the system will start deleting the earliest recorded files to make space for the new recordings when the system runs out of the...

Страница 34: ...function and the system will delay the recording for a preset time after an alarm Motion Post Rec Enable this function and the system can be recorded for a preset time after an alarm Video Lost IO Er...

Страница 35: ...the function of Digital Watermark in order to prevent artificial alteration or distortion of recorded events The purpose of digital watermark is to provide copyright protection for an image or video...

Страница 36: ...has its own setup window and you can use the camera control tab to switch between the cameras Camera Name You can specify a name for each camera You can name each camera according to its location or u...

Страница 37: ...ptions available Smart High and Low Smart When Smart Recording Option is selected the system will distribute as many frame rates as possible to the camera where motion occurs High System will distribu...

Страница 38: ...evel from 1 to 10 The higher the value the more sensitive the system is to the motion Movement will be recorded when the motion exceeds the value By applying mask to the camera window system will igno...

Страница 39: ...Invoke E Mail Alerts Enable this function and the system will send E mail alerts when motions are detected You may use the slider bar to select notice interval whereas High 0 5 second Medium 1 sec and...

Страница 40: ...ected to the Com port of your computer Now in the Select I O Device area choose the module you wish to install in the Device drop down menu select Com port and address then click Format Add button The...

Страница 41: ...ton Apply All Select Hotline or Email Choose Alarm Type Select Camera Recording Delay Select Output Address Name You can specify a name for each input device in the Name text column Signal Type Select...

Страница 42: ...Output Configuration The Output area allows you to configure the output parameters from 1 to 16 The PT811 supports 1 8 outputs while the GV IO supports 1 16 outputs Output Select Button PTZ Option Sig...

Страница 43: ...ur modem Note We do not recommend using internal modem PCI or ISA HotLine Notice You may specify 3 different telephone pager numbers for HotLine Notice You can attach text messages if you wish to send...

Страница 44: ...ifies you by pager your pager s screen will appear with these text messages 5 You can also attach audio files if you want the system to notify you by telephone If you already have a pre recorded messa...

Страница 45: ...P server Enable Assign IP option to enable the drop down list at the right hand side Select the network card within the drop down list and your IP address will be displayed in Bind IP The default port...

Страница 46: ...ng window will appear Camera Activate Click on the Activate button and a camera list menu will appear You ll find a check box before each camera click on the check box to activate or deactivate the ca...

Страница 47: ...following dialog box will appear Click on Auto Reboot System to enable this function and the settings in the dialog box will be unlocked In Day Period you may specify the day interval of each auto re...

Страница 48: ...file for each GV System user A user s profile determines which functions a user is allow to access Only the supervisor level users can access to Password Setup function Add New User Step 1 Click the N...

Страница 49: ...OK and the new user will be added User information will appear in the User Profile area and the accessible functions will appear in the function area Edit User Profile Step 1 Locate the user you wish...

Страница 50: ...il address in E Mail From column optional Step 3 Input the email address you want to send alerts to in E mail To column Step 4 Select a charset most suitably to your specification from the drop down m...

Страница 51: ...ions then the system will continuously send emails to notify you You can specify the time interval between each email The default time interval is 5 minutes configurable from 0 to 60 minutes therefore...

Страница 52: ...ction is only available to GV 650 GV 700 GV 750 and GV 800 Preview Master The Display speed increases because the system resource will focus on the monitoring after clicking Preview Master icon Both M...

Страница 53: ...ers Use the Camera Select button to select between cameras or you may also use the Apply All button to apply your setting to all cameras Camera Select Apply All Default Button Full Screen Click Config...

Страница 54: ...Camera Scan button or the F11 key of your keyboard to star stop camera scan function 3 2 6 Network Functions Your GV System can be connected to various remote view applications each remote vi applica...

Страница 55: ...ons M m Start Stop Modem connection T t Start Stop TCP IP connection W w Start Stop Webcam connection I I Start Stop IP Multicast connection C c Start Stop Center connection F f Start Stop Full Screen...

Страница 56: ...Application You may use the Windows Task Bar to switch between the Main Application and View Log Application If your GV System is equipped with dual view display then you can move the View Log applica...

Страница 57: ...arch function Normal Search The Normal Search function is a more direct way to find files if you know exactly when and which camera s video event you re looking for Step One Select Camera Click on the...

Страница 58: ...e Shift key of your keyboard and left click on the last file All files within the field will be highlighted in the Event List Window Advance Search You can search for video event that was recorded wit...

Страница 59: ...Panel contains the playback buttons speed adjustment buttons and the zoom adjustment buttons Click the Play button to start playing the selected video The Playback Meter will indicate the play progres...

Страница 60: ...to add smoothness to the video image Each click will apply a small amount of smoothness effect to the picture You may click the Undo button to remove the effect Color Monochrome Allow you to switch b...

Страница 61: ...bine audio and video files of the same recording time and save them as AVI movie 4 1 6 Playback Status Panel The Playback Status Panel displays the date time and the playback speed of the selected vid...

Страница 62: ...Hide Event Time Range F9 Display Hide Event Panel Scroll Right Scroll Left Scroll Up Scroll Down Page Up Previous Frame Page Down Next Frame Home First Frame End Last Frame Zoom In Zoom Out Increase...

Страница 63: ...Chapter 4 View Log Application Page 58 DVR 9404 9408 9416 Mace Security Products FOR ADDITIONAL QUESTIONS CONTACT TECHNICAL SUPPORT TEAM 1 866 392 MACE...

Страница 64: ...onnections The RPB system is consisting of two components the RPB server and the RPB workstation Each RPB server will handles up to 16 RPB workstations login at the same time and each RPB workstation...

Страница 65: ...cated below before proceeding to the installation System Requirement OS Win 98SE ME 2000 XP CPU Pentium 500 minimum Memory 128 MB RAM Hard Disk 20 GB minimum VGA NVIDIA GeForce II 32MB at 800 x 600 re...

Страница 66: ...wing dialog box will appear input an authorized user s ID and password in the user login window then click OK to establish connection to the network Figure 5 4 User Login 3 The RPB server in your GV S...

Страница 67: ...p these login records Assign IP The RPB server will automatically detect your GV System s current IP and display it in the IP address column next to Assign IP option If your GV System is equipped with...

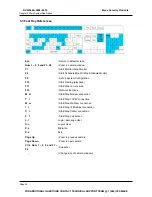
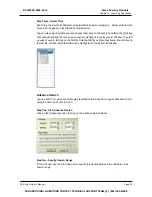
Страница 68: ...is section will explain the major functions and tools of the RPB main screen The RPB Function Panel and RPB Playback Control Panel will be explained in 5 2 2 and 5 2 3 Camera Layout Panel The camera l...

Страница 69: ...el Connection Button Click the Connection Button from the function panel and the RPB login window will appear Figure 5 9 RPB login window 1 Enter the IP address or DNS of the RPB server you wish to lo...

Страница 70: ...choose between the two Normal Search Select Normal Search and the Search Download panel will appear Select RPB Server Download Button Close Panel Refresh Channel Select Figure 5 10 Normal Search Panel...

Страница 71: ...h criterias There are 3 search criterias available Server name cameras and time period Figure 5 11 Advance search panel 1 Select server in the drop down list and all available cameras of the selected...

Страница 72: ...video event You can use the Up and Down button to move files from channel to channel Connect List Allows you to see which RPB server you are currently connected The first field indicates the Server s...

Страница 73: ...button which are Save Connective Status Load Connective Status and Load Resume File Save Connective Status This function will save your current connection status in your RPB workstation Load Connecti...

Страница 74: ...ver When creating a new server you will need to define new server s profile by key in its information There are total 5 fields in the server profile which are Server Name Enter a name for the new RPB...

Страница 75: ...ite it without warning messages Always tell me when download is finished If this option is selected then when downloads are completed the system will notify you with a finish download message Channel...

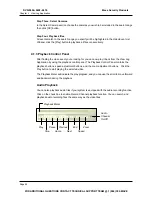
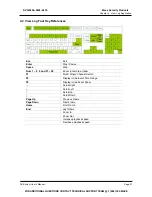
Страница 76: ...dicator 5 2 4 Saving a Snapshot or AVI movie The RPB application allows you to save a snapshot of the video in bmp format or a complete video event in avi format Save as Snapshot Save as AVI movie Sav...

Страница 77: ...Chapter 5 Remote PlayBack System Page 72 DVR 9404 9408 9416 Mace Security Products FOR ADDITIONAL QUESTIONS CONTACT TECHNICAL SUPPORT TEAM 1 866 392 MACE...

Страница 78: ...s of remote monitoring applications Each remote monitoring application serves a different type of functions and features Remote View System IP Multicast System GeoCenter System Page 73 DVR 9404 9408 9...

Страница 79: ...sed for monitoring live videos from your GV System through modem dial up or TCP IP connection Each Remote View System can login to one GV System at a time However you can run multiple applications in...

Страница 80: ...MB RAM Hard Disk 20 GB minimum VGA NVIDIA GeForce II 32MB at 800 x 600 resolution minimum Network TCP IP Modem Dial Up Installation 1 Insert GV System CD into the CD ROM drive of the remote workstatio...

Страница 81: ...ppear In the drop down list select the proper modem in use 3 Click the Connect button from Remote View System s menu bar select Dial Modem from the submenu and the following window will appear 4 Input...

Страница 82: ...TCP IP from the menuand the following window will appear 3 4 5 Enter the IP address or the domain name of the GV System you wish to connect to in the IP Address column and specify the port number If y...

Страница 83: ...ecording playback functions Tool Bar Buttons Connect Click to select modem dial up or TCP IP connection My Favorite Click to create My Favorite list Stop Click to terminate network connection Zoom In...

Страница 84: ...dit My Favorite Select Edit my favorite from the sub menu and the following window will appear Highlight the connection from the list and you will be able to change the IP address and the port number...

Страница 85: ...and time The text and background color are adjustable in the Preferences setting Rec Button Allow you to start stop pause and resume recording Play Save Button This button serves 2 functions it allow...

Страница 86: ...w Window s Play Save button and the following application will appear The Qview s major function is for playback recorded video clips in the Temporarily Record Buffer Page 81 DVR 9404 9408 9416 Mace S...

Страница 87: ...lts in better video quality However high quality video will also make the video more sluggish since the file are larger and requires more resources out of your PC General Setting Text Display This are...

Страница 88: ...to control The control panel s user interface may vary from models to models PTZ select button Direction control button Zoom Focus Auto Focus Auto Pan PTZ speed select ID address select Remote I O con...

Страница 89: ...een mode provides a larger viewing area for the cameras There are four functional buttons located at the right hand side that allows you to access to some of the basic functions Start Monitor Stop Mon...

Страница 90: ...ironment The IP Multicast System can automatically locate all available GV System within the same local area network by click of a button Users are not required to input each GV System s IP address se...

Страница 91: ...y 128 MB RAM Hard Disk 20 GB minimum VGA NVIDIA GeForce II 32MB at 800 x 600 resolution minimum Network TCP IP Intranet LAN environment only Installation 1 Insert GV System CD into the CD ROM drive of...

Страница 92: ...ation in your workstation 3 Click the Search button from the tool bar and the IP Multicast System will automatically locate all available GV System within your local area network 4 All GV System avail...

Страница 93: ...mera Click to lock a particular camera Live Channel Click to show or hide live channel frame Live Channel Frame Live Bar Click to select the GV System you wish to view Indicates the number of camera a...

Страница 94: ...ast System s recording file will be stored in a Temporary Record Buffer This buffer can only store one file at a time If you try to record a second file then the following message will appear to notif...

Страница 95: ...g video clips are save in the temporarily record buffer folder These recorded clips will be lost after you close the GeoCenter application To permanently save the video clips in your Center workstatio...

Страница 96: ...Let you specify a folder to hold your recording videos Full Screen Operation Click Channel and select Full Screen Mode from the menu bar to switch to full screen operation The full screen mode provid...

Страница 97: ...ed in the Internet WAN or Intranet LAN environment but you need a FIX IP at where Center is installed One Center can serve 10 GV Systems at one time and you can daisy chain multiple Center in a local...

Страница 98: ...rusion occurs after you leave the office or the warehouse you will receive real time video image from Center and make necessary response All video images sent to Center will be recorded at remote site...

Страница 99: ...imum Memory 128 MB RAM Hard Disk 20 GB minimum VGA NVIDIA GeForce II 32MB at 800 x 600 resolution minimum Network TCP IP Installation 1 Insert GV System CD into the CD ROM drive of the remote workstat...

Страница 100: ...lication in the PC where Center is installed 2 Click Customer button from the menu bar and the following window will appear 3 Click Add button to add new customer and fill out the information in the f...

Страница 101: ...nd then click Login 8 From the GV System main screen click Start Stop Monitoring button and enable all monitoring function 9 If you have select Around the Clock surveillance then you will see video fe...

Страница 102: ...ontally Single location will display one GV System at a time while Tile Horizontally will display multiple GV System across the camera view area Customer Allow you to add or delete customer file Brows...

Страница 103: ...ws you to select between the GV Systems that connects to your Center If your have 10 GV Systems connect to your Center then there will be 10 selection bars in the Location List Event List The Event Li...

Страница 104: ...use and resume recording Play Save Click to play last recording or to save it as avi file Camera Lock Click this button to lock a particular camera Once a camera is lock it will appear in the right ar...

Страница 105: ...recording video clips are save in the temporarily record buffer folder These recorded clips will be lost after you close the GeoCenter application To permanently save the video clips in your Center w...

Страница 106: ...ng videos Alarm Option You can enable the alarm option to notify you when your center receives an image from the GV System The drop down list let you select between 6 different alarm types You can cli...

Страница 107: ...Chapter 6 Remote Monitoring System Page 102 DVR 9404 9408 9416 Mace Security Products FOR ADDITIONAL QUESTIONS CONTACT TECHNICAL SUPPORT TEAM 1 866 392 MACE...

Страница 108: ...e and recorded video over the Internet This function is called the WebCam System which allows users from anywhere in the world to monitor their GV System by using PCs or mobile devices via Internet ac...

Страница 109: ...II 32MB at 800 x 600 resolution minimum Network TCP IP Connection Limit Win98 up to 45 client login simultaneously Win2000 256MB RAM up to 132 channels simultaneously 512MB RAM up to 145 channels simu...

Страница 110: ...LAN where router is installed Click Auto Find button and the system will automatically detect the IP address of your gateway computer 6 Click OK button to apply your setting and Execute button to enab...

Страница 111: ...the online retry Max 9999 JPG Quality Video quality may be adjusted by moving the slide bar The higher the value the better the quality Better video quality needs more storage size Frame Page Title C...

Страница 112: ...l remote monitoring option in the WebCam System It basically run within the Internet Explorer and is capable of receiving live video stream from the GV Systems over the Internet Start and Stop Mpeg4 E...

Страница 113: ...nection such as DSL or Cable Modem then select DSL CABLE T 1 and you will be able to view up to 16 cameras at a time 6 Click Connect button from the WebCam interface and the Login dialog box will appe...

Страница 114: ...p the connection Click to login to a different GV System Click to select camera Click to take a snapshot from the received video Click to adjust the video quality in 3 levels Click to save a video fil...

Страница 115: ...to 5 Specify port number in both Command Port and Data Port 6 Click OK to establish connection to the server This new connection will now be listed in the Host drop down list 7 To remove the connecti...

Страница 116: ...em will switch the control to the next user in queue The counter on the upper right corner serves two meanings for user who is controlling the camera it indicates the remaining time of your control Fo...

Страница 117: ...u can distribute them to each one of the Mpeg4 Encoder Viewer s camera windows Or you can have each window connecting to a different GV System This way you can connect up to 16 different GV System und...

Страница 118: ...d allow you to view only one camera at a time Start and Stop JPEG Image Viewer 1 Run Internet Browser from your PC 2 Key in GV System s IP address in the browser s address box then press Enter 3 Selec...

Страница 119: ...iew window Click to scroll up down left and right of the image Click to take a snap shot from the video Click to select view camera 7 2 3 Remote Play Back System for WebCam Page 114 DVR 9404 9408 9416...

Страница 120: ...ogin at the same time Snapshot Load Stop Play Pause Zoom Download RPB Control Buttons Click to take a snap shot from the playback video Click to load recorded files from the GV System Click to stop vi...

Страница 121: ...the date in the folder tree 3 All recorded video files within the selected date will be listed in the Event List window 4 Use the camera select or audio select buttons to select input channels whose...

Страница 122: ...hich cameras are experiencing signal lost WebCam Information WebCam Update Time Display the last login time WebCam Server Startup Time Displays the startup time of the webcam server in the login GV Sy...

Страница 123: ...nstalled with Microsoft ActiveSync 2 Run Microsoft ActiveSync in the connected PC and make sure both the PDA and PC are synchronized 3 Insert GV System CD into the CD ROM drive of the PC and run Setup...

Страница 124: ...GV System you wish to connect to in the IP Address column enter a valid user s ID and password then click OK 4 If login successfully you will be able to see the video coming to your PDA 5 Click Stop b...

Страница 125: ...clip Use this drop down list to switch cameras Use these buttons for focus in and focus out control Use and button for zoom in and zoom out control Use these buttons to control left up down and right...

Страница 126: ...e experiencing signal lost Web Info Update Time Display the last login time Startup Time Displays the startup time of GV System s Web Server Mpeg4 Current User Displays the number of online users whom...

Страница 127: ...to the volume of data transmitted or received Therefore GV System does not send live videos instead it will only send one images at a time and will not send another unless it is requested to do so To...

Страница 128: ...of your GV System in the Address column then press OK Input Web Address Login History Return 1 2 3 Address http 65 59 37 172 OK Cancel 3 Input an valid user s name and password then press Submit User...

Страница 129: ...to the GV System DMIP System Concept There are 3 major components required in the DMIP concept which are DMIP Server GV System and client PC with web browser DMIP Server Act as the FTP server and web...

Страница 130: ...in GV System Please go to Start Program DMIP Register Dynamic IP and the DMIP setup window will appear A Input the host name of your GV System The host name will be used for identifying your GV System...

Страница 131: ...your own DMIP server please refer to the following instructions to set it up 1 Execute the IIS server 5 0 embedded in the Windows 2000 Server 2 Build up a FTP server and allow the Write function 3 Bu...

Страница 132: ...ty 8 1 Backup System Our backup system will do the following tasks 1 Recorded audio video files can be saved to CD R DVD MO or ZIP media 2 Delete audio video files from the database Page 127 DVR 9404...

Страница 133: ...the Media you want to backup to either a CD Writer a hard disk drive or a MO ZIP JAZ drive 3 Enter the desired starting time in Start Time and the desired ending time in End Time of the audio video f...

Страница 134: ...cted CD DVD Writer you will see the following dialog box 6 After clicking ok you may run a CD R application such as EasyCD Click on the right button of your mouse to paste files in the application Pag...

Страница 135: ...driver you will see the following dialogue box 8 You need to run the EZViewLog500 exe located in the root directory of your backup media in order to view the backup video files Page 130 DVR 9404 9408...

Страница 136: ...peat the same procedures in 1 and 2 in the previous topic Remote Playback Remote users may run the DMBackUp500 exe through LAN in the following screen Page 131 DVR 9404 9408 9416 Mace Security Product...

Страница 137: ...ox You may be required to enter a password if one has been set previously Step 2 Enter the desired starting time in Start Time and the desired ending time in End Time of the video files that you want...

Страница 138: ...when you press the playback button Garbage text is displayed Default Path The Repair Database Utility will search and rebuild the database using the path you have defined in the GV Series system Searc...

Страница 139: ...Chapter 8 Back Up System and Repair Database Utility Page 134 DVR 9404 9408 9416 Mace Security Products FOR ADDITIONAL QUESTIONS CONTACT TECHNICAL SUPPORT TEAM 1 866 392 MACE...

Страница 140: ...gram can help you check whether or not your picture was originally captured from the GV System Before your record video files have to used digital watermark protection Page 135 DVR 9404 9408 9416 Mace...

Страница 141: ...en File First Frame Play Previous Frame Next Frame Previous Have Watermark Frame Next Have Watermark Frame Page 136 DVR 9404 9408 9416 Mace Security Products FOR ADDITIONAL QUESTIONS CONTACT TECHNICAL...

Страница 142: ...k to extracted of similar with original then show percent Original This is original watermark Extracted This is extracted watermark You record video files before first you must enable Use Digital Wate...

Отзывы: