IO-390-D Series Engine Maintenance Manual
72-70
© 2020 Avco Corporation. All Rights Reserved
Page 244
March 2020
IO-390-D Series Engine Maintenance Manual
(1)
Torque Method (measure the torque required to slip the belt at the small pulley as
follows):
(a)
Hold and secure the propeller to prevent rotation of the crankshaft.
(b)
Apply a torque indicating wrench to the nut that attaches the pulley to the alternator
and turn it clockwise.
(c)
Record the torque value on the torque indicating wrench to slip the belt(s) at the small
pulley.
(d)
Adjust the belt tension as per the required torque values that correspond to a new or
used belt identified in Table 1.
Table 1
Required Torque (Belt Tension)
Width of Belt
Condition
of Belt
Torque at Pulley
Condition
of Belt
Torque at Pulley
ft.-lb
Nm
ft.-lb
Nm
3/8 inch
New
11 to 13
15 to 18
Used*
7 to 9
10 to 12
Twin 3/8 inch
New
22 to 26
30 to 35
Used*
14 to 18
19 to 24
½ inch
New
13 to 15
18 to 20
Used*
9 to 11
12 to 15
11 millimeter
New
22 to 24
30 to 33
Used*
15 to 17
20 to 23
* A belt is considered used if it has been installed on the engine and the engine has been operated.
(2)
Deflection Method
(a)
Attach the hook of a small spring-scale to the alternator belt at the approximate mid-
point between the ring gear support and the alternator.
(b)
Pull on the scale until a reading of 14 lb (6.4 kg), is shown for a new belt, 10 lb. (4.5
kg) for a used belt.
(c)
Measure the distance the alternator belt has moved with the 10 or 14 lb. (4.5 to 6.4
kg) load applied.
(d)
The distance (deflection) is to be 5/16 in. (7.94 mm). If less than 5/16 in. (7.94 mm),
the alternator belt tension is too tight.
(e)
Adjust the belt tension as required for 5/16 in. (7.94 mm) distance (deflection) per the
“Alternator Belt Tension Adjustment” procedure in this chapter.
(3)
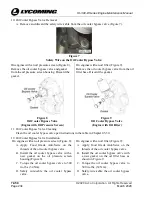
Belt Tension Dial Gage Method (using Lycoming tool number ST-131 (Figure 2):
(a)
Extend the hook on the Belt Tension Dial
Gage ST-131 (Figure 2) to its extreme position
by depressing the handle.
(b)
Put the hook over the alternator belt with the
nose piece centered on the alternator belt.
NOTICE:
In the next step, release the handle of
the Belt Tension Dial Gage (ST-131) quickly.
If the handle is released slowly, internal
friction will cause an inaccurate reading.
Figure 2
Belt Tension Dial Gage - ST-131

