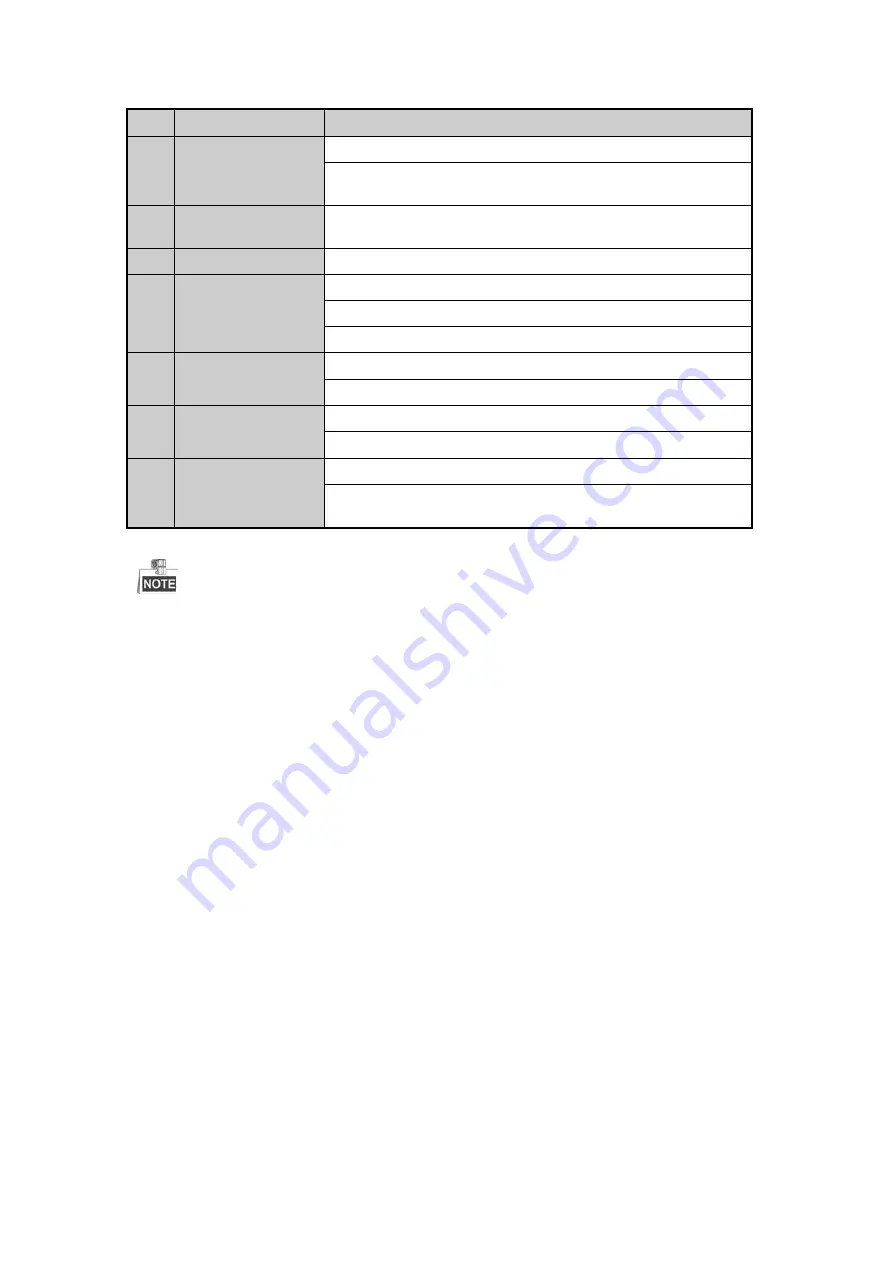
LT Security LTD8316T-ET Скачать руководство пользователя страница 17

No. 

Name 

Description 

In Playback mode, it can be used to play or pause the video. 

In single-frame Playback mode, pressing the button will advance the video 

by a single frame. 

PTZ Button


In Auto-switch mode, it can be used to stop /start auto switch. 

DEV


Enables/Disables Remote Control. 

Alphanumeric Buttons


Switch to the corresponding channel in Live view or PTZ Control mode. 

Input numbers and characters in Edit mode. 

Switch between different channels in the Playback mode. 

ESC Button


Back to the previous menu. 

Press for Arming/disarming the device in Live View mode. 

PLAY Button


The button is used to enter the All-day Playback mode. 

It is also used to


auto scan in the PTZ Control menu. 

10 

PREV Button


Switch between single screen and multi-screen mode. 

In PTZ Control mode, it is used to adjust the focus in conjunction with the 

A/FOCUS+ button. 


Troubleshooting Remote Control: 


Make sure you have install batteries properly in the remote control. And you have to aim the remote control at the 
IR receiver in the front panel. 

If there is no response after you press any button on the remote, follow the procedure below to troubleshoot. 

Steps: 

1.


Go into Menu > Settings > General > More Settings by operating the front control panel or the mouse. 

2.


Check and remember the DVR No.. The default DVR No. is 255. This number valid for all IR remote 

controls. 

3.


Press the DEV button on the remote control. 

4.


Enter the DVR No. in step 2. 

5.


Press the ENTER button on the remote. 

If the Status indicator on the front panel turns blue, the remote control is operating properly. If the Status indicator 
does not turn blue and there is still no response from the remote, please check the following: 

1.


Batteries are installed correctly and the polarities of the batteries are not reversed. 

2.


Batteries are fresh and not out of charge. 

3.


IR receiver is not obstructed. 

If the remote still cannot function properly, please change the remote and try again, or contact the device provider. 

                    Available from A1 Security Cameras 

    www.a1securitycameras.com email: [email protected]

Содержание LTD8316T-ET

Страница 1: ...Digital Video Recorder User Manual Available from A1 Security Cameras www a1securitycameras com email sales a1securitycameras com...

Страница 2: ...ALL BE WHOLLY AT YOUR OWN RISKS OUR COMPANY SHALL NOT TAKE ANY RESPONSIBILITES FOR ABNORMAL OPERATION PRIVACY LEAKAGE OR OTHER DAMAGES RESULTING FROM CYBER ATTACK HACKER ATTACK VIRUS INSPECTION OR OTH...

Страница 3: ...This product and if applicable the supplied accessories too are marked with CE and comply therefore with the applicable harmonized European standards listed under the EMC Directive 2004 108 EC the Ro...

Страница 4: ...specifications for detailed information Input voltage should meet both the SELV Safety Extra Low Voltage and the Limited Power Source with 100 to 240 VAC or 12 VDC according to the IEC60950 1 standar...

Страница 5: ...nit as a result of dropping it may cause damage to the sensitive electronics within the unit Use the device in conjunction with an UPS if possible Power down the unit before connecting and disconnecti...

Страница 6: ...tially hazardous situation which if not avoided could result in equipment damage data loss performance degradation or unexpected results Provides additional information to emphasize or supplement impo...

Страница 7: ...ering detection video exception alarm video loss alarm and VCA alarm functions Privacy mask Several PTZ protocols supported PTZ preset patrol and pattern Zooming in out by clicking the mouse and PTZ t...

Страница 8: ...tc Alarm triggers full screen monitoring audio alarm notifying surveillance center sending email and alarm output VCA detection alarm line crossing detection and intrusion detection is supported Suppo...

Страница 9: ...channel transmission Alarm and exception information can be sent to the remote host Remotely start stop recording Remotely start stop alarm output Remote PTZ control Remote JPEG capture Two way audio...

Страница 10: ...ings 37 3 5 Manual Video Quality Diagnostics 38 Chapter 4 PTZ Controls 39 4 1 Configuring PTZ Settings 40 4 2 Setting PTZ Presets Patrols and Patterns 41 4 2 1 Customizing Presets 41 4 2 2 Calling Pre...

Страница 11: ...age Detection 100 9 12 Object Removal Detection 101 9 13 Audio Exception Detection 101 9 14 Defocus Detection 102 9 15 PIR Alarm 102 Chapter 10 VCA Search 103 10 1 Face Search 104 10 2 Behavior Search...

Страница 12: ...nfo 140 14 4 Importing Exporting Configuration Files 141 14 5 Upgrading System 142 14 5 1 Upgrading by Local Backup Device 142 14 5 2 Upgrading by FTP 142 14 6 Restoring Default Settings 143 Chapter 1...

Страница 13: ...Chapter 1 Introduction Available from A1 Security Cameras www a1securitycameras com email sales a1securitycameras com...

Страница 14: ...mally 2 USB Interfaces Universal Serial Bus USB ports for additional devices such as USB mouse and USB Hard Disk Drive HDD 3 Composite Keys 1 MENU Enter numeral 1 Access the main menu interface 2 ABC...

Страница 15: ...different fields and items and select setting parameters In playback mode the Up and Down buttons are used to speed up and slow down record playing and the Left and Right buttons are used to move the...

Страница 16: ...interface 3 REC Button Enter the Manual Record setting menu In PTZ control settings press the button and then you can call a PTZ preset by pressing Numeric button It is also used to turn audio on off...

Страница 17: ...rly in the remote control And you have to aim the remote control at the IR receiver in the front panel If there is no response after you press any button on the remote follow the procedure below to tr...

Страница 18: ...n of the Mouse Control Name Action Description Left Click Single Click Live view Select channel and show the quick set menu Menu Select and enter Double Click Live view Switch between single screen an...

Страница 19: ...oft keyboard Table 1 4 Description of the Soft Keyboard Icons Icons Description Icons Description English Capital English Numbers Symbols Lowercase Uppercase Backspace Space Enter Exit Table 1 5 Avail...

Страница 20: ...T RCA connector 4 VGA DB15 connector for VGA output Display local video output and menu 5 HDMI HDMI video output connector 6 USB Port Universal Serial Bus USB port for additional devices 7 Network Int...

Страница 21: ...Chapter 2 Getting Started Available from A1 Security Cameras www a1securitycameras com email sales a1securitycameras com...

Страница 22: ...ould turn on indicating that the unit begins to start up 3 After startup the Power indicator LED remains on Shutting down the DVR Steps There are two proper ways to shut down the DVR To shut down the...

Страница 23: ...recommend you reset your password regularly especially in the high security system resetting the password monthly or weekly can better protect your product 2 Click OK to save the password and activate...

Страница 24: ...e message can be displayed on the screen 2 3 2 Using the Wizard for Basic Configuration By default the Setup Wizard starts once the device has loaded Figure 2 5 Start Wizard Interface Operating the Se...

Страница 25: ...work parameters Then you will enter the PT Cloud interface Configure the PT Cloud according to your need 5 Click Next button to enter the Advanced Network Parameter interface You can enable PPPoE enab...

Страница 26: ...is in inactive status you can click the inactive icon of the camera to set the password to activate it You can also select multiple cameras from the list and click the One touch Activate to activate...

Страница 27: ...ount will be locked for 60 seconds 2 4 4 User Logout Purpose After logging out the monitor turns to the live view mode and if you want to perform some operation you need to enter user name and passwor...

Страница 28: ...and confirm it STRONG PASSWORD RECOMMENDED We highly recommend you create a strong password of your own choosing Using a minimum of 8 characters including at least three of the following categories up...

Страница 29: ...admin password and the admin password of the camera is the same with the DVR s 4 For the encoders with multiple channels only check the checkbox of Channel Port in the pop up window as shown in the fo...

Страница 30: ...n the page you can configure the basic setting of the IP cameras Steps 1 Click the icon to edit the parameters you can edit the IP address protocol and other parameters Figure 2 15 Edit the Parameters...

Страница 31: ...edit the network information and the password of the camera Figure 2 17 Password Configuration of the Camera 3 Click OK to save the settings and exit the interface Available from A1 Security Cameras w...

Страница 32: ...nt signal input types TVI or AHD CVBS Figure 2 18 Configure Signal Input Type 3 Click Apply to save the settings Each two video channels are grouped in sequence e g CH01 and CH02 CH03 and CH04 and the...

Страница 33: ...Chapter 3 Live View Available from A1 Security Cameras www a1securitycameras com email sales a1securitycameras com...

Страница 34: ...before enabling the auto switch Menu Configuration Live View Dwell Time Start Recording normal record and motion detection record are supported Quick Set select the output mode to Standard Bright Gent...

Страница 35: ...ed as the main output you can perform the following operation to switch to CVBS output as the main output Steps 1 Use the mouse wheel to double click on the HDMI VGA output screen and the message box...

Страница 36: ...ely smoother Dim Light the image is smoother than the other two modes Outdoor the image is relatively clearer and sharper The degree of contrast and saturation is high Figure 3 4 Image Settings You ca...

Страница 37: ...e View Settings interface Menu Configuration Live View 2 Select the Channel Zero Encoding tab Figure 3 5 Live View Channel Zero Encoding 3 Check the checkbox after Enable Channel Zero Encoding 4 Confi...

Страница 38: ...e Audio Output Enables disables audio output for the selected camera in the live view mode Volume Adjust the volume of the audio output Event Output Designates the output to show event video if availa...

Страница 39: ...gnostics 2 Check the checkboxes to select the channels for diagnostics 3 Click the button Diagnose and the results will be displayed on a list You can view the video status and diagnostics time of the...

Страница 40: ...Chapter 4 PTZ Controls Available from A1 Security Cameras www a1securitycameras com email sales a1securitycameras com...

Страница 41: ...Z Figure 4 1 PTZ Settings 2 Choose the camera for PTZ setting in the Camera dropdown list 3 Click the RS 485 Settings button to set the RS 485 parameters Figure 4 2 PTZ General 4 Enter the parameters...

Страница 42: ...k the location to the preset Repeat the steps2 3 to save more presets You can click the Clear button to clear the location information of the preset or click the Clear All button to clear the location...

Страница 43: ...teps 1 Enter the PTZ Control interface Menu Camera PTZ Figure 4 5 PTZ Settings 2 Select patrol No in the drop down list of patrol 3 Click the Set button to add key points for the patrol Figure 4 6 Key...

Страница 44: ...the PTZ setting interface Or press the PTZ button on the front panel or click the PTZ Control icon in the quick setting bar or select the PTZ option in the right click menu to show the PTZ control pan...

Страница 45: ...ess the PTZ button on the front panel or click the PTZ Control icon in the quick setting bar or select the PTZ option in the right click menu to show the PTZ control panel 2 Click the button to show t...

Страница 46: ...call the linear scan in the predefined scan range Steps 1 Click the button PTZ in the lower right corner of the PTZ setting interface Or press the PTZ button on the front panel or click the PTZ Contro...

Страница 47: ...anel One touch 3 There are 3 one touch park types selectable click the corresponding button to activate the park action Park Quick Patrol The dome starts patrol from the predefined preset 1 to preset...

Страница 48: ...s connected with the device If no mouse is connected the icon appears in the lower left corner of the window indicating that this camera is in PTZ control mode Figure 4 13 PTZ Panel Table 4 1 Descript...

Страница 49: ...Chapter 5 Recording Settings Available from A1 Security Cameras www a1securitycameras com email sales a1securitycameras com...

Страница 50: ...in the camera dropdown list 3 Configure the following parameters for the Main Stream Continuous and the Main Stream Event Stream Type Set the stream type to be Video or Video Audio Resolution Set reco...

Страница 51: ...e saved permanently if the value is set as 0 The actual keeping time for the files should be determined by the capacity of the HDDs 5 Redundant Record Enabling redundant record means you save the reco...

Страница 52: ...a camera in the camera dropdown list 3 Configure the parameters 4 Click Apply to save the settings 5 Optional If the parameters can also be used to other cameras click Copy to copy the settings to ot...

Страница 53: ...are marked in different color icons Continous scheduled recording Event recording triggered by all event triggered alarm Motion recording triggered by motion detection Alarm recording triggered by al...

Страница 54: ...refer to Chapter 8 1 Chapter 8 8 and Chapter 9 The VCA settings are only available to the smart IP cameras Repeat the above steps 1 4 to schedule recording for other days in the week If the schedule...

Страница 55: ...the drawing You can repeat step 4 to set schedule for other channels If the settings can also be used to other channels click Copy and then choose the channel to which you want to copy 5 Click Apply i...

Страница 56: ...after Enable Motion Detection 3 Drag and draw the area for motion detection by mouse If you want to set the motion detection for all the area shot by the camera click Full Screen To clear the motion d...

Страница 57: ...e detection and audio exception detection Steps 1 Enter the VCA settings interface and select a camera for the VCA settings Menu Camera VCA Figure 5 14 VCA Settings 2 Configure the detection rules for...

Страница 58: ...Enable manual record Click the status icon before camera number to change it to Or click the status icon of Analog to enable manual record of all channels 3 Disable manual record Click the status ico...

Страница 59: ...2 Check the checkbox of Enable 3 Select Mode from the dropdown list There are three different modes for the date format to configure holiday schedule By Month By Week and By Date are selectable 4 Set...

Страница 60: ...he channel both holiday schedule and normal day schedule are displayed Repeat the above step 4 to set Holiday schedule for other channel If the holiday schedule can also be used to other channels clic...

Страница 61: ...ase refer to Chapter 12 3 Managing HDD Group There should be at least another HDD which is in Read Write status Steps 1 Enter HDD Information interface Menu HDD Figure 5 19 HDD General 2 Select the HD...

Страница 62: ...checkbox of Redundant Record 4 Click Apply to save settings If the encoding parameters can also be used to other channels click Copy and choose the channel you want to apply the settings Available fro...

Страница 63: ...e HDD group 2 Click Apply to save your settings 3 Click OK to back to the upper level menu Repeat the above steps to configure more HDD groups 5 Choose the Channels which you want to save the record f...

Страница 64: ...24 Export Search Result 5 Protect the record files 1 Find the record files you want to protect and then click the icon which will turn to indicating that the file is locked The record files of which t...

Страница 65: ...you want to save files in the HDD change the property to R W If there is only one HDD and is set to Read only the DVR cannot record any files Only live view mode is available If you set the HDD to Rea...

Страница 66: ...of 1080 Efficient Mode and click Apply to pop up the attention box 4 Click Yes to reboot the device to have new settings taken effect Task2 Disabling the 1080P Efficient Mode Steps 1 Enter the Record...

Страница 67: ...Chapter 6 Playback Available from A1 Security Cameras www a1securitycameras com email sales a1securitycameras com...

Страница 68: ...will be played back Figure 6 1 Instant Playback Interface 6 1 2 Playing Back by Normal Search Playback by Channel Enter the Playback interface Right click a channel in live view mode and select Playba...

Страница 69: ...dio on Mute Start Stop clipping Save clip s Add default tag Add customized tag Tag management Digital Zoom Smart Search Pause Reverse play Single frame reverse play Stop Pause play Play Single frame p...

Страница 70: ...to play back before the event For example when an alarm triggered the recording at 10 00 if you set the pre play time as 5 seconds the video plays back from 9 59 55 Post play The time you set to play...

Страница 71: ...he normal speed while the video without motion will be played in the 16 time speed The smart playback rules and areas are configurable Before you start To get the smart search result the corresponding...

Страница 72: ...ion Select the button and click on the image to specify the start point and end point of the line Intrusion Detection Click the button and specify 4 points to set a quadrilateral region for intrusion...

Страница 73: ...ult Filter The Result Filter function is supported by the IP camera only 6 1 6 Playing Back by System Logs Purpose Play back record file s associated with channels after searching system logs Steps 1...

Страница 74: ...of Playback by Log 6 1 7 Playing Back by Sub periods Purpose The video files can be played in multiple sub periods simultaneously on the screens Steps 1 Enter Playback interface Menu Playback 2 Selec...

Страница 75: ...or 1 hour on each screen simultaneously 6 1 8 Playing Back External File Purpose Perform the following steps to look up and play back files in the external devices Steps 1 Enter the Playback interface...

Страница 76: ...ton until the speed changes to Single frame 2 One click on the playback screen represents playback or adverse playback of one frame You can use button in toolbar to stop the playing 6 2 2 Digital Zoom...

Страница 77: ...ely Up to 16 ch simultaneous reverse playback is supported Steps 1 Enter Playback interface Menu Playback 2 Check more than one checkboxes to select multiple channels and click to select a date on the...

Страница 78: ...Chapter 7 Backup Available from A1 Security Cameras www a1securitycameras com email sales a1securitycameras com...

Страница 79: ...e Figure 7 1 Normal Video Search for Backup 4 The matched video files are displayed in Chart or List display mode Click to play the record file if you want to check it Check the checkbox before the vi...

Страница 80: ...9 A prompt message will pop up after the backup process is complete Click OK to confirm Figure 7 5 Export Finished The backup of video files using USB writer or SATA writer has the same operating ins...

Страница 81: ...lipping record file s 3 Click the to enter the file management interface 4 Export the video clips in playback Please refer to step5 of Chapter 7 1 1 Backing up by Normal Video Search for details 7 2 M...

Страница 82: ...Chapter 8 Alarm Settings Available from A1 Security Cameras www a1securitycameras com email sales a1securitycameras com...

Страница 83: ...ons Figure 8 2 Set Detection Area and Sensitivity 3 Click Trigger Channel tab and select one or more channels which will start to record or become full screen monitoring when motion alarm is triggered...

Страница 84: ...Actions Repeat the above steps to set up arming schedule of other days of a week Click the OK button to complete the motion detection settings of the channel 6 If you want to set motion detection for...

Страница 85: ...k the Setting checkbox and click button to set its alarm response actions Figure 8 6 Alarm Input Settings Interface 3 Select Trigger Channel tab and select one or more channels which will start to rec...

Страница 86: ...PTZ linkage of the alarm input Set PTZ linking parameters and click the OK button to complete the settings of the alarm input Please check whether the PTZ or speed dome supports PTZ linkage One alarm...

Страница 87: ...Figure 8 9 Copy Settings of Alarm Input Available from A1 Security Cameras www a1securitycameras com email sales a1securitycameras com...

Страница 88: ...oose one day of a week and up to eight time periods can be set within each day Or you can click the Copy button to copy the time period settings to other day s Time periods shall not be repeated or ov...

Страница 89: ...the above steps to finish settings of other channels or click the Copy button copy the above settings to them Available from A1 Security Cameras www a1securitycameras com email sales a1securitycamera...

Страница 90: ...channel 1 Click Arming Schedule tab to set the arming schedule of response action 2 Choose one day of a week and up to eight time periods can be set within each day Time periods shall not be repeated...

Страница 91: ...ttings of other channels or click the Copy button copy the above settings to them 5 Click the Apply button to save and activate the settings Available from A1 Security Cameras www a1securitycameras co...

Страница 92: ...ng method of video quality diagnostics Set arming schedule and alarm response actions of the channel 1 Click Arming Schedule tab to set the arming schedule of response action 2 Choose one day of a wee...

Страница 93: ...ous exceptions Menu Configuration Exceptions Figure 8 15 Exception Settings Interface 2 Check the checkbox of Enable Event Hint to display the Event Exception icon when an exceptional event occurs And...

Страница 94: ...host when an event occurs The alarm host refers to the PC installed with Remote Client The alarm signal will be transmitted automatically at detection mode when remote alarm host is configured Please...

Страница 95: ...r days of a week You can also use Copy button to copy an arming schedule to other days Click the OK button to complete the arming schedule setting of alarm output 4 Click the Apply button to save the...

Страница 96: ...Chapter 9 VCAAlarm Available from A1 Security Cameras www a1securitycameras com email sales a1securitycameras com...

Страница 97: ...the face detection alarm Please refer to step3 step5 of Chapter 9 1 Setting Motion Detection Alarm for detailed instructions 5 Click the Rule Settings button to set the face detection rules You can c...

Страница 98: ...ions for the line crossing detection alarm 6 Click the Rule Settings button to set the line crossing detection rules 1 Select the direction to A B A B or A B A B Only the arrow on the B side shows whe...

Страница 99: ...and drag the slider to set the detection sensitivity Sensitivity Range 1 100 The value of the sensitivity defines the size of the object which can trigger the alarm The higher the value is the more e...

Страница 100: ...o clear the existing virtual line and re draw it Up to 4 rules can be configured 8 Click Apply to save the settings 9 6 Region Exiting Detection Purpose Region exiting detection function detects peopl...

Страница 101: ...configured 9 10 Parking Detection Purpose Parking detection function detects illegal parking in places such as highway one way street etc and a series of actions can be taken when the alarm is trigger...

Страница 102: ...as the sudden increase decrease of the sound intensity and some certain actions can be taken when the alarm is triggered The audio exception detection is supported by all analog channels Steps 1 Ente...

Страница 103: ...s ranges from 1 to 100 and the higher the value is the more easily the defocus image can trigger the alarm 9 15 PIR Alarm Purpose A PIR Passive Infrared alarm is triggered when an intruder moves withi...

Страница 104: ...Chapter 10 VCA Search Available from A1 Security Cameras www a1securitycameras com email sales a1securitycameras com...

Страница 105: ...al storage device for matching the detected face pictures 5 Set the similarity level for the source pictures and the captured pictures 6 Click Search to start searching The search results of face dete...

Страница 106: ...e dropdown list including the line crossing detection intrusion detection unattended baggage detection object removal detection region entrance detection region exiting detection parking detection loi...

Страница 107: ...t the country from the drop down list for searching the location of the vehicle plate 5 Input the plate No in the field for search 6 Click Search to start searching The search results of detected vehi...

Страница 108: ...10 5 People Counting Interface 6 You can click the Export button to export the statistics report in excel format Available from A1 Security Cameras www a1securitycameras com email sales a1securitycame...

Страница 109: ...ssing 3 Select the report type to Daily Report Weekly Report Monthly Report or Annual Report 4 Set the statistics time Figure 10 6 Heat Map Interface 5 Click the Counting button to export the report d...

Страница 110: ...Chapter 11 Network Settings Available from A1 Security Cameras www a1securitycameras com email sales a1securitycameras com...

Страница 111: ...interface you can configure the following settings NIC Type IPv4 Address IPv4 Gateway MTU and DNS Server If the DHCP server is available you can check the checkbox of DHCP to automatically obtain an...

Страница 112: ...status of PPPoE connection 11 2 2Configuring PT Cloud Purpose PT Cloud provides the mobile phone application and as well the service platform page to access and manage your connected NVR which enable...

Страница 113: ...on Network 2 Select the DDNS tab to enter the DDNS Settings interface 3 Check the DDNS checkbox to enable this feature 4 Select DDNS Type Five different DDNS types are selectable IPServer DynDNS Peanu...

Страница 114: ...egister the device on the HiDDNS server 1 Go to the HiDDNS website www hiddns com 2 Click to register an account if you do not have one and use the account to log in 3 In the Device Management interfa...

Страница 115: ...ronization interval can be set from 1 to 10080 minutes and the default value is 60 minutes If the DVR is connected to a public network you should use a NTP server that has a time synchronization funct...

Страница 116: ...Configure the external port No for server port http port and RTSP port respectively You can use the default port No or change it according to actual requirements External Port indicates the port No fo...

Страница 117: ...ftware the multicast address must be the same as the device s multicast IP RTSP Port The RTSP Real Time Streaming Protocol is a network control protocol designed for use in entertainment and communica...

Страница 118: ...will be the certificate information after you successfully create and install the certificate Figure 11 17 Installed Certificate Property 6 Check the checkbox to enable the HTTPS function 7 Click the...

Страница 119: ...d Pictures Check the checkbox of Enable Attached Picture if you want to send email with attached alarm images The interval is the time between two captures of the alarm images Interval The interval re...

Страница 120: ...DVR to network the captured network data packet can be exported to USB flash disk SATA and other local backup devices Steps 1 Enter the Network Traffic interface Menu Maintenance Net Detect 2 Click th...

Страница 121: ...ut with other information instead of this one you can click Network button to show the quick setting interface of the network parameters Figure 11 24 Network Parameters Configuration 11 4 4Checking Ne...

Страница 122: ...bandwidth of Remote Live View bandwidth of Remote Playback and bandwidth of Net Total Idle 4 Click Refresh button to get the latest bandwidth statistics Available from A1 Security Cameras www a1securi...

Страница 123: ...Chapter 12 HDD Management Available from A1 Security Cameras www a1securitycameras com email sales a1securitycameras com...

Страница 124: ...l change from Uninitialized to Normal Figure 12 4 HDD Status Changes to Normal Initializing the HDD will erase all data on it The HDDs which are free of working for a long time can be enabled to sleep...

Страница 125: ...the allocated NetHDD 4 Select the type to NAS or IP SAN 5 Configure the NAS or IP SAN settings Add NAS disk 1 Enter the NetHDD IP address in the text field 2 Click Search to search the available NAS d...

Страница 126: ...SAN disks can be added Figure 12 9 Add IP SAN Disk 5 After having successfully added the NAS or IP SAN disk return to the HDD Information menu The added NetHDD will be displayed in the list If the add...

Страница 127: ...ck the Apply button and the following Attention box will pop up Figure 12 12 Attention for Reboot 4 Click the Yes button to reboot the device to activate the changes 5 After reboot of device enter the...

Страница 128: ...is set to redundancy the video can be recorded both onto the redundancy HDD and the R W HDD simultaneously so as to ensure high security and reliability of video data Steps 1 Enter the HDD Informatio...

Страница 129: ...ou can copy the quota settings of the current camera to other cameras if required Click the Copy button to enter the Copy Camera interface as shown in Figure 12 17 Figure 12 17 Copy Settings to Other...

Страница 130: ...Status 1 If the status of HDD is Normal or Sleeping it works normally If the status is Uninitialized or Abnormal please initialize the HDD before use And if the HDD initialization is failed please rep...

Страница 131: ...Menu Maintenance HDD Detect 2 Click the S M A R T Settings tab to enter the interface 3 Select the HDD to view its S M A R T information list as shown in Figure 12 20 If you want to use the HDD even w...

Страница 132: ...tab to enter the interface 3 Select a HDD and click the Detect button to start detecting Figure 12 22 Bad Sector Detecting 4 You can click the Pause button to pause the detection and click the Resume...

Страница 133: ...ow to select the linkage action s for HDD error as shown in Figure 12 23 The linkage actions can be selected to Audible Warning Notify Surveillance Center Send Email and Trigger Alarm Output Figure 12...

Страница 134: ...Chapter 13 Camera Settings Available from A1 Security Cameras www a1securitycameras com email sales a1securitycameras com...

Страница 135: ...an use the mouse to click and drag the text frame on the preview window to adjust the OSD position 7 Copy Camera Settings 1 If you want to copy the OSD settings of the current camera to other cameras...

Страница 136: ...d with different frame colors Up to 4 privacy mask zones can be configured and the size of each area can be adjusted 5 The configured privacy mask zones on the window can be cleared by clicking the co...

Страница 137: ...ct the mode from the drop down list of Mode there are four modes selectable Standard Indoor Dim Light and Outdoor 5 Adjust the image parameters according to actual needs The parameters include Brightn...

Страница 138: ...Chapter 14 DVR Management and Maintenance Available from A1 Security Cameras www a1securitycameras com email sales a1securitycameras com...

Страница 139: ...VR can be stored in log files which can be viewed and exported at any time Steps 1 Enter the Log Search interface Menu Maintenance Log Information Figure 14 2 Log Search Interface 2 Set the log search...

Страница 140: ...ct the backup device from the dropdown list of Device Name 8 Click the Export to export the log files to the selected backup device You can click the New Folder button to create new folder in the back...

Страница 141: ...e excel file to it Steps 1 Enter the camera management interface Menu Camera IP Camera Import Export 2 Click the IP Camera Import Export tab the content of detected plugged external device appears 3 C...

Страница 142: ...ration File interface Menu Maintenance Import Export 2 Click the Export button to export configuration files to the selected local backup device 3 To import a configuration file select the file from t...

Страница 143: ...er the upgrading is complete reboot the DVR to activate the new firmware 14 5 2Upgrading by FTP Before you start Configure PC running FTP server and DVR to the same Local Area Network Run the 3rd part...

Страница 144: ...teway MTU NIC working mode default route server port etc and user account parameters to the factory default settings Factory Defaults Restore all parameters to the factory default settings Restore to...

Страница 145: ...Chapter 15 Others Available from A1 Security Cameras www a1securitycameras com email sales a1securitycameras com...

Страница 146: ...ame with the video input standard Resolution Select the output resolution which must be the same with the resolution of the VGA HDMI display Time Zone Select the time zone Date Format Select the date...

Страница 147: ...e DST Settings tab Figure 15 2 DST Settings Interface You can check the checkbox before the Auto DST Adjustment item Or you can manually check the Enable DST checkbox and then you choose the date of t...

Страница 148: ...e set in the range of 1 255 and the default No is 255 CVBS Output Brightness Adjust the video output brightness via the CVBS interface Auto Logout Set timeout time for menu inactivity E g when the tim...

Страница 149: ...ng using a minimum of 8 characters including upper case letters lower case letters numbers and special characters in order to increase the security of your product And we recommend you reset your pass...

Страница 150: ...g of network camera s This function is supported by HDVR series Local Advanced Operation Operating HDD management initializing HDD setting HDD property upgrading system firmware Local Shutdown Reboot...

Страница 151: ...ra s Remote PTZ Control Remotely controlling PTZ movement of the selected camera s Local Video Export Locally exporting recorded files of the selected camera s Local Camera Management is provided for...

Страница 152: ...ord in the text field of Password and Confirm STRONG PASSWORD RECOMMENDED We highly recommend you create a strong password of your own choosing using a minimum of 8 characters including upper case let...

Страница 153: ...Chapter 16 Appendix Available from A1 Security Cameras www a1securitycameras com email sales a1securitycameras com...

Страница 154: ...DDNS Dynamic DNS is a method protocol or network service that provides the capability for a networked device such as a router or computer system using the Internet Protocol Suite to notify a domain n...

Страница 155: ...s up Possible Reasons a No HDD is installed in the device b The installed HDD has not been initialized c The installed HDD is not compatible with the device or is broken down Steps 1 Verify at least o...

Страница 156: ...Reasons a The frame rate is not the real time frame rate b The DVR supports up to 16 channel synchronize playback at the resolution of 4CIF if you want a 16 channel synchronize playback at the resolut...

Страница 157: ...detected and can be read and written normally 4 Check if the fault is solved by the above steps If it is solved finish the process If not please contact the engineer from our company to do the further...

Отзывы: