background image

11

Vista Pro 6 Server: Viewing Mode

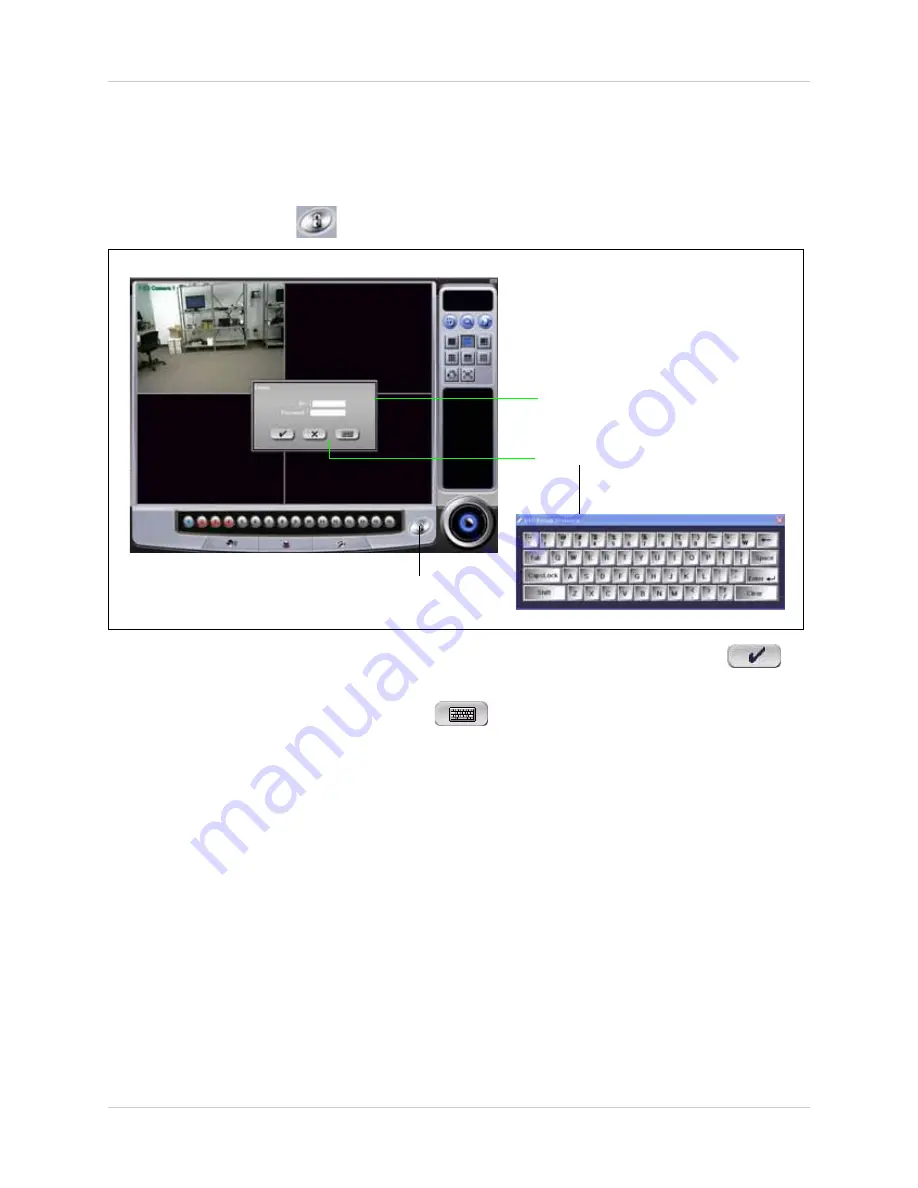
LOGGING INTO THE VIEWER

To log in to the Viewer:
1. Click the 

Vista Pro 6 Server 

shortcut on your desktop, or locate the application in the start 

menu.

2. Click the 

Lock Button

 (

 ). The Logon window appears.

3. Under 

ID

, enter 

admin

under 

Password

, enter 

1111

. Click the checkmark button(

 )to 

log in.

NOTE: 

Click the Virtual Keyboard button (

 ) to type in the User ID and Password if you 

do not have access to a keyboard.

NOTE: 

It is recommended to change the default password. For details on changing the admin 

password, see “Changing User Account Password” on page 38.

NOTE: 

Click the 

Exit 

button on the bottom right hand corner of the window to exit the program.

Logon window.
Default ID: admin
Default Password: 1111

Figure 4.0 Log in window and Virtual Keyboard .

Virtual Keyboard button

Lock Button

Содержание QLR460 SERIES

Страница 1: ...Copyright 2010 Lorex Technology Inc www lorexcctv com INSTRUCTION MANUAL English Version 1 0 PCI CARD DIGITAL VIDEO RECORDER QLR460 SERIES...

Страница 2: ...TO QUALIFIED SERVICE PERSONNEL The lightning flash symbol within an equilateral triangle is intended to alert the user to the presence of uninsulated dangerous voltage within the products enclosure t...

Страница 3: ...roduct Consumer Guides and Video Tutorials are available on our web site at www lorexcctv com support If you require further installation assistance please visit www lorexcctv com installation or cont...

Страница 4: ...nsert Need Help pour ob tenir de l information sur le service la cli ent le et le support technique Veuillez constater qu une fois que les com posantes de ce produit ont t retir es de l emballage vous...

Страница 5: ...il Customer Care for warranty and accessory sales customerservice lorexcorp com Customer Feedback info lorexcorp com Product Support is available 24 7 including product information user manuals quick...

Страница 6: ...s visitez www lorexcctv com Veuillez veiller enregistrer votre produit www lorexcctv com registration pour recevoir des mises jour et l information de produit Cerci rese de por favor colocar su produc...

Страница 7: ...ced by your service technician 7 Power Cord Protection Power supply cords should be routed so that they are not likely to be walked on or pinched by items placed upon or against them paying particular...

Страница 8: ...ent fire electric shock or other hazards 16 Safety Check Upon completion of any service or repairs to this video product ask the service technician to perform safety checks recommended by the manufact...

Страница 9: ...t the specifications are subject to change without notice from time to time FCC CLASS B NOTICE NOTE This equipment has been tested and found to comply with the limits for a Class B digital device purs...

Страница 10: ...compatible with Windows XP Vista and 7 Viewing options Quad Full Screen Sequencing Easy search and playback of digitally recorded video Password security protection Free Lorex DDNS Dynamic Domain Nam...

Страница 11: ...th an external hard drive ie C drive external hd 8 Disabling User Account Control 9 Disabling Login Password 9 Vista Pro 6 Server Viewing Mode 10 Viewing Mode 10 Logging into the Viewer 11 Adjusting V...

Страница 12: ...ntrols 42 Using The Timeline 43 Bookmarking Video Events 43 Printing Screenshots 44 Backing Up Video 45 Managing Your Saved Video 46 Copying Videos to a CD DVD Writer 46 Saving Video Screenshots 47 Pl...

Страница 13: ...your DDNS information into the system 66 Connecting to your system using Internet Explorer 66 DDNS Viewing Interface 68 Appendix B What Is DDNS 69 How does DDNS work 69 Enabling DDNS 69 How DDNS benef...

Страница 14: ...x...

Страница 15: ...RIES PCI SURVEILLANCE CARD MANUAL AND SOFTWARE CD 2 CHANNEL AUDIO CABLE CAMERA CONFIGURATIONS AND CONTENTS MAY VARY BY MODEL PLEASE REFER TO YOUR PACKAGE FOR SPECIFIC CONTENT DETAILS CHECK YOUR PACKAG...

Страница 16: ...mdate the QLR460 series Minimum System Requirements Intel Pentium 4 or higher processor Windows XP Vista 7 32 bit versions Optical Drive 250GB SATA hard drive Separate video card with 64MB of memory 8...

Страница 17: ...ctions on how to remove the case cover 3 Remove the PCI slot s metal plate at the back of the computer 4 Push the card firmly into the PCI slot until it clicks in place The gold colored connector pins...

Страница 18: ...ng requires audio capable cameras not included Installing the Cameras To install the cameras to your QLR card 1 Power off your system 2 Screw in the BNC connector from the camera to the back of the QL...

Страница 19: ...etup exe to install Vista Pro 6 Client 3 The installation screen opens Click Install then click Express to install Vista Pro 6 Server 4 After the installation is complete remove CD and restart your sy...

Страница 20: ...s complete remove CD and restart your system NOTE ToinstallVistaPro6ClientintheAdvancedmenu youmustinstallthefollowingprograms in this order 1 DVR Board Driver 2 Vista Pro 6 Client 3 Storage Managemen...

Страница 21: ...ory and re allocating storage space You can change the save directory and re allocate storage space by using the Storage Management program For more information see Storage Management See Appendix E R...

Страница 22: ...ive with a partition ie C and D drive If you have a second partition in your hard drive ie a D drive with ample space for example 100GB and above it is recommended to set your partition as the storage...

Страница 23: ...e User Account Control to protect your computer and then click OK to save your settings Click on Restart Now to restart your computer Disabling Login Password Disabling the login password allows Vista...

Страница 24: ...inactive audio do not appear in camera list 4 Relay Control Button Not supported in this model 5 Video Color Adjustment Adjust video brightness contrast saturation and hue 6 Lock Button Click to log i...

Страница 25: ...button to log in NOTE Click the Virtual Keyboard button to type in the User ID and Password if you do not have access to a keyboard NOTE It is recommended to change the default password For details on...

Страница 26: ...The Camera List The Camera List allows you to have a bird s eye view of the current status of the channels A Blue button indicates the channel is active A Red button indicates the channel is offline...

Страница 27: ...the bottom of the window 3 Click the channel that you wish to adjust colors A red outline around the channel indicates the channel is selected 4 Click and hold or to increase or decrease Brightness Co...

Страница 28: ...s When a system error occurs the Watch Dog forces the system to restart Once the system restarts the viewer automatically begins recording Forcing a system to restart when there are potential problems...

Страница 29: ...amera feeds 1 Click the Setup button to open the System tab 2 Beside Init Screen Mode click Set The Display Layout window opens 3 Click the All Clear button to empty the assigned cameras in the window...

Страница 30: ...4 CHANNEL VIEW To start the program with 1 channel or 4 channel view 1 Click the Setup button The System tab opens 2 Beside Init Screen Mode click Set 3 Under the Init Screen Mode drop down menu sele...

Страница 31: ...ab opens 2 Click the Backup Setting button The Schedule Backup Setup window opens Click the Backup Setting button ClicktheSelect button to choose save directory Select the Enable schedule Backup check...

Страница 32: ...drive to re write itself when it is full 6 Under Backup Type select Full Backup to back up the entire library of video events or Under Backup Type select Selected Specification time Backup Select the...

Страница 33: ...Setup window opens Enable Schedule Backup and Choose a Save Directory 1 Select the Enable schedule backup check box on the top left corner of the window 2 Under Backup Device Select click the Select b...

Страница 34: ...SCENARIO B SCHEDULING A 24 HR FULL BACKUP The shop owner may want to backup all 24 hours of video starting on December 24th 2010 at 11 00pm every 2 days To back up 24 hours of video on a scheduled tim...

Страница 35: ...ed Settings button The Advanced system setting window opens 3 Under System Setting configure the following Video Signal Type Select NTSC or PAL Video loss beep Select check box if you want the compute...

Страница 36: ...of the week Or Click the buttons with the days of the week SUN SAT and from the drop down menu select the Hour 24 hour clock and Minute you want the system to reboot 6 Under Auto Shutdown click the Us...

Страница 37: ...remotely into the viewer You can also personalize the information on the DVR This allows you to easily distinguish which system you are connected to if you operate more than one system To retrieve yo...

Страница 38: ...ically you may want to prevent a camera from recording To disable a camera from recording 1 Click the Setup button The System tab opens 2 Under Camera On Off click the camera that you want to enable o...

Страница 39: ...ideo feed you are viewing This is useful in night time footage since you can quickly identify what camera you are viewing To change the camera name 1 Click the Setup button and then click the Camera t...

Страница 40: ...our events The screen will display a black screen while the system records To enable Covert recording 1 Click the Setup button and then click the Camera tab The Camera tab opens 2 Under Camera Select...

Страница 41: ...odes that allow you to save storage space and to specify the type of recording you want for each camera Setting cameras to record Motion is the most common setting To adjust recording modes 1 Click th...

Страница 42: ...t Records continuously and records Event recordings Event recordings can be a combination of Sensor or Motion 4 Drag the mouse cursor across the day and time you wish to apply the scheduled recording...

Страница 43: ...at days you want to enable Normal Event recording 4 Under Priority Motion Recording select the Normal recording frame rate Under Event Recording select the Event recording frame rate 5 Under Event Sel...

Страница 44: ...d in Holiday mode 5 Type in the name of the holiday in the blank field You cannot have duplicate names 6 Click Add Your holiday populates in the list Click OK to save your settings Click the Holiday S...

Страница 45: ...s when motion is detected To configure camera notifications 1 Under Select Camera select a camera you wish to configure 2 Under Local Event Notify check off the events you want to occur when a system...

Страница 46: ...4 Under Motion Detection Area select Full Area or Partial Area If Partial Area is selected you can select certain portions of the screen to detect motion To select a certain portion of the screen cli...

Страница 47: ...the settings to 3 Under Audio Setting select the Live checkbox to listen to live audio select the Recording checkbox to record audio from the channel To listen to live audio when viewing in Vista Pro...

Страница 48: ...browser Prerequisites You must set up a DDNS account For details on how to set up a DDNS account see Appendix A Viewing Your System Remotely Using DDNS on page 64 To configure DDNS settings 1 Click t...

Страница 49: ...ngs 1 Click the Setup button and then click the Network tab The Network tab opens 2 Under Network Config click the E Mail Set button The E mail configuration window opens 3 Under Select Camera click t...

Страница 50: ...the event via e mail 10 Beside Frequency enter how many minutes in between you want notifications to be sent 11 Click the Email Test button to send a test e mail 12 Click OK to save your settings NOT...

Страница 51: ...u do not want them to view all the camera channels To open the User tab Click the Setup button and then click the User tab The User tab opens ADDING A NEW USER FOR VISTA PRO 6 CLIENT To add a guest ac...

Страница 52: ...ount CHANGING USER ACCOUNT PASSWORD To modify a user s password 1 Click the Setup button and then click the User tab The User tab opens 2 Select a user from the User list then click the Modify button...

Страница 53: ...earch archive and playback recorded events from your cameras To open the Search Mode window Click the Search button in Live view The Search window opens Event Calendar Video Timeline Video Playback Co...

Страница 54: ...layback 1 Right click on the channel you wish to view events from 2 Select how many minutes you wish to start viewing the video from A video playback screen appears 3 Use the video controls to play vi...

Страница 55: ...1 Click the Digital Zoom button The Zoom window opens near the top of the screen 2 Drag the slider to zoom in or out of the image Drag within the red box to move zoom location 3 Click the Digial Zoom...

Страница 56: ...ike to begin viewing the video 3 Click the Panorama button then click the foreward playback button The video plays frame by frame in a 4x4 window VIDEO CONTROLS 1 Select date to begin viewing video 2...

Страница 57: ...d like to begin to watch click the timeline to mark the timeline in red Next click on the foreward playback button to begin viewing the video BOOKMARKING VIDEO EVENTS Bookmarking video events allows y...

Страница 58: ...k the View Image button Click the Exit 7 Use the Video controls to begin video playback PRINTING SCREENSHOTS To print a screenshot of your video 1 Click on the Event Calendar and locate the date of th...

Страница 59: ...the checkbox if you wish to back up audio Under Select Time select the time range you want to back up Under Select Media to Save select the backup media you wish to use 5 To select a different CD DVD...

Страница 60: ...t directory click Copy Select the directory you wish to save the video file Copying Videos to a CD DVD Writer To copy data to your CD or DVD writer 1 Click the Save button and then click on CD Burn Th...

Страница 61: ...p left corner of the window to select the save directory 3 Click OK to save your picture NOTE UsetheImageAnalysissoftwaretoverifythatimagestakenusingVistaPro6aregenuine See Appendix C Using The Image...

Страница 62: ...t list populates in the Log list 5 Double click on the event you wish to view The image appears in the Playback window on the left Use the playback controls to navigate video Click Print to print scre...

Страница 63: ...h Click Load First to find the first immediate event that matches your search criteria Click Search to populate a list of results in the Log list 7 Select an event from the Log list Use the play contr...

Страница 64: ...ons to Undo Zoom or Revert Image to default settings NOTE You can move the Image Adjuster window by dragging it USING PTZ CONTROLS To control your PTZ Pan Tilt Zoom cameras not included click the PTZ...

Страница 65: ...4 Under the Description field enter the area that the camera will point to ie Front Door 5 Go back to the PTZ control and point the camera to the desired camera angle 6 In the Preset window select th...

Страница 66: ...t Touring setting window opens 2 Under the Tour No and Description field enter the touring number and description ie touring number 1 front door 3 Under Reg Preset No select the pre set settings and t...

Страница 67: ...ely To open Remote Viewing 1 Double click the Vista Pro 6 Client icon or open the Vista Pro 6 Client program in your Programs list The Vista Pro 6 Client log in window opens 2 Under ID enter admin und...

Страница 68: ...r New Site The Site Setup window opens 3 Enter the following into the blank fields Under Name enter the name of the system this can be any name you wish Under IP or URL enter the DDNS address you set...

Страница 69: ...VIDEO USING VISTA PRO 6 CLIENT To search for video click the Search button near the top left corner of the window The search menu is identical to the local viewing software For details on operating t...

Страница 70: ...nel Split Configure how many channels Vista Pro 6 Client should start up with Select 1 Split 4 Split default 9 Split 16 Split 36 Split 3 Text Setup Allows you to change the font style when overlay is...

Страница 71: ...drop down menu select the interval Vista Pro 6 Client should attempt to connect ie every 1 minute or every 10 minutes VIEWING MULTIPLE DVRS AND SYSTEMS You can view multiple systems using the Group f...

Страница 72: ...eft 3 Under the camera list on the left drag the desired cameras into the empty channel boxes 4 Click Save Array to save your changes Viewing Group Channels To view the group channels that you created...

Страница 73: ...ip while watching an event 1 Click on the channel you wish to record The channel highlights with a red box 2 Click the AVI Save button to begin recording Click the button again to stop recording NOTE...

Страница 74: ...quality with fast frame rates To adjust video quality Click the Image Quality button and select the desired quality ADDING AND MANAGING MULTIPLE USER ACCOUNTS You may have more than one user that can...

Страница 75: ...e user you wish to delete under the User List Click the Delete button NOTE You can only delete one user at a time NOTE The admin account cannot be deleted List of remote systems Select this checkbox t...

Страница 76: ...dow opens 3 Fill in the required blank fields Name Enter the name of the system IP or URL Enter the DDNS address of the system in full ie tomsmith lorexddns net Video Port Number Enter the Video Port...

Страница 77: ...ion button near the top of the window Use this feature when you view video in a single channel mode and wish to change channels quickly Auto Sequencing Auto sequencing allows the channels to continual...

Страница 78: ...into your system 5 Enter the DDNS address name you obtained during DDNS registration into Internet Explorer Obtaining Your Computer s MAC Address A MAC address is the physical address of your computer...

Страница 79: ...rranty Information with your purchase details optional NOTE Your account information user ID and password will be sent to your e mail address 3 Under the System Information fields Select the model num...

Страница 80: ...entering DDNS information in your system see Configuring DDNS Settings on page 34 Connecting to your system using Internet Explorer Once you have registered for Lorex DDNS and port forwarded the requ...

Страница 81: ...ct to connect to your system A new window opens that shows the DDNS remote login interface 5 Click on the message bar near the top of the browser and then click on Install ActiveX Control A new remote...

Страница 82: ...ng Interface Click Playback button Event Calendar Time selection Month and Year selection The Playback Window interface is similar to the Search mode in Vista Pro 6 Server To view video select the mon...

Страница 83: ...olves the problem Imagine DDNS as a human telephone operator If you wanted to contact your friend whose phone number changed every minute you can tell the telephone operator your friend s home address...

Страница 84: ...o manually browse the file browse for X extras ImageAnalysis where X is your CD DVD Rom drive 3 Double click on Setup to install Image Analyst Once installed the program shortcut can be found on your...

Страница 85: ...ng Backup Viewer To manually install Backup Viewer 1 Insert the software CD into your CD DVD drive 2 Browse for X extras BackupViewer where X is your CD DVD drive 3 Double click on the Setup file Foll...

Страница 86: ...age Management window opens 6 Under Drive Information select the directory of your current storage directory Click Append 7 Beside Input Workspace Count enter the amount of workspaces you wish to expa...

Страница 87: ...setup menu click on Install Advanced PTZ USB Drivers Installing the PTZ Card To install the PTZ controller card into your motherboard plug the ribbon cable head into the USB pin block in your mo ther...

Страница 88: ...Ch Split Screen 1 4 Recording Speed 30fps 4Ch 320 x 240 Resolution 352 x 240 720 x 240 Recording Modes Motion Detection Motion Continuous Playback Display 1 4 Search Modes Data Time Channel Event Netw...

Страница 89: ......

Страница 90: ......

Страница 91: ......

Страница 92: ...EX 1 888 425 6739 11262009 R10 SEE HEAR PROTECT PROTECT EVERYTHING THAT MATTERS Warehouse CVC6998HR Office CVC6993R Kitchen LW2702 Convenience Store LW2100 VQ1536HR Restaurant Home Office LW2002B Add...

Отзывы: