background image

30

Playback and Backup

6

Click




 to scroll through the list of videos. The videos are named by time. Videos are 

"packed" into 15 minute - 60 minute increments.
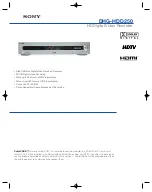
7

Click the 

BAK

 checkbox beside the video you wish to back up.

8

Click 

Backup

. Wait for the backup to finish before removing the USB memory drive.

NOTE: 

To change the duration of how often a file is "packaged", see “Configuring 
Backup File Duration (Pack Duration)” on page 40.

Viewing Backed Up Video

To view the downloaded video, you must install the Lorex Player software.

For details on viewing backed up video, see “Lorex Player 11: Playing Backed up Video on 
PC” on page 92 or see “Lorex Player for Mac: Viewing Backed up Video on Mac” on page 94.

Converting Backed Up Video to AVI Files

The DVR saves its backup files as proprietary video files. To share these files, you must 
convert them into .AVI files. Note that the AVI generator can also back up audio from 
audio-enabled cameras.

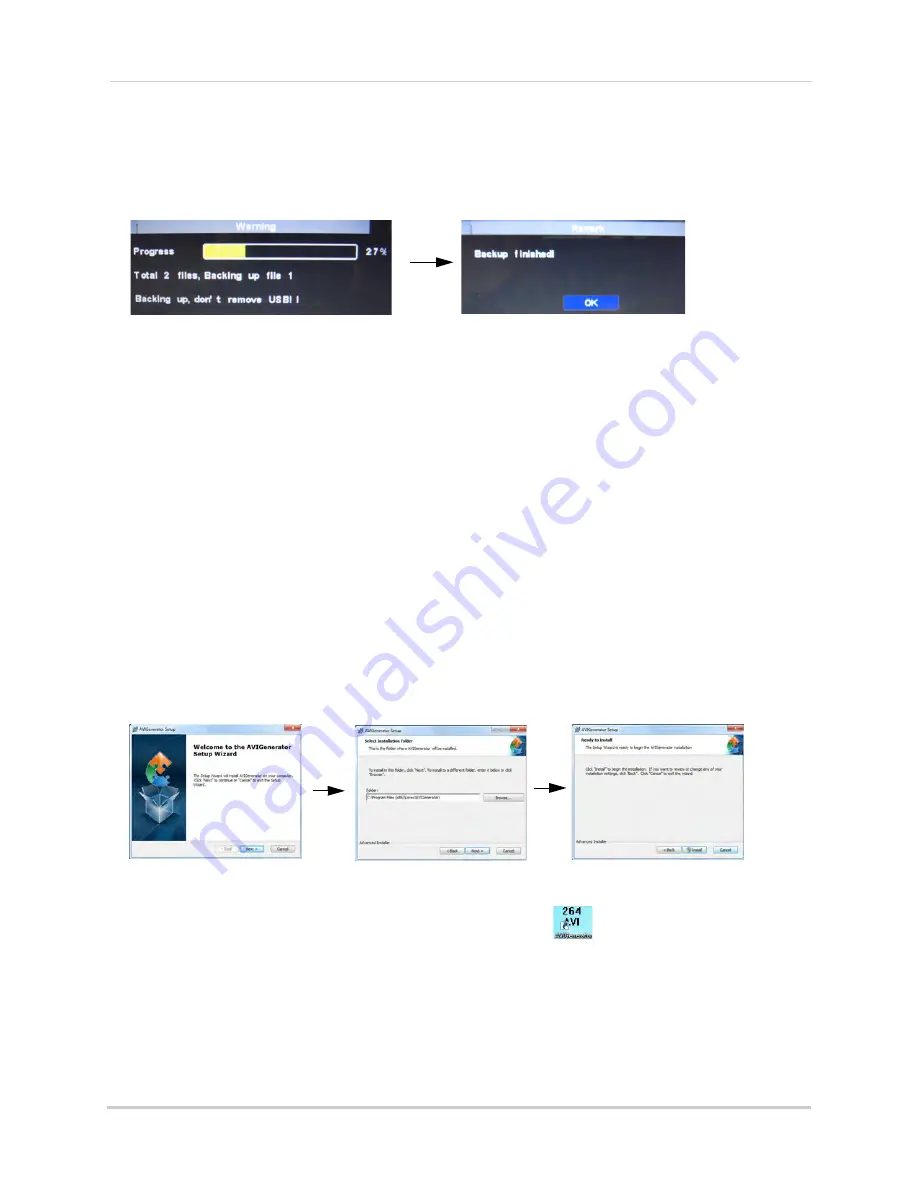
To install the AVI converter:

1

Insert the software disc in your computer’s CD/DVD rom drive.

2

Locate the 

AVI Generator 

software from the CD installation wizard.

3

Follow the on-screen instructions to install AVI Generator.

To start the AVI Generator:

1

Double-click the 

AVI Generator

 shortcut on the desktop (

).

Содержание LH140

Страница 1: ...TAL VIDEO SURVEILLANCE RECORDER LH140 ECO3 SERIES Copyright 2013 Lorex Technology Inc Instruction Manual English Version 2 0 THE ECONOMICAL SOLUTION TO PROTECT YOUR HOME OR BUSINESS RETAIL INDUSTRY BU...

Страница 2: ...G TO QUALIFIED SERVICE PERSONNEL The lightning flash with arrowhead symbol within an equilateral triangle is intended to alert the user to the presence of uninsulated dangerous voltage within the prod...

Страница 3: ...vice for warranty matters 1 888 425 6739 1 888 42 LOREX Tech Support for technical installation issues 1 877 755 6739 1 877 75 LOREX Mexico 001 800 681 9263 001 800 514 6739 International 800 425 6739...

Страница 4: ...rend les renseignements sur les produits guides d utilisation guides de d part rapide et FAQ www lorextechnology com support En ligne Hay 2 maneras f ciles de comunicarse con nosotros Norte Am rica At...

Страница 5: ...logy com support If you require further installation assistance please visit www lorextechnology com installation or contact a professional installer Please note that once the components of this produ...

Страница 6: ...de ce produit vous ne pouvez pas retourner celui ci directement au magasin sans son emballage original Favor de leer la gu a de instalaci n r pida y la gu a del usuario antes de instalar este product...

Страница 7: ...f the obsolete outlet 5 Power Sources This product should be operated only from the type of power source indicated on the marking label If you are not sure of the type of power supplied toyourlocation...

Страница 8: ...moving covers may expose you to dangerous voltage or other hazards Refer all servicing to qualified service personnel 2 ConditionsRequiringService Unplugthisproduct from the wall outlet and refer serv...

Страница 9: ...essly approved by the grantee of this device could void the user s authority to operate the device Toute modification non approuv e explicitement par le fournisseur de licence de l appareil peut entra...

Страница 10: ...n Name Service for advanced remote connectivity at all times Instant email alerts with snap shot attachments and web link 1 Recording time may vary based on recording resolution quality lighting condi...

Страница 11: ...rd Port Numbers 9 Quick Access to System Information 9 Connecting Cameras 10 Installation Tips 10 Installing Cameras 10 Connecting BNC Cameras to your DVR 11 Connecting and Removing BNC Cables 11 Mous...

Страница 12: ...g 36 Configuring the Time and Recording Time Display 37 Configuring Sequence Time 37 Changing the Video out Resolution 37 Restoring the System s Resolution if you see a Blank Screen 37 Adjusting Menu...

Страница 13: ...ngs 54 Saving Your System Configuration to a USB Flash Drive 54 Loading a System Configuration from a USB Flash Drive 55 Setting up your DVR for Remote Connectivity 56 System Requirements 56 Accessing...

Страница 14: ...83 Configuring your System to Beep During Motion 84 Configuring Alarm Notifications 85 Configuring Hard Drive Recording Mode 86 Configuring PTZ Parameters 86 Configuring the System Time and Date 87 Ch...

Страница 15: ...System Specifications 105 Appendix B Connecting a PTZ Camera 106 Configuring PTZ Settings 106 Using the PTZ Menu Local DVR 107 PTZ Presets and PTZ Cruise 108 Setting PTZ Presets 108 Selecting PTZ Pre...

Страница 16: ...xiv...

Страница 17: ...D USB MOUSE ETHERNET CABLE REMOTE CONTROL may not be exactly as shown DVR DIGITAL VIDEO RECORDER HDMI CABLE HARD DRIVE SIZE NUMBER OF CHANNELS AND CAMERA CONFIGURATION MAY VARY BY MODEL PLEASE REFER T...

Страница 18: ...ecording Password required does not override scheduled recording Press and hold for 15 seconds to reset the DVR to the default resolution DVR will reboot Press to stop resume recording When the channe...

Страница 19: ...to play pause video In Viewing mode press to open Search Menu to select playback time In Playback Mode press to fast forward Press repeatedly to increase fast forward speed In Playback Mode press to s...

Страница 20: ...cursor right 5 PTZ Within system menus press to confirm a selection In Live Viewing Mode press to open the System Information window In Live Viewing Mode press and hold for 6 seconds to open the PTZ...

Страница 21: ...d 4 VGA Connect a VGA monitor not included to view the system interface 5 PTZ Alarm Block Connect compatible PTZ cameras not included or alarm devices not included 6 IR EXT Service only not supported...

Страница 22: ...utput Connect a VGA monitor not included to view the system interface 5 PTZ Alarm Block Connect compatible PTZ cameras not included or alarm devices not included 6 IR EXT Service only not supported 7...

Страница 23: ...o the BNC port 8 channel model shown Step 2 Connect the Mouse Connect a USB mouse included to one of the USB ports 8 channel model shown USB port Step 3 Connect the Ethernet Cable Connect an ethernet...

Страница 24: ...rn the power switch to I to turn on the DVR At startup the system performs a basic system check and runs an initial loading sequence After a few moments the system loads a live display view 8 channel...

Страница 25: ...remotely using a computer or mobile device ALL the system port numbers below must be port forwarded on your router to log in to your system over the Internet or an internal network LAN Local DVR user...

Страница 26: ...ith high traffic In high risk locations have multiple cameras point in the same area This provides camera redundancy if a vandal attempts to damage the camera Installing Cameras 1 Mount the camera s t...

Страница 27: ...nsion cable Female power connector Digital Video Recorder 8 channel model shown Male power connector BNC Plug the camera power adapter to a power outlet Connecting and Removing BNC Cables BNC Bayonet...

Страница 28: ...buttons to perform the following Left Button Click to select a menu option During live viewing in Split screen View double click on a channel to view the selected channel in full screen double click t...

Страница 29: ...show the mouse cursor on the BNC monitor or the monitor connected with HDMI VGA 2 Navigation Cursors Press to navigate menus Presstoselectmenuitems InLiveViewing Mode press to access System Informati...

Страница 30: ...to navigate menus ENTER In menus press to confirm selections In Live Viewing Mode press to access System Information 3 MENU ESC Press to open the system menu In menus press to go back exit menu MUTE I...

Страница 31: ...recording status of the system C continuous normal recording M motion recording A alarm recording 3 Channel number Channel title Displays channel number or channel title To rename the channel number...

Страница 32: ...16 way 16 channel models only Split screen Mode PTZ Opens the PTZ controls Start Stop PTZ Cruise Start or stop the PTZ cruise function Zoom Opens digital zoom Must be in Full screen Live Viewing Mode...

Страница 33: ...on an option or field such as the User ID and Password fields if passwords are enabled The Virtual Keyboard opens Virtual Keyboard Click Shift to switch between upper and lowercase letters Click to m...

Страница 34: ...ct the Zoom button A Zoom icon appears on the screen 3 Click and drag on the area of the screen you would like to enlarge The image zooms in on the selected area Zoom icon Click and drag to zoom in on...

Страница 35: ...l PIP1X2 shows 1 channel in full screen and 2 other channels Click inside the main viewing area to change the full screen channel Click inside the white bar and drag to move the smaller channels Click...

Страница 36: ...ate and year Time Click inside the field and enter the time Optional Date Format Use the drop down menu to select MM DD YY or DD MM YY or YY MM DD Optional Time Format Use the drop down menu to select...

Страница 37: ...button DST Setup 2 Configure the following Daylight Saving Time Select Enable Time Offset Select the number of hours the system should move forward or backward when DST occurs Daylight Saving Time Mo...

Страница 38: ...e To enable NTP 1 Right click to open the Menu Bar and click the Main Menu button 2 Click System Beside NTP click Setup NTP Setup 3 Configure the following Enable Select Enable Server Address Select n...

Страница 39: ...ded data For more details see Configuring Hard Drive settings on page 50 Event Recording The system also includes motion recording M Recording Motion The system records when motion is detected by the...

Страница 40: ...he Record Search tab opens 2 Configure the following CH Select the channel you wish to search Select All to search all channels Search Date Enter the month date and year you wish to search for video P...

Страница 41: ...on Your search results appear in the calendar In the top portion of the calendar results are shown for each day in the month In the bottom portion results are shown for each hour in the selected day D...

Страница 42: ...trols To use the advanced playback controls 1 Move the mouse slightly to display the on screen playback controls You can also use the playback control buttons on the remote control Click the playback...

Страница 43: ...OR To create a custom time range click The button will become colored Move your mouse to the time you where you would like the range to start and click Then move your mouse to the time you where you...

Страница 44: ...ideo during playback mode and save it to a USB flash drive not included NOTE Video clip backup is only available when a single channel is selected for Playback To create a backup video clip 1 Connect...

Страница 45: ...cted to the rear panel of the DVR To back up video 1 Connect a USB flash drive to one of the USB ports on the rear panel of the DVR 2 Right click to open the Menu Bar and click the Record Search butto...

Страница 46: ...e For details on viewing backed up video see Lorex Player 11 Playing Backed up Video on PC on page 92 or see Lorex Player for Mac Viewing Backed up Video on Mac on page 94 Converting Backed Up Video t...

Страница 47: ...he desired file format 264 h 264 All File that you wish to search for Click Open Open 4 Click Start to convert and save the file in the default save folder Or click Save As to select a desired save fo...

Страница 48: ...both administrator and user passwords and enable disable password protection USER normal user only has access to live viewing search playback and other functions You may set up multiple USER accounts...

Страница 49: ...ultiple users to log in to the system When adding different users you can assign what menus they have access to For example you may want your friend to monitor your system while you are away while not...

Страница 50: ...r Enable Select Enable to enable the user account Password Enable Select Enable or Disable to enable or disable the system from prompting you for a user or admin password during log in Password Enter...

Страница 51: ...lor settings camera title video output 2 Search Search for recorded video and log files on the system 3 Alarm Configure motion detection and alarm settings 4 System Configure system time and user acco...

Страница 52: ...to appear U L Upper left hand corner D L Lower left hand corner U R Upper right hand corner D R Lower right hand corner OFF Do not display the channel name 4 Optional Use the drop downs next to Copy t...

Страница 53: ...4 Right click repeatedly to exit all menus The DVR prompts you to restart Click OK 5 The DVR restarts and asks you to confirm the new resolution Click Yes to confirm or No to revert to the old resolu...

Страница 54: ...tput mode between BNC mode and VGA HDMI mode When BNC mode is selected the mouse cursor appears on the BNC monitor To adjust the video margin 1 Click the Output tab 2 Click the Margin button 3 Drag th...

Страница 55: ...ondary monitor connected to the Video Out port First move the mouse and system interface to the Video Out monitor by pressing 0 three times on the remote control Complete the steps and then press 0 th...

Страница 56: ...ng Settings 1 Select the Rec Para tab 2 In the Channel drop down menu select the desired channel you wish to configure 3 In the PreRecord drop down menu select Enable to enable pre recording or Disabl...

Страница 57: ...Optional Use the top Copy and Copy To drop down to copy the recording schedule to a specific day or all days Click Copy to copy the schedule 5 Optional Use the bottom Copy and Copy To drop down to co...

Страница 58: ...tion for each channel If D1 is selected available options are CIF 320x240 HD1 720x240 orD1 720x480 If960Hmodeisselected availableoptions are 480x240 960x240 or 960x480 5 Under the FPS drop down menu s...

Страница 59: ...to see video available Click a time to play video from that time and date 6 Click on the hour of the video you want to play back 7 Select the channel or channels you want to play back 8 Click Play to...

Страница 60: ...eos that only have alarm attributes NOTE Videos are not marked as Alarm unless continuous recording is turned off and motion or alarm settings are enabled To perform an Event Search 1 Click the Event...

Страница 61: ...ing Network Type DHCP Static IP The system has the ability to operate in DHCP mode and Static IP mode After setting up your system it is highly recommended to set your system to use a static IP addres...

Страница 62: ...the DVR s Client and HTTP Port The DVR s Default Client port is 9000 The default HTTP port is 80 You must port forward the Client Port and HTTP port on your router to your DVR s IP address to enable r...

Страница 63: ...Disable Disables email notification If you want to use Lorex s email server recommended 1 In the Email drop down menu select Default Select Default 2 In the Sender Email field enter the email address...

Страница 64: ...d is 0000 to connect with a mobile device 3 To change the Mobile port click the field beside Mobile Port to enter a new port The default Mobile port is 1025 This must beportforwardedonyourroutertoenab...

Страница 65: ...kbox to enable the system to trigger a device connected to the alarm block Latch Time Enter the duration the alarm continues to trigger after the event ends ShowMessage Selectthecheckbox ifyou want th...

Страница 66: ...larmtriggerends For example if you select 30s 30 seconds the system continues to record for 30 seconds after the alarm trigger ends Full Screen Select the Full Screen check boxsothatthesystemgoesintof...

Страница 67: ...time including how to setup automatic Daylight Savings Time adjustments or NTP see Setting the Date and Time on page 20 Changing Date Format You can change the way the system displays the time i e Mon...

Страница 68: ...assword to unlock the system Adding Users Changing the Admin Password For details on changing admin and user passwords see ManagingPasswords on page 32 For details on creating User accounts see Adding...

Страница 69: ...e Update 7 Follow the on screen instructions to update the firmware Do not remove the USB flash drive or power off the DVR during the firmware update Wait for the system to reboot Restoring to Factory...

Страница 70: ...nt Type Select the event that triggers the system to send out a notification or alarmtrigger ChoosefromDiskNoSpace low hard drive space Disk Error hard drive error or Video Loss Enable Select Enable o...

Страница 71: ...in Menu 3 Click Advanced and select the Maintain tab 4 Click Save Settings Wait for the system to save your settings Click to save all system settings to a USB flash drive Loading a System Configurati...

Страница 72: ...or to using Lorex Web Client make sure your system meets or exceeds the following system requirements Description Requirement CPU Pentium 4 or above Operating System Windows XP Vista 7 8 Mac OSX 10 6...

Страница 73: ...d Mac Step 1 of 3 Connect your DVR to the Local Area Network 1 Power off your DVR by turning the power switch to 2 Connect an Ethernet cable included to the LAN port on the rear panel of the DVR Conne...

Страница 74: ...you must use the 32 bit version From the Start Menu click Internet Explorer Do not click Internet Explorer 64 bit 32 bit Internet Explorer 2 Enter http the IP address of the DVR colon and the HTTP po...

Страница 75: ...ernet Explorer it is recommended to use the Client Software provided on the CD or as a free download from www lorextechnology com For instructions see Lorex Client 11 Client Software for PC on page 67...

Страница 76: ...motely over the Internet Setting up remote connectivity allows you to view your DVR from any computer or compatible mobile device with Internet access NOTE Except where noted the instructions below ar...

Страница 77: ...r use with your system A DDNS account allows you to set up a web site address that points back to your local network This allows you to connect to your system remotely You must create a DDNS account i...

Страница 78: ...registration is required to register for DDNS 4 The Warranty page opens Click Activate Warranty to register your product for warranty 5 Under Your Address select an address or click Enter a New Addres...

Страница 79: ...Check the sticker underneath your DVR for the Product Model Number and Serial Number Click Save Warranty Select your address or enter a new address Enter your product and purchase details Click Save W...

Страница 80: ...it the DDNS page MAC Address Enter the MAC address of your Lorex product Press the PTZ button on the front panel to find your MAC address A MAC address is a permanent unique 12 digit address used to i...

Страница 81: ...r DDNS User Name Password Enter DDNS Device password tomsmith tsmith01 Example of entering DDNS information in the DDNS setup menu Beside Server select LOREXDDNS default 4 Under Domain Name enter your...

Страница 82: ...name URL Request HTTP Port number Colon Example of a DDNS address http tomsmith lorexddns net 80 DDNS Domain name created by you Colon Web Server Port number http lorexddns net Once you have entered...

Страница 83: ...R login screen appears 3 Configure the following IP Address Enter the DDNS address or local IP address of your DVR The DDNS address must include the URL Request you created when you registered for DDN...

Страница 84: ...4 6 7 5 1 Navigation Tabs Allows you to access the following tabs Live Watch live video Playback View saved video footage Remote Setting Configure system and networking options Local setting Configur...

Страница 85: ...sired viewing mode 5 Mute Click to mute audio 6 Main Screen Main display screen for live viewing and playback You can also drag the screens to any desired position 7 PTZ Controls PTZ Pan Tilt Zoom con...

Страница 86: ...beside the desired channel to capture an image 2 A pop up window opens on the bottom left corner of the window Click Preview to view the image or Folder to show the image in the save folder If you re...

Страница 87: ...ecord video 1 Click next to the channel that you wish to capture video from The video will record to the default save directory 2 Click to stop video recording Showing Hiding Channels The Active Chann...

Страница 88: ...nel A sub menu opens 2 Click on one of the following Show Bit rate Displays video bit rate Original Proportions Displays live video in its original proportions Changing the Save Directory of Screensho...

Страница 89: ...affect the format of video files that are backed up locally on the DVR i e using a USB flash drive NOTE This feature is not available via Mac 1 Click the Local Setting tab 2 Under File Type select the...

Страница 90: ...us and iris control of the camera Direction keys Click to pan and tilt the camera Speed Slider Increase or decrease the pan and tilt speed Preset Cruise Video Tab Use the Preset tab to configure camer...

Страница 91: ...ick the desired month year and date Select month and year Select date 3 Under the Type drop down menu select the desired recording type you wish to search for Continuous Alarm or All 4 Select the chan...

Страница 92: ...ack speed Download Content Allows you to download recorded videos to your computer hard drive To download video click the channel you want to back up and click the Download content button A list of fi...

Страница 93: ...r hide the record time on the remote display 3 Click Save to apply your settings Configuring Privacy Zone Settings ATTENTION Areas covered by privacy zones are not visible in recordings You can blank...

Страница 94: ...ect 15 minutes then every file will contain 15 minutes of footage Pre record Select whether to enable or disable pre recording 3 Click Save to apply your settings Configuring the Recording Schedule To...

Страница 95: ...cord MainStream 2 Under Resolution Mode select D1 or 960H If you do not have 960H compatible cameras it is recommended to select D1 as D1 will provide a higher number of total frames per second FPS fo...

Страница 96: ...it the IP address Subnet Mask Gateway and DNS settings AutoPortForwarding Select EnableorDisabletoenableordisabletheAutoPortForwarding feature 3 Click Save to apply your settings Configuring the Syste...

Страница 97: ...n menu select Default to use the default Lorex email server recommended or select Custom to use your own custom SMTP email server If you want to use Lorex s email server recommended 1 In the Sender Em...

Страница 98: ...new email notification 2 Click Save to save your settings Changing the Mobile User Name and Password You can change the User Name and Password used to connect to the system with a mobile device To ch...

Страница 99: ...NS User Name that was emailed to you after DDNS registration Password EnteryourDDNSDevicepasswordthatwasemailedtoyouafterDDNSregistration 3 Click Save to apply your settings Configuring Motion Detecti...

Страница 100: ...tem to send a email notification during a motion event 3 Drag your mouse cursor in the window to select the desired area to monitor the channel for motion 4 Click Save to apply your settings Configuri...

Страница 101: ...rm triggers Show Message Select the checkbox so that the system displays a warning message during an alarm recording Send email Select the checkbox for the system to send out email alerts during alarm...

Страница 102: ...ould retain data For example if you select 30 days the hard drive will begin to overwrite itself after 30 days Note that your hard drive must be large enough to store video for the selected duration 3...

Страница 103: ...configure the system time and date 1 Click the Remote Setting tab and click System General 2 Configure the system format and time System Time Enter the desired system time and date An on screen calend...

Страница 104: ...ired user you wish to configure i e user1 User name Enter the desired user name Password Enter the desired user password Confirm Re enter the user password Active Select Enable or Disable to activate...

Страница 105: ...age at www lorextechnology com To upgrade the system firmware 1 Download and extract the file to your computer s desktop 2 Click the Remote Setting tab and click Advanced Firmware upgrade 3 Beside Upg...

Страница 106: ...nfigure the system event settings 1 Click the Remote Setting tab and click Advanced Events 2 Configure the following Event Type Configure the type of event that triggers the system to send an alert En...

Страница 107: ...ability To configure Auto Maintain 1 Click the Remote Setting tab and click Advance Maintain 2 Click the Auto Reboot drop down menu and select Enable or Disable to activate or deactivate the auto rebo...

Страница 108: ...ur local hard drive Installing Lorex Player 11 1 Insert the software CD that comes included with the system OR download Video Player for PC from www lorextechnology com under the page for your DVR mod...

Страница 109: ...e Video Window Hide reveal playlist Next File Stop Previous File Open File Rewind Fast Forward About the Advanced Config menu The Advanced Config menu allows you to select where the screen captures ar...

Страница 110: ...te to the product page for your DVR model and download Video Player for MAC 3 Extract the file and double click the Lorex Mac Player installer pkg file Follow the on screen instructions to install the...

Страница 111: ...The default save directory is in your Home folder dvr 3 Double click the video file in the playlist to begin playback Loading Multiple Video Files You can load an entire folder of video files To load...

Страница 112: ...ogy com For the latest device compatibility list visit www lorextechnology com Before you Begin You will need the following before you can start viewing on your mobile device Your DVR s DDNS address B...

Страница 113: ...nd above NOTE For the latest device compatibility list visit www lorextechnology com Prerequisites An iTunes account requires valid credit card number NOTE Your credit card will not be billed when dow...

Страница 114: ...rthenumberofchannelsoftheDVR 4 8 or 16 4 Touch the OK button and then touch the Back button Step 3 of 3 Connecting to your DVR 1 In Quad View touch the plus button button If a channel is already selec...

Страница 115: ...he channel to view video in full screen 3 Repeat steps 1 2 as required for the remaining channels Deleting Accounts From the Device List swipe your finger on beside your device name The Delete button...

Страница 116: ...iew 1 Add Device Touch to add a DVR channel 2 Channel List Touch to view channel in full screen 3 Pan Tilt camera PTZ only 4 Zoom in out PTZ only 5 Focus PTZ only 6 Iris PTZ only 7 Disconnect Disconne...

Страница 117: ...model of your Android device System requirements Android v 1 5 and above NOTE For the latest device compatibility list visit www lorextechnology com Step 1 of 2 Downloading the App 1 Install Lorex Mo...

Страница 118: ...n 5 In Quad View touch Touch the name of your DVR and select the channel you would like to display in the space in Quad view Touch Touch the name of your DVR Then touch the channelyouwant to add Touch...

Страница 119: ...bile devices 3 Download and install the app on your Windows Mobile phone For support on downloading or installing Windows Mobile apps consult your Windows Mobile s user s manual or www microsoft com f...

Страница 120: ...Port Auto Connect check box Enter the DVR s Mobile Port number by default port 1025 4 Select the Auto Connect checkbox and then click Ok 5 From the Server window select the DVR account you created Cl...

Страница 121: ...A System Specifications As our products are subject to continuous improvement Lorex Technology Inc and its subsidiaries reserve the right to modify product design specifications and prices without not...

Страница 122: ...able to the side of the RS485 port on the rear panel 3 Connect the video cable to a BNC port BNC TX TX 8 channel model shown Configuring PTZ Settings Before you can use the PTZ controls you must enter...

Страница 123: ...opy the PTZ settings to multiple channels 4 Click Apply to save your settings Using the PTZ Menu Local DVR To control the PTZ camera locally on your DVR 1 Select the channel that the PTZ camera is con...

Страница 124: ...tal Number of presets Preset number Time shown before changing 4 Complete the steps above to create additional presets as needed Press Save when you are finished to save all created presets Selecting...

Страница 125: ...to the Main port EXTERNAL MONITORS Not Included Not Included PRIMARY MONITOR TV VGA HDMI VGA or HDMI cable BNC cable BNC to RCA adapter To connect the DVR to a television using RCA cables connect a BN...

Страница 126: ...le Select display mode Click Vout Setup 6 Under View Mode select the desired viewing mode Single Quad Nine or Sixteen 7 Click Vout Setup A menu appears that allows you to select the arrangement of cha...

Страница 127: ...he camera to one of the BNC Video INPUT ports on the rear panel of the DVR between 1 and 4 16 channel models or any Video Input port 8 channel For example connect the camera to Video INPUT port 1 2 Co...

Страница 128: ...hard drives which are designed to be reliable over long periods of time while recording 24 7 Security certified hard drives are available at www lorextechnology com Removing the Hard Drive The steps...

Страница 129: ...the hard drive in place and remove the 4 screws securing the hard drive Keep holding the hard drive and turn the DVR back over Remove the hard drive from the DVR Remove the hard drive screws Make sur...

Страница 130: ...the bracket Replace the hard drive bracket and hard drive bracket screws Remove hard drive bracket Remove the hard drive screws If your system has a 2 5 hard drive turn the DVR over carefully Hold th...

Страница 131: ...ive and tighten them 1 2 of the way Place the hard drive in the screw slots with the power and data connectors facing left if looking at the DVR from the front and slide the hard drive into place Tigh...

Страница 132: ...the rear panel and lift off Be careful of sharp edges 3 Next install the hard drive If installing a 3 5 hard drive remove the 4 screws holding the hard drive bracket and remove the bracket from the DV...

Страница 133: ...and carefully turn the DVR over Insert 4 hard drive screws to secure the hard drive Turn the DVR back over Remove the hard drive screws Make sure to hold the hard drive in place while removing the har...

Страница 134: ...to open the Menu Bar and click the Main Menu button 2 Click Device 3 Click the checkbox under Select to choose the drive you wish to reformat Select checkbox 4 Click Format HDD 5 When the warning win...

Страница 135: ...r bar or surge protector try bypassing the bar and connecting the power directly to the wall outlet Confirm that there is power at the outlet Connect the power cable to another outlet Test the outlet...

Страница 136: ...panel There is no picture on selected channels camera picture is not being displayed Camera cables are loose or have become disconnected Check the camera video cable and connections Disconnect and re...

Страница 137: ...ow the instructions under Step 3 of 4 Enable DDNS on the DVR on page 65 DDNS address not entered correctly In Internet Explorer or Safari enter http the DDNS domain name from the confirmation email in...

Страница 138: ...R16 EXPAND AND CUSTOMIZE YOUR SYSTEM WITH A FULL RANGE OF CAMERAS ACCESSORIES Accessories www lorextechnology com Specialty Cameras Wireless Cameras Dome Cameras Digital Video Recorders Simulated Came...

Отзывы: