background image

  Appendix #5 – Network Connectivity Overview 


68 

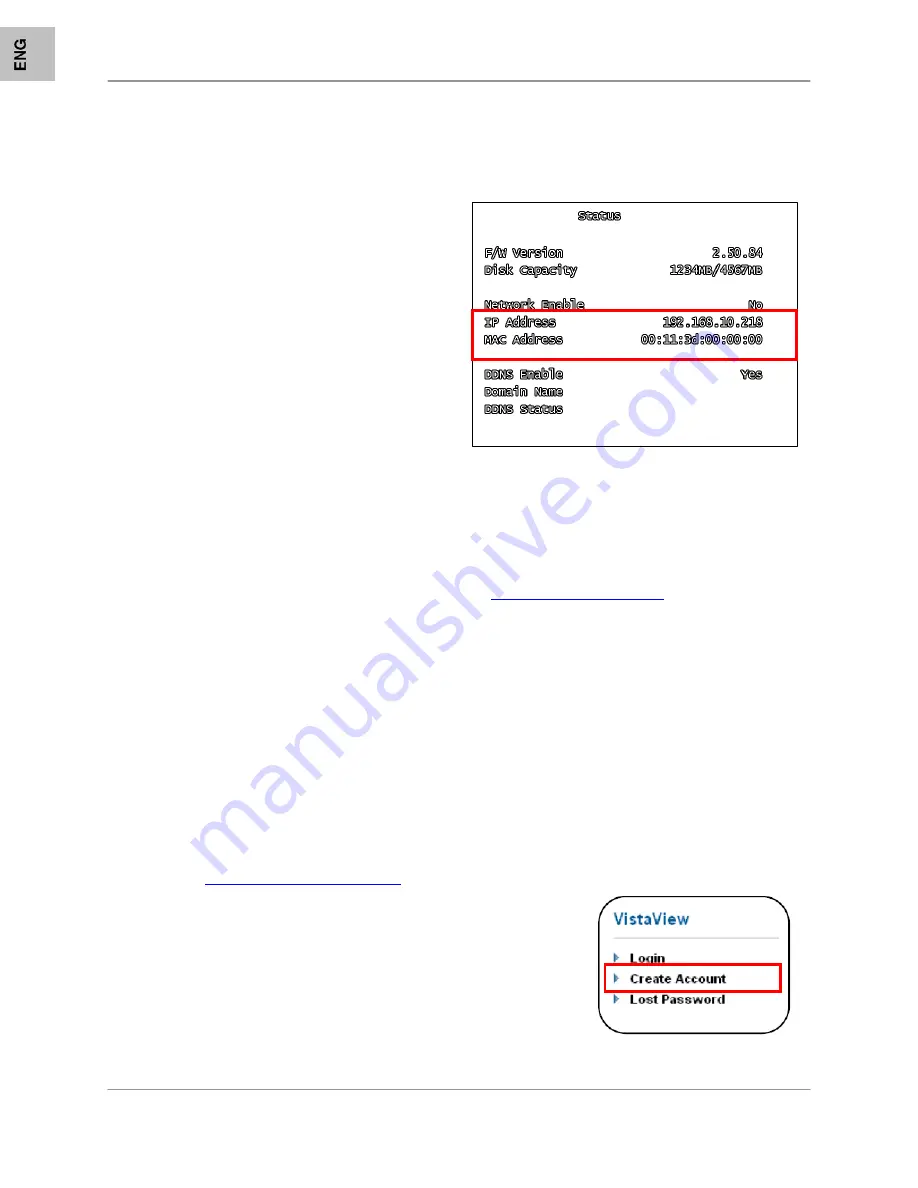
IP & MAC Address (Step #2) 

 
The IP & MAC Addresses are necessary for DDNS Setup (for remote access to the DVR). 
 
To Locate the System information, Press the REV 
Button on the Front Panel or Remote Control while 
viewing the Cameras. The System Info window will 
be displayed. 
 
- OR - 
 
 
1. Press the Menu Button on the Front Panel or 
Remote Control to access the Setup Menu. Select 
the System Menu option and press the Enter button. 
 
2. Select the Status option and press Enter. 


Finding Your External IP Address 

You will need to have your External IP address to set up your DDNS account. One of the fastest ways to 
find this information is to use a 3rd Party website such as 

http://www.showmyip.com


Your IP address can also be found within your Router settings. Refer to your router user guide for further 
details. 


Setting Up Your DDNS Account (Step #3) 

Lorex offers a free DDNS service for use with your System. A DDNS account allows you to set up a web 
site address that points back to your Local Network. The following outlines how to set up your free DNS 
account. 
 
1. Navigate to 

http://DDNS.strategicvista.net


2. Select the Create Account option from the list on the left side of the 
screen. 

Содержание L204

Страница 1: ...ht 2007 Lorex Technology Inc Includes L204 L208 DIGITAL VIDEO SURVEILLANCE RECORDER WITH MOTION DETECTION AND AUDIO RECORDING Instruction Manual English Version 1 0 www lorexcctv com MODELS L204 L208...

Страница 2: ...AUTION RISK OF ELECTRIC SHOCK DO NOT OPEN CAUTION TO REDUCE THE RICK OF ELECTRIC SHOCK DO NOT REMOVE COVER OR BACK NO USER SERVICABLE PARTS INSIDE REFER SERVICING TO QUALIFIED SERVICE PERSONNEL The li...

Страница 3: ...nience receptacles and the point where they exit from the video product 8 Ventilation Slots and openings in the case are provided for ventilation to ensure reliable operation of the video product and...

Страница 4: ...ds 16 Safety Check Upon completion of any service or repairs to this video product ask the service technician to perform safety checks recommended by the manufacturer to determine that the video produ...

Страница 5: ...ever there is no guarantee that interference will not occur in a particular installation If this equipment does cause harmful interference to radio or television reception which can be determined by t...

Страница 6: ...arge storage capacity Supports 2 internal security certified disk drives up to 1TB total Pan tilt zoom camera control RS485 interface Multiple recording modes continuous motion alarm sensor schedule A...

Страница 7: ...s 17 Initial Loading Sequence 17 General Display Overview 18 Camera Display Modes 18 Onscreen Symbols Channel Symbols 19 Onscreen Symbols Status Bar 19 System Setup Controls 20 Menu Navigation Control...

Страница 8: ...2 67 IP MAC Address Step 2 68 Finding Your External IP Address 68 Setting Up Your DDNS Account Step 3 68 Setting Up Your DDNS Account Step 3 Cont 69 Router Port Forwarding Step 4 70 DDNS Setup on the...

Страница 9: ...CHECK YOUR PACKAGE TO CONFIRM THAT YOU HAVE RECEIVED THE COMPLETE DVR INCLUDING ALL COMPONENTS SHOWN ABOVE 1 x COMPACT DIGITAL VIDEO RECORDER 8 CHANNEL MODEL SHOWN 1 x REMOTE CONTROL 1 x HARDWARE MANU...

Страница 10: ...time to display Channels 5 8 in QUAD Display mode 3 POWER REC PLAY LEDs POWER LED The ORANGE POWER LED indicates that the unit is ON REC LED The RED REC LED will blink indicating that the unit is cur...

Страница 11: ...e View Mode will perform the following functions o Reverse Opens the System Information window o Play Pause Opens the Search Menu o Fast Forward Sets the Live View to Sequence Mode o Record Starts man...

Страница 12: ...4 L204 Series or Channel 1 8 L208 Series camera inputs used to connect Cameras with BNC connection type Cameras with BNC connections require an additional power adapter 6 PS 2 PORT Connection port for...

Страница 13: ...tops the playback of video and returns to the Live View screen 10 SLOW PTZ BUTTON Press to enter PTZ View Mode if using a PTZ Camera The PTZ diagram buttons correspond to the circle of buttons on the...

Страница 14: ...k data navigate to either o Setup Search or o Setup System Event List Click the right mouse button during playback to control the video using the icons located on the lower left side of the screen Fin...

Страница 15: ...he camera in a location that has conditions not recommended in this manual consult with a professional installer and consider use of a separate camera cover or housing Before starting permanent instal...

Страница 16: ...he Camera 2 Connect the Power Adaptor to a wall outlet IMPORTANT NOTE The ends of the extension cable are NOT the same one end has a Male power port and the other has a Female power port Before perman...

Страница 17: ...re displayed in the bottom bar If a camera cannot be displayed a Video Loss Icon appears and the channel will display a blank blue screen instead of an image Display Modes Initial Loading Sequence 1 8...

Страница 18: ...TUS Displays the Camera Name Up to 8 Characters and Displays the current Recording Status if the System is recording the symbol appears 2 VIDEO LOSS ICON Appears when the Camera is not sending a Video...

Страница 19: ...laying this symbol check the camera connection Onscreen Symbols Status Bar Indicates that DVR is in monitoring mode Indicates that a network user is connected to the system Indicates that alarm on sys...

Страница 20: ...Hard Drive Password Time and Date Settings Network PTZ Setup and Firmware Upgrading SEARCH Search the drive for previously recorded video and events STATUS Displays the system settings FACTORY DEFAUL...

Страница 21: ...LITY CHANNEL DISPLAY BRIGHTNESS CONTRAST HUE SATURATION EVENT REC DURATION ALARM DURATION REC SCHED ENABLE RECORD SCHEDULE SENSOR 1 SETUP SENSOR 2 SENSOR 3 SENSOR SENSOR 4 SENSITIVITY CHANNEL SCREEN M...

Страница 22: ...SETUP TIME SET PASSWORD ENABLE SYSTEM RECORD MUTE INPUT VOLUME OUTPUT VOLUME SYSTEM EVENT LIST NETWORK RS 485 PAN TILT DEVICE F W UPGRADE SEARCH NORMAL RECORD TIME SEARCH MOTION RECORD TIME RECORD SE...

Страница 23: ...CH1 CH4 L204 Series or CH1 CH8 L208 Series to change the settings for the individual channel DISPLAY Set the onscreen display of the camera to ON or OFF Covert Camera If the camera is in Covert not d...

Страница 24: ...e i e 15 FPS than a camera that is monitoring a low traffic area i e 7 FPS RECORD QUALITY Set the RECORD QUALITY to LOW NORMAL or HIGH This setting is the same for all channels With a higher Recording...

Страница 25: ...set the entire line all hours in a day to the same recording type set one square in the day to the desired recording type Remain on that square and press the Record Button To set all days to the same...

Страница 26: ...de OFF 05 10 15 20 25 30 Seconds or CONT continuously If there are no sensors connected to the DVR set the Alarm Duration to OFF MOTION AREA SUBMENU Use the Motion Detection area to determine which ar...

Страница 27: ...between 0 seconds to 7 seconds NOTE Press the FF Button on the front panel to enter Sequence Mode when viewing live video AUDIO SETUP The Audio Setup adjusts the Audio input output of the DVR system...

Страница 28: ...ll begin overwriting the older information If Overwrite is set to No then the DVR will stop recording when the Hard Drive becomes full FORMAT HDD Formatting the Hard Drive erases all stored video data...

Страница 29: ...the Menu Exit button to finish changing the settings APPLY Select the Apply option and press the ENTER button to save the changes to the date and time SYNC FROM NTP SERVER Synchronizes the system with...

Страница 30: ...information to the DVR o Static Enter the information manually based on the connected network o PPPOE Enter the information manually based on the PPPOE Network Settings DHCP SETUP NOTE The Local Netwo...

Страница 31: ...ess that is not currently in use on the local network Gateway Enter the Gateway for the local network Net Mask Enter the Subnet Mask information for the local network PPPOE ID Press the Enter button t...

Страница 32: ...ce updates the remote connection information and is useful when the IP Address frequently changes DDNS SETUP Enable Set to YES if using the DDNS Service DDNS ID DDNS SERVER SET UP ENABLE Select YES in...

Страница 33: ...VICE SUBMENU The information in the PAN TILT Device submenu allows users to configure the settings for a PTZ Camera PAN TILT DEVICE SUBMENU NOTE The configuration settings for this section would be pr...

Страница 34: ...was detected SENSOR RECORD EVENT Searches for video that was recorded during a sensor event TOTAL RECORD EVENT Displays all recorded video BACKUP Allows the user to back up data to a USB Memory Stick...

Страница 35: ...ng and does not detect Motion or Sensor events Green Motion Detection Recording Begins recording when Motion is detected and does not record continuously or when a sensor event occurs Yellow Sensor Re...

Страница 36: ...earch for Video by entering the Date and Time for the desired data Time Search Start Displays the Date and Time for the first available recording End Displays the Date and Time of the last recording P...

Страница 37: ...r event TOTAL RECORD EVENT Displays all recorded video BACKUP Allows the user to back up data to a USB Memory Stick RECORD EVENT LISTS The Record Event Lists display all Events of a specific type as d...

Страница 38: ...ay press the CH1 CH4 buttons L204 Series or the CH1 CH8 buttons to change the view The Date and Time of the video image are displayed on the lower part of the screen The Video Playback speed is also d...

Страница 39: ...ng session A used CD can not be reused by the DVR USING THE BACK UP FUNCTION Start End Use the arrows to select the desired Start and End times for the backup TOTAL Displays the date of the first and...

Страница 40: ...ancel NOTE If the system is actively recording the Firmware Upgrade cannot take place If recording is in progress press the STOP button to end the recording before proceeding with the firmware upgrade...

Страница 41: ...ra RIGHT DOWN Moves the camera DOWN LEFT Moves the camera LEFT FF ZOOM IN REW ZOOM OUT CH1 8 Select PTZ camera Select the camera ID for PTZ control The camera ID is the same as channel No CH1 PAN TILT...

Страница 42: ...cation has two components Player Mode Used to view video data from a backup device such as a USB Memory Stick or CD RW Viewer Mode Used to remotely connect to the DVR Once the program is running a pro...

Страница 43: ...DVD Drive Once the backup data is connected to the PC start the Lorex Client program Click the Player icon on the top of the Lorex Client program to switch to Player mode Click the icon on the lower...

Страница 44: ...YER MENU PLAYBACK The playback menu includes buttons for Play Reverse Pause Fast Forward Fast Rewind Next Frame Previous Frame Speed Normal Speed Up Speed Down These function buttons are arranged alon...

Страница 45: ...l hard drive Click the Export link to save the selected video to a VVF file Click the Mark In link at the starting point and Mark Out at the end point Click the Browse button to assign a Save location...

Страница 46: ...NCTION The Audio Function controls the Audio Volume and turns the MUTE ON OFF Full Screen Select Full Screen to view a single camera in Full Screen mode or Press Alt Enter Double click the upper part...

Страница 47: ...Lorex Client Application 47 ENG Aspect Ratio The screen size can be set to 640x448 or 640x544 Split Mode The Split mode QUAD can be set to 1ch full screen 4ch Quad screen 9ch split screen...

Страница 48: ...Always on top Highest level on window Use DirectDraw Use the applied program interface API included in Direct X Show playback time Set to show the playback time on the screen Repeat playback Repeat P...

Страница 49: ...lect the video data to backup select Input File Select a location and a name for the saved file select Output File Select the Compression type on the Compression Select menu and click OK Click the Exp...

Страница 50: ...ght side of program to close BUTTON FUNCTION You can click the buttons shown below on the program to perform the matching function or use the shortcut keys listed ICON SHORTENING KEY FUNCTION F2 Open...

Страница 51: ...hile playback and then it will automatically save the image BMP format into the local PC directory Initial folder setup C VxCapture View in 1 channel full screen mode View in 4 channel screen mode Vie...

Страница 52: ...the Viewer however if it doesn t then Click the Viewer icon on the top of client program Click on the button on the bottom left side of VIEWER program or press the L key to launch the Connect box Onc...

Страница 53: ...R Set the ENABLE option to ON Make sure to record the IP ADDRESS PORT and DVR NAME DVR ID listed on the DDNS Settings If the external IP addresses is needed check your router settings or visit http ww...

Страница 54: ...DVR can be controlled through the Viewer portion of the Lorex Client application The DVR control panel has the following buttons located on the bottom panel Pause Rewind Play Fast Forward Stop Record...

Страница 55: ...an be saved to the connected PC using the viewer program Click the Local Recording Start Local recording menu to begin saving the data Click the Stop Local Recording menu to end the data save to the l...

Страница 56: ...ull Screen To change the screen to Full Screen mode select the FULL SCREEN option or press ALT F4 Double click on the upper port of program to maximize the screen Aspect Ratio The screen size can be s...

Страница 57: ...s on top Places the window at the top of the screen Use DirectDraw Use the applied program interface API included with Direct X Auto Reconnection Attempts to reconnect with the DVR when the connection...

Страница 58: ...on the top right side of program to close BUTTON FUNCTION You can click the buttons shown below on the program to perform the matching function or use the shortcut keys listed ICON SHORTENING KEY FUN...

Страница 59: ...Lorex Client Application 59 ENG Up Down Left Right Enter key Enter Select M Menu Exit Time Search PTZ...

Страница 60: ...Pixels NTSC 640 224 Pixels 640 224 Pixels Recording Resolution PAL 640 272 Pixels 640 272 Pixels NTSC 120 fps Real time 240 fps Real time Display Frame rate PAL 100 fps Real time 200 fps Real time NTS...

Страница 61: ...tion detection ON OFF Control ON OFF Control Audio 1 Ch 1 Ch LAN Yes DHCP Static IP PPPoE Yes DHCP Static IP PPPoE PTZ Yes RS485 Yes RS485 Sensor Alarm 4 Ch Input 1Ch Output 4 Ch Input 1Ch Output CD R...

Страница 62: ...tivity Diagram Appendix 2 The following diagram outlines a general set of connections available with the DVR DVR BNC CAMERAS PC MONITOR SLAVE MONITOR TV OR OBSERVATION SYSTEM MOUSE SENSOR All componen...

Страница 63: ...DVR will not be recognized by a PC and the data cannot be accessed NOTE Make sure that the DVR is OFF and the power cable has been disconnected before changing the Hard Drive Removing the Back Cover...

Страница 64: ...n using two 2 Hard Drives it is recommended to back up any data on the existing drive before installing the second one RTC Real Time Clock Chip RTC REAL TIME CLOCK CHIP contains the system information...

Страница 65: ...through a power bar or surge protector try bypassing the bar and connecting the power directly to the wall outlet Confirm that the unit is powered on LED indicators on the front should be ON Problem...

Страница 66: ...R and at the Camera Clean the camera lens Adjust the CONTRAST and BRIGHTNESS settings in the Menu Check that the Camera is not in direct sunlight Problem There is no picture appearing on a Channel Cam...

Страница 67: ...the router prior to powering on the system This allows the DVR to communicate on your network 2 Find the IP address of your DVR through the Menu System on the unit See the Menu section of this manual...

Страница 68: ...ing Your External IP Address You will need to have your External IP address to set up your DDNS account One of the fastest ways to find this information is to use a 3rd Party website such as http www...

Страница 69: ...n has been entered click on the Create New Account link 5 Your Account information will be sent to you at the E mail Address you used in Step 3 You will need this information for remote access to your...

Страница 70: ...al IP address of the Router The Router then needs to decide where this data is to be sent to This is where setting up Port Forwarding becomes important Port Forwarding tells the router which device on...

Страница 71: ...and press the ENTER button to access the System Setup 2 Navigate to the NETWORK option and press the Enter button to access the Network settings Select the DDNS option and press the ENTER button to e...

Страница 72: ...able at http www lorexcctv com Installing a PTZ RS 485 Type PTZ Camera 1 Connect the Transmit Cable to the 485 port on the PTZ Control Block 2 Connect the Receive Cable to the 485 port on the PTZ Cont...

Страница 73: ...Video Channel when enabled in the Menu Example A Window sensor unit has been installed on Alarm Block port 4 When this sensor is activated the camera on CH4 will become active if enabled in the MENU o...

Страница 74: ...ATION OFF MOTION DETECTION MOTION AREA BORDER ON VIDEO ADJUSTMENT SCREEN SEQUENCE INTERVAL 4 SEC RECORD ON MUTE OFF INPUT VOLUME AUDIO OUTPUT VOLUME OVERWRITE ENABLED YES HARD DISK SETUP FORMAT HDD PA...

Страница 75: ...DNS PASSWORD DOMAIN NAME DDNS SETUP STATUS VIDEO QUALITY HIGH BAUDRATE 115200 DATA BIT 8 PARITY BIT NONE RS485 STOP BIT 1 CHANNEL 1 ID 1 MODEL NONE PAN TILT DEVICE PAN TILT TEST F W UPGRADE SEARCH STA...

Страница 76: ...000 15 225 13500 810000 19440000 Normal 15 5 75 4500 270000 6480000 60 720 43200 2592000 62208000 30 360 21600 1296000 31104000 15 180 10800 648000 15552000 Low 12 5 60 3600 216000 5184000 HDD Quality...

Страница 77: ...are available to add to your existing DVR To order these accessory items or for a complete listing of available products please visit us on the web at WWW LOREXCCTV COM BNC DOME TYPE CAMERAS BNC CAME...

Страница 78: ...It s all on the web Product Information User Manuals Quick Start Guides Specification Sheets Software Upgrades Firmware Upgrades Lorex Technology Inc VISIT www lorexcctv com www lorexcctv com...

Отзывы: