background image

29

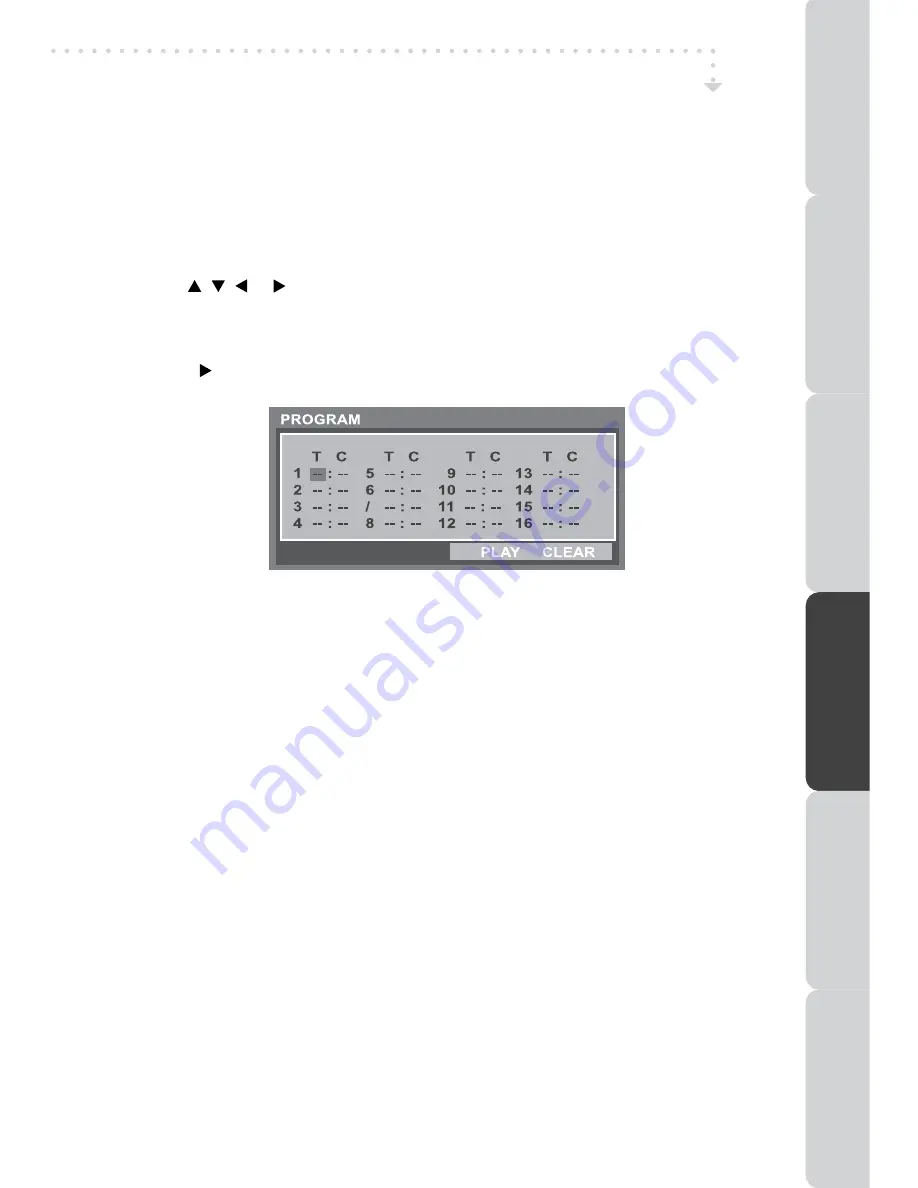
PROGRAmmABLE mEmORy 

PROGRAMMABLE MEMORY

The two types of programmed playback provided by this unit is title/chapter programmed 
playback.

TITLE/CHAPTER PROGRAmmED PLAyBACK

1. Press the 

mEmORy

 button (red button) in PLAY mode.

2. Use the  ,  ,   or   buttons to move the highlighter bar to input the title T (2 digits) 

and chapter C (2 digits) by pressing the number buttons.

  (For example : 01 02, 02 05, 02 11.) 
3. Repeat steps 2 to add additional titles and chapters.
4. Press the   

PLAy

 button to start the programmed playback.

DVD PROGRAmmABLE PLAyBACK

DVD FEATURES

PRE

PA

RA

TIOn

COnnECTIOn

S

USInG 

THE FEA

TURES

USInG 

THE D

VD / iPod

FE

AT

URE

S

TR

OUBLESHO

OT

In

G

SPECIFICA

TIOn

Содержание L17LIDI9E

Страница 1: ...L17LIDI9WE L19LIDI9E L19LIDI9WE L22LIDI9E L22LIDI9WE 17 19 22 Inch HD Ready Digital LCD TV with Integrated DVD Player and docking for iPod iPod is a trademark of Apple Inc registered in the U S and other countries ...

Страница 2: ...erate climates Under the influence of electrostatic phenomenon the product may malfunction and require user to power reset Condensation INFORMATION When the unit is left in a heated room with warm and damp water droplets may form inside the unit due to condensation this may cause malfunction of the unit Let the unit stand for 1 2 hours before turning the power on or gradually heat the room and let...

Страница 3: ...e equipment NEVER let anyone especially children push objects into holes ventilation slots or any other opening this could result in fatal electric shock ALWAYS disconnect the AC power cord when you are not going to use the unit for a long period of time ENSURE adequate ventilation of the equipment is not obstructed for example by curtains above or soft furnishings underneath it ENSURE that all el...

Страница 4: ...D FEATURES 25 29 CD DVD OPERATION 25 26 Playing a disc 25 Playing a picture file disc 25 Pausing playback still mode 25 Stopping playback 25 Skipping to a different track 25 Fast forward fast reverse 26 Slow motion play DVD 26 Audio selection DVD 26 Subtitle selection DVD 26 Angle Selection DVD 26 SPECIAL FUNCTIONS 27 Display function 27 Locating a specific title DVD 27 Locating a specific chapter...

Страница 5: ...N 043 A55656W110 L17LIDI9WE L19LIDI9WE L22LIDI9WE P N 043 A55656W120 L17LIDI9E L19LIDI9E L22LIDI9E YUV SCART adaptor P N 138 RGB040W000 applicable to model L19LIDI9E L19LIDI9WE L22LIDI9E L22LIDI9WE only LINEOUT cable P N 122 000020W102 Quick Start Guide P N 810 711995Wxxx PREPARATIOn COnnECTIOnS USInG THE FEATURES USInG THE DVD iPod FEATURES TROUBLESHOOTInG SPECIFICATIOn L17LIDI9E L17LID9WE L19LID...

Страница 6: ...geographic area or made for business purposes Disc Function or Operation that is Not Available When the symbol appears on the screen it indicates that the function or operation attempted is not available at that time This occurs because the DVD disc manufacturer determines the specific functions Certain functions may not be available on some discs Be sure to read the documentation provided with th...

Страница 7: ...rechargeable NICKEL CADMIUM batteries Corrosion oxidation battery leakage and any other gradually acidic defect of this nature will invalidate the guarantee When discarding batteries environmental problems must be considered and local rules or laws governing the disposal of these batteries must be followed strictly CAUTION Danger of explosion may be resulted if batteries are incorrectly replaced R...

Страница 8: ...acks Left Right 15 PHONES jack 16 COMMON INTERFACE slot LCD TV FRONT VIEW BACK VIEW 1 Color LCD Screen 2 Tweeters 3 Remote Sensor Do not block this sensor or the remote control will not work Standby Indicator Indicates whether the unit is ON or in STANDBY OFF mode Light On The unit is in STANDBY Light Off The unit is turned ON 4 Dock for iPod 5 Speakers 1 2 3 4 2 5 PREPARATIOn COnnECTIOnS USInG TH...

Страница 9: ...DVD iPod HDMI or PC HDMI is applicabletomodelL19LIDI9E L19LIDI9WE L22LIDI9E L22LIDI9WE only 22 buttons Press to change TV channels Press to highlight selections Up Down on the menu screen Press to select previous or next chapters tracks on a disc 23 controls Adjust the volume level 24 Disc Door Push gently to close the disc door 25 button Press to open the disc door 26 Sub woofer 17 18 19 20 21 23...

Страница 10: ...ton Press to set the letters size of teletext on the screen 12 SUBTITLE button Presstoselectoneofthesubtitlelanguagesprogrammed on a DVD DTV 13 TITLE Button Press to select the title menu screen 14 GOTO button Press to skip directly to a specific location on a DVD CD 15 button Press to directly select Mono Stereo or Mono Dual I Dual II 16 TEXT button Press to directly selects Teletext mode Press a...

Страница 11: ...channel list in TV DTV mode Press to start and resume playback of a disc Press to play music or video in iPod mode GUIDE Press to display the Electronic Programme Guide EPG in DTV mode Press to pause playback and single frame advance INFO Press to display the channel information in DTV mode 30 SLOW Press to play a DVD in slow motion INDEX Press to select the page number of the index from Teletext ...

Страница 12: ...xternal fixed antenna Should you require the use of a temporary antenna please ensure that you purchase an antenna with sufficient ability to receive in weak signal areas Only when you are in close proximity to a transmitter will a temporary antenna reproduce a signal as strongly as a fixed antenna CONNECTIONS COMMON INTERFACE The unit is equipped with a CI slot The CI slot allows you to insert a ...

Страница 13: ...ed to the SCART input Connects the SCART from the source to the corresponding SCART on this unit SCART cable not included as shown Make sure you connect both to SCART to SCART To operate the connected device and play the source first press the FUNCTION or AV button to select the AV2 SCART mode SCART CABLE If your VCR permits then connect your antenna to your VCR and VCR RF to your TV Connecting DE...

Страница 14: ...y the source first press the FUNCTION button to select the YUV SCART mode May require a subscription for receiving HD channels Check with your cable satellite service provider for details To AUDIO IN jacks To AUDIO OUT jacks To COMPONENT VIDEO OUT jacks To SCART jacks CONNECTING A PC Connect the 15 pin D SUB PC VGA connector from your computer to the 15 pin D SUB PC VGA input on this unit using a ...

Страница 15: ...l connection for use with DVD players DTV set top boxes and other digital AV devices HDMI was developed to provide the technologies of High Bandwidth Digital Content Protection HDCP as well as DigitalVisual Interface DVI in one specification HDCP is used to protect digital content transmitted and received by DVI compliant or HDMI compliant displays HDMI has the capability to support standard enhan...

Страница 16: ...wer supply cord from AC outlet TURNING THE UNIT ON FOR THE FIRST TIME The first time you turn the unit on it will go straight into Auto scan mode Simply follow the screen prompts as below to tune in the channels 1 Use the button to select the screen menu language you prefer 2 Use the button to move to Auto Tuning press the ENTER OK button to enter Auto Tuning menu 3 Use the button to select the Co...

Страница 17: ...ramme Edit All channels stored are listed in the Programme Edit menu you can edit the channels by the following steps 1 Use the or button to select a channel Press the CH PAGE button to skip to previous next page 2 Press the RED GREEN YELLOW BLUE button or the FAV button to edit the channel DELETE Press the RED button to delete the selected channel press the ENTER OK button to confirm Press the TV...

Страница 18: ...or button to select an audio language or audio format if available press the or button to select soundtrackbetweenL R Stereo L L MonoLeft andR R Mono Right Press the ENTER OK button to confirm Pressthe orEXITbuttontoexittheAudioLanguage menu Note For analogue TV press the button to select Mono Stereo or Mono Dual I Dual II directly While watching a DTV programme you can press the buttontodisplayth...

Страница 19: ...l in the picture Tint only for AV mode with NTSC signal Adjust the tint of the picture Toward purple Toward green Colour Temp Select the colour temperature of the picture Select Normal balanced Warm red white Cold blue white mode sound MENU 1 Press the TV MENU button 2 Use the or button to select the SOUND 3 Use the or button to select the options Sound Mode Treble Bass Balance adjust them by usin...

Страница 20: ...XIT button Clock Press the ENTER OK button to enter the Clock menu use the button to set Date Month Year Hour and Minute Sleep timer Select the time to turn the unit to Standby mode automatically Off 5min 90min 120min Time Zone Select your time zone SETUP MENU 1 Press the TV MENU button 2 Use the or button to select the SETUP 3 Use the or button to select the options Language Audio Language Subtit...

Страница 21: ...tem is ON a valid password is required if the TV is to be retuned Change Password Ifyouchangethepassword pleaseremember your password Block Programme This is designed to prevent unsuitable programs for children to be watched Press the or buttons to select a program then press the GREEN button on the remote control to block or unblock the program Parental Guidance Select a censorship level to censo...

Страница 22: ... programme Press the MIX button again to return to the text page Page search whilst watching TV In Text mode press the CANCEL button Enter the page number you want using the Numeric buttons The top line of the text page will appear whilst the text searches for your page When the page is found the number will remain in the top left hand corner of the screen Double height text If you have difficulty...

Страница 23: ...ays disc menus consistent with the disc s initial language setting VIDEO SETUP 1 Press the SETUP button in stop mode 2 Use the or button repeatedly until VIDEO SETUP appears 3 Use the or button to select the option Brightness Contrast Hue Saturation Sharpness then press the button Use the or button to make adjustments then press the ENTER OK button The screen will change to your selected setting 4...

Страница 24: ...nt to the following ratings Level 1 Kid Safe Level 5 PG R Level 2 G Level 6 R Level 3 PG Level 7 NC 17 Level 4 PG 13 Level 8 Adult TV Type Pan Scan When wide screen video is played this mode clips the right and left sides of the image so that it can be viewed on a conventional screen Some wide screen DVDs that do not permit Pan Scan playback are automatically played in Letter Box mode black bands ...

Страница 25: ...l to rotate the picture orientation by 90 This owner s manual explains the basic instructions of this unit Some DVDs are produced with limited operation during playback For example many DVDs do not allow users to skip government warnings or in some cases previews or other features This is not a defect in the unit Refer to the instruction notes of discs may appear on the screen during operation A m...

Страница 26: ...later playback continues with the new subtitle you selected The number of languages recorded differs depending on the disc If no button is pressed within a few seconds playback continues without changing the current subtitle This function can only be used for discs on which subtitles have been recorded in multiple languages In some DVDs subtitles are activated from the main menu of the DVD Press t...

Страница 27: ...aying press the DISPLAY button repeatedly to display information on operation status SPECIAL FUNCTIONS DVD FEATURES LOCATING A SPECIFIC TIME You can move to a specific location by entering its corresponding time hours minutes seconds 1 Press the GOTO button 2 Press the or button to highlight a time and press the corresponding number button s for the setting point you want 3 Press the ENTER OK butt...

Страница 28: ...t track is played repeatedly 2 Repeating an entire disc While the disc is playing press the REPEAT DISC button blue button until the REP REP ALL indicator displays on the screen The entire disc is played repeatedly 3 To resume normal playback Press the REPEAT DISC button blue button until the REP OFF indicator displays on the screen Repeating a specific section DVD CD You can play a specific secti...

Страница 29: ...mode 2 Use the or buttons to move the highlighter bar to input the title T 2 digits and chapter C 2 digits by pressing the number buttons For example 01 02 02 05 02 11 3 Repeat steps 2 to add additional titles and chapters 4 Press the PLAY button to start the programmed playback DVD PROGRAMMABLE PLAYBACK DVD FEATURES PREPARATIOn COnnECTIOnS USInG THE FEATURES USInG THE DVD iPod FEATURES TROUBLESHO...

Страница 30: ...ase reconnect the iPod mini if the screen displays connect fail please reconnectiPod Connectionissuccessfulif iPodmini isdisplayed on the screen iPod FEATURES Playing Music 1 In iPod Home menu use the button to select Music and press the ENTER OK button 2 Use the button to select from Playlists Artists Albums Songs Genres or Composers Press the ENTER OK button to enter 3 Use the button to navigate...

Страница 31: ...go back to the previous menu or press the iPod RETURN button on remote control to go back to the previous screen 1 2 3 Using a iPod Classic iPod Nano to view the photo 1 Press the button on remote control to select Photos on iPod panel and then press the ENTER OK button to confirm 2 Use the button on remote control to select a photo 3 Press ENTER OK button on remote control twice to activate photo...

Страница 32: ...ENTER OK button on remote control NavigateyouriPodPhotoLibrarydirectlyfromyouriPod willappear on the screen Press the iPod SWITCH button to control the iPod library directly from your iPod via remote control Note Make sure TV Out in iPod is set to ON when you are playing the video Using a iPod Touch to watch the video 1 Touch the Videos selection on iPod panel directly with your finger 2 Press the...

Страница 33: ...peatOff RepeatOneandRepeat All Language Select OSD language WARNING Due to the i Pod limitation not all functions of some i Pod models can be controlled via the remote control If the above screen appears you need to press the iPod SWITCH button to control the iPod library directly from your iPod via remote control Navigate your iPod Video Library directly from your iPod OR Press The iPod SWITCH Ke...

Страница 34: ... irregular shape discs example heart shaped octagonal etc They may cause malfunctions CLEANING THE UNIT Be sure to turn the unit off and disconnect the AC power cord before cleaning the unit Wipe the unit with a dry soft cloth If the surfaces are extremely dirty wipe clean with a cloth which has been dipped in a weak soap and water solution and wrung out thoroughly Then wipe it with a dry cloth Ne...

Страница 35: ...ot have access to a rooftop aerial for example if you rent a flat and the aerial is the responsibility of your landlord or if you re using a second TV in the bedroom and don t want the hassle and expense of extension cables a set top aerial may be your only option If you are installing a new aerial we recommend a wideband roof top aerial rather than a loft aerial Loft aerials generally receive a w...

Страница 36: ...eturn to normal play mode Make sure the VIDEO output and AV IN input connections are correct The unit is too hot shut off the unit for 30 minutes to cool it down DVD No sound or only a very low level sound is heard The picture is not clear Clean the disc The disc is scratched The plugs and jacks are dirty Wipe them with a cloth slightly moistened with alcohol Clean the disc The disc does not play ...

Страница 37: ...D Panel Power Source Power Consumption Dimension WEIGHT 19 TFT LCD 300 400 1 1440 x 900 AC 230V 50Hz 52W standby 2W 480 x 220 x 445 mm 4 8 kg 17 TFT LCD 300 400 1 1440 x 900 AC 230V 50Hz 48W standby 2W 450 x 220 x 415 mm 4 3 kg 22 TFT LCD 250 700 1 1680 x 1050 AC 230V 50Hz 58W standby 2W 555 x 220 x 495 mm 6 2 kg MODEL L17LIDI9E L17LIDI9WE L19LIDI9E L19LIDI9WE L22LIDI9E L22LIDI9WE Panel Size PREPA...

Страница 38: ...0 black iPod number plug 10 black iPod adaptor 11 black iPod number plug 11 black iPod adaptor 13 black iPod number plug 13 black iPod adaptor 14 black iPod number plug 14 black iPod adaptor 3 white iPod number plug 3 white iPod adaptor 8 white iPod number plug 8 white iPod adaptor 9 white iPod number plug 9 white iPod adaptor 10 white iPod number plug 10 white iPod adaptor 11 white iPod number pl...

Отзывы: