ACS-CB-SENS - MANUAL // PAGE 14
6.5 MOUNTING THE LOG-PRT-DMS
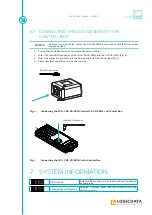
Fig. 4:
Location of the Yellow Dot. This must be placed against the Table Top.
NOTICE
If the components are mounted incorrectly, Intelligent System Protection may not work
properly. This could lead to damage to the Table System.
• Use both screws to attach the sensor
• Ensure the screws have been tightened properly
• Ensure the screws cannot be released
• Ensure the surface of the Sensor with the yellow dot is placed against the Table Top
INFO
The sensor can be attached to the Crossbar using a bolt with a nut and a washer or a
self-tapping screw. Contact LOGICDATA for exact specifications.
INFO
LOGICDATA recommends a tightening torque of 3 Nm for the connection to the
Crossbar and 2 - 2.5 Nm for the connection to the table top, depending on material used.
1. Place the surface of the Sensor with the yellow dot against the Table Top, the other against the
Crossbar. Use Fig. 4 to help you place the Sensor correctly.
2. Hold the Sensor in the desired position and mark the points for drilling.
3. Pre-drill the holes into the Crossbar and Table Top.
4. Use the Mounting Screws to attach the sensor to the Crossbar and Table Top.
6.5.1 ATTACHING THE DMS COVER
Yellow Dot
This surface against the Table Top
This surface against the Crossbar
2
Position the cover at an angle of
about 30° against the crossbar.
Push the cover upwards and
inwards towards the crossbar.
You will hear a click when the
cover has been secured.
1
3


