background image

6

SECTION 2.6

2.6 Changing the Battery

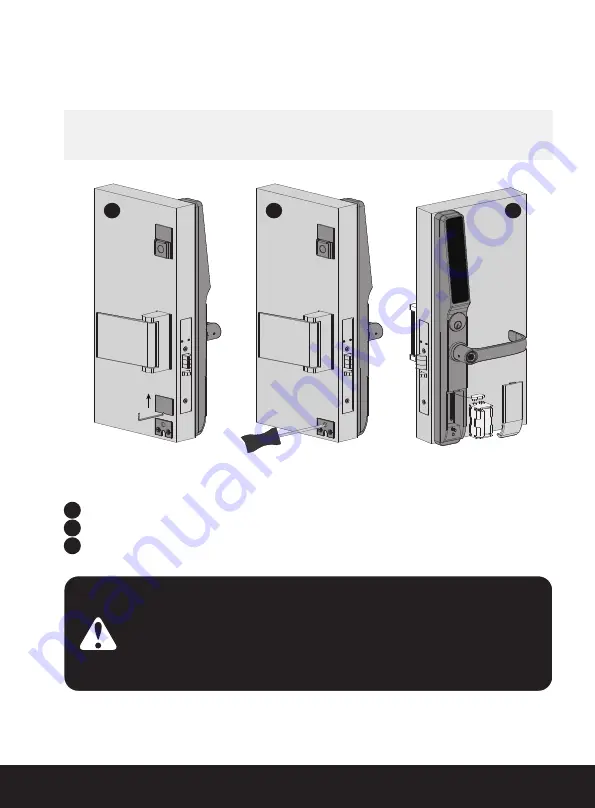
Open the battery compartment cover and insert 

4 AA alkaline battery

 as shown 

below.

• Make sure the batteries are correctly oriented.

• Replacement of batteries does not affect programmed data.

• Replace only with new batteries.  

DO NOT mix with used batteries. 

Whenever batteries are replaced, reconnecting the 

smart lock to your smartphone App is required.

If you have not yet downloaded the app, visit:  

Lockly

Pro

.com/app

NOTICE

Use a screwdriver to push the back screw stopper up then loosen the screw.
Remove the battery cover.
Unplug the terminals of the battery compartment then install the batteries.

1
2

3

3

1

2

Содержание DEFENDER 238LE

Страница 1: ...WWW LOCKLYPRO COM FOR COMMERCIAL USE PROFESSIONAL INSTALLATION USER MANUAL DEFENDER 238LM 238LE...

Страница 2: ...evice 3 4 Adding an Access Code 3 5 Checking Deleting an Access Code 3 6 Adding a Fingerprint 3 7 Adding Deleting Fingerprints 3 8 Fingerprint Scanning Directions 3 9 Fingerprint Scanning Tips Trouble...

Страница 3: ...cess Store up to 999 MIFARE RFID cards Live Monitoring Through your smartphone monitor door access from anywhere in the world and securely control who comes and goes Offline Access CodeTM OAC The offl...

Страница 4: ...ram Button Reboot Button 9V alkaline battery Battery Compartment Operated by 4 X AA size alkaline batteries Welcome Safe Mode Battery Indicator OK Button Exterior Handle Battery Cover Touchscreen Keyp...

Страница 5: ...gure your OAC Offline Access Code For any questions you can always visit http LocklyPro com support for assistance 2 2 Understanding Your New Lock The Default Access Code is 1 2 3 4 5 6 NOTICE 2 3 Loc...

Страница 6: ...en necessary To reboot find the reboot button from the bottom of Lockly Guard You will need something small such as a paperclip to press the reboot button Insert the paper clip and press down firmly N...

Страница 7: ...ty So hold your 9V battery lead in place against bottom of the Lockly to temporarily activate the screen to enter your Access Code Be sure to hold the 9V battery against the contact points located at...

Страница 8: ...data Replace only with new batteries DO NOT mix with used batteries Whenever batteries are replaced reconnecting the smart lock to your smartphone App is required If you have not yet downloaded the a...

Страница 9: ...e will suffice The button on the bottom is the OK button You will be pressing this button when you are done entering your Access Code Your new Lockly Guard Access Code can be any combination of 6 to 8...

Страница 10: ...t BL to pair a new smart phone If you are not in Programming Mode please see Section 3 2 to enter Programming Mode After pressing BL the BL icon will flash and you will here short beeps You need to wa...

Страница 11: ...remove your Lockly Guard from the old account please contact LocklyPro support 855 562 5599 or email prosales lockly com IMPORTANT 1 2 Old LocklyPro app account Scan to new LocklyPro app account LOCK...

Страница 12: ...ediately setup a new access code and delete the default access code for your security 3 5 Checking Deleting an Access Code Access codes can only be deleted through the App Enter the App Access Managem...

Страница 13: ...ollowing examples show which types of fingerprint patterns will be acceptable It is highly recommended to enroll at least one finger from each hand in case the hand you are using is unavailable such a...

Страница 14: ...successfully register your fingerprint FAIL will show on the keypad If FAIL is displayed return to the previous App menu and rescan your finger For fingerprint scanning directions please refer to Sec...

Страница 15: ...gorithms to extract quality features from fingers even in poor conditions Placing your finger on the sensor correctly helps consistency in fingerprint recognition The following directions and tips wil...

Страница 16: ...during growth Elderly with fading fingerprints may have difficulty in recognition If your finger has a cut scar or cracked skin due to dryness try another finger Troubleshooting Fingerprints In case...

Страница 17: ...f the RFIDs to be added Place the card into RFID card reading area When RFID card is successfully added keypad will display PASS followed by a beep The display screen will exit automatically and lit u...

Страница 18: ...twice Lock your Lockly Guard by pressing the OK Button anytime when the door is closed Lockly Guard will also auto lock after five 5 seconds after unlocking and opening Automatic locking is only appli...

Страница 19: ...the fingerprint scanner located on the exterior handle of the lock To register a fingerprint please see Section 3 7 If your fingerprint is registered and acknowledged you will hear a beep sound and a...

Страница 20: ...18 SECTION 4 3 Light up the screen by touching the keypad Place your RFID card closer to the panel 4 3 Unlocking with RFID Push down the handle and open the door after it chimed...

Страница 21: ...r Exterior View 4 5 Unlock with QR Code If you have multiple Lockly door locks you can use the Lockly app code scanner to unlock A QR code sticker blue color comes together with your lock Open the Loc...

Страница 22: ...only be displayed for 3 seconds You can reactivate the screen by sliding your hand across the screen 4 6 Safe Mode Countdown Prompt Displayed in Minutes Will start with 10 and countdown until 0 Exampl...

Страница 23: ...There is a pair of keys included with your new lock You may use the keys to manually unlock the door To learn how to use your physical keys see Section 4 4 Option 3 Registered Fingerprint Use any regi...

Страница 24: ...k your door with One Touch anywhere on the keypad or simply press the The latchbolt will lock To lock the deadbolt lift the handle to fully lock door One Touch feature can be activated or deactivated...

Страница 25: ...nsor and RFID reader cannot be used Unlock via LocklyPro App or physical key Rain Mode auto exits every 30 mins and re enters if water or rain is still present If you are using the LocklyPro app you w...

Страница 26: ...brightness after the screen dimmed 4 10 Welcome Mode Welcome Mode temporarily disables auto locking keeping the door open for a specified period of time eliminating the need to enter access codes fin...

Страница 27: ...TM within the app Go to Access and choose Add a New User then select Offline Access CodeTM OAC and follow on screen instructions to generate your Offline Access CodeTM Understanding Offline Access Cod...

Страница 28: ...ttery to touch the bottom contacts of the outer lock to activate the on screen buttons For more information please refer to Section 2 5 Physical Keys Even though you have your fingerprints registered...

Страница 29: ...Safety Precautions Read the following instructions for your own safety Do not attempt to disassemble the smart lock by yourself It can cause product damage void warranty and cause injuries Do not use...

Страница 30: ...one or more of the following measures Reorient or relocate the receiving antenna Increase the separation between the equipment and receiver Connect the equipment into an outlet on a circuit different...

Страница 31: ...d en compromettre le fonctionnement IC Radiation Exposure Statement This equipment meets the exemption from the routine evaluation limits in section 2 5 of RSS 102 It should be installed and operated...

Страница 32: ...10 463 B2 AU Patent NO 2013403169 AU Patent NO 2014391959 AU Patent NO 2016412123 UK Patent NO EP3059689B1 UK Patent NO EP3176722B1 The Bluetooth word mark and logos are registered trademarks owned by...

Отзывы: