background image

Pre-Cut Value Gable Shed/Value Workshop Shed

ASSemBly InStruCtIOn mAnuAl

14

Assembly Instruction manual

© 2020 Little Cottage Co. 

*PleASe nOte: A 10’X14’ WOrKSHOP SHeD WAS uSeD FOr PICtureS SHOWn - yOur lAyOut mAy VAry*

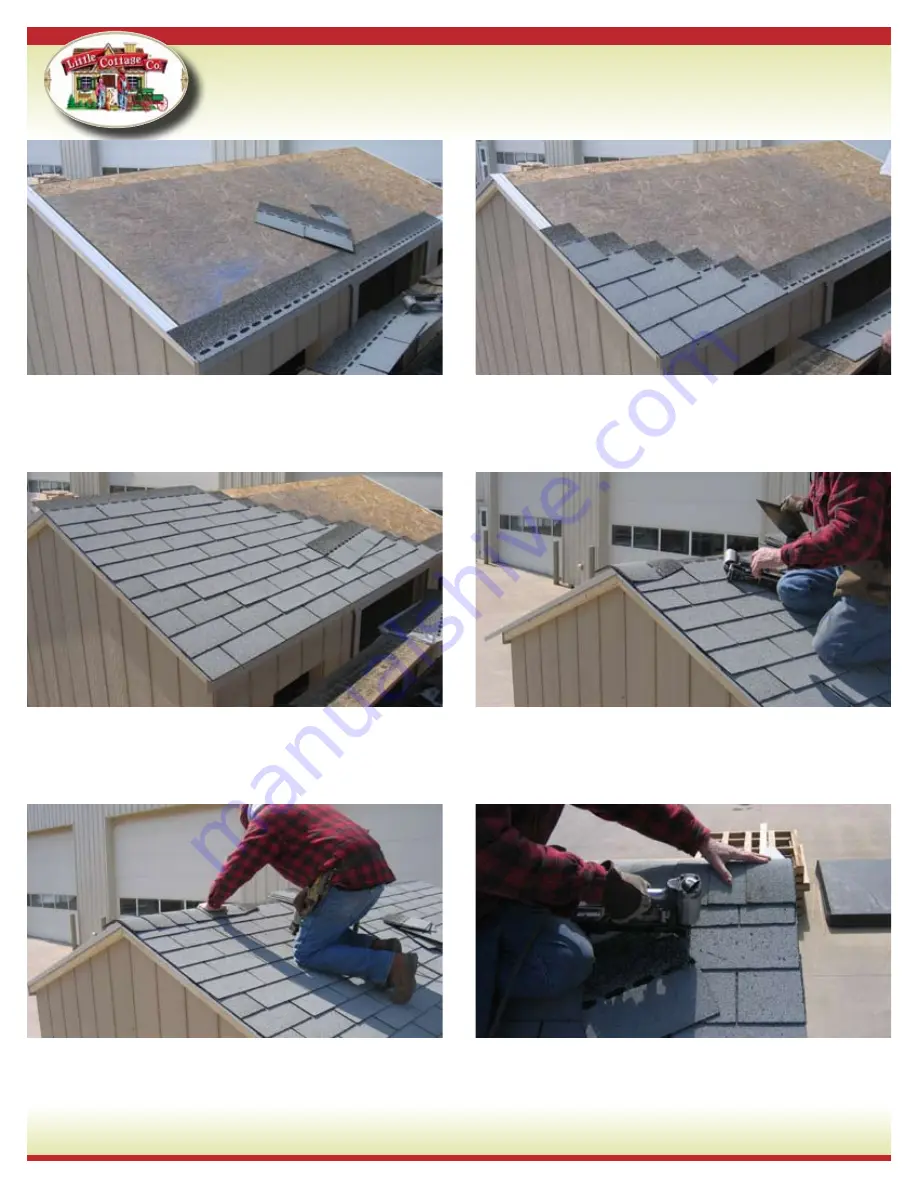
73.

 Continue with starter strips. 

74.

 Install shingles in a staggered fashion. 

75.

 Continue with shingles as shown.

76.

 Cut the ridge caps and install the first one as shown.

77. 

Continue placing the ridge cap, as shown.

78.

 You can finish with a smaller cap with no 

adhesion strip.

Содержание Value Gable Shed

Страница 1: ...Value Gable Shed Value Workshop Shed Cordless Drill 12 V Or Higher 2 Square Drive Bit Hammer 6 Step Ladder Tape Measure Square Utility Knife With Blade Hook Blade Speed Square Sizes 8 x8 8 x10 8 x12 8...

Страница 2: ...893 4212 You will find all the components necessary to build your storage shed Refer to your buy list for specific contents which will vary by unit 2 Using the floor diagram layout sheet locate your r...

Страница 3: ...wall plates for the wall section as show 8 To create the wall interior fasten the 2x4 studs with 3 nails in between the 2x4 top and bottom plates 9 Next place the 2x4 s for the windows if you have pu...

Страница 4: ...th 2x4 studs 14 Make sure the outside corners are flush as shown before fastening with the 2 nails Note There will be a 3 skirt at the bottom 15 Continuing with Smartside siding installation place the...

Страница 5: ...e the trim with 2 nails staying at least 1 1 4 in from the inside edge so they do not interfere with the hinge screws later 20 Lay wall to side as shown 21 Using the wall layout diagram sheet build th...

Страница 6: ...Y VARY 25 Continue with Smartside and fasten with 2 nails every 6 to 8 inches 26 Lay wall to the side as shown 27 Using the wall layout diagram sheet locate the wall plates and studs as shown 28 Secur...

Страница 7: ...TURES SHOWN YOUR LAYOUT MAY VARY 31 Secure the truss to the top plate with 3 nails 32 Locate the gable siding layout sheet Install the Smartside making sure it is 3 from the bottom of the 2x4 to the b...

Страница 8: ...e small piece of Smart side is installed at the top Repeat with the opposite wall 38 For rake installation measure 2 from the edge of the Smartside siding and mark with pencil as shown 39 Continue usi...

Страница 9: ...Y VARY 43 Make sure the wall is flush on the end and put pressure on the outside as shown fasten with 3 nails 44 Fasten with 3 nails 16 on center 45 Make sure you have 48 or 60 depending on the buildi...

Страница 10: ...USED FOR PICTURES SHOWN YOUR LAYOUT MAY VARY 49 Fasten with 2 nails 50 Make sure the walls are in place and secure with 3 nails 51 Next nail the bottom of the building with 2 nails 8 on center all th...

Страница 11: ...t Repeat with remaining trusses 56 Locate the temporary wall braces Note Wall bracing pieces may not be included for some smaller buildings if so skip steps 56 59 57 Space the temporary wall braces ac...

Страница 12: ...the trusses as shown making sure they are 24 on center before fastening with 3 nails Note The amount of trusses may vary depending on your building size 62 Install 2 3 4 trim as shown keep flush with...

Страница 13: ...own drip edge not included see kit packing list for amount of shingles you will need to purchase 69 Continue with drip edge 70 Use the tin snips to cut drip edge so it will bend 71 Installing Shingles...

Страница 14: ...10 X14 WORKSHOP SHED WAS USED FOR PICTURES SHOWN YOUR LAYOUT MAY VARY 73 Continue with starter strips 74 Install shingles in a staggered fashion 75 Continue with shingles as shown 76 Cut the ridge ca...

Страница 15: ...T MAY VARY 79 Locate the window shutters and trim 80 Install the window and fasten with 2 nails as shown 81 Next install the shutters and secure with provided screws for shutters 82 Install the top 2...

Страница 16: ...Y 85 Install the door with 1 1 4 black headed screws 3 per hinge as well as 1 2 1 3 black headed screw per hinge 86 Install the screws on the bottom 87 Install the next door in the same manner 88 Loca...

Страница 17: ...ole as shown 92 Use the hammer again to tap on the top barrel bolt to locate where to drill your 5 16 hole 93 Drill a 5 16 hole for the barrel bolt 94 Locate the latch Install half of the latch as pic...

Страница 18: ...ruction Manual 2020 Little Cottage Co PLEASE NOTE A 10 X14 WORKSHOP SHED WAS USED FOR PICTURES SHOWN YOUR LAYOUT MAY VARY Your Finished Product Thank You For Purchasing From Little Cottage Co Enjoy Co...

Отзывы: