background image

57

CLIENT 

PROGRAM

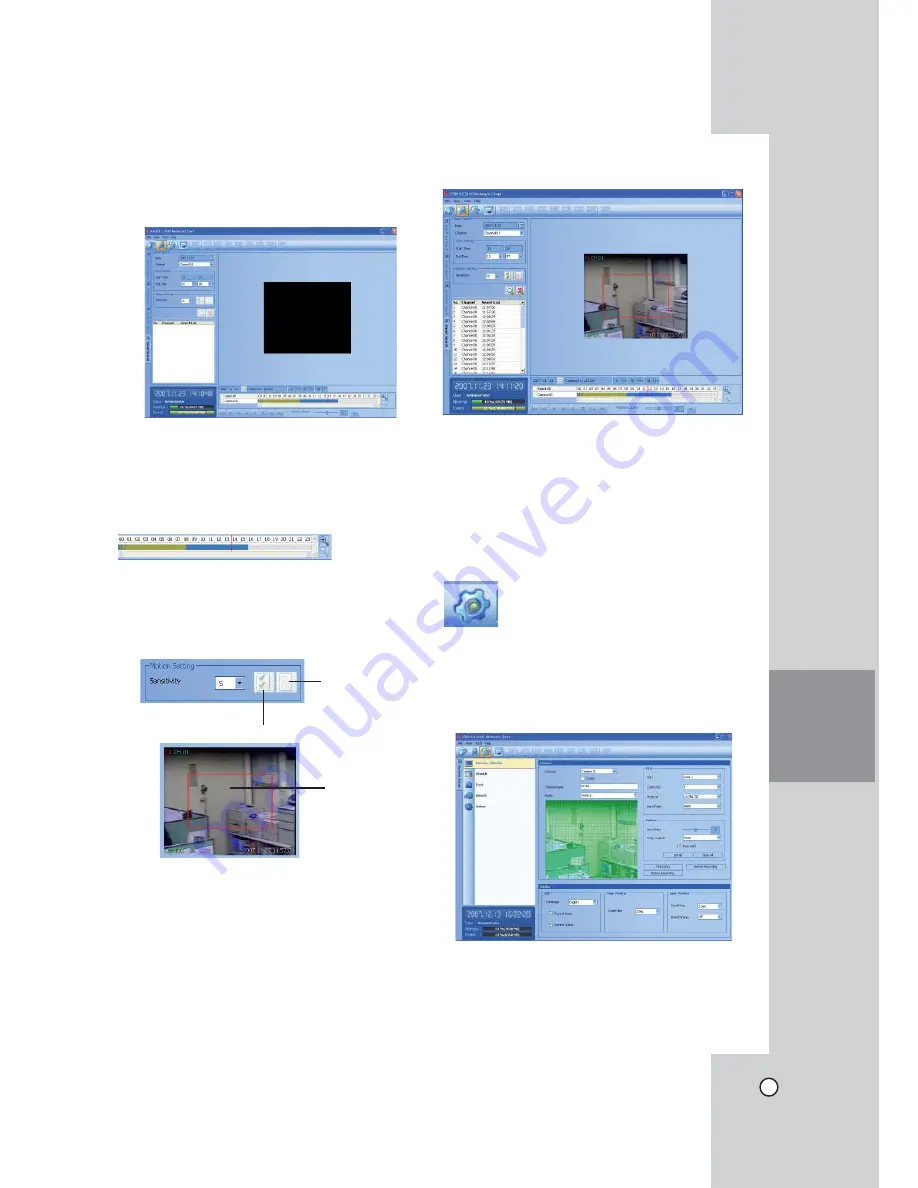
Using the Smart Search function

Picture recorded via motion detection can be 
searched by specifying the motion detection condi-
tions.

1.  Select the Smart Search tab.

2.  Click the date icon and select the day.

(The selectable days are displayed in blue color.)

3.  Select the camera channel.

4.  Select the start time using the timeline.

5.  Select the end time.

6.  Select the motion sensitivity level and motion area 

on the display window using the mouse.

7.  Click the search icon.

The smart search data is displayed.

8.  Select the channel from the list.

9.  You can play the searched data using the play-

back control buttons.

Remote Setup Mode

You can set the DVR of a selected site name in the 
remote setup tab via the network.

Camera / Display Setup

Select the all area.

Cancel the 
selected area.

Selected area 
within red box.

Содержание LDV-S503

Страница 1: ...LDV S500_ENG Before connecting operating or adjusting this product please read this ownerʼs manual carefully and completely DIGITAL VIDEO RECORDER OWNERʼS MANUAL MODEL LDV S504 LDV S503 ...

Страница 2: ...g This is a class A product In a domestic envi ronment this product may cause radio interference in which case the user may be required to take adequate measures Warning To reduce a risk of fire or electric shock do not expose this product to rain or moisture Caution This installation should be made by a qualified service person and should conform to all local codes Caution To avoid electrical sho...

Страница 3: ...ype plug has two blades and a third grounding prong The wide blade or the third prong are provided for your safety If the pro vided plug does not fit into your outlet consult an electrician for replacement of the obsolete outlet 10 Protect the power cord from being walked on or pinched particularly at plugs convenience receptacles and the point where they exit from the apparatus 11 Only use attach...

Страница 4: ... system and the wall for the cables connected to the system otherwise they may be bent damaged or cut This may cause fire electric shock or injury Install the system in a cool place without direct sunlight and always maintain room temperature Avoid candlelight and heat generating devices such as heaters Keep the system away from places where many people pass This may cause fire Install the system ...

Страница 5: ...coil the core ferrite around the connector of the system to avoid electromag netic interference The outlet must be placed on the ground If there is strange sound or smell unplug the power cable immediately and contact the service center This may cause fire or electric shock In order to maintain stable system performance have your system checked regularly by the ser vice center LG Electronics is no...

Страница 6: ...formation 26 Viewing the System Log List 26 Menu Configuration 27 Camera Settings 28 Schedule Settings 30 Display Settings 33 Event Settings 34 Network Settings 35 System Settings 38 RECORDING 43 Instant Recording 43 SEARCH AND PLAYBACK 44 PLAYBACK 44 SEARCH 45 Functions Available During Playback 48 EXPORT 49 CLIENT PROGRAM 50 PC Requirements 50 Client Program Installation 50 Main Screen of DVR Cl...

Страница 7: ...artition recording Pre alarm recording Up to 1minute Motion event recording and preview test function of motion sensitivity Recording image rate quality adjustment per individual camera Powerful record scheduling Instant playback in surveillance mode POP picture over picture playback Viewing live and playback video simultaneously Perfect audio video synchronization Automatic backup by schedule Ima...

Страница 8: ...d S VIDEO mode SHIFT If you use the Sub function of the channel but ton the button is activated c Channel Buttons You can input a number with channel buttons You can also use the channel buttons for sub function with SHIFT button 11 16 buttons of 8 channel DVR are used for subfunction without SHIFT button The LED in the button indicates the status as follows Off No video input signal Green The cur...

Страница 9: ...or reverse frame search In pause mode plays recorded images frame by frame through rotation Increases or decreases the options value h Shuttle Ring Fast forward or reverse picture search when the dial is rotated i 1 Power Turns DVR on or off Press and hold for more than 2 seconds to turn on or off j Playback Control Buttons X Pauses playback m c Search the recorded images in reverse or skip the re...

Страница 10: ...nnector such as a personal com puter This unit can be controlled from other devices via this connector i LAN Port Connect the ethernet 10 100Mbps network cable for controlling this unit via a PC network j SPOT OUT BNC Type Connector Connect to spot monitor or display device k MAIN OUT BNC Type Connector Connect to main monitor or display device l S VIDEO Connect an S Video compatible monitor The i...

Страница 11: ...the recording data to an external device SEARCH Displays the search menu MARK Sets the mark point for record ing search You can set the mark point during the single channel playback of recorded data PAUSE X Pauses playback STOP x Stops playback REC z Starts or stops recording m c Searches the recorded images in reverse or skips the recorded images bB Playback or reverse playback of recorded images...

Страница 12: ...ic Connection Overview HOOKUP AND SETTINGS Connect the coaxial type cameras For audio amplifier Connect audio line input Connect power code Connect PTZ cameras DVRs or keypads optional Connect mouse for use with this operating system or USB device for backup copy or others Connect BNC type spot monitor Connect network cable for client control Connect VGA monitor Default output Connect the Monitor ...

Страница 13: ...DVRs Connecting the LKD1000 controller Connecting the LKD1000 controller to control the DVR Refer to the manuals of the LKD1000 control ler for more details Connecting Sensor Input and Alarm Output Alarm terminals are used to connect the alarm devic es such as sensors door switches etc Sensor Input You can connect up to 16 alarm sensors LDV S503 8 alarm sensors Each alarm sensor should be connecte...

Страница 14: ... to the USB port on the rear panel of the unit Example CD DVD R RW drive HDD or other exter nal storage Mouse Connect the USB mouse for function control of the unit Network Connection LAN Connection Connect the LAN port to an available 10 100 base T port with a straight ethernet cable not supplied The NET indicator on the front panel will be lit Automatic Network Configuration The DVR can automati...

Страница 15: ... used at the time of the power failure attached Then add replace or trans port the HDD The HDD is very delicate Handle the HDD with care and follow the precautions below because even a small shock may damage the internal com ponents of the HDD Do not place the HDD on a desk or a table directly Put a thick cushion under the HDD because even a small shock may damage the internal components of the HD...

Страница 16: ...s A Attach the first HDD onto the upper side of the primary HDD mounting bracket and set the primary master HDD B Attach the second HDD onto the lower side of the primary HDD mounting bracket and set the primary slave HDD C Attach the third HDD onto the upper side of the secondary HDD mounting bracket and set the secondary master HDD A B C When installing 4 HDDs A Attach the first HDD onto the upp...

Страница 17: ...rimary Master HDD To Primary Slave HDD When installing 3 HDDs Connect the IDE cable to the IDE terminal of HDD using the Primary and Secondary IDE cables Primary IDE cable Secondary IDE cable To Primary Master HDD To Primary Slave HDD To Secondary Master HDD When installing 4 HDDs Connect the IDE cable to the IDE terminal of the HDD using the primary and secondary IDE cables Primary IDE cable Seco...

Страница 18: ... Notes When you add the new HDD do not change the position or jump setting of the HDD It may delete the current data and cause a mal function You must connect the primary IDE cable to the primary IDE connector on the main board and the secondary IDE cable to the secondary IDE connec tor on the main board Replacing the Hard Disk Drive Turn the power of the unit off and detach the power plug from th...

Страница 19: ...d with the product before installing the jumper If the jumper pin settings are identical with each other in terms of priority either HDD may not be detected in the DVR or malfunction may occur Make sure that each of the IDE cables is con nected to the connector housing through its holes Do not stack them nor keep them upright Do not use an electric screwdriver to fix them Recommended HDD The follo...

Страница 20: ...owed to connect the VGA moni tor and the composite monitor simultaneously Consequently the user is obliged to choose either the composite monitor or the VGA monitor When set to composite monitor there is no VGA output When set to VGA monitor there is no composite output SPOT OUT is unaffected by the monitor setting This DVR is based on a VGA monitor using OSD We recommend to using the VGA monitor ...

Страница 21: ...ll restart and then the VGA monitor is set as a main monitor CCTV Composite Video Type Monitor 1 Connect the CCTV monitor to the MAIN OUT or S VIDEO jack on the rear of the DVR 2 Turn on the CCTV monitor 3 Press and hold the SPOT button on the front panel until the beep sounds to display the main screen The DVR will restart and then the CCTV monitor is set as a main monitor Note You can select the...

Страница 22: ...the PTZ remote control window Displays the screen divi sion selection window for the main monitor Displays the screen divi sion selection window for the spot monitor Displays the lock menu to change the user type or disable system operation Displays the system log list window Turns the alarm off Displays the system information window Displays the remaining HDD status N Normal partition Used size t...

Страница 23: ...irm your selection Note To display the screen you desire to watch in full screen mode double click the desired channel Spot Monitor You can select the live screen mode to full or 4 split screens on the spot monitor 1 Press SPOT or Click the SPOT icon in the system control bar Screen mode select menu of spot monitor is dis played on the main monitor 2 Select screen mode Channel Number Press the 1 t...

Страница 24: ... control the PTZ camera a Exit Remove the PTZ virtual remote control b v V b B Use to pan tilt the camera Confirm the preset position c ZOOM To adjust the camera zoom d FOCUS To manually adjust the focus of a camera e IRIS To manually adjust the iris of a camera f Displays the Selected Preset Number g Number Buttons To input the preset number h SET To register preset positions i MOVE To move the c...

Страница 25: ...memorized pre set positionʼs index number then press ENTER or click the icon The camera moves to the preset position and the picture of the camera in that posi tion appears on the monitor To Clear the Preset Position You can clear a memorized preset position 1 Press the CLEAR button or Click the CLEAR icon 2 Use number buttons to enter the memorized pre set index number then press ENTER or Click t...

Страница 26: ...Power User Login Remote 7 Power User Logout Remote 8 Normal User Login Remote 9 Normal User Logout Remote 10 Admin Login Local 11 Admin Logout Local 12 Power User Login Local 13 Power User Logout Local 14 Normal User Login Local 15 Normal User Logout Local 16 Configuration Changed 17 Configuration Imported 18 Factory Default Set 19 Backup Started 20 Backup Finished 21 Backup Failed 22 Export Start...

Страница 27: ...ttons or Remote Control Buttons Arrow Buttons Use these buttons to select the menu options or adjust the options value ENTER Select the option or confirm the setting ESC Return to the previous menu or level 1 Press SETUP ESC to display the setup menu 2 Use v V to select the desired option 3 While the desired item is selected press ENTER to move to the second level 4 Use v V to select the desired o...

Страница 28: ...el PTZ Settings for the PTZ cameras connected via the data port of the RS 422 485 terminal l Channel Selects the desired channel to set the connected PTZ camera l Port Selects the connected data port of the RS 422 485 terminal on the rear panel The DATA 2 port is used to control the PTZ camera connected to DVR or to control by using the LKD1000 control ler If you want to use the PTZ camera via DAT...

Страница 29: ... records the situation from when the sensor alarm signal has input or motion has been detect ed 10 20 30 40 50 SEC or 1 2 3 5 10 MIN Note The setting values of Prealarm and Postalarm options are also used as the same ones for Sensor Recording and Motion Recording function Sensor Recording Settings concerning sensor recording l Ch Displays the channel number l Resolution Selects the recording resol...

Страница 30: ...d 2 Select OK and press ENTER After the HDD has been formatted the system will reboot Schedule Settings The DVR can record according to a schedule set by the user It can also record manually regard less of date and time The recording can be made either continuously or triggered by events alarm and motion detection The recording schedule screen displays one day of the week showing the schedule of a...

Страница 31: ... change the continu ous recording mode to sensor event recording mode and recording starts automatically Green Blue Continuous Motion event record ing Recording starts automatically from the preset time When the motion is detected within a designated time change the continu ous recording mode to motion event recording mode and recording starts automatically Green Yellow Continuous Sensor Motion ev...

Страница 32: ... menu appears 6 Enter the name of the special day Use v V b B to select a character then press ENTER to con firm your selection 7 Use v V to select the OK icon then press ENTER to fix the date of the special day and return to the special day menu screen 8 Select the schedule time and set the recording method for each channel Checking the Special Day Schedule List 1 Press INFO when the Special Day ...

Страница 33: ... the Day You can copy the scheduled day of the week to another day of the week weekday and weekend using the COPY button 1 Select the day of week that you want to copy 2 Press COPY then the select date s menu appears 3 Use b B to select the target date s 4 Use v V to select OK then press ENTER to confirm your selection Display Settings OSD l Language Select a language for the setup menu and inform...

Страница 34: ...the cre ated motion detection area Sensitivity can be set from level 01 to 10 or OFF l Alarm Out Select the number of the ALARM OUT terminal for the output alarm relay signal when motion is detected l Area Select the desired motion detection area on the preview window screen b B v V Moves the yellow cell box to another cell zone ENTER Selects or cancels the motion detection area at the current cel...

Страница 35: ...io data is 9001 However in some cases it is better to change this port number for added flexibility or security If desired change the port number 1025 65535 l Web Server Port Enter the Web Sever Port num ber using the virtual keyboard You can watch the live surveillance image over the network with a web browser Typically the TCP port used by HTTP is 80 However in some cases it is better to change ...

Страница 36: ...firmation e mail has been sent to your e mail address 4 Open the received confirmation e mail and you will find a link to activate your account 5 Click the URL and the account confirmed mes sage is displayed 6 Enter the E mail ID and Password to login the No IP web site 7 Click Hosts Redirects Add to make the host 8 Enter the Hostname in the Hostname Information and click the Create Host button Re...

Страница 37: ...il options are dimmed l SMTP Server Enter the SMTP Server address using the virtual keyboard If notification is set to ON and the SMTP server option is empty the SMTP port no user name and password options are dimmed and the options are not set l SMTP Port Enter the SMTP Port Number using the virtual keyboard Typically the port used for SMTP is 25 However in some cases it is better to change this ...

Страница 38: ...one For more details refer to Timezone table on page 72 l Daylight Saving Set to ON to you use the daylight saving function l Daylight Saving Start Select the Daylight Saving start time l Daylight Saving End Select the Daylight Saving end time NTP l NTP Set to ON when using the NTP Network Time Protocol server for time adjustment If the NTP is set to OFF the time settings should be entered manuall...

Страница 39: ...the password please contact an authorized service center or the store where you purchased the system Update The update feature allows you to upgrade DVR soft ware and add upgrade PTZ protocols In this case the current DVR settings are not deleted or replaced during the update process 1 Select one of the following Select SYSTEM S W to upgrade DVR system software Select PTZ PROTOCOL to update the DV...

Страница 40: ...cording is possible for normal partition of HDD when the normal partition of HDD has fully recorded EVENT PARTITION Overwrite recording is possible for event partition of HDD when the event partition of HDD has fully recorded OFF Do not use overwriting l Full Warning When the HDD has overflowed a warning message is displayed l Event Partition Set the space of event partition for event recording l ...

Страница 41: ...ase media options If you format the external media by using a PC with FAT32 the media may not be used on this unit Instant Backup 1 Connect the backup USB device or insert a recordable disk to the disc driver for backup 2 Select the partition you want to backup 3 Select INSTANT from the schedule options 4 Select the backup device 5 Select the Time Range Date Time Range Start time and Time Range En...

Страница 42: ...timated size of backup data is only the approximate size So you must prepare sufficient space on the media to prevent lack of space At the scheduled recording time you can check the backup status on the system control bar While export is in progress or searching the backup data from the external USB device the scheduled backup will not be started After the export or backup search is finished sched...

Страница 43: ...again and the instant record stops and the recording type indicator will be changed into the scheduled recording mode Continuous Alarm Motion record If the schedule is not set the recording type indicator turns white You can instant record that the channels scheduled such as alarm motion or continuous Once you stop instant recording the recording type indicator will be changed to the scheduled rec...

Страница 44: ...ntrol bar on the system control bar 3 Press x STOP to stop the playback Note The PIP window can be moved through the live pic ture using b B v V buttons or right mouse button Instant Playback in POP Picture over Picture Use the ZOOM buttons to enlarge or reduce the PIP window as below x1 size y x4 size y x9 size y Full screen size Notes The POP window can be moved through the live picture using b ...

Страница 45: ...ta on the backup device Do not remove the external USB device whilst the backup search is in progress from the USB device It may cause a malfunction Date and Time Search Use to search recorded pictures by specifying date hour and minute 1 Use v V to select the Date Time Search icon then press ENTER 2 Select the year month date hour or minute col umn then press ENTER 3 Use b B to input the date or ...

Страница 46: ...ch a recorded picture by date and type of event 1 Use v V to select Event Search then press ENTER The event search menu is displayed 2 Set the year month date and time b B Moves to the previous or next column or changes the setting at the current position ENTER Selects the column or confirms the setting 3 Select the channel for event search using ENTER 4 Use v V to select the Event Type then press...

Страница 47: ...nu is displayed 7 Select the recording data on the motion detect list then press PLAY click Play or double click the selected data to start playback The picture is displayed in the POP window of the main monitor 8 Press STOP x to the stop playback and return to motion detect list menu 9 Press SETUP ESC repeatedly to exit the smart search menu Bookmark Search Search the desired picture with a bookm...

Страница 48: ...ize y x4 size y x9 size y Full screen size Move the playback picture window Press MARK at a desired point to be marked during playback Up to 15 points can be marked Notes You can playback the backup or export data in normal speed only If you use the reverse frame skip function a frame may be skipped Multi channel play works only in the date time search function Using a Mouse during playback Left b...

Страница 49: ... while the backup is in progress You can search the exported data with the sup plied viewer software When you export the recorded data the audio data will also be exported When you export the recorded data the export viewer program will also be exported in the ExportViewer folder of the device The exported data file name is made automatically as the Channel name_export date_export time exp type Do...

Страница 50: ...PC open the Client Program CD and install the pro gram manually 2 Run the install file and install the programs to your computer following the InstallShield Wizard displayed 3 After installation finished you will find the pro grams in the start menu of the computer Note The Emergency Agent and Export viewer programs will be installed with the client program installation Connecting to the DVR Regis...

Страница 51: ...to the manual of Broadband router for more detailed settings Note If you use the multi DVR with Broadband router you must set the TCP IP port number for each DVR User Log In 1 Select the registered site name and right click the mouse 2 Select User Log In 3 Enter the user ID and enter the password ADMINISTRATOR To operate the unit without limitations Power User To use the live and search mode funct...

Страница 52: ...nt Version Information 2 Mode Selection Icons Live Mode Camera View You can see the surveillance camera s images in the window s and the camera information Pan Tilt Zoom You can control the PTZ cameras Log View Displays system log list Search Mode You can search the recorded data as shown below Date Time Search See page 56 Event Search See page 56 Bookmark Search See page 56 Smart Search See page ...

Страница 53: ...w then all channels are displayed 6 Live image is displayed in the selected window 7 Repeat steps 3 5 to set the other live windows Note Configuration of camera view is set the first time only This configuration setup is memorized for the next time and displayed as it is Using the live window Playback of Recorded Data A B C C E D 1 Select the camera s display window 2 Select the date The day is di...

Страница 54: ...he PTZ function and vice versa You can not use the PTZ function when you log in with a normal user ID To Register Preset Positions 1 Move the camera to the point you wish by using the v V b B 2 Click the SET icon 3 Select preset the number you wish to register 4 Click the icon The position and its numbers are memorized 5 Repeat steps 1 4 to add additional positions Note The preset range is availab...

Страница 55: ...ow 2 You can stop the tour by clicking the TOUR icon Setup for PTZ camera You can change the setting of PTZ camera using each item in the menu 1 Click the SETUP icon MENU appears in the windows 2 Use the arrow and icons to set the options Note Refer to the manuals of the PTZ camera for more details Using the Log View Function You can see the system log list of selected site names in the remote set...

Страница 56: ...ol buttons Using the Event Search function Search a recorded picture by date and event type 1 Select the event search tab 2 Click the date icon and select the day The selectable days are displayed in blue color 3 Select the camera channel for event search 4 Select the event type 5 Select the start time using the timeline 6 Click the search icon The event list is displayed 7 Select the event from t...

Страница 57: ... the start time using the timeline 5 Select the end time 6 Select the motion sensitivity level and motion area on the display window using the mouse 7 Click the search icon The smart search data is displayed 8 Select the channel from the list 9 You can play the searched data using the play back control buttons Remote Setup Mode You can set the DVR of a selected site name in the remote setup tab vi...

Страница 58: ...on detection area Sensitivity can be set from 0 to 10 Relay Output Select the number of the ALARM OUT terminal for the output alarm signal when motion is detected Area Select the desired motion detection area on the preview window screen using the mouse Click the one point and drag drop the end point to select the motion area Notes If you want to display the grid mark up the Show Grid option If yo...

Страница 59: ...ed time change the continuous recording mode to sensor event recording mode and recording starts automatically Continuous Motion Recording starts automati cally from the preset time When the motion is detected within a designated time change the continuous recording mode to motion event recording mode and recording starts automati cally Continuous Sensor Motion Recording starts automatically from ...

Страница 60: ...he name of the special day 7 Click the add button to add the special day set tings The special day is added to the list If you want to cancel the registered special day select the special day in the list and click the delete button Event setup 1 Set the event options Sensor Displays the number of the SENSOR IN terminal Sensor Type The alarm state can be set to either N O Normally Open or N C Norma...

Страница 61: ...uch cases For more detail on SMTP setup ask your network administrator and or mail service pro vider Notification Set the notification options Sensor On Sends an E mail when a sensor has been detected Video Loss Sends an E mail when a video sig nal from the camera has stopped because of a cable disconnection or malfunction of a camera Motion Detection Sends an E mail when motion detection has occu...

Страница 62: ...ser Logout Setting the logout time You can set the auto logout time to off 5 minutes 10 minutes 30 minutes or 60 minutes Buzzer Settings Select the buzzer options l Button Makes a sound when using the buttons l Sensor Makes a sound when an sensor occurs l Motion Makes a sound when motion is detected l System Makes a sound when the HDD has bed sector Update Settings Set the update options l Item Se...

Страница 63: ...cted export setting sched ule from the list l Export Click to start export the data of the selected export setting l Cancel Click it to cancel data exporting l Exit Click to exit the window How to export the data 1 Set the Exprot Channel options You should select more than one channels 2 Set the Date Time options 3 Select the folder on the computer to save the exported data 4 Set the export saving...

Страница 64: ...5 seconds 3 Check the message 4 Click the message box within 5 seconds to dis play the Received Messages window or Right click the mouse on the program icon in the system tray and select the Check Message Box option to display the Received Messages win dow 5 You can check all the subjects of received messages 6 Click the CLOSE button to close the Received Messages window Main Screen of Emergency A...

Страница 65: ...arch Search by selected date 3 Click the Search button The search message is displayed on the Received Messages window Delete the Message from the List 1 Select the message s you want to delete 2 Click the DELETE button The confirmation window is displayed 3 Click Yes to delete the message Export Viewer Program You can playback from the export data on the PC using this program The export viewer pr...

Страница 66: ...ick the Export Viewer icon on the PC or ExportViewer folder of the external USB device If you insert the exported data CD or DVD disc the export viewer program run automatically The Export Viewer window is displayed 2 Select File F Open The open window is displayed 3 Select the root directory of the USB device and search select the desired file An example of playable file format is Channel name_da...

Страница 67: ...nge the PTZ View mode or Live View mode x Screen Mode selection icons See page 52 x Live screen display window See page 22 Live screen control Left mouse button Select the channel If you want to set the 1 split mode double click the selected channel To return to the normal screen double click again Right mouse button If you want to exit the full screen mode right click the mouse to return to the n...

Страница 68: ...k the power cable on the camera is connected correctly Check there is no problem with the video cable connection from the cam era to the LDV S504 LDV S503 DVR system Turn off the DVR system and turn it on again The camera video is shown on the screen but the system does not record the video Check the recording mode in the record setting menu Check the HDD detection status in the System Information...

Страница 69: ...camera has a problem Ensure the camera is not damaged by trying another camera with a working video output Check if the video cable connection between the camera and the DVR is cut crosswired or shorted Check if there is a high voltage wire around the video cable connection between camera and DVR system It can cause interference and affect video quality Check the video cable connection between the...

Страница 70: ...Check the SMTP server address Check the SMTP port number Default setting is 25 Check the network settings When the Please check the authentication information message is displayed Check the user name Check the password The mail reception failed without error message Check the receiverʼs mail address Check your E mail is not classified as a spam mail on the receiver s mail set ting The remote contr...

Страница 71: ...up Export Configuration Import Export CD DVD O X O X USB memory O O O O HDD O O O O Note If you use a USB memory stick or USB HDD for configuration import export you must disconnect the other external USB devices Supported PTZ Camera list Protocol Name Maker Pan Tilt Zoom Focus Iris Preset Tour Setup LG_MULTIX LG YES YES YES YES YES YES YES LG_SD168 LG YES YES YES YES YES YES YES LG_ZOOM LG No YES...

Страница 72: ...ockholm Vienna West Central Africa AMS 01 00 02 00 Athens Istanbul Minsk AIM 02 00 03 00 Bucharest Cairo Pretoria Jerusalem Harare Pretoria BCP 02 00 03 00 Helsinki Riga Israel Kyiv Sofia Tallinn Vilnius HRI 02 00 03 00 Baghdad Kuwait Riyadh Nairobi BKR 03 00 04 00 Moscow St Petersburg Volgograd MSV 03 00 04 00 Tehran THE 03 30 04 30 Abu Dhabi Muscat Baku Tbilisi Yerevan ABT 04 00 Kabul KAB 04 30 ...

Страница 73: ...40 NTSC 352X288 PAL Quality STANDARD Frame rate 30 NTSC 25 PAL Prealarm OFF Postalarm 10SEC Sensor Recording Ch Resolution 352X240 NTSC 352X288 PAL Quality STANDARD Frame rate 30 NTSC 25 PAL Motion Recording Ch Resolution 352X240 NTSC 352X288 PAL Quality STANDARD Frame rate 30 NTSC 25 PAL Video Video Format NTSC or PAL Schedule Sun Sensor Motion Mon Sensor Motion Tue Sensor Motion Wed Sensor Motio...

Страница 74: ... Address NULL Subnet Mask NULL Gateway NULL Primary DNS NULL Secondary DNS NULL TCP IP Port 9001 Web Server Port 80 Bandwidth Throttle 100 Mbps DDNS User Name NULL Password NULL Notification Sensor On OFF Motion Detection OFF Disk Full OFF Admin Password Changed OFF Video Loss OFF Power On Off OFF Mail Notification OFF SMTP Server NULL SMTP Port 25 User Name NULL Password NULL TLS OFF Mail Address...

Страница 75: ...Buzzer Button OFF Sensor OFF Motion OFF System OFF User No ID ADMINISTRATOR Level ADMINISTRATOR Password 000000 Update Item SYSTEM S W Method USB Update Server NULL Update Configuration Configuration Import Configuration Export Factory Default Hard Disk Format Overwrite ALL Full Warning 70 Event Partition 50 Auto Delete OFF Backup Partition Selection ALL Schedule OFF Device Schedule Start Current ...

Страница 76: ...3 527 421 296 237 435 348 245 196 1 1 856 685 481 385 638 511 359 287 Standard 30 25 143 114 80 64 135 108 76 61 20 20 152 122 86 68 143 115 81 65 15 12 5 245 196 138 110 223 178 125 100 7 5 6 318 255 179 143 283 226 159 127 5 5 362 290 204 163 317 253 178 142 3 3 389 311 219 175 337 269 189 152 1 1 623 498 350 280 499 399 281 224 High 30 25 107 86 60 48 103 82 58 46 20 20 123 99 69 56 118 94 66 5...

Страница 77: ...0 272 191 153 3 3 423 338 238 190 362 289 203 163 1 1 699 559 393 314 546 437 307 246 Standard 15 12 5 190 152 107 86 177 141 99 80 7 5 6 254 203 143 114 230 184 130 104 5 5 282 225 159 127 253 203 142 114 3 3 311 249 175 140 277 222 156 125 1 1 489 391 275 220 409 327 230 184 High 15 12 5 159 127 90 72 150 120 84 67 7 5 6 214 171 120 96 197 158 111 89 5 5 240 192 135 108 219 175 123 99 3 3 263 21...

Страница 78: ...0 91 73 5 5 206 165 116 93 190 152 107 86 3 3 225 180 127 101 207 165 116 93 1 1 349 279 197 157 307 245 172 138 Standard 7 5 6 125 100 70 56 119 95 67 53 5 5 134 107 76 60 127 102 72 57 3 3 149 119 84 67 141 112 79 63 1 1 222 177 125 100 204 163 115 92 High 7 5 6 98 78 55 44 94 75 53 42 5 5 117 94 66 53 112 89 63 50 3 3 129 103 73 58 123 98 69 55 1 1 196 157 110 88 181 145 102 82 Highest 7 5 6 72...

Страница 79: ... each channel 480 IPS Real time per each channel PAL 200 IPS Real time per each channel 400 IPS Real time per each channel Division Mode 1 4 9 1 5 1 7 PIP 1Channel POP Multi 1 4 9 16 1 5 1 7 PIP 1Channel POP Multi Internal HDD Max Capacity 2TB Up to 4 HDDs 2TB Up to 4 HDDs Backup Backup Interface USB 2 0 x3 Network USB 2 0 x3 Network Supportable Devices Memory Stick CD RW DVD RW HDD Memory Stick C...

Страница 80: ...P NO MFL40426656 0712 V2 0 ...

Отзывы: