background image


34


13 SD/MMC 

The IP PHONE 1535 is equipped with an SD/MMC (Secure Digital Multi-Media Card) slot which allows files to 
be copied to or from the card and the Videophone galleries, see section 9. 


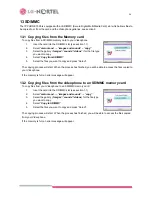
13.1 Copying files from the Memory card 

To copy files from a SD/MMC memory card to your Videophone: 

1. 

Inset the card into the SD/MMC slot (see section 1.1). 

2. Select 

main menu

” 

 “

images and sounds

” ~ “

copy

”” 

3. 

Select the gallery (“

images

”/”

sounds

”/”

videos”

) for the file type 

you want to copy. 

4. Select 

Copy from SD/MMC

”. 

5. 

Select the files you want to copy and press “Select”. 


The copying process will start.  When the process has finished, you will be able to access the files copied to 
your Videophone. 

If the memory is full, an error message will appear. 


13.2 Copying files from the videophone to an SD/MMC memory card 

To copy files from your Videophone to an SD/MMC memory card: 

1. 

Inset the card into the SD/MMC slot (see section 1.1). 

2. Select 

main menu

” 

 “

images and sounds

” 

 “

copy

”” 

3. 

Select the gallery (“

images

”/”

sounds

”/”

videos

) for the file type 

you want to copy. 

4. Select 

Copy to SD/MMC

”. 

5. 

Select the files you want to copy and press “Select”. 


The copying process will start.  When the process has finished, you will be able to access the files copied 
from your Videophone. 

If the memory is full, an error message will appear. 


Содержание IP Phone 1535

Страница 1: ...Rev 0 01 IP Phone 1535 Videophone User s Manual ...

Страница 2: ...io Volume 8 3 2 2 Ringing Options 8 3 3 Video Options 9 3 3 1 Window Size 9 3 3 2 Camera On Off 9 3 3 3 Video fluency 9 3 4 Personalize with Phone Settings 10 3 4 1 Display Options 10 3 4 2 Call barring 10 3 4 3 Language Selection 11 3 4 4 Writing Mode 11 3 5 Adjusting VoIP 11 3 5 1 User Information 11 3 5 2 Proxy 12 3 5 3 Registration 12 3 5 4 Expires 12 3 5 5 Miscellaneous 12 3 5 6 Ports 13 3 5 ...

Страница 3: ... 4 2 Video fluency 20 5 4 3 Phonebook 20 5 4 4 Mute the Microphone 20 5 4 5 Audio Volume 20 5 4 6 Show hw sw version 20 5 4 7 Telephone number 20 6 E Mail Messages Menu 21 6 1 Configuring E Mail 21 6 2 E mail Menu Options 21 6 2 1 Writing an email 21 6 2 2 Sending Saving an E Mail 21 6 3 Accessing saved E Mails 22 6 4 Reading New E Mails 22 6 5 E Mail Management Options 22 7 Services Menu 23 7 1 V...

Страница 4: ...sulting the Phonebook 31 11 2 1 Access Phonebook Records 31 11 2 2 Quick Access to the Phonebook 31 11 3 Modifying an entry 32 11 4 Deleting an entry 32 11 5 VIP list 32 12 SIM Card 33 12 1 Copying entries from the SIM card 33 12 2 Copying entries to the SIM card 33 13 SD MMC 34 13 1 Copying files from the Memory card 34 13 2 Copying files from the videophone to an SD MMC memory card 34 14 Mainten...

Страница 5: ...320 x 240 pixels Digital camera 1 4 5 inch 640x480 pixels Handset Speaker Microphone Fast Ethernet port and internal WiFi module for Internet connection USIM Unified Subscriber Identification Memory slot for data exchange with Phonebook SD MMC Secure Digital Multi Media Card slot for data exchange with multimedia devices Fig 1 Front view of the Videophone T Te el le ep ph ho on ne e d di ia al l p...

Страница 6: ...Camera button Gives access to camera and audio and video recorder On a video call controls video window size FAVOURITES button Gives direct access to browser Favourites MESSAGES button gives access to voice mail service Table 1 Videophone buttons 1 3 Screen Symbols The telephone has a color screen displaying different icons giving you information on the Videophone s various events and status The m...

Страница 7: ...want to insert a symbol press the key to view the available symbols Move through them choose the desired symbol and select with OK Delete text a Delete option will always be available Pressing it once deletes a single character If you press and hold the Delete for a few seconds the entire text string is deleted Insert a space press the key or in all writing modes other than 123 press 0 1 7 Shippin...

Страница 8: ...r Intel PXA270 416 MHz PSTN port RJ 11 LAN port RJ 45 WLAN interface IEEE802 11b g SD MMC slot SIM slot Ring melodies 50 polyphonic Background images 5 Operating temperature 0 C 40 C Operating humidity 5 95 non condensing Noise level 15 dB 1 m Dialing Mode DTMF Dual Tone Multi frequency Power AC DC Adapter AC Input 100 240 VAC 60Hz DC Output 5 VDC 1 5 Amps ...

Страница 9: ...et connector see fig 2 2 2 2 Connection to Power Insert the power adaptor DC plug in the DC power jack in the rear of the Videophone see fig 2 Connect the adaptor s AC plug into an appropriate AC voltage socket Note use only the adaptor delivered as other adaptors may cause operating anomalies hazardous conditions and or material damage 2 2 3 PSTN Connection Insert one end of the Telephone line co...

Страница 10: ...6 Figure 2 IP PHONE 1535 Installation Power Connection LAN Conncetion PSTN Line Conncetion Handset Conncetion ...

Страница 11: ...nfigure the video size and fluidity see section 3 3 Phone settings modify telephone related parameters language screen options etc see section 3 4 VoIP settings modify VoIP parameters See section 3 5 Setting VoIP System settings modify system related parameters date time network parameters etc See section 3 6 System settings 3 1 Profile Selection In place of the narrowband mode the IP Phone 1535 m...

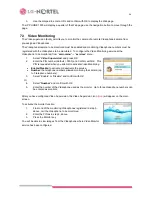
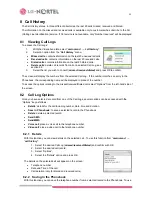
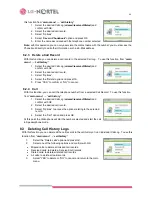
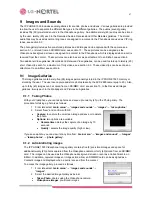
Страница 12: ...d for ring Each melody is 8 seconds long and an additional 60 sixty melodies may be downloaded from a SD MMC card or recorded from the IP PHONE 1535 To use the built in melodies follow the procedure below To store a melody in the Phone see section 9 1 From the idle screen select main menu settings audio settings ringing melody and press OK to confirm 2 Search for the desired melody select and conf...

Страница 13: ...all remote party s image is displayed in full screen while your own image is seen in a small frame Remote full screen remote party s image is displayed in full screen 3 Press OK to confirm 3 3 2 Camera On Off The camera can be turned off so that the video and photo functions of the IP PHONE 1535 are disabled This parameter can only be accessed if the user has logged in to Admin see section 3 6 2 T...

Страница 14: ... Press OK to confirm your selection 3 4 1 3 Screen Saver After a period of inactivity Screensaver switches the IP PHONE 1535 display screen off The user can enable or disable the Screensaver function and define the Screensaver delay period To enable the Screensaver function 1 With the telephone idle select main menu settings phone settings display screen saver and press OK 2 Press YES to confirm o...

Страница 15: ... the T9 look ahead dictionary which compares entries to a dictionary to pre determine a desired entry thus easing user entry To set the writing mode 1 With the telephone idle select main menu settings phone settings writing mode and press OK 2 Select one of the 4 options available Dictionary T9 in small letters Dictionary T9 in capital letters Small letters Capital letters 3 Press OK to confirm Wh...

Страница 16: ...lect Registration and press OK 2 Select Register and press OK 3 5 4 Expires For SIP service the end point must periodically register with the SIP server to continue proper operation The IP PHONE 1535 can be configured with a preferred registration interval or Registration expiration period The IP PHONE 1535 will request the SIP server use this period as the expiration time To configure the Registr...

Страница 17: ... or video 3 Select the priority level and assign a codec from the list of codecs available Audio G 711 u law G 711 a law G 723 G 729 AMR None Video H 263 H 264 Once a codec is assigned it must be released to be available for another priority level 3 6 System Settings System settings include operational and network interfaces parameters To access the System Settings menu press main menu settings sy...

Страница 18: ...3 6 3 Date and time With this menu you can modify the date and time From the system settings menu 1 Select date and time and press OK 2 Enter the date MM DD YYYY and press OK 3 Enter the time HH MM and press OK 3 6 4 Network parameters In this menu you can view or modify IP network parameters To access the Network parameters menu from main menu settings system settings 1 Select LAN or WiFi network...

Страница 19: ...he type of authentication is always WPA PSK 3 If you modify one of above parameters select Apply to save the changes 3 6 6 Modifying the system PIN With this menu you can modify the user PIN for features such as Video monitor call restriction etc From main menu settings system settings 1 Select pin and press OK 2 Enter the old PIN default 0000 and press OK 3 Enter the new PIN and press OK 4 Confir...

Страница 20: ...g With this function you can automatically call the Last Number Dialed simply select the Redial key to dial the number in the normal or pre dial mode 4 1 3 Phonebook Dialing In the Phonebook see section 11 you may select from several options including to call a number from the Phonebook With this function you can make a call using a name in the Phonebook in the normal or pre dial mode To use phone...

Страница 21: ... access To access contacts saved in the phonebook see section 11 4 3 2 Mute the microphone With this function you can disable the local microphone so as not to be heard by the remote party To activate microphone mute 1 During the active call select Options from the left side of the screen 2 Select the Mute option using the vertical arrows 3 Press OK to confirm and disconnect the microphone The Mut...

Страница 22: ...ing the conversation select Options from the left side of the screen 2 Select Consultation Transfer and confirm with OK 3 Dial the number and confirm with Call to make a second call 4 After the call is connected select Transfer you and the two remote parties are connected in an active call 5 Hang up to complete the transfer and return to idle 4 3 7 Conference With this function you can establish a...

Страница 23: ...e accept or reject the video call 3 The remote user must press the Video Call button to accept the request Important only the initiator of a voice call can request an indirect Video Call 5 2 Receiving a Video Call When an incoming video call is received the user can accept the call in one of several ways 1 If the user accepts the call by pressing Off hook button or lifting the handset the Video ca...

Страница 24: ... video frames per second sent 5 4 2 Video fluency With this function you can set the image fluency level choosing from five different values during a video call Modifying this parameter allows you to increase or decrease the fluidity of the image transmitted during a video call This parameter is also determined by the definition with which the image is sent In fact the greater the reproduction spe...

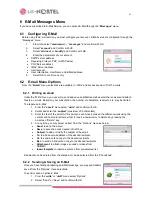
Страница 25: ... limited To prepare an E Mail 1 From the e mail menu select write and confirm with OK 2 Select and enter the subject maximum 255 characters 3 Enter the text of the email At this point you can move between the different words using the vertical and horizontal arrows either to insert a new word or to delete it by pressing the on screen Delete key 4 At any time you may select an item from the Options...

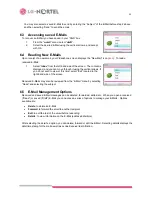
Страница 26: ... If you do not wish to view at this time select Exit located in the right hand side of the screen Received E Mails may also be reviewed from the E Mail menu by selecting Read and selecting the subject 6 5 E Mail Management Options Received and saved E Mail messages can be deleted forwarded edited etc When you open a received Read or saved Draft E Mail you can access a series of options to manage y...

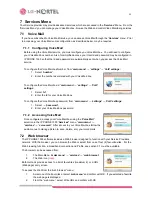
Страница 27: ...ect id 2 Enter the Id for your Voice Mail box To configure the Voice Mail box password from main menu settings VoIP settings 1 Select password 2 Enter your Voice Mail box password 7 1 2 Accessing Voice Mail Once configured access your Voice Mail box using the Voice Mail selection in the IP PHONE 1535 Services menu main menu services voice mail After access to your Voice Mail box follow the audio m...

Страница 28: ...er default 0000 and Confirm with OK This PIN is requested when you attempt to activate Video Monitoring Enable Disable to activate or deactivate the service Number the telephone numbers allowed monitoring the camera up to 3 telephone numbers 3 Select Enable or Disable and confirm with OK Or 4 Select Number and confirm with OK 5 Enter the number of the Videophone used as the monitor Up to three Vid...

Страница 29: ...ng name will be displayed in place of the number To access the options relating to the missed received Dialed call select Options from the left hand side of the screen 8 2 Call Log Options Once you have selected a record from one of the Call Logs several options can be accessed with the Options key as follows Details details for the call including number date time and duration Save in Phonebook to...

Страница 30: ...cel 8 2 4 Call With this function you can call the telephone number from a selected Call Record To use this function from main menu call history 1 Select the desired Call Log missed received Dialed and confirm with OK 2 Select the desired call record 3 Select Options to access the options relating to the selected record 4 Select the Call option and press OK At this point the Videophone will dial t...

Страница 31: ... stored by the user The user can capture and store photos taken by the KVP 2890 camera up to 20 Also up to forty 40 images can be copied from an SD MMC card see section 13 to the Received Images galleries twenty each in the Wallpaper and Pictures sub galleries 9 1 1 Taking Photos With your Videophone you can take photos and save up to twenty 20 in the Photo gallery The procedure for taking a photo...

Страница 32: ...select Record and record the desired audio 3 Select Stop to stop recording at which time you have two options Save to save the recorded audio Delete to remove the audio you have just recorded 4 Select the desired option and confirm with OK If you save a recorded audio you can listen to it at any time from main menu images and sounds sounds recorded audios Audio gallery 9 2 2 Administrating sounds ...

Страница 33: ...mages and sounds videos recorded videos video gallery 9 3 2 Administrating videos The IP PHONE 1535 has several Video galleries including the Recorded Videos videos recorded with the Videophones camera and the Received Videos gallery containing up to twenty 20 videos stored from an SD MMC card To access the gallery proceed as follows 1 With the Videophone idle select main menu images and sounds vi...

Страница 34: ...e through the characters with the horizontal arrows to make corrections 3 Press OK to confirm 4 With the telephone dial pad enter the time minutes seconds for the alarm notification to display You can move through the characters with the horizontal arrows to make corrections 5 Press OK to confirm 6 Enter a text of the message maximum 40 characters to display and press OK to confirm Once the alarm ...

Страница 35: ...sulting the Phonebook You can consult the phonebook with the Videophone On or Off hook 11 2 1 Access Phonebook Records 1 Select main menu organizer phonebook 2 Select the search option 3 Enter part or the full name of the desired contact and press OK You can move to the first name in the Phonebook that begins with a certain letter simply by pressing the dial pad key corresponding to this letter On...

Страница 36: ...ous settings Image to modify the image associated with a phonebook entry 3 Enter the new data and confirm with OK 11 4 Deleting an entry To eliminate a contact from the Phonebook 1 Search for and select the Phonebook entry you want to delete 2 Select the Delete option and Confirm with OK 3 To confirm the deletion selects YES or select NO to cancel 11 5 VIP list If CLI service Calling Number Identi...

Страница 37: ... The copying process will begin If you try to copy an entry that already exists the Videophone will inform you of this with a message Also if there is insufficient memory an error message will appear 12 2 Copying entries to the SIM card To copy Phonebook entries to the SIM card 1 Insert the SIM card into the SIM card slot see section 1 1 2 Select phonebook copy copy to SIM and confirm with OK 3 Se...

Страница 38: ...s Select The copying process will start When the process has finished you will be able to access the files copied to your Videophone If the memory is full an error message will appear 13 2 Copying files from the videophone to an SD MMC memory card To copy files from your Videophone to an SD MMC memory card 1 Inset the card into the SD MMC slot see section 1 1 2 Select main menu images and sounds c...

Страница 39: ...deophone version do I have If you wish to know what the hardware and software version of your Videophone is see section 3 6 7 Version Control 14 2 Updating the Phone s software If you wish to update the phone s software see section 3 6 7Version Control ...

Страница 40: ...s device may not cause harmful interference and 2 this device must accept any interference received including interference that may cause undesired operation Caution Changes or modifications to the device that are not expressly approved by Nortel will void your warranty and could void your authority to operate this equipment ...

Отзывы: