background image

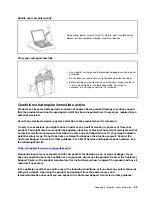
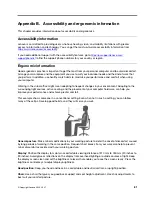
Handle your computer gently.

Do not drop, bump, scratch, twist, hit, vibrate, push, or place heavy 
objects on your computer, display, or external devices.

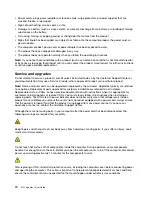
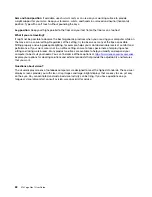
Carry your computer carefully.

•  Use a quality carrying case that provides adequate cushioning and 

protection.

•  Do not pack your computer in a tightly packed suitcase or bag.

•  Before putting your computer in a carrying case, make sure that it 

is off, in sleep mode, or in hibernation mode. Do not put a 
computer in a carrying case while it is turned on.

Conditions that require immediate action

Products can become damaged due to misuse or neglect. Some product damage is serious enough 
that the product should not be used again until it has been inspected and, if necessary, repaired by an 
authorized servicer.

As with any electronic device, pay close attention to the product when it is turned on.

On very rare occasions, you might notice an odor or see a puff of smoke or sparks vent from your 
product. You might also hear sounds like popping, cracking, or hissing. These might merely mean that 
an internal electronic component has failed in a safe and controlled manner. Or, they might indicate a 
potential safety issue. Do not take risks or attempt to diagnose the situation yourself. Contact the 
Customer Support Center for further guidance. For a list of Service and Support phone numbers, see 
the following Web site: 

https://pcsupport.lenovo.com/supportphonelist

Frequently inspect your computer and its components for damage, wear, or signs of danger. If you 
have any question about the condition of a component, do not use the product. Contact the Customer 
Support Center or the product manufacturer for instructions on how to inspect the product and have it 
repaired, if necessary.

In the unlikely event that you notice any of the following conditions, or if you have any safety concerns 
with your product, stop using the product and unplug it from the power source and 
telecommunication lines until you can speak to the Customer Support Center for further guidance.

Appendix A. Important safety information

69

Содержание ThinkPad X13 Yoga Gen 1

Страница 1: ...X13 Yoga Gen 1 User Guide ...

Страница 2: ...nt safety information on page 67 Safety and Warranty Guide Setup Guide Third Edition May 2021 Copyright Lenovo 2020 2021 LIMITED AND RESTRICTED RIGHTS NOTICE If data or software is delivered pursuant to a General Services Administration GSA contract use reproduction or disclosure is subject to restrictions set forth in Contract No GS 35F 05925 ...

Страница 3: ...ne mode 31 Chapter 4 Accessories 33 Purchase options 33 Docking station 33 Front view 34 Rear view 35 Attach a docking station 36 Detach a docking station 37 Connect multiple external displays 38 Chapter 5 Secure your computer and information 39 Lock the computer 39 Use passwords 39 Password types 39 Set change and remove a password 41 Use Power Loss Protection function for selected models 42 Use ...

Страница 4: ...information 67 Appendix B Accessibility and ergonomic information 81 Appendix C Supplemental information about the Linux operating system 83 Appendix D Compliance and TCO Certified information 85 Appendix E Notices and trademarks 101 ii X13 Yoga Gen 1 User Guide ...

Страница 5: ...ght not be applicable to your computer Documentation content is subject to change without notice Lenovo makes constant improvements on the documentation of your computer including this User Guide To get the latest documentation go to https pcsupport lenovo com Microsoft makes periodic feature changes to the Windows operating system through Windows Update As a result some information in this docume...

Страница 6: ...iv X13 Yoga Gen 1 User Guide ...

Страница 7: ... the camera is in use If you use other apps that support photographing video chatting and video conference the camera starts automatically when you enable the camera required feature from the app 4 Microphones Capture or record sound 5 Camera Take pictures or record videos by clicking Camera from the Start menu The indicator next to the camera is on when the camera is in use If you use other apps ...

Страница 8: ...2 X13 Yoga Gen 1 User Guide ...

Страница 9: ...se See Use the trackpad on page 16 3 NFC mark Your computer supports NFC near field communication You can share information with another NFC enabled device See Set up an NFC connection for selected models on page 29 4 TrackPoint pointing device Perform all the functions of a traditional mouse See Use the TrackPoint pointing device on page 14 for selected models Chapter 1 Meet your computer 3 ...

Страница 10: ...he battery power is below 10 the connected USB C accessories might not work correctly 2 Thunderbolt 3 connector USB C Charge your computer Charge USB C compatible devices with the output voltage and current of 5 V and 1 5 A Transfer data at Thunderbolt 3 speed up to 20 Gbps Connect to an external display USB C to VGA 1920 x 1200 pixels 60 Hz USB C to DP 3840 x 2160 pixels 60 Hz Connect to USB C ac...

Страница 11: ...a USB compatible device when the computer is on off in sleep mode or in hibernation mode Notes By default Always On USB is enabled and Charge in Battery Mode is disabled in UEFI BIOS When the computer is off or in hibernation mode and Charge in Battery Mode is disabled in UEFI BIOS ensure that you have connected the computer to ac power To enable the Always On USB feature 1 Enter the UEFI BIOS men...

Страница 12: ...ly The computer is in sleep mode 3 microSD card slot Insert a microSD card for data access or storage See Use a microSD card or a smart card on page 30 4 Nano SIM card slot Use the Nano Subscriber Identity Module SIM card to connect to a wireless WAN network See Connect to a cellular network on page 11 5 USB 3 2 connector Gen 1 Connect a USB compatible device such as a USB keyboard USB mouse USB s...

Страница 13: ...Chapter 1 Meet your computer 7 ...

Страница 14: ...ponding and you cannot turn it off by pressing the power button reset your computer 1 Disconnect your computer from ac power 2 Insert a straightened paper clip into the hole to cut off power supply temporarily 3 Connect your computer to ac power and then turn on your computer 3 Speakers Enable you to experience high quality sound 8 X13 Yoga Gen 1 User Guide ...

Страница 15: ...rive Hybrid solid state drive with Intel Optane memory Display Brightness control Color display with In Plane Switching IPS technology or Organic Light Emitting Diode OLED technology Display size 337 82 mm 13 3 inches Display resolution 1920 x 1080 pixels or 3840 x 2160 pixels Multi touch technology PrivacyGuard feature Keyboard Function keys Six row keyboard or six row keyboard with backlight Tra...

Страница 16: ...tatement on USB transfer rate Depending on many factors such as the processing capability of the host and peripheral devices file attributes and other factors related to system configuration and operating environments the actual transfer rate using the various USB connectors on this device will vary and will be slower than the data rate listed below for each corresponding device USB device Data ra...

Страница 17: ...omputer has a wireless wide area network WAN card and a nano SIM card installed you can connect to a cellular data network and get online using the cellular signal Note The cellular service is provided by authorized mobile service carriers in some countries or regions You must have a cellular plan from a service carrier to connect to the cellular network To establish a cellular connection 1 Turn o...

Страница 18: ... updates to keep your computer up to date Monitor your computer health and secure your computer against outside threats Scan your computer hardware and diagnose hardware problems Look up warranty status online Access User Guide and helpful articles Notes The available features vary depending on the computer model The Vantage app makes periodic updates of the features to keep improving your experie...

Страница 19: ...trol Panel and view by Large icons or Small icons 2 Click Keyboard or Lenovo Keyboard Manager and select the option of your preference Switch the function of the F1 F12 keys between the standard function and special function printed as an icon on each key When the Fn Lock indicator is on Press F1 F12 to use the standard function Press Fn F1 F12 to use the special function When the Fn Lock indicato...

Страница 20: ...eak key on a conventional external keyboard Fn K Equal the ScrLK or Scroll Lock key on a conventional external keyboard Fn P Equal the Pause key on a conventional external keyboard Fn S Equal the SysRq key on a conventional external keyboard Fn 4 Put the computer to sleep mode To wake up the computer press Fn or the power button Fn D If your computer supports the PrivacyGuard feature press Fn D to...

Страница 21: ...ess to select or open an item 3 Right click button Press to display a shortcut menu 4 Middle button Press and hold the dotted middle button while applying pressure to the pointing stick in the vertical or horizontal direction Then you can scroll through the document Web site or apps Disable the TrackPoint pointing device The TrackPoint pointing device is active by default To disable the device 1 O...

Страница 22: ...ng clicking and scrolling functions of a traditional mouse Use the trackpad 1 Left click zone Press to select or open an item You also can tap anywhere on the surface of the trackpad with one finger to perform the left click action 2 Right click zone Press to display a shortcut menu You also can tap anywhere on the surface of the trackpad with two fingers to perform the right click action 16 X13 Y...

Страница 23: ...bles you to scroll through the document Web site or apps Two finger zoom out Put two fingers on the trackpad and move them closer together to zoom out Two finger zoom in Put two fingers on the trackpad and move them farther apart to zoom in Swipe three fingers up Put three fingers on the trackpad and move them up to open the task view to see all your open windows Swipe three fingers down Put three...

Страница 24: ...he trackpad is active by default To disable the device 1 Open the Start menu and then click Settings Devices Touchpad 2 In the Touchpad section turn off the Touchpad control Use the multi touch screen If your computer display supports the multi touch function you can navigate the screen with simple touch gestures Note Some gestures might not be available depending on the app you use Tap once From ...

Страница 25: ...mode Show a hidden title bar Swipe in from the top edge to the bottom edge when your computer is in the tablet mode Close the current app Tips Turn off the computer before cleaning the multi touch screen Use a dry soft and lint free cloth or a piece of absorbent cotton to remove fingerprints or dust from the multi touch screen Do not apply solvents to the cloth The multi touch screen is a glass pa...

Страница 26: ... privacy level Press to decrease the privacy level Automatic PrivacyGuard feature for passwords Though the PrivacyGuard feature is disabled the PrivacyGuard feature could also be automatically enabled in case that you are required to input passwords By default this automatic PrivacyGuard feature for passwords is disabled You can enable it on the Vantage app Note The automatic PrivacyGuard feature ...

Страница 27: ...itch to performance mode Use multimedia Use your computer for business or entertainment with the built in components camera speakers and audio features or connected external devices an external projector monitor and HDTV Use audio To enhance your audio experience connect speakers headphones or a headset with a 3 5 mm 0 14 inch 4 pole plug to the audio connector Change the sound settings 1 Go to Co...

Страница 28: ... to 4096 x 2304 pixels 60 Hz Thunderbolt 3 connector USB C Up to 4096 x 2304 pixels 60 Hz the HDMI connector Up to 4096 x 2160 pixels 30 Hz Connect to a wireless display To use a wireless display ensure that both your computer and the external display support the Miracast feature Press and then select a wireless display to connect with Set the display mode Press or and then select a display mode o...

Страница 29: ...ner of the computer display Otherwise the computer display or hinges might get damaged Your computer features the following four YOGA modes You can switch among different modes according to your preference Note The keyboard and the pointing devices are automatically disabled in the stand mode tent mode and tablet mode Use the touch screen to control your computer instead Chapter 2 Get started with...

Страница 30: ...Notebook mode Stand mode Tent mode Tablet mode Use ThinkPad Pen Pro The ThinkPad Pen Pro is an electronic pen stored in the pen slot To use the pen slide it out of the slot 24 X13 Yoga Gen 1 User Guide ...

Страница 31: ...To double click tap twice without pausing To right click tap the display and hold the pen there for one second Alternatively you can press and hold the click button 2 and tap the display To erase ink press and hold the eraser button 1 tap the display and drag the pen across the ink you want to erase Charge the ThinkPad Pen Pro 1 Ensure that your computer is on or in sleep mode 2 Insert the pen bac...

Страница 32: ...26 X13 Yoga Gen 1 User Guide ...

Страница 33: ...y temperature The recommended battery temperature range for charging the battery is between 10 C 50 F and 35 C 95 F Note To maximize the life of the battery the computer does not recharge the battery if the remaining power is greater than 95 Use P to P 2 0 charging function Both the USB C connector USB 3 2 Gen 1 and the Thunderbolt 3 connectors USB C on the computer feature the Lenovo unique P to ...

Страница 34: ...rs get charged Note The actual charging speed using the Lenovo unique P to P 2 0 charging function varies depending on many factors such as the remaining battery power of the computers the wattage of the ac power adapter and whether you are using the computers Maximize the battery life Lower the brightness of the computer display Turn off the wireless features when not in use Use the battery until...

Страница 35: ...nection You can connect all types of Bluetooth enabled devices to your computer such as a keyboard a mouse a smartphone or speakers To ensure successful connection place the devices at most 10 meters 33 feet from the computer 1 Type Bluetooth in the Windows search box and then press Enter 2 Turn on Bluetooth if it is off 3 Select a Bluetooth device and then follow the on screen instructions Set up...

Страница 36: ...t read the following information Supported microSD card Your computer does not support the content protection for recordable media CPRM feature for the microSD card Secure Digital SD card Secure Digital eXtended Capacity SDXC card Secure Digital High Capacity SDHC card Supported smart card Supported smart card specifications 85 60 mm 3 37 inches x 53 98 mm 2 13 inches Attention Smart cards with sl...

Страница 37: ...pting you to safely remove hardware and eject media 2 Select the corresponding item to eject the card from the Windows operating system 3 Press the card and remove it from your computer Store the card safely for future use Turn on the Airplane mode When the Airplane mode is enabled all wireless features are disabled 1 Click the action center icon in the Windows notification area 2 Click Airplane m...

Страница 38: ...32 X13 Yoga Gen 1 User Guide ...

Страница 39: ... your computer Options include memory modules storage devices network cards port replicators or docking stations batteries power adapters keyboards mice and more To shop at Lenovo go to https www lenovo com accessories Docking station You can use the following docking stations to extend the capacity of your computer ThinkPad Basic Docking Station ThinkPad Pro Docking Station ThinkPad Ultra Docking...

Страница 40: ...d You can contact Lenovo sales to purchase a system lock with the option part number 4XE0Q56388 2 Key lock indicator This indicator turns on when the system lock key is in the locked position 3 Docking status indicator This indicator turns on when your computer is successfully connected to the docking station 4 Power button Press the power button to turn on or turn off the computer attached to the...

Страница 41: ... Pro Docking Station ThinkPad Ultra Docking Station 1 Audio connector 2 ac power connector 3 DisplayPort connector 4 VGA connector 5 USB 2 0 connector 6 Always On USB 3 2 connector Gen 1 7 USB 3 2 connector Gen 1 8 Ethernet connector 9 Security lock slot 10 USB C connector 11 HDMI connector 12 Always On USB 3 2 connector Gen 2 13 USB 3 2 connector Gen 2 Chapter 4 Accessories 35 ...

Страница 42: ...k skip step 4 and step 7 in the following instruction If you do not connect the docking station to ac power the computer attached runs on battery power 1 Connect the docking station to ac power 2 Disconnect the cables and devices from the left side of the computer 3 Turn the system lock key to the unlocked position 4 Align the top left corner of the computer with the guide post of the docking stat...

Страница 43: ...m lock key to the locked position Attention When the computer is attached to a docking station always hold the whole assembly when you need to move your computer Otherwise the docking station might drop down Detach a docking station Note The ThinkPad Basic Docking Station does not ship with a system lock installed If you do not purchase and install a system lock skip step 1 in the following instru...

Страница 44: ...ng station To ensure that the multiple displays work correctly observe the following guidelines and connect the external displays to the appropriate connectors Docking station Supported external displays Video connectors ThinkPad Basic Docking Station Up to two DisplayPort VGA ThinkPad Pro Docking Station Up to two DisplayPort x2 ThinkPad Ultra Docking Station Up to three DisplayPort x2 HDMI VGA 3...

Страница 45: ...e Interface BIOS Basic Input Output System and how to set change and remove a password Password types You can set a power on password supervisor password system management password or hard disk password in UEFI BIOS to prevent unauthorized access to your computer However you are not prompted to enter any UEFI BIOS password when your computer resumes from sleep mode Power on password If you set a p...

Страница 46: ... management password If you have set both the system management password and the power on password the system management password overrides the power on password Hard disk passwords The hard disk password prevents unauthorized access to the data on the storage drive When a hard disk password is set you are prompted to type a correct password each time you try to access the storage drive To set the...

Страница 47: ...ssword removed What to do if you forget your hard disk password If you forget your user hard disk password or both user and master hard disk passwords Lenovo cannot reset your passwords or recover data from the storage drive You can contact a Lenovo authorized service provider to have the storage drive replaced A fee will be charged for parts and service If the storage drive is a CRU Customer Repl...

Страница 48: ...rint reader to enroll your fingerprints After enrollment you can tap your finger on the fingerprint reader to log in to Windows Enroll your fingerprints Type Sign in options in the Windows search box and then press Enter Select the fingerprint setting and then follow the on screen instruction to enroll your fingerprint During the enrollment the fingerprints are associated with the Windows password...

Страница 49: ...eate your face ID and unlock your computer by scanning your face 1 Type Sign in options in the Windows search box and then press Enter 2 Select the face ID setting and then follow the on screen instruction to create your face ID Use firewalls and antivirus programs Your computer might be preinstalled with a firewall program The firewall protects against computer Internet security threats unauthori...

Страница 50: ...44 X13 Yoga Gen 1 User Guide ...

Страница 51: ... menu However you cannot change the system configurations that are protected by the supervisor password Navigate in the UEFI BIOS interface Attention The default configurations are already optimized for you in boldface Improper change of the configurations might cause unexpected results You can navigate in the UEFI BIOS interface by pressing the following keys F1 Display the General Help screen F9...

Страница 52: ...indows operating system and device drivers Install a Windows operating system Microsoft constantly makes updates to the Windows operating system Before installing a particular Windows version check the compatibility list for the Windows version For details go to https support lenovo com us en solutions windows support Attention It is recommended that you update your operating system through offici...

Страница 53: ...t and ensure that OS Optimized Defaults is enabled Then press F10 to save the settings and exit 9 Follow the on screen instructions to install the device drivers and necessary programs 10 After installing the device drivers apply Windows Update to get the latest updates for example the security patches Install device drivers You should download the latest driver for a component when you notice poo...

Страница 54: ...48 X13 Yoga Gen 1 User Guide ...

Страница 55: ...replacement CRU and 2 you might be charged for the replacement CRU if Lenovo does not receive the defective CRU within thirty 30 days of your receipt of the replacement CRU For full details see the Lenovo Limited Warranty documentation at https www lenovo com warranty llw_02 Refer to the following CRU list for your computer Self service CRUs ac power adapter Nano SIM card tray Power cord ThinkPad ...

Страница 56: ...e minutes to let the computer cool Replace a CRU Follow the replacement procedure to replace a CRU Base cover assembly Prerequisite Before you start read Appendix A Important safety information on page 67 and print the following instructions Note Do not remove the base cover assembly when your computer is connected to ac power Otherwise there might be a risk of short circuits Replacement procedure...

Страница 57: ...5 Loosen the screws that secure the base cover assembly 6 Pry up the latches and remove the base cover assembly Chapter 7 CRU replacement 51 ...

Страница 58: ...the pen slot Troubleshooting If the computer does not start up after you reinstall the base cover assembly disconnect the ac power adapter and then reconnect it to the computer Wireless WAN card for selected models The following information is only for the computer with user installable modules Ensure that you use only a Lenovo authorized wireless module specifically tested for this computer model...

Страница 59: ...ac power and all connected cables 3 Close the computer display and turn the computer over 4 Remove the base cover assembly See Base cover assembly on page 50 5 Remove the wireless WAN card Note A Mylar film might cover the wireless WAN card To access the wireless WAN card open the film first a Hold the cable connector with your fingers and gently disconnect each cable from the wireless WAN card 1 ...

Страница 60: ... 2 solid state drive you might need to install a new operating system For details on how to install a new operating system see Install a Windows operating system and drivers on page 46 If your computer is installed with a hybrid solid state drive with Intel Optane memory go to https support lenovo com docs tg_ssd to know the details on how to replace it The M 2 solid state drive is sensitive Inapp...

Страница 61: ...up and the built in battery on page 49 2 Turn off the computer and disconnect the computer from ac power and all connected cables 3 Close the computer display and turn the computer over 4 Remove the base cover assembly See Base cover assembly on page 50 5 Remove the screw that secures the M 2 solid state drive 1 The M 2 solid state drive is released from the secured position and pivots upward Then...

Страница 62: ...computer Connect the ac power adapter and all disconnected cables to the computer Replacement procedure for the short M 2 solid state drive 1 Disable the built in battery See Disable Fast Startup and the built in battery on page 49 2 Turn off the computer and disconnect the computer from ac power and all connected cables 3 Close the computer display and turn the computer over 4 Remove the base cov...

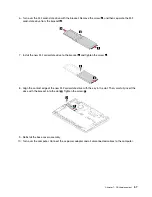
Страница 63: ...ve to the bracket 1 and tighten the screw 2 8 Align the contact edge of the new M 2 solid state drive with the key in the slot Then carefully insert the drive with the bracket into the slot 1 Tighten the screw 2 9 Reinstall the base cover assembly 10 Turn over the computer Connect the ac power adapter and all disconnected cables to the computer Chapter 7 CRU replacement 57 ...

Страница 64: ...58 X13 Yoga Gen 1 User Guide ...

Страница 65: ...connect to ac power and restart the computer What do I do if I spill liquid on the computer 1 Carefully unplug the ac power adapter and turn off the computer immediately The more quickly you stop the current from passing through the computer the more likely you will reduce damage from short circuits Attention Although you might lose some data or work by turning off the computer immediately leaving...

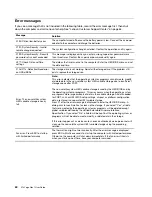
Страница 66: ...torage due to insufficient storage space after POST The non volatile system UEFI variable storage is used by the UEFI BIOS and by the operating system or programs This error occurs when the operating system or programs store large amounts of data in the variable storage All data needed for POST such as UEFI BIOS setup settings chipset or platform configuration data are stored in a separate UEFI va...

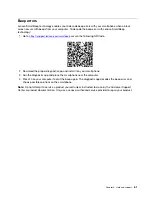
Страница 67: ...e proper diagnostic app and install it on your smartphone 3 Run the diagnostic app and place the smartphone near the computer 4 Press Fn on your computer to emit the beep again The diagnostic app decodes the beep error and shows possible solutions on the smartphone Note Do not attempt to service a product yourself unless instructed to do so by the Customer Support Center or product documentation O...

Страница 68: ...ect your computer model 3 Click Diagnostics Operating System Diagnostics and then follow the on screen instructions Use the Vantage app to Configure device settings Download and install UEFI BIOS drivers and firmware updates Secure your computer from outside threats Diagnose hardware problems Check the computer warranty status Access User Guide and helpful articles Note The available features vary...

Страница 69: ...countries and regions the Genuine Microsoft label is required only on computer models licensed for Windows Pro editions The absence of a Genuine Microsoft label does not indicate that the preinstalled Windows version is not genuine For details on how to tell whether your preinstalled Windows product is genuine refer to the information provided by Microsoft at https www microsoft com en us howtotel...

Страница 70: ...t notice If the number for your country or region is not provided contact your Lenovo reseller or Lenovo marketing representative Services available during the warranty period Problem determination Trained personnel are available to assist you with determining if you have a hardware problem and deciding what action is necessary to fix the problem Lenovo hardware repair If the problem is determined...

Страница 71: ... and conditions of the Lenovo Limited Warranty that apply to your Lenovo hardware product go to https www lenovo com warranty llw_02 https pcsupport lenovo com warrantylookup Purchase additional services During and after the warranty period you can purchase additional services from Lenovo at https pcsupport lenovo com warrantyupgrade Service availability and service name might vary by country or r...

Страница 72: ...66 X13 Yoga Gen 1 User Guide ...

Страница 73: ...ces to power adapters and batteries In addition some products such as speakers and monitors ship with external power adapters If you have such a product this information applies to your product In addition computer products contain a coin sized internal battery that provides power to the system clock even when the computer is unplugged so the battery safety information applies to all computer prod...

Страница 74: ...eep liquids away from your computer Protect the cables from being damaged Applying strong force to cables may damage or break them Route communication lines or the cables of an ac power adapter a mouse a keyboard a printer or any other electronic device so that they cannot be walked on tripped over pinched by your computer or other objects or in any way subject to treatment that could interfere wi...

Страница 75: ...t from your product You might also hear sounds like popping cracking or hissing These might merely mean that an internal electronic component has failed in a safe and controlled manner Or they might indicate a potential safety issue Do not take risks or attempt to diagnose the situation yourself Contact the Customer Support Center for further guidance For a list of Service and Support phone number...

Страница 76: ...oved for customer installation are referred to as Customer Replaceable Units or CRUs Lenovo provides documentation with instructions when it is appropriate for customers to install options or replace CRUs You must closely follow all instructions when installing or replacing parts The Off state of a power indicator does not necessarily mean that voltage levels inside a product are zero Before you r...

Страница 77: ...gradual corrosion of power cord terminals and or the connector terminals on a power adapter which can eventually result in overheating Ensure that all power cord connectors are securely and completely plugged into receptacles Do not use any power adapter that shows corrosion at the ac input pins or shows signs of overheating such as deformed plastic at the ac input pins or anywhere on the power ad...

Страница 78: ...rating Consult an electrician for more information if you have questions about power loads and branch circuit ratings Be sure that the power outlet you are using is properly wired easily accessible and located close to the equipment Do not fully extend power cords in a way that will stress the cords Be sure that the power outlet provides the correct voltage and current for the product you are inst...

Страница 79: ... temperature charged to approximately 30 to 50 of capacity We recommend that the batteries be charged about once per year to prevent overdischarge Do not put the battery in trash that is disposed of in landfills When disposing of the battery comply with local ordinances or regulations Notice for built in rechargeable battery DANGER Do not attempt to remove or replace the built in rechargeable batt...

Страница 80: ... coin cell battery is swallowed or placed inside any part of the body seek medical care immediately Do not Throw or immerse into water Heat to more than 100 C 212 F Repair or disassemble Leave in an extremely low air pressure environment Leave in an extremely high temperature environment Crush puncture cut or incinerate Dispose of the battery as required by local ordinances or regulations The foll...

Страница 81: ... computer or charge the battery near flammable materials or in explosive environments Ventilation slots fans and or heat sinks are provided with the product for safety comfort and reliable operation These features might inadvertently become blocked by placing the product on a bed sofa carpet or other flexible surface Never block cover or disable these features When the ac power adapter is connecte...

Страница 82: ...il all internal parts enclosures are fastened into place Never use the computer when internal parts and circuits are exposed DANGER Connect and disconnect cables as described in the following procedures when installing moving or opening covers on this product or attached devices To connect 1 Turn everything OFF 2 First attach all cables to devices 3 Attach signal cables to connectors 4 Attach powe...

Страница 83: ...onnectors do not comply with specifications of EN 50332 2 The headphone output connector of your computer complies with EN 50332 2 Sub clause 7 This specification limits the computer s maximum wide band true RMS output voltage to 150 mV To help protect against hearing loss ensure that the headphones or earphones you use also comply with EN 50332 2 Clause 7 limits for a wide band characteristic vol...

Страница 84: ...itive option or CRU touch the static protective packaging containing the part to a metal expansion slot cover or other unpainted metal surface on the computer for at least two seconds This reduces static electricity in the package and your body When possible remove the static sensitive part from the static protective packaging and install the part without setting it down When this is not possible ...

Страница 85: ...the latches to keep the display open or closed Avoid directly exposing your computer and peripherals to the air from an appliance that can produce negative ions Wherever possible ground your computer to facilitate safe electrostatic discharge Clean your computer It is a good practice to clean your computer periodically to protect the surfaces and ensure trouble free operation Clean the computer co...

Страница 86: ...80 X13 Yoga Gen 1 User Guide ...

Страница 87: ...unding light sources active seating and the placement of your computer hardware can help you improve your performance and achieve greater comfort This example shows someone in a conventional setting Even when not in such a setting you can follow many of these tips Develop good habits and they will serve you well General posture Make minor modifications in your working posture to deter the onset of...

Страница 88: ...s of comfort and performance If your work area is not in an office setting ensure to take special note of employing active sitting and taking work breaks Many product solutions are available to help you modify and expand your computer to best suit your needs You can find some of these options at https www lenovo com accessories Explore your options for docking solutions and external products that ...

Страница 89: ...o doc for Fedora go to opt Lenovo If you cannot view the LLW either from the Web site or from your computer contact your local Lenovo office or reseller to obtain a printed version of the LLW Access Linux distributions Linux is an open source operating system and popular Linux distributions include Ubuntu and Fedora To learn more about the Ubuntu operating system go to https www ubuntu com To lear...

Страница 90: ...84 X13 Yoga Gen 1 User Guide ...

Страница 91: ...ains integrated wireless cards that operate within the guidelines identified by radio frequency RF safety standards and recommendations therefore Lenovo believes that this product is safe for use by consumers These standards and recommendations reflect the consensus of the worldwide scientific community and result from deliberations of panels and committees of scientists who continually review and...

Страница 92: ...r selected models 3 Wireless WAN antenna main for selected models 4 Wireless LAN antenna main For WLAN only models 1 Wireless LAN antenna auxiliary 2 Wireless LAN antenna main Locate wireless regulatory notices For more information about the wireless regulatory notices refer to the Regulatory Notice at https support lenovo com 86 X13 Yoga Gen 1 User Guide ...

Страница 93: ...ification of the product including the installation of option cards from other manufacturers This product has been tested and found to comply with the limits for Class B equipment according to European and UK compliance standards The limits for Class B equipment were derived for typical residential environments to provide reasonable protection against interference with certified communication devi...

Страница 94: ...tion about our products is available at https www lenovo com ecodeclaration Important battery recycling and WEEE information Take back and recycling information for WEEE and batteries accumulators in the European Union and the United Kingdom The crossed out wheeled bin marking applies only to countries with WEEE and batteries waste regulations including the European Union EU and United Kingdom UK ...

Страница 95: ...r place of purchase or a waste disposal operator and follow their instructions Your Lenovo device might contain a lithium ion battery pack or a nickel metal hydride battery pack You can find details on the battery pack in the product documentation If you need to dispose of a battery pack insulate it with vinyl tape contact Lenovo sales service or your place of purchase or a waste disposal operator...

Страница 96: ...spose of a disused battery from Lenovo notebook computers Your Lenovo notebook computer has a lithium ion battery or a nickel metal hydride battery If you are a company employee who uses a Lenovo notebook computer and need to dispose of a battery contact the proper person in Lenovo sales service or marketing and follow that person s instructions You also can refer to the instructions at https www ...

Страница 97: ...m ecodeclaration European Union EU United Kingdom UK RoHS This Lenovo product with included parts cables cords and so on meets the requirements of EU Directive 2011 65 EU as amended by Directive 2015 863 EU and UK SI 2012 No 3032 on the restriction of the use of certain hazardous substances in electrical and electronic equipment RoHS recast or RoHS 2 For more information about Lenovo worldwide com...

Страница 98: ...RoHS compliant as per E Waste Management Rules Mainland China RoHS The information in the following table is applicable to products manufactured on or after January 1 2015 for sale in the People s Republic of China 92 X13 Yoga Gen 1 User Guide ...

Страница 99: ...Appendix D Compliance and TCO Certified information 93 ...

Страница 100: ...tes The statements below regarding FCC are only valid for products that are shipping to the United States Refer to the product label information to identify the specific model name and number of your product The following information refers to ThinkPad X13 Yoga Gen 1 machine types 20SX and 20SY 94 X13 Yoga Gen 1 User Guide ...

Страница 101: ...d changes or modifications could void the user s authority to operate the equipment This device complies with Part 15 of the FCC Rules Operation is subject to the following two conditions 1 this device may not cause harmful interference and 2 this device must accept any interference received including interference that may cause undesired operation Responsible Party Lenovo United States Incorporat...

Страница 102: ... betreiben Des Weiteren dürfen auch nur von der Lenovo empfohlene Kabel angeschlossen werden Lenovo übernimmt keine Verantwortung für die Einhaltung der Schutzanforderungen wenn das Produkt ohne Zustimmung der Lenovo verändert bzw wenn Erweiterungskomponenten von Fremdherstellern ohne Empfehlung der Lenovo gesteckt eingebaut werden Zulassungsbescheinigung laut dem Deutschen Gesetz über die elektro...

Страница 103: ...on your computer To access the E label screen restart the computer When the logo screen is displayed press F9 or tap the prompt to enter the Startup Interrupt menu and the Regulatory Information option subsequently Korean E label notice TCO Certified Selected models are TCO Certified and bear the TCO Certified logo Note TCO Certified is an international third party sustainability certification for...

Страница 104: ...ции в графе Date дата указана в формате год месяц дата Для получения более подробной информации посетите веб сайт https support lenovo com Единый знак обращения на рынке стран Таможенного союза Brazil audio notice Ouvir sons com mais de 85 decibéis por longos períodos pode provocar danos ao sistema auditivo ENERGY STAR model information ENERGY STAR is a joint program of the U S Environmental Prote...

Страница 105: ...t ENERGY STAR go to https www energystar gov Lenovo encourages you to make efficient use of energy an integral part of your day to day operations To help in this endeavor Lenovo has preset a default power plan To change the power plan see Set the power plan on page 29 Appendix D Compliance and TCO Certified information 99 ...

Страница 106: ...100 X13 Yoga Gen 1 User Guide ...

Страница 107: ...to improve and or modify the products and software programs described in the manuals included with your computer and the content of the manual at any time without additional notice The software interface and function and hardware configuration described in the manuals included with your computer might not match exactly the actual configuration of the computer that you purchase For the configuratio...

Страница 108: ... site https pcsupport lenovo com Trademarks LENOVO LENOVO logo THINKPAD THINKPAD logo TRACKPOINT and ULTRACONNECT are trademarks of Lenovo Intel Intel Optane and Thunderbolt are trademarks of Intel Corporation or its subsidiaries in the U S and or other countries Microsoft Windows Direct3D BitLocker and Cortana are trademarks of the Microsoft group of companies Mini DisplayPort mDP and DisplayPort...

Страница 109: ......

Страница 110: ......

Отзывы: