BL55-RU
(E)
4-5
4-4-4. Adjusting the Reference Point
The positional relationship between the selected position for the reference point gate and scale signal must
be set in order to output a reference point in synchronization with the A/B signal. This adjustment and
setting uses the synchronization with the A/B signal to prevent shifting of the reference point position even
if the gate signal for the reference point is shifted slightly due to the temperature, electrical characteristics,
or other factors.
After the scale is attached, be sure to always perform the adjustments and settings using the following
procedure.
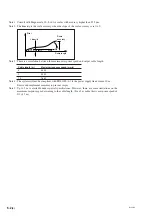
Fig. 4-4
1
Move the head in the opposite direction from where the reference point is captured. For instance, for
forward direction reference point detection, move the slider (the scale unit in the case of scale unit
movement) as shown in
w
, and pass through the reference point.
2
Set MODE switch 5 (reference point adjustment mode switch) to OFF. The system changes to reference
point setting mode, and all POS. lamps turn off.
3
Move the slider (the scale unit in the case of scale unit movement) in the direction where the reference
point is captured, and pass through the reference point.
4
One of the POS. lamps turns on.
5
Set MODE switches 1 and 2 (reference point POS1 and POS2 switches) corresponding to the POS.
lamps that are on as shown in Table 4-4.
POS. lamps
MODE settings
1
2
OFF
OFF
ON
OFF
OFF
ON
ON
ON
Table 4-4
6
Set MODE switch 5 (reference point adjustment mode switch) to ON.
•
To increase the reproducibility of the synchronous reference point, be sure that the encoder passes through
the reference point at the same speed when the reference point was originally set and when detecting the
reference point at the beginning of work.
For the analog output type, perform detection of the reference point at a speed of 150 mm/s or less.
•
The reference point position can be verified using the reference point lamp. The reference point lamp
turns off when the reference point is detected. (It is normally on.) After the reference point is detected, it
remains off for a distance of about 4 mm.
4
3
2
1
q
Forward direction
reference point detection
Reverse direction
reference point detection
w
Содержание BL55-RU
Страница 2: ...BL55 RU ...
Страница 14: ...1 4 E BL55 RU ...
Страница 30: ...3 14 E BL55 RU ...
Страница 40: ...4 10 E BL55 RU ...
Страница 48: ...7 2 E BL55 RU ...
Страница 50: ...8 2 E BL55 RU ...
Страница 62: ...1 4 G BL55 RU ...
Страница 78: ...3 14 G BL55 RU ...
Страница 88: ...4 10 G BL55 RU ...
Страница 96: ...7 2 G BL55 RU ...
Страница 98: ...8 2 G BL55 RU ...


