9
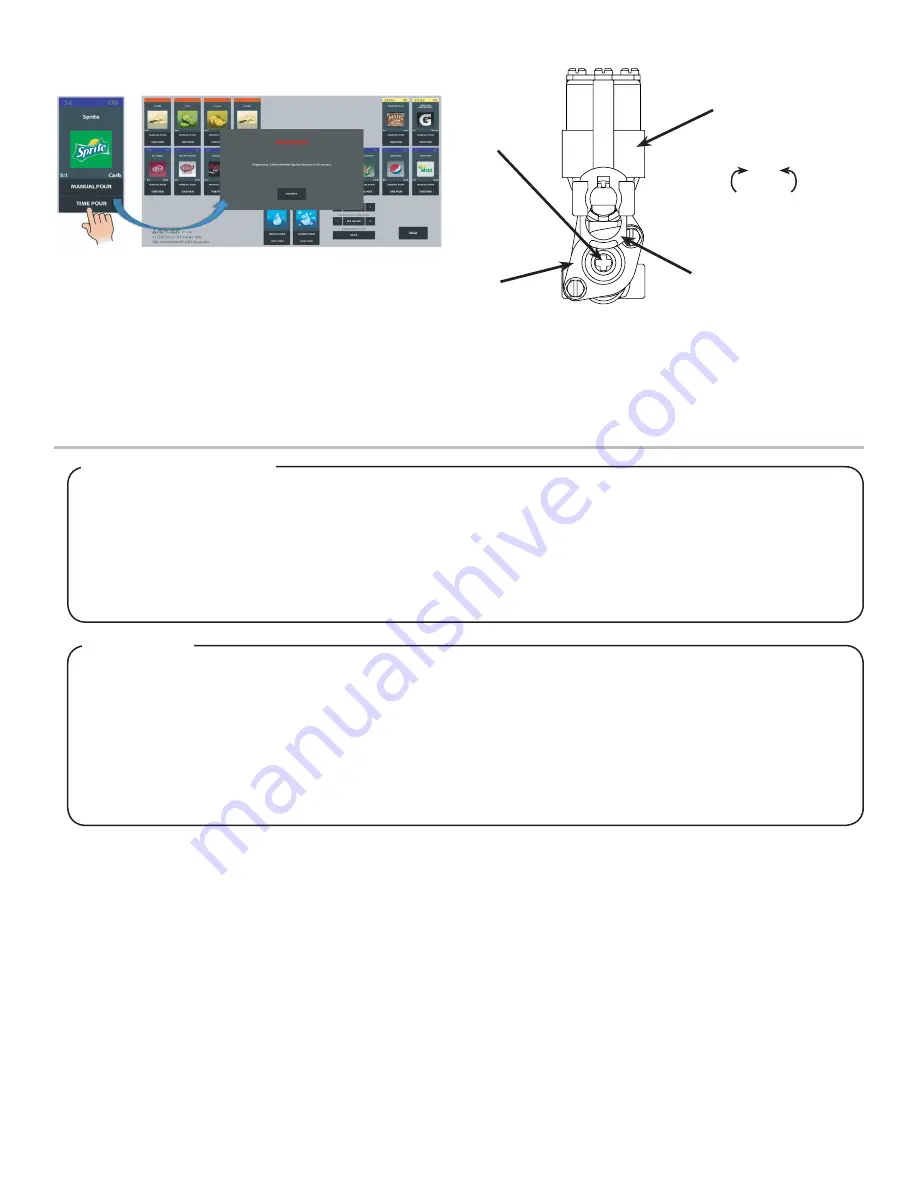
7. The unit will dispense a specific amount of product, compare
the amount captured in the graduated cylinder to the amount
shown on the screen. Tap Dismiss to return to the valve
modules.
8. Using a screwdriver, adjust the flow control for the
designated module and repeat Steps 7 and 8 until the
amount dispensed matches the amount shown on the
screen.
9. Repeat Steps 5-8 for the remaining modules on the screen.
10. Reinstall the unit merchandiser, and the key switch back to
the normal “Run” position.
A
B
C
D
Increase
Decrease
A. Flow Control
B. Valve Retainer
C. Solenoid
D. Valve Body
6. Press the Time Pour button for the designated module being
tested.
Lancer equipment (new or reconditioned) is shipped from the factory cleaned and sanitized in accordance with NSF
guidelines. The operator of the equipment must provide continuous maintenance as required by this manual and/or
state and local health department guidelines to ensure proper operation and sanitation requirements are maintained.
The cleaning procedures provided herein pertain to the Lancer equipment identified by this manual. If other equipment
is being cleaned, follow the guidelines established by the manufacturer for that equipment.
Cleaning should be accomplished only by trained personnel. Sanitary gloves are to be used during cleaning operations.
Applicable safety precautions must be observed. Instruction warnings on the product being used must be followed.
GENERAL INFORMATION
• Use sanitary gloves when cleaning the unit and observe all applicable safety precautions.
• DO NOT
use a water jet to clean or sanitize the unit.
• DO NOT
disconnect water lines when cleaning and sanitizing syrup lines, to avoid contamination.
• DO NOT
use strong bleaches or detergents; These can discolor and corrode various materials.
• DO NOT
use metal scrapers, sharp objects, steel wool, scouring pads, abrasives, or solvents on the dispenser.
• DO NOT
use hot water above 140° F (60° C). This can damage the dispenser.
• DO NOT
spill sanitizing solution on any circuit boards. Insure all sanitizing solution is removed from the system.
!
ATTENTION
CLEANING AND SANITIZING
Cleaning Solution
Mix a mild, non-abrasive detergent (e.g. Sodium Laureth
Sulfate, dish soap) with clean, potable water at a temperature
of 90°F to 110°F (32°C to 43°C). The mixture ratio is one ounce
of cleaner to two gallons of water. Prepare a minimum of five
gallons of cleaning solution. Do not use abrasive cleaners or
solvents because they can cause permanent damage to the unit.
Ensure rinsing is thorough, using clean, potable water at a
temperature of 90°F to 110°F. Extended lengths of product lines
may require additional cleaning solution.
Nozzle Sanitizing Solution
Prepare a chlorine solution (less than pH 7.0) containing 50
PPM chlorine with clean, potable water at a temperature of 90
– 110°F. Any sanitizing solution may be used as long as it is
prepared according to manufacturer’s recommendations and
safety guidelines, and provides 50 PPM cholorine.
1. Clean cloth towels
2. Bucket
3. Extra nozzle
4. Sanitary gloves
5. Small brush (PN 22-0017)
Sanitizing Solution
Prepare the sanitizing solution in accordance with the
manufacturer’s written recommendations and safety guidelines.
The type and concentration of sanitizing agent recommended in
the instructions by the manufacturer shall comply with 40 CFR
§180.940. The solution must provide 200 parts per million (PPM)
chlorine (e.g. Sodium Hypochlorite or bleach) and a minimum of
five gallons of sanitizing solution should be prepared.
Other Supplies Needed


