background image

8

Setting Up Brands

1.  Access the Technicians Menu.
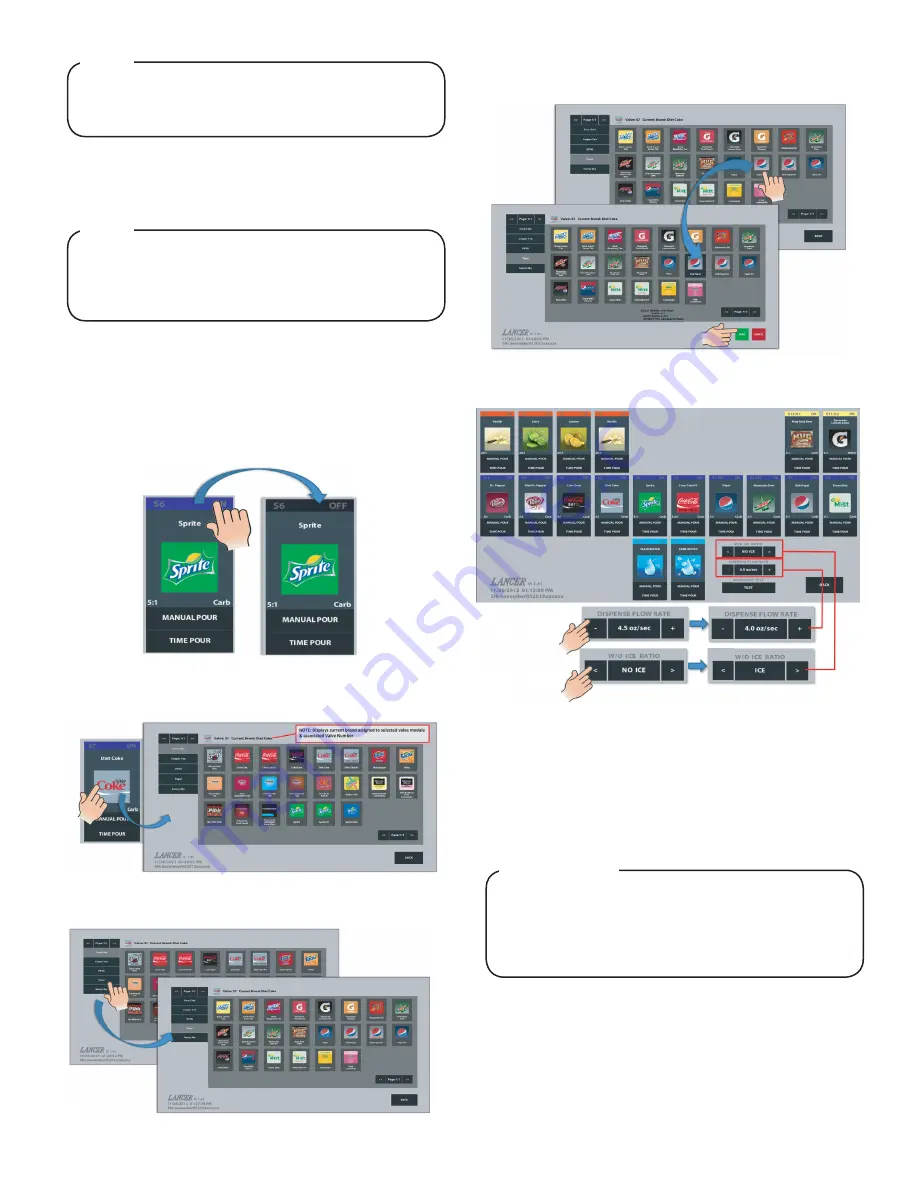
2.  Deactivate any syrup or flavor adder valve module not being 

used by tapping the colored ribbon at the top of the module.

17.  Activate the Carb Water module until the carbonator pump 

comes on. Release the button, allow carbonator to fill and 

stop. Repeat this process until a steady flow of carbonated 

water is achieved.

18.  Activate each syrup and flavor module by way of the Manual 

Pour button, to purge air from the syrup lines. 


The pump deck has a 3 minute timeout feature. If the


timeout occurs, turn the deck OFF then ON by flipping


the switch on the control box.

NOTE


To check for CO

2

 leaks, close the valve on the CO

2


cylinder and observe if the pressure to the system 


drops with the  cylinder valve closed for five minutes. 


Open the cylinder valve after check.

NOTE

3.  For each syrup and flavor adder module being used, tap the 

brand icon to open the Brand Library and reveal additional 

syrup brands for selection.

4.  Selecting the different tabs on the left side of the screen will 

reveal even more available brands. Tap Back to return to 

Technicians Menu.

5.  Tap the desired syrup brand. Selected brand will become 

darker. Tap Save to change assignment. Tap Cancel to 

remove selection.

6.  Modify the Dispense Flow Rate and W/O Ice Ratio if 

required. Ratios and dispense times will automatically be              

updated when changes are applied. 

7.  After completing changes, tap Save to apply all changes 

made. Tapping Cancel will undo all unsaved changes.

Filling Ice and Setting Ratio

1.  Fill unit with ice until the auger is covered then push the ice 

chute to check for ice delivery.

2.  Finish filling the ice bin with ice then install top cover (if 

applicable). 

3.  Access the Technicians Menu. 
4.  Remove the unit merchandiser to access the module flow 

controls. 

5.  Place the graduated cylinder, supplied in the installation kit, 

underneath the nozzle. 


If an icemaker is not installed on the unit, it is required  


to leave at least 6 to 8 inches (158 to 203 mm) of 


clearance from the top of the bin to the ice line. This 


ensures the lid will not be displaced due to the ice


shifting during agitation.

ATTENTION

Содержание TouchPoint

Страница 1: ...s including children with reduced physical sensory or mental capabilities or lack of experience and knowledge unless they have been given supervision or instruction concerning use of the appliance by...

Страница 2: ...ter supply line must be at least a 3 8 inches 9 525 mm pipe with a minimum of 25 PSI 0 172 MPA line pressure but not exceeding a maximum of 50 PSI 0 345 MPA Water pressure exceeding 50 PSI 0 345 MPA m...

Страница 3: ...r 2 Remove agitator bar from the hub 3 Remove ice shroud by lifting the side opposite the auger and rotating out from beneath the auger 4 Locate drain spider and reinstall in the coldplate cavity wher...

Страница 4: ...y cord to a grounded electrical outlet of the proper voltage and amperage rating Installing an Icemaker if necessary When installing an icemaker on the dispenser use a bin thermostat to control the ic...

Страница 5: ...Source D Line to Remote Pump 3 Connect line from tee fitting at water line to the remote pump deck inlet regulator 4 Complete the carbonated water line connection between the remote pump deck and car...

Страница 6: ...achment nut ATTENTION A CO2 Regulator B 1 4 Nut Stem Seal C Line to CO2 Regulator Manifold D Oetiker Pliers A B C D A dedicated CO2 regulator is required to supply the CO2 inlet at the unit as well as...

Страница 7: ...devices on the same outlet WARNING TouchPoint will begin booting up as soon as power is connected Boot up may take several minutes Cup selection carousel will appear when complete NOTE 7 Test the moto...

Страница 8: ...n 4 Selecting the different tabs on the left side of the screen will reveal even more available brands Tap Back to return to Technicians Menu 5 Tap the desired syrup brand Selected brand will become d...

Страница 9: ...syrup lines to avoid contamination DO NOT use strong bleaches or detergents These can discolor and corrode various materials DO NOT use metal scrapers sharp objects steel wool scouring pads abrasives...

Страница 10: ...plash Plate Assembly by lifting it up and out from the dispenser face Refer to the Automatic Agitation Warning on the first page of this manual NOTE It is recommended to perform this procedure monthly...

Страница 11: ...syrup lines with BIB connectors into cleaning solution 8 Activate each valve for a minimum of sixty 60 seconds until lines are filled with cleaning solution then let stand for thirty 30 minutes 9 Flus...

Страница 12: ...PLUMBING DIAGRAM ELECTRONICS DIAGRAM Lancer Corp 800 729 1500 Technical Support Warranty 800 729 1550 custserv lancercorp com lancercorp com...

Отзывы: