background image

-9-

www.igmtools.com

Receiving your tablesaw

This is how machine is shipped from the 

factory. 

Unscrew the crate fasteners

Use a drill with a #2 Phillips head bit and 

remove the bottom screws from carton. These 

screws may be discarded. 

Lift crate off pallet

Use two persons to lift the carton away from the 

pallet. There should be three packages along 

with the table saw.

NOTE: The throat plate, riving knife, and 10” 

blade is pre-installed in the machine. The miter 

gauge, and blade changing tool are positioned 

in the tool holder located on the right side of the 

cabinet.

Check Inventory

1. Fence, install tools, push stick, blade guard  

    assembly

2. Smaller fence rail sections, hardware kit

3. Longer fence rail sections.

Wipe off protective plastics

Peel back the protective vinyl plastic and wipe

away the oil with a waste rag. 

Use Caution: An oily rag can be a serious fire 

hazard. Discard in an appropriate manner.

Tech Tip: To help keep your table top clean and 

to prevent or clean any rust, we recommend 

waxing your tabletop with an appropriate wax 

rubbing compound. This will also reduce friction 

under operation. Rust can be removed with 

WD-40.

6.2 Inventory

Box 1

Fence: PTSF236110175-0130-1-1

Push stick: PTSF236110175-0130-130

Blade guard: PTSF236110175-01302-1


Install Tools

Fence hooks*: PTSF236110175-0130-118

* Fence storage hooks may be pre-installed.

Box 2

Rear Rail 2: PTSF236110175-0130-127.5

Front Rail 2: PTSF236110175-0130-127.6

Hardware kit

Box 3

Rear rail 1: PTSF236110175-0130-127.5

Front rail 1: PTSF236110175-0130-127.6

Pre-installed on machine

Throat plate 

PTSF236110175-0130-6

Riving knife 

PTSF236110175-0130-27

250mm blade 

PTSF236110175-0130-33

Mitre gauge 

PTSF236110175-0130-3

Arbor wrench 

PTSF236110175-0130-137

Tool storage 

PTSF236110175-0130-120

Wings (2x) 

PTSF236110175-0130-4

Note: The front rail part number is comprised of 

two pieces – both long and short. The rear rail 

part number is comprised of two pieces – long 

and short.

Note.: For safety reasons, this machine is not 

sold with a tape-rule for the left side of the 

blade. It is not a missing part. 

6.3 Loose Parts & Overview  

Your new machine has been mostly assembled 

at the certified ISO 91001 factory where it was 

made. Some parts must be assembled by the 

purchaser. Please read all steps first before 

proceeding with step one.

Blade Guard

5) M8x1.5+ lock nut

(5) Square head 8x1.5 + nut

Fence hooks (step 2)


6.4 General Setup 

1. Attach the short rear fence support

2. Attach the long rear fence support

3. Level the rear rails and fasten

4. Attach T-Slot bolts to front table

5. Insert long front rail fence support

6. Insert short front rail and switch

7. Join front fence supports

8. Align the entire front rail to blade mark

9. Level and fasten the front rail

10. Insert fence

11. Level the saw by adjusting casters

1. Attach short rear fence support 

Use the supplied wrench and Alan key to 

loosely fasten (2) bolts, lock washers, washers, 

Содержание Fusion2 2022

Страница 1: ...natools com Distributor IGM n stroje a stroje s r o Ke Kopanin 560 252 67 Tuchom ice Czech Republic EU Phone 420 220 950 910 E mail sales igmtools com Website www igmtools com 2022 10 25 151 Fusion2 L...

Страница 2: ...2 www igmtools com...

Страница 3: ...3 www igmtools com...

Страница 4: ...cifications 3 1 Contents Professional Square Zero Clearance Throat Plate pre installed 250 mm Saw Blade pre installed Riving Knife pre installed Mitre Gauge ships in tool holder Tool Holder pre instal...

Страница 5: ...sonal Safety Stay alert watch what you are doing and use common sense when operating a power tool do not use a power tool while you are tired or under the influence of drugs alcohol or medication A mo...

Страница 6: ...or a slip could direct your hand towards the saw blade and result in serious personal injury Feed the workpiece into the saw blade or cutter only against the direction of rotation Feeding the workpiec...

Страница 7: ...surements of sound power levels were conducted according to EN ISO 3746 2010 Operating conditions The operating conditions for noise measurement comply with Annex A of ISO 7960 1995 Testing results A...

Страница 8: ...lifting the tool into position and moving the tool into position Warning DO NOT connect to a power supply until the setup is complete DO NOT perform any of the following steps installations or adjustm...

Страница 9: ...ar Rail 2 PTSF236110175 0130 127 5 Front Rail 2 PTSF236110175 0130 127 6 Hardware kit Box 3 Rear rail 1 PTSF236110175 0130 127 5 Front rail 1 PTSF236110175 0130 127 6 Pre installed on machine Throat p...

Страница 10: ...entire front rail section to the blade 9 Level and fasten front rail To level the front rail sections to the table top use a ridged straight edge atop the loosely fit rail sections Apply downward forc...

Страница 11: ...ht hand 6 Reinstall the throat plate Grasp the pawls up and out of the way to re insert the throat plate Lock the throat plate CAUTION Make sure the riving knife is in line with the blade If it is not...

Страница 12: ...whether you have set the aluminum profile vertically or horizontally on the longitudinal ruler Adjusting the Fence Glide Bushings You may need to adjust the height of the bushings on either side or r...

Страница 13: ...nsion wing on supports 4 Join or adjust the wing with supplied bolts Note The clamps may scratch the tabletop Use a cloth or soft wood between the clamp and the iron surfaces 2 Take initial measuremen...

Страница 14: ...mately 2 above table Loosen the belt adjustment bolt With the bolt loose Raise or lower the motor so that the belt is tight Changing the belt 1 Unplug the table saw 2 Remove all throatplates blades an...

Страница 15: ...his push stick provides sufficient distance of the hand from the saw blade Warning Never use a damaged or cut push stick A damaged push stick may break causing your hand to slip into the saw blade 8 T...

Страница 16: ...e angle ruler in the table groove there are 2 adjusting screws in the longitudinal profile of the angle ruler For greater rigidity in the table groove simply tighten the screws more the more screws yo...

Страница 17: ...t grinding loose shaft requires bearing replacement Machine trips the overload or feels underpowered during operation Possible Causes 1 Feed rate cutting speed too fast 2 Workpiece material unsuitable...

Страница 18: ...18 www igmtools com Wiring Diagram Fusion 2 230V...

Страница 19: ...19 www igmtools com Fence assembly...

Страница 20: ...20 www igmtools com Mitre gauge blade guard...

Страница 21: ...21 www igmtools com Motor and trunnion...

Страница 22: ...22 www igmtools com Cabinet...

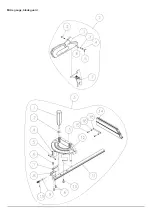
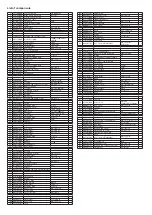
Страница 23: ...Shaft 1 83 251455 615 Bushing 1 84 240061 008 Handwheel HF 150 2 85 920703 000 Fixing Knob 2 86 051470 000 Bracket 1 88 660229 000 Magetic Ring 1 89 006706 100 Wave Washer WW 18 1 90 006001 203 Flat...

Отзывы: