background image

-11-

www.igmtools.com

• Note on the Riving Knife

Since Riving Knife, other than those offered by 

Laguna, has not been tested with this product, 

use of such accessories with this tool could be 

hazardous. To reduce the risk of injury, only 

Laguna, recommended accessories should be 

used with this product.

• 

Note on the saw blade

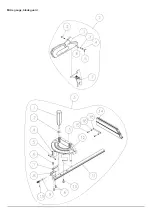
Installing/removing the riving knife

1. Unplug the tablesaw!

2. Make sure the lock is in open position

3. Insert the blade guard

4. Position the guard insert

5. Lock the blade guard

6. Reinstall throat plate


CAUTION: Make sure the blade guard is in line 

with the blade. If it is not in line, please see the 

Adjustment section.

3. Insert the blade guard

WARNING: MAKE SURE SAW IS 

UNPLUGGED.

With the throat plate removed, and the cam lock

mechanism in the open position (pulled up), 

insert the blade guard insert into the slot.

4. Position to the left of the casing

Make sure the guard is positioned correctly and 

seated in the bottom of the casing. Grasp the 

pawls with one hand, leaving the other hand 

free to activate the cam action lock.

5. Lock the blade guard

Keep firm hold of the blade guard with left hand 

and engage the cam lock with the thumb of 

your right hand.

6. Reinstall the throat plate

Grasp the pawls up and out of the way to re-

insert the throat plate. Lock the throat plate.

CAUTION: Make sure the riving knife is in-line 

with the blade. If it is not in line, please see the 

Adjustments Section.

6.7 Installing/removing the Blade 

1. Unplug the table saw!

2. Remove any blade guards, riving knifes, and 

the throat plate to access the blade.

3. Set the arbor tilt to 0 degrees and lock.

4. Raise saw to highest position.

5. Engage blade lock (red component).

6. Remove the arbor nut and flange with arbor 

wrench.

7. Remove or install blade.

CAUTION: Make sure the teeth of the blade are 

facing the front of the saw as shown.

2. Remove all accessories 

WARNING: MAKE SURE SAW IS 

UNPLUGGED. To access the blade remove all 

accessories around the blade, including riving 

knifes, throat plates, ect.

3. Set arbor tilt to 0 and lock. 

Set the arbor tilt to 0 degrees and lock the arbor 

to prevent it from moving when installing or 

removing blades. 

4. Raise saw blade to highest position

5. Engage the blade lock

6. Remove arbor nut and flange


Limit position of the top guard
Use riving knife only with 250 mm 

diameter blade

Riving knife thickness 2,3 mm

Only use this riving knife with 2 mm 

and 3 mm teeth thickness

No saw blade should be used where 

the maximum marked speed is lower 

than the selected rotational speed of 

the saw spindle.

5500 max rpm

Содержание Fusion2 2022

Страница 1: ...natools com Distributor IGM n stroje a stroje s r o Ke Kopanin 560 252 67 Tuchom ice Czech Republic EU Phone 420 220 950 910 E mail sales igmtools com Website www igmtools com 2022 10 25 151 Fusion2 L...

Страница 2: ...2 www igmtools com...

Страница 3: ...3 www igmtools com...

Страница 4: ...cifications 3 1 Contents Professional Square Zero Clearance Throat Plate pre installed 250 mm Saw Blade pre installed Riving Knife pre installed Mitre Gauge ships in tool holder Tool Holder pre instal...

Страница 5: ...sonal Safety Stay alert watch what you are doing and use common sense when operating a power tool do not use a power tool while you are tired or under the influence of drugs alcohol or medication A mo...

Страница 6: ...or a slip could direct your hand towards the saw blade and result in serious personal injury Feed the workpiece into the saw blade or cutter only against the direction of rotation Feeding the workpiec...

Страница 7: ...surements of sound power levels were conducted according to EN ISO 3746 2010 Operating conditions The operating conditions for noise measurement comply with Annex A of ISO 7960 1995 Testing results A...

Страница 8: ...lifting the tool into position and moving the tool into position Warning DO NOT connect to a power supply until the setup is complete DO NOT perform any of the following steps installations or adjustm...

Страница 9: ...ar Rail 2 PTSF236110175 0130 127 5 Front Rail 2 PTSF236110175 0130 127 6 Hardware kit Box 3 Rear rail 1 PTSF236110175 0130 127 5 Front rail 1 PTSF236110175 0130 127 6 Pre installed on machine Throat p...

Страница 10: ...entire front rail section to the blade 9 Level and fasten front rail To level the front rail sections to the table top use a ridged straight edge atop the loosely fit rail sections Apply downward forc...

Страница 11: ...ht hand 6 Reinstall the throat plate Grasp the pawls up and out of the way to re insert the throat plate Lock the throat plate CAUTION Make sure the riving knife is in line with the blade If it is not...

Страница 12: ...whether you have set the aluminum profile vertically or horizontally on the longitudinal ruler Adjusting the Fence Glide Bushings You may need to adjust the height of the bushings on either side or r...

Страница 13: ...nsion wing on supports 4 Join or adjust the wing with supplied bolts Note The clamps may scratch the tabletop Use a cloth or soft wood between the clamp and the iron surfaces 2 Take initial measuremen...

Страница 14: ...mately 2 above table Loosen the belt adjustment bolt With the bolt loose Raise or lower the motor so that the belt is tight Changing the belt 1 Unplug the table saw 2 Remove all throatplates blades an...

Страница 15: ...his push stick provides sufficient distance of the hand from the saw blade Warning Never use a damaged or cut push stick A damaged push stick may break causing your hand to slip into the saw blade 8 T...

Страница 16: ...e angle ruler in the table groove there are 2 adjusting screws in the longitudinal profile of the angle ruler For greater rigidity in the table groove simply tighten the screws more the more screws yo...

Страница 17: ...t grinding loose shaft requires bearing replacement Machine trips the overload or feels underpowered during operation Possible Causes 1 Feed rate cutting speed too fast 2 Workpiece material unsuitable...

Страница 18: ...18 www igmtools com Wiring Diagram Fusion 2 230V...

Страница 19: ...19 www igmtools com Fence assembly...

Страница 20: ...20 www igmtools com Mitre gauge blade guard...

Страница 21: ...21 www igmtools com Motor and trunnion...

Страница 22: ...22 www igmtools com Cabinet...

Страница 23: ...Shaft 1 83 251455 615 Bushing 1 84 240061 008 Handwheel HF 150 2 85 920703 000 Fixing Knob 2 86 051470 000 Bracket 1 88 660229 000 Magetic Ring 1 89 006706 100 Wave Washer WW 18 1 90 006001 203 Flat...

Отзывы: