background image

Applications 9-41

Applications

Stamp/Overlay (continued)

1 Touch 

APPLI.

 on the Basic Screen to display the Application Selection Screen.

2 Touch 

Stamp/Overlay

. The Stamp/Overlay Selection Screen will be displayed.

3 Touch to select the desired stamp to display the subsequent screen.

On each screen, you can specify the desired type of the selected stamp.

4 When selecting STAMP, SET NUMBERING, PAGE NUMBERING, or DATE/TIME,

select the desired position from 9 location keys on each screen.
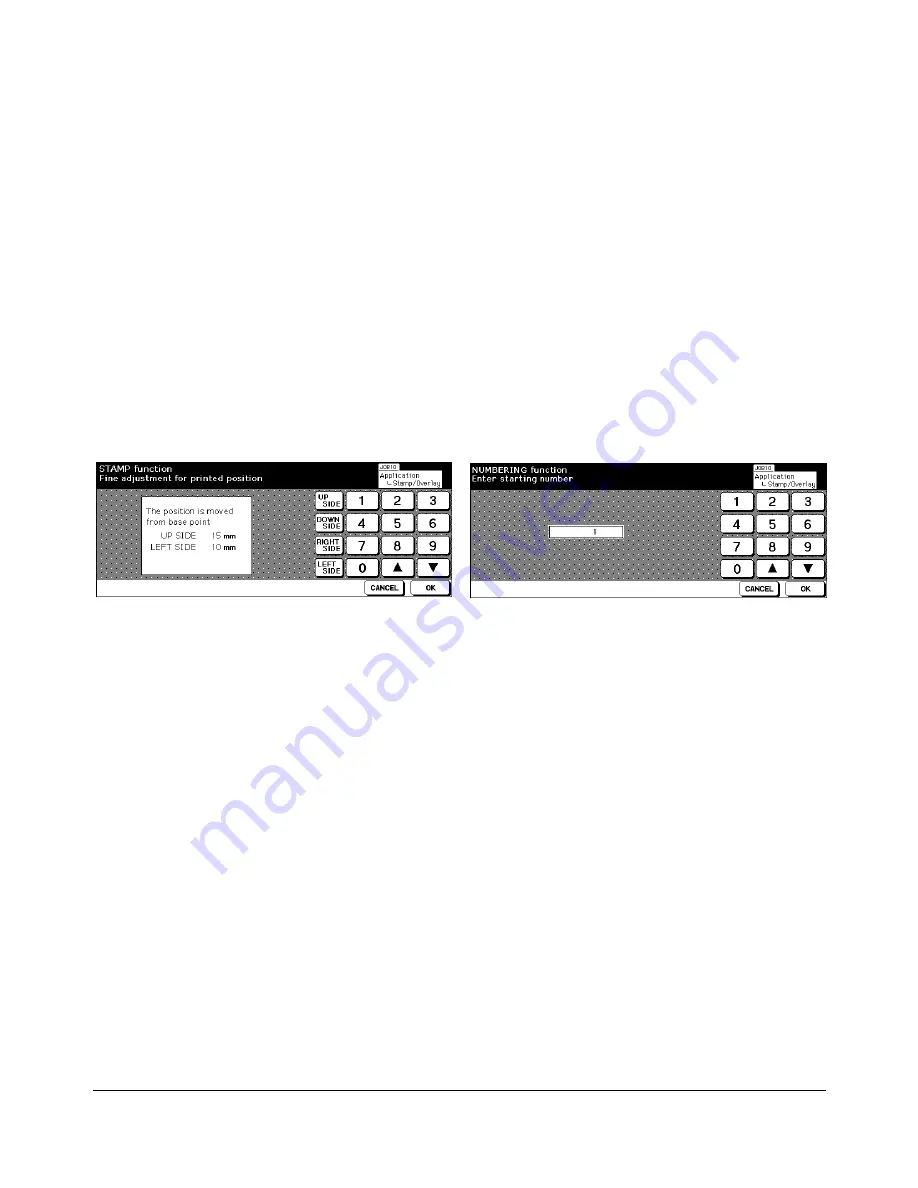
If fine adjustment is required, touch 

FINE ADJ. OF POSITION

 to display the Fine

Adjustment Setting Screen.
Touch 

UP SIDE

RIGHT SIDE

DOWN SIDE

, or 

LEFT SIDE 

to specify the direction, then

use the touch screen keypad or up/down arrow key to enter the desired amount.

Fine Adjustment Setting Screen

5 Touch 

CHARACTER SIZE

, if desired, to change the character size. The following

options are provided:

STAMP

: LARGER/ SMALLER

SET NUMBERING

: 20pt/ 36pt

PAGE NUMBERING : 8pt/ 10pt/ 12pt/ 14pt
DATE/TIME

: 8pt/ 10pt/ 12pt/ 14pt

6 Touch 

PRINTED PAGE

 on the Stamp Selection, Set Numbering Type Selection, or

Date/Time Type Selection Screen to designate whether to print the selected stamp on
the cover only or on all pages.
Touch 

PRINTED PAGE

 on the Page Numbering Type Selection Screen to designate

whether to print the page numbers on all pages, except the front cover, or except the
front/back covers.

7 Touch 

STARTING No.

 on the Set Numbering, Page Numbering, or Watermark

Numbering Type Selection Screen to display the Starting No. Setting Screen (see
above). Use the touch screen keypad or up/down arrow key to enter the desired
starting number, then touch 

OK

 to return to the previous screen.

8 When selecting WATERMARK or WATERMARK NUMBERING, touch 

LIGHT

,

NORMAL

DARK

, or 

DARK+

 to select the desired density level on each screen.

9 The Overlay function will be selected simply by touching 

OVERLAY 

to highlight it.

10When all the desired selections are made, touch 

OK

 to return to the Application

Selection Screen.

Starting No. Setting Screen

Содержание Vi7360

Страница 1: ...INSTRUCTION HANDBOOK Please read the instruction handbook before using the copier Keep it in the designated location for easy reference ...

Страница 2: ... or transmitted in any form or by any means electronic or mechanical including photocopying recording or by any information storage and retrieval system without permission in writing from the Publisher Legal Restriction On Copying It may be prohibited to copy copyrighted material without permission of the copyright owner It is prohibited under any circumstances to copy domestic or foreign currenci...

Страница 3: ... CAUTION Indicates that personal injury or mechanical damage may result from insufficient attention to or incorrect compliance with the related points Symbols The symbol indicates that the related section includes safety warnings Specific points of attention are indicated inside the symbol General warning Warning of danger of electrical shock Warning of high temperature The symbol indicates that t...

Страница 4: ...Please contact your service representative to order a replacement if the safety warnings in the handbook are illegible or if the handbook itself is missing fee required ...

Страница 5: ...ment 1 11 Section 2 Safety Information CAUTION LABELS 2 2 INSTALLATION PRECAUTIONS 2 4 PRECAUTIONS FOR USE 2 7 Regulations 2 10 FCC Regulations 2 10 Canadian Department of Communications Regulations 2 10 FDA Regulations 2 10 Section 3 Machine Information Machine Configuration 3 2 External Machine Call Outs 3 3 Internal Machine Call Outs 3 3 Standard Optional Equipment 3 4 Site Requirements 3 5 Con...

Страница 6: ... Positioning Originals on the Platen Glass 4 2 Positioning an Original for Manual Copying 4 2 Using the Reversing Automatic Document Feeder RADF 4 3 Positioning Originals 4 4 Positioning an SDF Original 4 5 Positioning Mixed Originals 4 6 Paper in Main Body Trays 4 7 Paper in Large Capacity Tray Option 4 7 Paper in Automatic Duplex Unit 4 8 Paper in Multi Sheet Bypass Tray 4 8 Paper in 2 Paper Tra...

Страница 7: ...Exposure Selection AES 6 7 Manual Mode Lighter Normal Darker 6 7 Density Shift 6 8 Lens Mode 6 10 Automatic Paper Selection APS 6 10 Automatic Magnification Selection AMS 6 11 Special Ratio Table 6 12 Selecting a Special Ratio for Non Standard Paper 6 13 Preset and User Set Ratios 6 14 Zoom Mode 6 15 Vertical Horizontal Zoom 6 16 Copy Size 6 17 Programming Copy Size for UNIV Key 6 18 Selecting Pap...

Страница 8: ...7 4 Sort Mode Using Primary Main Tray 7 5 Staple Sort Mode Using Primary Main Tray 7 6 Group Mode Using Primary Main Tray 7 9 Output Modes Using Secondary Sub Tray 7 10 Folding and Stapling Folding Modes 7 12 Cover Sheet Feeder 7 15 Manual Stapling 7 18 Output Mode for Machine without Finisher 7 20 Face Down Exit 7 21 Face Up Exit 7 24 Section 8 Special Original Special Original Screen 8 2 Resolut...

Страница 9: ... Area 9 33 Image Shift 9 34 Stamp Overlay 9 38 Section 10 Job Memory Job Store 10 2 Job Recall 10 4 Job Memory Form 10 6 Section 11 Server Function Server Function 11 2 Image Store Delete Mode 11 4 To Store Image Data in HDD 11 4 To Delete Image Data 11 6 Image Store Output Mode 11 8 Image Recall Mode 11 10 Section 12 Shortcuts Set Reserve Job 12 2 Store Originals Scanned from Platen 12 2 Store Or...

Страница 10: ... 13 8 IP Address Setting 3 13 9 Copier Initial Setting 2 13 10 User Setting Mode 3 13 12 User Density Level 1 Setting 1 13 12 User Density Level 2 Setting 2 13 13 User Lens Mode Ratio Setting 3 13 14 ECM Electronic Copy Monitor Function Setting 4 13 15 How to Access the ECM Setting Mode 13 16 E C M Data Edit 1 13 17 E C M All Count Reset 2 13 21 E C M Function Setting 3 13 22 Lock Delete Job Memor...

Страница 11: ...n Tray 1 2 and 3 14 3 Loading Paper in Tray 4 14 4 Loading Tabbed Sheets in Tray 1 2 or 3 14 5 Loading Tabbed Sheets in Tray 4 LCT 14 6 Adding Toner 14 7 Inserting a New Staple Cartridge into 2 Paper Tray 3 Paper Tray Finisher 14 8 Preventive Maintenance 14 9 Reading the PM Count 14 9 Printing the PM Count 14 9 Cleaning the Left Partition Glass 14 10 Cleaning the Document Glass and Cover 14 10 Ser...

Страница 12: ...User Key Operator Functions Copier Service Repairs Supplies Machine Labels Control Panel with Interactive Touch Screen Overview of This Manual Help Mode Product Overview Features of This Machine Copier Features Standard Equipment Optional Equipment ...

Страница 13: ...tions on basic copying loading paper adding toner and clearing mishandled paper In addition safety labels are attached to various internal areas of the copier and provide cautionary information that must be heeded to prevent personal injury or damage to the copier Sample machine safety labels are shown in Section 2 Safety Information Control Panel with Interactive Touch Screen The control panel of...

Страница 14: ... on output modes including sort staple sort group face up folding stapling folding cover sheet feed and manual staple functions Section 8 provides information on special original modes Section 9 provides information on special applications modes Section 10 provides information on job memory functions Section 11 describes server functions for storing the image data in HDD during printing Section 12...

Страница 15: ...ed data can be retrieved from memory and output in various ways as controlled by software Digitized image is represented as pixels on a screen or as dots per inch dpi on hard copy This machine resolves image in the copier mode at 400 600 dpi and resolves image in the printer mode at 600 dpi The digital technology of this machine enables you to feed originals only once to make multiple copies there...

Страница 16: ...lected tray becomes empty while copying is in progress Auto Layout The original image on the platen glass or in the document feeder is copied and centered on a sheet Auto Low Power Automatically lower the power after a specified period of copier inactivity Auto Reset Automatically reset to auto mode defaults after a specified period of copier inactivity Auto Shut Off Automatically shut off the mai...

Страница 17: ...rease Contrast into two levels to lighter and three levels to darker Frame Fold Erasure Erase border and or fold image area using Frame 1 15mm Fold 1 30mm or Frame Fold HDD Store While operating ordinary copying job store image data in HDD option for future printing Image Insert Store pages in memory from the platen glass and insert the pages into a document copied from the document feeder Image R...

Страница 18: ...he unused reserve job or display the previous job list Lens Mode Preset Zoom Select Preset ratios three reduction and three enlargement ratios Zoom ratios can be selected from 33 400 in 1 increments 400 dpi or 33 200 increments 600 dpi Machine Status Confirmation Display the current machine status on LCD for confirmation Magnification Set user programmable ratios under User Set 1 User Set 2 and Us...

Страница 19: ...ach output mode see Section 7 Output Modes Output for Machine with no Finisher Installed Sort and Group modes Use the default condition to output copies in the same order as the originals Use the Sort mode to alternately switch the horizontal and vertical orientation of each copied set upon exit Use the Group mode to output multiple copies of each original without offsetting them upon exit Output ...

Страница 20: ... many times as the repeat width setting 10 150mm permits in manual or auto Reserve Scan in subsequent copy jobs while the machine is busy printing or copying Resolution High Very High High resolution mode and Very High resolution mode provide optimal image quality for photos and complicated graphics and text that require high to very high compression amounts Reverse Image Reverse the image from bl...

Страница 21: ...ge in Photo mode regular image in Auto mode enhance text image in Text mode enhance lighter image in increase contrast mode Transparency Interleave Copy onto transparency film and interleave blank or copied paper for each original copied Userset Density USERSET 1 USERSET 2 Output up to 16 density samples on a total of 4 pages that display 4 samples per page then program the desired density under U...

Страница 22: ...and by the setting on the Output Mode Screen Face up exit is not available 1 Sort exit 2 Staple sort exit 3 Non sort exit 4 Group exit Stapler Finisher 3 Paper Tray This finisher is equipped with three exit trays and a cover sheet feeder option Secondary sub tray Four output types can be specified on the Output Mode Screen 1 Face down non sort exit 2 Face up non sort exit 3 Face down group exit 4 ...

Страница 23: ...ed Optional Equipment continued Cover Sheet Feeder Used when selecting COVER SHEET on the Output Mode Screen or when stapling copies manually Large Capacity Tray 4 000 sheets Expanded Memory Unit 64MB 128MB Image Processor HDD Network Board PostScript Unit ...

Страница 24: ...fety Information 2 1 Section 2 Safety Information CAUTION LABELS INSTALLATION PRECAUTIONS PRECAUTIONS FOR USE Regulations FCC Regulations Canadian Department of Communications Regulations FDA Regulations ...

Страница 25: ...r High voltage inside NEVER touch parts in this area because there is a danger of electric shock Label 3 4 Label 1 High temperature inside Do not touch parts in this area because there is a danger of getting burned The conveyance fixing unit is heavy Use care and draw it out gently otherwise you may be injured DO NOT put your hand between the main body and developing fixing unit otherwise you may ...

Страница 26: ...herwise you may be injured Use care after opening the paper exit outlet DO NOT put your hand into it otherwise you may be injured 3 Paper Tray Finisher Label 8 Label 7 CAUTION LABELS continued Tray 1 Tray 2 Tray 3 DO NOT put your hand between the main body and tray otherwise you may be injured Label 6 NOTE DO NOT remove these labels ...

Страница 27: ...tors heaters or other heat sources or locations near flammable items to avoid the danger of fire To keep the copier cool and facilitate changing of parts and maintenance allow access space as shown below Leave adequate space especially around the left and back cover to allow air to be properly ventilated out of the copier 1 1 2 3 4 92 3 2344 73 2 1858 21 7 550 12 65 321 3 9 100 3 9 100 34 95 887 4...

Страница 28: ...tion and performance of the copier Install in an air conditioned room recommended room temperature around 68 F humidity around 65 RH and avoid the following locations when selecting a site for the copier Avoid locations near a window or with exposure to direct sunlight Avoid locations with vibrations Avoid locations with drastic temperature fluctuations Avoid locations with direct exposure to hot ...

Страница 29: ...s connect the copier to an outlet with a ground connection to avoid the danger of fire or electrical shock in case of an electric short If an earth connection is not possible contact your service representative Other precautions Connect the power plug to the closest outlet possible to the copier The power supply cord is used as the main disconnect device Ensure that the socket outlet is located in...

Страница 30: ...excessively hot smoke appears from the copier there is an odd smell or any other abnormal situation occurs there is a danger of fire or electrical shock Turn the main switch OFF O immediately remove the power plug from the outlet and contact your service representative If anything harmful paper clips water other fluids etc falls into the copier turn the main switch OFF O immediately Next remove th...

Страница 31: ... the copier DO NOT leave the document feeder open as there is a danger of personal injury Other precautions DO NOT place heavy objects on the copier or cause other damage to the copier DO NOT open the front cover turn off the main switch or pull out the power plug during copying During copying some ozone is released but the amount does not cause any ill effect to one s health If however the copier...

Страница 32: ...age Use of this product as intended does not result in inhalation of excessive dusts Keep away from children Do not incinerate toner and toner containers Dangerous sparks may cause burn Other precautions Always read the safety instructions which are included in the box or printed on the container when handling consumables Dispose of the toner or toner containers in accordance with Federal State an...

Страница 33: ... interference at their own expense Canadian Department of Communications Regulations Le présent appareil n émet pas de bruits radioélectriques dépassant les limites applicables aux de Classe A prescrites dans le règlement sur la brouillage radioélectrique édicté par Le Ministère des Communications du Canada This equipment does not exceed the Class A limits for radio noise emissions as set out in t...

Страница 34: ...n Initial Settings Auto Reset Mode Automatic Paper Selection APS Automatic Magnification Selection AMS Automatic Exposure Selection AES Automatic Tray Switching ATS Lead Edge Delete Service Settings Finisher Paper Capacity Key Operator Password ECM Master Key Code Weekly Timer Master Key Code Weekly Timer Key in Help Screen Control Panel Contrast Key in Help Screen Staple Sheet Capacity Notice Mes...

Страница 35: ...oor yLCT left side door iTray 3 oTray 2 7Control panel 1Left door 2Front door 3Left side cover not shown 4Power switch 52 Paper Tray 3 Paper Tray Finisher option 6LCD touch screen 0Tray 1 uRight side door not shown tTray 4 Large capacity tray option qToner bottle wToner unit eDrum unit rLever A tConveyance Fixing unit uFixing part iConveyance part yKnob ...

Страница 36: ...are available for loading wide types of the regular sizes specified above 11 Left door opens together with the front door to allow removal of mishandled paper 12 Front door opens to the internal copier to allow clearing of mishandled paper and replenishing of toner 13 Left side cover opens to allow removal of mishandled paper 14 Power switch turns copier power On Off when pressed 15 2 Paper Tray 3...

Страница 37: ...xit mode w Non sort Face Up exit mode e Group Face Down exit mode r Group Face Up exit mode Finisher door Manual staple control panel Booklet tray 3 Paper Tray Finisher only Cover sheet feeder option Holds cover sheets for use in Cover Sheet output mode or a copied set in manual stapling mode Booklet mode outlet 3 Paper Tray Finisher only ejects finished copied sets when selecting Folding mode or ...

Страница 38: ... 19 1 486 15 7 400 63 1 1603 72 6 1845 30 5 775 37 4 950 4 7 120 Unit inches mm Main Body 2 Paper Tray 3 Paper Tray Finisher Large Capacity Tray NOTES 1 Dimensions are in inches with millimeters included in parentheses 2 The Finisher main tray of the 2 Paper Tray 3 Paper Tray Finisher gradually goes down while printed material is output DO NOT allow any object to interfere with the operation of th...

Страница 39: ...memory 8 TIMER lights when the timer function is set 9 POWER SAVER ON OFF activates power saving mode for times when the copier is inactive or activates timer interrupt mode when weekly timer function is active 10 START activates copying or scanning 11 CLEAR QTY allows resetting of print quantity 12 P counter displays the Counter Screen or accesses programming modes for setting special functions 1...

Страница 40: ...ly 6 minutes until the fixing temperature is reached When the Basic Screen is displayed the touch screen becomes interactive The interactive condition enables you to communicate directly with the copier system simply by touching keys displayed on the screen or by pressing conventional keys as required In addition the screens automatically display information regarding machine and copying status Ad...

Страница 41: ...p 13 10 to p 13 11 Automatic Paper Selection APS When APS is highlighted on the touch screen the appropriate copy paper size is automatically selected When copying from the platen glass or document feeder APS detects the sizes indicated below For key operator settings of APS see p 13 40 to p 13 45 PLATEN GLASS 11 x17 8 5 x14 8 5 x11 8 5 x11 R 5 5 x8 5 RADF 11 x17 8 5 x14 8 5 x11 8 5 x11 R 5 5 x8 5...

Страница 42: ...s the Key Operator Mode Screen After this setting a Password Entry Screen will display and require entry of the Key operator password to access the Key Operator Mode Screen ECM Master Key Code Service can set an 8 digit ECM master key code to access the ECM Setting Menu Screen After this setting the ECM Master Key Code Screen will be displayed and will always require entry of the set ECM master ke...

Страница 43: ...ontrast key on the Help Screen to display the Contrast Adjustment Screen for adjusting panel contrast Staple Sheet Capacity Staple capacity is changeable and may be set to 45 40 or 35 by service Notice Message ADD TONER PM CALL Service can set the copier message area to display ADD TONER when the toner supply is low or PM CALL when preventive maintenance is required ...

Страница 44: ...al Positioning Mixed Originals Paper in Main Body Trays Paper in Large Capacity Tray Option Paper in Automatic Duplex Unit Paper in Multi Sheet Bypass Tray Paper in 2 Paper Tray 3 Paper Tray Finisher Option 2 Paper Tray 3 Paper Tray Finisher Primary Main Tray 2 Paper Tray 3 Paper Tray Finisher Secondary Sub Tray 3 Paper Tray Finisher Booklet Tray Paper in Cover Sheet Feeder Option Cover Sheet Feed...

Страница 45: ...placement Face down on right depth side of glass 1 Raise the document cover as shown in the illustration below 2 Place original FACE DOWN in the right rear corner aligning the edge with the right measuring guide 3 Gently close the document cover to prevent the original from shifting on the glass CAUTION When the finisher capacity is exceeded due to the print quantity selected remove the copied set...

Страница 46: ...ginal weight 13 lb 34 lb Max feeder capacity 1 original sheet Using SDF Mode 1 in 1 1 1 2 Copying Original size 11 x17 8 5 x14 8 5 x11 8 5 x11 R 5 5 x8 5 5 5 x8 5 R A4 Original weight 13 lb 110 lb 200g m2 thick paper Max feeder capacity 1 original sheet Using Mixed Original Mode 2 Original size 11 x17 8 5 x14 8 5 x11 8 5 x11 R 5 5 x8 5 R mixed 5 5 x8 5 original is available in portrait type feedin...

Страница 47: ...e used for unstapled unfolded smooth flat originals Original size detection requires accurate paper guide adjustment APS detects size 11 x17 8 5 x14 8 5 x11 8 5 x11 R 5 5 x8 5 5 5 x8 5 R and A4 Size weight and capacity are specified for all copy modes on p 4 3 Before placing originals in the tray be sure the document feeder is closed fully 1 Position original s FACE UP on the document feeder tray ...

Страница 48: ...mber of original 1 sheet at a time Print quantity Max 9 999 sheets Incompatible Basic Copying Conditions Using platen glass Staple Sort Group Rotation Sort Rotation Group Incompatible Special Originals Mixed Original Z Folded Original WHOLE AREA in Non STD Size Incompatible Applications Sheet Cover Insertion Chapter Combination Booklet Image Insert Non Image Area Erase Repeat except 2 4 8 Repeat A...

Страница 49: ...er Print quantity Max 9 999 sheets Incompatible Basic Copying Conditions Rotation Exit Staple Sort with APS Folding Stapling Folding in APS Reserve with APS Incompatible Special Originals Resolution Very high Non STD Size Incompatible Applications Sheet Cover Insertion Chapter Combination Booklet Transparency Interleave Image Insert Book Copy Program Job Non Image Area Erase Repeat AUTO Layout Ima...

Страница 50: ...k 1 or Thick 2 for each tray can be made in the Key operator mode See p 13 24 p 13 25 Total Paper Capacity 2 150 sheets including 150 sheet Multi Sheet Bypass Tray Tray 1 2 500 sheets 20lb user adjustable to any standard wide size from 11 x17 W 5 5 x8 5 W Tray 3 1 000 sheets 20lb user adjustable to any standard wide size from 11 x17 W 5 5 x8 5 W Paper in Large Capacity Tray Option Standard Paper S...

Страница 51: ...matically 11 x17 8 5 x14 8 5 x11 8 5 x11 R 5 5 x8 5 5 5 x8 5 R A3 B4 A4 B5 B5R Specified Size Manually STD Size Special F4 A4R A5 A5R Specified Size Manually Wide Paper 11 x17 W 8 5 x11 W 8 5 x11 WR 5 5 x8 5 W 5 5 x8 5 WR A3W B4W A4W A4WR B5W B5WR A5W A5WR Paper Weight 16 45 lb duplex 1 2 and 2 2 copy mode Special OHP transparencies labels hole punch rag content Multi Sheet Bypass Tray Capacity 15...

Страница 52: ...iable according to the number of pages to be stapled See the table below 2 Paper Tray 3 Paper Tray Finisher Secondary Sub Tray In Bin Stapler Finisher 2 Paper Tray 3 Paper Tray capacities at 20lb unless otherwise indicated 200 sheets max 12 36 x17 52 314mmx445mm min 3 94 x5 83 100mmx148mm CAUTION When the finisher capacity is exceeded due to the print quantity selected remove the copied sets while...

Страница 53: ...mber of Folded Sheet 16 sheets max using 20lb paper only 15 sheets max a thick cover paper included Booklet Tray Capacity Approx 100 sheets max 20 sets max of 5 sheet folded booklet 20 x 5 100 sheets 10 sets max of 10 sheet folded booklet 10 x 10 100 sheets 6 sets max of 16 sheet folded booklet 6 x 16 96 sheets CAUTION Inside the Booklet mode outlet is the roller drive unit DO NOT put your hand in...

Страница 54: ...Bypass Tray In Bin 2 Paper Tray 3 Paper Tray Stapler Finsher Cover Sheet Feeder 13 34 lb 13 110 lb 200g m2 thick paper in 1 1 or 1 2 copying with SDF mode All Trays 16 24 lb Tray specified in Thick 1 25 45 lb Tray specified in Thick 2 46 110 lb 200g m2 thick paper in 1 1 or 2 1 only 16 24 lb LCT specified in Thick 1 25 45 lb LCT specified in Thick 2 46 110 lb 200g m2 thick paper in 1 1 or 2 1 only...

Страница 55: ...ction 5 Copier Management Power Saver Mode Auto Low Power Manual Low Power Auto Shut Off Manual Shut Off Entering an ECM Password Weekly Timer Function Timer Interrupt Counter List To Display Counter List To Print Counter List ...

Страница 56: ... Power This function automatically lowers the power after a specified period of copier inactivity The Auto low power function can be set to 5 minutes 10 minutes 15 minutes 30 minutes 60 minutes 90 minutes 120 minutes 240 minutes Initially the mode is set to function after 15 minutes of copier inactivity For the key operator setting see p 13 39 The POWER SAVER ON OFF LED goes on Release Auto Low Po...

Страница 57: ...w power setting can be selected by Key operator For the key operator setting see p 13 40 to p 13 45 When selecting the Manual low power setting the Manual shut off setting is released When Manual low power is on the following message will be displayed on the dimmed Basic Screen The POWER SAVER ON OFF LED goes on Release Manual Low Power Press any key on the control panel The Auto low power will be...

Страница 58: ...opying operation will be available Manual Shut Off Press POWER SAVER ON OFF The Shut Off Setting Screen will be displayed Touch YES to activate the Manual shut off mode NOTE The Manual shut off setting can be selected by Key operator For the key operator setting see p 13 40 to p 13 45 When selecting the Manual shut off setting the Manual low power setting is released The POWER SAVER ON OFF LED wil...

Страница 59: ...d the copier will reset to the Initial mode In that case enter the correct password or contact the key operator 2 Press START once to display your current copy count and copy limit for 3 sec Current count limit 018888 025000 Ready to copy When your copy count reaches the copy limit the following message is displayed Copy limit reached 025001 025000 In that case contact the key operator to reset yo...

Страница 60: ...unavailable due to the weekly timer function However copying is available by following procedure 1 Press the POWER SAVER ON OFF The Basic screen will be displayed along with the messages shown below Please wait Copier is warming up Timer interrupt mode Enter password NOTE The timer interrupt password is not factory set and must be entered by the key operator see p 13 36 in Section 13 Key Operator ...

Страница 61: ... ex 3 hour is 3 using the keypad on the control panel 0 9 5 Press the START Input copy time is 3 hour s 05 minute s 6 Enter a 2 digit minutes ex 7 minutes is 07 using the keypad on the control panel 05 60 Input copy time is 3 hour s 07 minute s 7 Press the START Copying is available until the set time is up Align original on RADF unit 8 When timer interrupt of the copier is finished press the POWE...

Страница 62: ... List 1 Press P COUNTER to display the Counter List Screen 2 Touch EXIT to return to the Basic Screen To Print the Counter List 1 Press P COUNTER to display the Counter List Screen 2 Touch Counter list output The Basic Screen will be displayed 3 Touch the desired tray key to select the copy size NOTE Do not touch APS or the Management list print mode will be released 4 Press START The counter list...

Страница 63: ...ecial Ratio for Non Standard Paper Preset and User Set Ratios Zoom Mode Vertical Horizontal Zoom Copy Size Programming Copy Size for UNIV Key Selecting Paper Type Size for Multi sheet Bypass Tray Reserve Set Reserve Job Job Status Screen Mishandled Paper During the Reserve Setting When Paper is Depleted for the Job in Progress Store Mode Platen Store Mode RADF Store Mode Rotation 90 Rotation 90 Ro...

Страница 64: ...d by the key operator must be entered before copying can be performed See p 5 5 All of the settings in the Basic Screen except Print Quantity can be changed by the key operator in the Initial Setting Menu Screen The popup menu appears on the Basic Screen to select the basic copying conditions NOTE During the process of successive copying jobs the message Warming up may be displayed in the message ...

Страница 65: ...store mode see p 6 28 p 6 29 RADF store mode see p 6 30 Rotation see p 6 31 p 6 34 Check mode and Proof copy see p 6 35 p 6 37 Interrupt mode see p 6 38 p 6 39 Help mode see p 6 40 p 6 41 Using the Multi sheet bypass tray see p 6 42 p 6 43 Output Mode with Finisher see the Section 7 Special Original Mode see the Section 8 Application Selections see the Section 9 Server Function see the Section 11 ...

Страница 66: ...8 27 x11 69 210mmx297mm Copy paper weight requirements 20 lb 24 lb 14 lb 19 lb should be tested before it is used Copy paper size requirements 1 1 1 2 2 2 2 1 11 x17 8 5 x14 8 5 x11 8 5 x11 R 5 5 x8 5 5 5 x8 5 R 5 5 x8 5 paper is available in landscape type feeding only Sort mode paper size machine with 2 Paper Tray 3 Paper Tray Finisher 11 x17 8 5 x14 8 5 x11 8 5 x11 R A4R 8 27 x11 69 210mmx297mm...

Страница 67: ... s s s2 2s s s s s1 or 2s s s s s2 A copy mode key will appear dimmed if it is incompatible with other selections made 2 Position originals FACE UP in the document feeder as required 3 When all settings are acceptable press START To cancel the mode touch the desired Copy Mode key on the Basic Screen NOTE When the finisher capacity is exceeded due to the print quantity selected remove the copied se...

Страница 68: ...ections The STORE key is automatically highlighted on the screen 4 Press START to scan the original 5 Repeat steps 1 2 and 4 until all originals are scanned 6 Touch STORE to exit the store mode The STORE key will return to the normal display 7 Enter the print quantity using the keypad The quantity entered will be displayed on the upper right message area of the Basic Screen To change the print qua...

Страница 69: ... the density of the original image and automatically selects the appropriate exposure for the copy Manual Mode Lighter Normal Darker Select manual copy density to adjust exposure density when originals are too light or too dark Manual adjustments can be made in 9 levels simply by touching the lighter arrow NORMAL or darker arrow key to highlight the desired exposure level indicator ...

Страница 70: ...lect the density mode To select the Auto Text Photo mode touch AUTO to highlight it then press P COUNT The following message will be displayed Density Shift Text Photo 2 0 5 To select the Text mode touch Text to highlight it then press P COUNT The following message will be displayed Density Shift Text 2 0 5 To select the Photo mode touch Photo to highlight it then press P COUNT The following messa...

Страница 71: ...To select the Increase contrast mode touch Increase Contrast to highlight it then press P COUNT The following message will be displayed Density Shift Increase contrast 3 0 5 3 Press any key from 0 5 using the keypad to determine the Density shift 4 Press STOP Density shift is determined ...

Страница 72: ... 8 5 x14 8 5 x11 8 5 x11 R 5 5 x8 5 5 5 x8 5 R Wide paper sizes cannot be detected Incompatible AMS The relation of original size magnification ratio and copy paper size is shown below Original size 11x17 8 5x14 8 5x14 5 5x8 5 5 5x8 5 5 5x8 5 8 5x11 11x17 11x17 8 5x11R 5 5x8 5R 5 5x8 5 5 5x8 5 5 5x8 5 11x17 8 5x14 11x17 Copy size Copy size 8 5x11 8 5x11R 8 5x11 8 5x11R 11x17 11x17 0 33 0 61 0 62 0...

Страница 73: ...n this case the same magnification ratio as that of the standard size will be selected automatically AMS ratios are shown in the table below AMS TABLE COPY SIZE ORIGINAL SIZE 11 x17 8 5 x14 8 5 x11 8 5 x11 R 5 5 x8 5 5 5 x8 5 R A4 1 00 0 65 0 77 0 50 0 50 0 65 0 65 0 33 0 50 0 50 0 33 0 49 0 69 1 21 1 00 0 61 0 79 0 79 0 39 0 61 0 61 0 39 0 59 0 84 1 00 0 77 1 00 0 77 1 00 0 65 0 50 0 65 0 97 0 75...

Страница 74: ...6 12 Basic Operations Basic Operations Lens Mode continued Special Ratio Table ...

Страница 75: ...THESE TWO VALUES MEET The ratio you use must fall within the available magnification range of 0 33 4 00 Use the smaller ratio for reduction and use the larger ratio for enlargement 1 First determine the correct ratio as described above 2 Touch ZOOM on the Basic Screen to display the popup menu for setting the zoom ratio 3 Use the keypad on the popup menu to enter the desired reduction or enlargeme...

Страница 76: ...ratios Programmable by key operator and selected from 0 33 4 00 To copy 5 5 x8 5 originals to 5 5 x8 5 copy paper select 5 5 x8 5 Copy Size then select 1 00 magnification 1 Touch RE to display the popup menu for selecting the desired preset userset ratio 2 Select the desired magnification The selected key is highlighted and the popup menu goes out automatically and then the selected ratio will be ...

Страница 77: ...up menu for setting the zoom ratio 2 Use the keypad on the popup menu to enter a 3 digit zoom ratio or use arrows to scroll to the desired ratio 3 Touch OK to complete the setting and return to the Basic Screen To cancel the setting touch ZOOM again select the desired ratio then touch OK 4 Position original s FACE DOWN on the platen glass or FACE UP in the document feeder as required 5 When all se...

Страница 78: ...cal ratio 3 Use the keypad on the popup menu to enter a 3 digit vertical zoom ratio or use arrows to scroll to the desired ratio 4 Touch Horiz to select a horizontal ratio 5 Use the keypad to enter a 3 digit horizontal zoom ratio or use arrows to scroll to the desired ratio 6 Touch OK to complete the setting To cancel the setting touch ZOOM again to display the popup menu Specify the desired ratio...

Страница 79: ... a tray size is changed the tray key on the Basic Screen displays UNIV Touch the UNIV key to display the Universal Tray Size Selection Screen then select the new paper size When the BYPASS key is touched and highlighted the PAPER TYPE SIZE key appears above the BYPASS key Touch the key to display the Paper Type Size Setting Screen then specify the type and size of the special paper to be loaded on...

Страница 80: ...election Screen will be displayed 2 Touch the size key If the correct size is selected the Basic Screen will be restored automatically If an incorrect size is selected the message Please select correct tray size will be displayed and in that case the Basic Screen will not be restored Basic Screen Universal Tray Size Selection Screen ...

Страница 81: ...hick Thin TAB OHP Tracing or User is highlighted a printing job will be performed conforming to the selected paper type If no paper type indication is needed touch the highlighted key to clear the selection in the TYPE area The selection will be reflected on the Basic Screen when restored NOTE When selecting Thick THICK 1 will be displayed on Bypass key of the Basic Screen When selecting TAB AMS i...

Страница 82: ...ighlighted the popup menu will appear To set the vertical size touch the vertical size key to highlight it then use the keypad on the popup menu to enter the vertical size or use arrows to scroll to that number To set the horizontal size touch the horizontal size key to highlight it then use the keypad on the popup menu to enter the horizontal size or use arrows to scroll to that number In this ca...

Страница 83: ...nu to enter the vertical size or use arrows to scroll to that number The entered number should fall within the range from the vertical size of the standard size corresponding to the selected wide size to the maximum of 314mm 3 Similarly touch the horizontal size key to highlight it then use the keypad on the popup menu to enter the horizontal size or use arrows to scroll that number The entered nu...

Страница 84: ...he current job is under Memory copying Image insert or Book copy the reserve job setting will be available after the copier starts to print the current job If certain conditions occur while a reserve job is being set such as activation of Interrupt mode mishandled paper or depletion of paper the current printing job will cease and the FREE JOB indicator on the screen will be replaced by INTERRUPT ...

Страница 85: ... reserve job the PRINT or SCAN JOB key changes to JAM ADD PAPER key on the Basic Screen See p 6 26 to p 6 27 3 Position original s FACE UP in the RADF or FACE DOWN on the platen glass after completing to scan for the current job The message Ready to copy will be displayed on the Basic Screen 4 Press START The original for the reserve job will be scanned NOTE When the message Please load size paper...

Страница 86: ...E Displays the machine s current mode of operation Five modes are listed below COPIER RESERVE COPIER PRINTER RESERVE PRINTER CONTROLLER STATUS Displays the current status of the machine for each job Indication Meaning READY Ready to use in each mode WAITING Warming up in each mode SCANNING Scanning original s in copy mode INTERRUPT Interrupting the previous job ERROR Error in each mode PRINTING Pr...

Страница 87: ...JOB PRIORITY The highlighted reserve job is advanced by one in printing order unless the job preceding the selected one is already in progress 3 To return to the Basic Screen touch OK on the Job Status Screen To clear reserve job 1 Touch the desired reserve job key to highlight it 2 Touch JOB CLEAR 3 The Job Clear Setting Screen will be displayed Touch YES The highlighted reserve job is cleared 4 ...

Страница 88: ...formed after the jam is cleared and the cleared job is completed 1 Touch JAM to display the Jam Position Screen 2 To view Help Screen instructions touch GUIDE and remove paper original 3 The JAM will change to PRINT JOB or SCAN JOB 4 Press START The print scan job will be reprocessed 5 Touch FREE JOB to continue setting the reserve job If scanning is not completed when the misfeed occurs but reser...

Страница 89: ... are setting a Reserve job the PRINT JOB key on the screen will change to ADD PAPER key blinking In this case you can still continue the reserve job setting 1 Touch ADD PAPER to display the Basic Screen for the print job 2 Confirm the empty tray and supply the paper 3 Press START The print job will be reprocessed 4 Touch FREE JOB to continue setting the reserve job Basic Screen ...

Страница 90: ...lass area around the border of the original This feature ensures a clean copy result and reduces toner consumption The Non image area erase mode automatically releases after the original for which it is selected is scanned Additional images may be scanned Incompatible Basic copying conditions None Incompatible Special Originals None Incompatible Applications None 1 Open the document feeder 2 Place...

Страница 91: ...tered quantity will be displayed on the upper right message area of the Basic Screen To change the print quantity press C CLEAR QTY and re enter the correct quantity To delete the scanned data without printing press STOP then touch CANCEL on the popup menu to ensure that you delete the data 9 Press START The copier starts the printing job ...

Страница 92: ...ition originals FACE UP on RADF If the number of originals exceeds 100 divide them into blocks not exceeding 100 sheets and load them from the block with the first page 4 Enter the print quantity using the keypad The entered quantity will be displayed on the upper right message area of the Basic Screen To change the print quantity press C CLEAR QTY and re enter the correct quantity 5 Press START t...

Страница 93: ... Applications Book Copy Non Image Area Erase Repeat except 2 4 8 Repeat AUTO Layout 90 Rotation and APS In APS the copier automatically copies onto the same paper size as the original s in 1 1 For example when size 8 5 x11 copy paper is loaded in the tray in landscape orientation and the copier detects that the original is placed in portrait orientation Rotation and APS function together to rotate...

Страница 94: ...nd the copy is made with the appropriate AMS ratio to fit the portrait style of the copy paper Similarly when size 8 5 x11 copy paper is loaded in the tray in portrait orientation and the copier detects that the original is placed in landscape orientation Rotation if required rotates the original image by 90 and the copy is made with the appropriate AMS ratio to fit the landscape style of the copy...

Страница 95: ... upside down on the reverse side of duplex copies In 2 1 copy mode this function arranges the reverse sides of duplex portrait originals which read upside down to make normal simplex copies 180 Rotation functions when 1 2 or 2 1 copy mode is selected and the originals are placed in the landscape orientation This function is effective for portrait originals For landscape originals this function may...

Страница 96: ...reen to highlight it The Rotation icon will go out and the Rotation function will be canceled NOTE ROTATION OFF is initially set to activate deactivate 90 Rotation only If desired key operator can set ROTATION OFF to activate deactivate 180 Rotation also See p 13 40 to p 13 45 To resume automatic Rotation Touch ROTATION OFF on the Basic Screen to deselect it The Rotation icon will be displayed and...

Страница 97: ...rogram Job With Proof copy all originals are scanned into memory and only one set is output after you press the PROOF COPY key on the control panel or touch PROOF COPY key on the Check Screen After Proof copy some copying condition keys may appear dimmed in the Check Screen As to the copying condition indicated on these dimmed keys you cannot change or release the selection When START key is press...

Страница 98: ...a set of sample copy If only one copied set is needed and the sample set is adequate press STOP to delete the stored data 4 Touch EXIT or press CHECK to exit from the Check mode and return to the Basic Screen 5 Press START when the Basic Screen is displayed If set quantity is two or more the copier will output the rest except the sample sets Change Release Settings If you want to change or release...

Страница 99: ...ting a basic copying condition key will display the Basic Screen Selecting Enhance key will display the Change Enhance Selection Screen Selecting Non STD Size key will display the Non STD Size Setting Screen Selecting an application function key will display the Change Application Selection Screen 3 Change the setting as desired then restore the Check Screen to return to the checking steps or to t...

Страница 100: ...ying job press INTERRUPT For particular jobs in progress copying will cease only after certain phases of the immediate operation are completed as indicated by LED conditions described below Collectively printing image stored in memory The INTERRUPT LED blinks until one set of the current job is printed Then the LED remains steady for the temporary job performed in Interrupt mode Scanning originals...

Страница 101: ...features that are compatible with the Interrupt mode if desired 5 Press START 6 When Interrupt copying is completed press INTERRUPT again to return to the settings of the initial job 7 Replace the initial original then press START to resume copying NOTES 1 In Reserve mode pressing INTERRUPT before the copier finishes scanning originals of the reserve job will clear the settings selected for reserv...

Страница 102: ...er When the HELP MENU key is touched the Help Menu Screen displays a list of all of the copier functions When a function item is touched the Help Screen displays information specific to that topic The KEY OPERATOR MODE key is also provided in the lower left position of the Help Screen When touched the Key Operator Password Entry Screen will be displayed to access the Key operator mode See p 13 2 H...

Страница 103: ...number and Fax number to display specific Help information 3 For help on operations touch HELP MENU in the center area of the screen The Help Menu Screen will be displayed Select one of the 7 Help menu items 4 The Weekly timer key display only when the Weekly timer system is activated Touch the key to display the settings of the Weekly timer 5 Touch EXIT to return to the screen that was displayed ...

Страница 104: ...pen the Multi sheet bypass tray located on the right side of the copier When loading 11 x17 or 8 5 x14 paper withdraw the right edge of the Multi sheet bypass tray 2 Load copy paper and align the paper guides to the paper size Load Transparency film one sheet at a time or stack paper up to 150 sheets 20 lb Bond Load offset tabbed sheets so that the tab extensions are on the right at the rear not f...

Страница 105: ...ht at the rear not front of the tray The top sheet is designated face up as the first tab of the finished set Subsequent offset tab sheets follow in sequence When loading tabbed sheets in the Multi sheet bypass tray be sure to specify the paper type as TAB on the Paper Type Size Setting Screen otherwise mishandled paper may occur See p 6 19 to p 6 21 ...

Страница 106: ...ing Primary Main Tray Sort Mode Using Primary Main Tray Staple Sort Mode Using Primary Main Tray Group Mode Using Primary Main Tray Output Modes Using Secondary Sub Tray Folding and Stapling Folding Modes Cover Sheet Feeder Manual Stapling Output Mode for Machine without Finisher Face Down Exit Face Up Exit ...

Страница 107: ...imary Main Tray Non Sort Mode Paper size 11 x17 5 5 x8 5 Paper weight 16 24 lb Special stock 65 lb 176 g m2 cover paper transparency film labels hole punch rag content Paper capacity for 20 lb 500 sheets 5 5 x8 5 3 000 sheets 8 5 x11 8 5 x11 R 1 500 sheets 11 x17 8 5 x14 Sort Mode Group Mode Paper size 11 x17 5 5 x8 5 Paper weight 16 24 lb Paper capacity for 20 lb 500 sheets 5 5 x8 5 3 000 sheets ...

Страница 108: ... of 3 sheet folded booklet 33 x 3 99 sheets 50 sets max of 2 sheet folded booklet 50 x 2 100 sheets Stapling Folding Mode Paper size 11 x17 8 5 x14 8 5 x11 R A4R 8 27 x11 69 210mmx297mm Paper weight 16 24 lb Special stock 20 lb paper is recommended Number of Folding sheet 16 sheets max using 20 lb paper only 15 sheets max a thick cover paper included Booklet tray capacity Approx 100 sheets max 20 ...

Страница 109: ... Paper capacity for 20 lb 500 sheets 5 5 x8 5 3 000 sheets 8 5 x11 8 5 x11 R 1 500 sheets 11 x17 8 5 x14 1 Touch SORT on the Basic Screen to deselect it if highlighted 2 Enter the desired print quantity 3 Position original s in the document feeder or on the platen glass and make copying selections as required 4 Press START to begin copying in Non sort mode Copies will exit face down with the page ...

Страница 110: ...8 5 x11 R 8 5 x11 5 5 x8 5 5 5 x8 5 paper is available in landscape type feeding only Paper capacity for 20 lb 500 sheets 5 5 x8 5 3 000 sheets 8 5 x11 8 5 x11 R 1 500 sheets 11 x17 8 5 x14 1 Touch SORT on the Basic Screen to highlight it 2 Enter the desired print quantity 3 Position originals in the document feeder and make copying selections as required When using Store mode see p 6 28 to p 6 30...

Страница 111: ... 1 position 11 x17 8 5 x14 8 5 x11 R 8 5 x11 5 5 x8 5 is available in portrait orientation only Stapled paper at 2 positions only 8 5 x11 paper loaded with larger dimension vertical 11 x17 8 5 x14 8 5 x11 R 8 5 x11 paper loaded with larger dimension horizontal Paper capacity for 20 lb 1 000 sheets Variable according to the number of pages to be stapled See p 4 9 for details Staple capacity 50 shee...

Страница 112: ...g Primary Main Tray continued 1 Touch STAPLE SORT on the Basic Screen to highlight it The Staple Position icon will be displayed in the OUTPUT icon area When not changing the staple position proceed to step 5 Basic Screen Finisher Mode Selection Screen ...

Страница 113: ... Screen to complete the setting and return to the Basic Screen The selection made in stapling position will be displayed in the OUTPUT icon area 5 Select additional copying features as required 6 Enter the desired print quantity 7 Position originals in the document feeder When using Store mode see p 6 28 to p 6 30 8 Press START CAUTION When the finisher capacity is exceeded due to the print quanti...

Страница 114: ...UTPUT APPLI on the Basic Screen to display the Finisher Mode Selection Screen 2 Touch GROUP then OK to complete the setting and return to the Basic Screen The GROUP icon will be displayed in the OUTPUT icon area 3 Enter the desired print quantity 4 Position originals in the document feeder and make copying selections as required When using Store mode see p 6 28 to p 6 30 5 Press START 30mm 3 3 2 2...

Страница 115: ...ary sub tray provides 4 types of output mode as specified below also to be specified on the Output Mode Screen 1 Non sort and face down exit 3 Group and face down exit 2 Non sort and face up exit 4 Group and face up exit Paper size 11 x17 5 5 x8 5 Paper weight 16 24 lb Paper capacity for 20 lb 200 sheets Non sort Face down Finisher Mode Selection Screen Non sort Face up Finisher Mode Selection Scr...

Страница 116: ...N To select Group and face up exit touch GROUP and FACE UP 4 Touch OK on the Finisher Mode Selection Screen to complete the setting and return to the Basic Screen The selection made in output mode using secondary sub tray will be reflected in the OUTPUT icon area of the Basic Screen 5 Enter the desired print quantity 6 Position originals in the document feeder and make copying selections as requir...

Страница 117: ...lding 3 sheets less than in Staple Folding mode because they are not cinched first Stapling Folding 16 sheets 15 sheets when using thick cover paper Paper size 11 x17 8 5 x14 8 5 x11 R Paper weight 16 24 lb Special stock 20 lb paper is recommended Booklet tray capacity When the Booklet tray capacity is exceeded the finisher will stop operating Select an appropriate print quantity referring to the ...

Страница 118: ...es Folding and Stapling Folding Modes continued 3 sheets max 16 sheets max 15 sheets max when using thick cover paper Folding Stapling Folding Folding Finisher Mode Selection Screen Stapling Folding Finisher Mode Selection Screen ...

Страница 119: ...tomatically selected To change this selection touch APPLI on the Basic Screen to display the Application Selection Screen then touch Booklet twice to display the Booklet Mode Selection Screen to make another selection or to release the setting 6 Enter the desired print quantity 7 Position originals in the document feeder When using Store mode see p 6 28 to p 6 30 NOTE When loading originals heed t...

Страница 120: ...der cannot be copied This function is incompatible with cover sheet mode COVER WITH COPY SHEET and COVER WITH BLANK SHEET in Booklet and Thick paper mode in Sheet Cover Insertion Cover paper size 11 x17 5 5 x8 5 13 110 lb 200g m2 cover paper Copy paper size 11 x17 5 5 x8 5 20 lb paper recommended Incompatible Basic Copying Conditions Output to Secondary sub tray Rotation Sort Rotation Group Incomp...

Страница 121: ... Screen 5 Touch OK on the Finisher Mode Selection Screen The Basic Screen will be restored 6 Select additional copying features as required Cover Sheet Insert Selection Screen 7 Load the cover sheet paper into the optional cover sheet feeder of the 2 Paper Tray 3 Paper Tray finisher If the paper size loaded in the cover sheet feeder is not suitable the following messages will be displayed and copy...

Страница 122: ...quantity 9 Position originals in the document feeder or on the platen glass When using Store mode see p 6 28 to p 6 30 10Press START CAUTION When the finisher capacity is exceeded due to the print quantity selected remove the copied sets as they exit otherwise mishandled paper will occur ...

Страница 123: ...pling Folding 2 staples in the center Folding Booklet tray 1 oblique staple Primary main tray 2 parallel staples Primary main tray Specifications for Manual Stapling Folding mode Paper size 11 x17 8 5 x14 8 5 x11 R A4 A4R 8 27 x11 69 210mmx297mm Paper weight 16 24 lb 20 lb paper is recommended Staple capacity 16 sheets max 20 lb paper 15 sheets max 20 lb paper with a thick paper cover Output tray ...

Страница 124: ... a set of paper to be stapled into the cover sheet feeder then align the guide plate The indicator light of Staple Start Stop button will turn green NOTE Refer to the specifications on previous page for available paper size in each mode 2 Press Staple Mode Selection button to select the desired staple mode 3 Press Staple Start Stop button Stapled sheets will be delivered to the appropriate tray ac...

Страница 125: ... Face down non sort exit default Face down rotation sort exit Face down group exit Face down rotation group exit Face up non sort exit Face up rotation sort exit Face up group exit Face up rotation group exit 3 2 1 Originals Face down rotation sort Face down group Face down rotation group Face down sort default Face up rotation sort Face up group Face up rotation group Face up sort Example 3 set c...

Страница 126: ...mounts determined by the print quantity setting then outputs grouped sets normally Rotation group mode rotates every other grouped set by 90 upon exit provided the same paper size is loaded in two trays one tray with paper loaded in portrait orientation and the other tray with paper loaded in landscape orientation e g 8 5 x11 and 8 5 x11 R Basic Screen To Set Face Down Non Sort Exit 1 Confirm that...

Страница 127: ...ighted touch OUTPUT APPLI to display the Output Menu Screen Select to highlight FACE DOWN and deselect all the other keys then touch OK 2 Touch SORT to highlight it Output Menu Screen Basic Screen Basic Screen To Set Face Down Group Exit 1 Touch OUTPUT APPLI on the Basic Screen to display the Output Menu Screen 2 Touch GROUP and FACE DOWN to highlight them 3 Touch OK to complete the setting and re...

Страница 128: ...e Down Exit continued To Set Face Down Rotation Group Exit 1 Touch OUTPUT APPLI on the Basic Screen to display the Output Menu Screen 2 Touch ROTATION GROUP and FACE DOWN to highlight them 3 Touch OK to complete the setting and return to the Basic Screen Output Menu Screen Basic Screen ...

Страница 129: ...n sort Rotation sort Group or Rotation group When using the platen glass with simplex 1 1 copying start copying from the last page first and continue in that reverse order to output the set in correct order Incompatible None When using the Multi sheet bypass tray the Face Up mode is automatically selected To release this setting contact your service representative To Set Face Up Non Sort Exit 1 Co...

Страница 130: ...Screen 2 Touch FACE UP to highlight it 3 Touch OK to complete the setting and return to the Basic Screen 4 Touch SORT to highlight it Output Menu Screen Basic Screen To Set Face Up Group Exit 1 Touch OUTPUT APPLI to display the Output Menu Screen 2 Touch GROUP and FACE UP to highlight them 3 Touch OK to complete the setting and return to the Basic Screen Output Menu Screen Basic Screen ...

Страница 131: ... continued Face Up Exit continued To Set Face Up Rotation Group Exit 1 Touch OUTPUT APPLI to display the Output Menu Screen 2 Touch ROTATION GROUP and FACE UP to highlight it 3 Touch OK to complete the setting and return to the Basic Screen Output Menu Screen Basic Screen ...

Страница 132: ... 1 Section 8 Special Original Special Original Screen Resolution Image Quality High Mode Very High Mode 600 Dpi Text Photo Enhance Special Original Mixed Original Z Folded Original SDF Single Document Feed Original Form ...

Страница 133: ...ouch and highlight the desired key to change the standard setting Some function keys display subsequent screen when touched When all settings are made for each function the OK key can be touched to complete the settings and return you to the Basic Screen With the Basic Screen displayed you can press START key to perform the operation To cancel the change before returning to the Basic Screen touch ...

Страница 134: ...NOTE When using Program job function selecting High or Very High mode in one JOB will be incompatible with 600dpi in another JOB See p 9 21 to p 9 22 1 Touch SPECIAL ORIGINAL on the Basic Screen to display the Special Original Screen 2 Touch High mode 3 Select additional copying features as desired 4 Touch OK to complete the setting and return to the Basic Screen 5 Make other compatible selections...

Страница 135: ...oklet Image insert Repeat Overlay NOTE When using Program job function selecting High or Very High mode in one JOB will be incompatible with 600dpi in another JOB See p 9 21 to p 9 22 1 Touch SPECIAL ORIGINAL on the Basic Screen to display the Special Original Screen 2 Touch Very High mode 3 Select additional copying features as desired 4 Touch OK to complete the setting and return to the Basic Sc...

Страница 136: ...ther JOB See p 9 21 to p 9 22 1 Touch SPECIAL ORIGINAL on the Basic Screen to display the Special Original Screen 2 Touch 600 dpi 3 Select additional copying features as desired 4 Touch OK to complete the setting and return to the Basic Screen 5 Make other compatible selections 6 Position original s in the document feeder or on the platen glass When using Platen store mode see p 6 28 to p 6 29 Whe...

Страница 137: ...eral mode Photo Mode Use the Photo mode to reproduce a half tone photo image The copy will closely represent the half tones of the original image Increase Contrast Mode Select Increase Contrast to darken lightly printed images e g pencil without changing background exposure In cases where the image is light and background is dark the background will not be changed Original Copy paper 11 x17 8 5 x1...

Страница 138: ...DF store mode see p 6 30 Option Press CHECK to view the selection and make a Proof copy if desired then touch EXIT to return to the Basic Screen See p 6 35 to p 6 37 7 Press START After copying is completed press AUTO RESET to release the mode and reset the machine Original Photo mode Auto mode Original Text mode Auto mode Original Increase contrast mode Auto mode Hard Copy Hard Copy Hard Copy Har...

Страница 139: ... x11 and 5 5 x8 5 mixed 16 lb 32 lb 8 5 x14 8 5 x11 R 8 5 x11 and 5 5 x8 5 mixed 16 lb 32 lb 5 5 x8 5 original is available in portrait type feeding only RADF capacity Max 100 sheets APS is automatically selected can be switched to AMS when copy size is selected on the Tray Selection Screen Rotation can be used with AMS Incompatible Basic Copying Conditions Staple Sort with APS Rotation Sort Foldi...

Страница 140: ...lly APS is automatically selected To select AMS touch the tray key on the Basic Screen to select the desired copy size 6 Enter the desired print quantity 7 Position mixed originals FACE UP in the document feeder 11 x17 8 5 x14 8 5 x11 and 5 5 x8 5 mixed or 8 5 x14 8 5 x11 R 8 5 x11 and 5 5 x8 5 mixed When using Platen store mode see p 6 28 to p 6 29 When using RADF store mode see p 6 30 Option Pre...

Страница 141: ...DF Incompatible Applications Non image area erase Repeat AUTO layout 1 Touch SPECIAL ORIGINAL on the Basic Screen to display the Special Original Screen 2 Touch Z Folded Original 3 Select additional copying features as desired 4 Touch OK to complete the setting and return to the Basic Screen 5 Make other compatible selections 6 Position Z folded original s in the document feeder NOTE Normal origin...

Страница 142: ...ompatible Special Originals Mixed Original Z Folded Original Whole Area in Non STD Size Incompatible Applications Sheet Cover Insertion Chapter Combination Booklet Image Insert Non Image Area Erase Repeat except 2 4 8 Repeat Auto Layout Overlay 1 Touch SPECIAL ORIGINAL on the Basic Screen to display the Special Original Screen 2 Touch SDF 3 Select additional copying features as desired 4 Touch OK ...

Страница 143: ...t Book Copy Non Image Area Erase Image Shift 1 Touch SPECIAL ORIGINAL on the Basic Screen to display the Special Original Screen 2 Touch Non STD Size 3 Touch the desired size key When selecting WHOLE AREA the copier scans the whole area of the platen glass and copies with the paper size or magnification ratio currently selected 4 Touch OK on the popup menu of the size keys 5 Touch OK on the Specia...

Страница 144: ...ation Function Menu Sheet Cover Insertion Chapter Combination Booklet Transparency Interleave Image Insert Book Copy Program Job Non Image Area Erase Reverse Image Repeat Image Frame Fold Erasure AUTO Layout All Image Area Image Shift Stamp Overlay ...

Страница 145: ...dth using the touch screen keypad When all settings are made for each function the OK key can be touched to complete the settings and return you to the Application Selection Screen If no other Applications are desired the OK key can be touched again to complete your selections and bring you back to the Basic Screen With the Basic Screen displayed you can press the START key to perform the operatio...

Страница 146: ...ns from 1 250 including front and back covers Original paper 11 x17 8 5 x14 8 5 x11 13 lb 34 lb AMS Automatic Magnification Selection Functions when a different copy size is selected Incompatible Basic Copying Conditions APS Group Folding Stapling Folding with Booklet Rotation Sort Rotation Group Incompatible Special Originals Resolution Very high Mixed Original SDF Incompatible Applications Combi...

Страница 147: ...n the upper left corner key in the page setting area of the Sheet Cover Insertion Screen The tray source will be the same as that for back cover and can be selected and displayed on the Sheet Cover Insertion Screen Back Cover Mode This mode is classified as Back copy and Back blank The Back copy mode copies and inserts a plain or colored sheet into the finished set as a Back cover The Back blank m...

Страница 148: ...0 SURVEYOR S REPORT SURVEYOR S REPORT BACK COVER COPIED Originals Copies Originals Copies Originals Copies 1 2 3 4 5 6 7 8 9 10 1 2 3 4 5 6 7 8 9 10 SURVEYOR S REPORT SURVEYOR S REPORT 1 2 3 4 5 6 7 8 9 10 1 2 3 4 5 6 7 8 9 10 SURVEYOR S REPORT SURVEYOR S REPORT FRONT BACK COVERS COPIED AND COPY SHEET INSERTION FRONT BACK COVERS BLANK AND BLANK SHEET INSERTION Originals Copies Originals Copies Ori...

Страница 149: ... step 5 to select Sheet Insertion if desired 4 Select Back Cover Insertion Touch BACK COPY to insert a copied back cover or BACK BLANK to insert a blank back cover Return to step 3 to select Front Cover Insertion if desired Proceed to step 5 to select Sheet Insertion if desired 5 Select Sheet Insertion Touch COPY INSERTION to insert copied sheets or BLANK INSERTION to insert blank sheets Return to...

Страница 150: ...y 2 The same page number will be ignored if entered for the second time 7 The tray sources for covers and insertions currently selected are displayed on the Sheet Cover Insertion Screen Touch CHANGE OF THE COVERS TRAY or CHANGE OF THE INSERTION TRAY to select another tray if desired Every touching the key shifts the selection in the display that includes paper type if specified in Key operator mod...

Страница 151: ...can be selected Use document feeder RADF Store mode is also available in this case use platen glass or RADF Incompatible Basic Copying Conditions 1 1 2 1 Group Rotation Sort Rotation Group Face Up Incompatible Special Originals Resolution High Very high Mixed Original SDF Incompatible Applications Combination Transparency Interleave Image Insert Program Job Non Image Area Erase Repeat Application ...

Страница 152: ...creen In this case you can touch CHANGE OF THE INSERTION TRAY to change the currently selected paper tray displayed on the screen 6 When all entries are made touch OK to return to the Application Selection Screen 7 Select additional copying features as desired 8 Touch OK to complete the setting and return to the Basic Screen 9 Enter the desired print quantity 10 Position originals FACE UP on the d...

Страница 153: ...asic Copying Conditions APS Group Rotation Sort Rotation Group Folding or Stapling Folding with Booklet Incompatible Special Originals Resolution Very high Mixed Original SDF Incompatible Applications Sheet Cover Insertion Chapter Booklet Transparency Interleave Image Insert Book Copy Program Job Non Image Area Erase Repeat Stamp Overlay Application Selection Screen Combination Mode Selection Scre...

Страница 154: ...nd return to the Basic Screen 7 AMS is automatically selected When selecting any tray other than the one that is set and displayed on the Basic Screen touch the desired tray key 8 Enter the desired print quantity 9 Place original s FACE UP in the document feeder When using Platen store mode see p 6 28 to p 6 29 When using RADF store mode see p 6 30 Option Press CHECK to view the selection and make...

Страница 155: ...ed Copy mode 1 2 or 2 2 mode only Folding Stapling Folding output mode is available when copier is equipped with 3 Paper Tray Original size One sided or two sided letter sheets 8 5 x11 Copy size 11 x17 8 5 x14 8 5 x11 R Incompatible Basic Copying Conditions APS Group Rotation Sort Face Up 1 1 2 1 Cover sheet feeder with Cover mode in Booklet Incompatible Special Originals Resolution Very high Mixe...

Страница 156: ...e center of copies Key operator can set the machine to position the page numbers automatically on the outside edges of the copy when using Booklet with Page Numbering in Stamp See p 13 40 to p 13 45 7 Touch OK on the Application Selection Screen to complete the selections and return to the Basic Screen 8 Select the 1 2 or 2 2 copy mode 9 AMS is selected automatically When selecting any tray other ...

Страница 157: ...or less for duplex copying Stapling Folding mode 32 pages or less for simplex copying 64 pages or less for duplex copying Exceeding the above limits on capacity may cause trouble in the finisher Option Press CHECK to view the selection and make the Proof copy if desired then touch EXIT to return to the Basic Screen See p 6 35 to p 6 37 13 Press START After copying is completed touch Booklet on the...

Страница 158: ...filing or inserting into a binder AMS is automatically selected Transparency source Multi sheet bypass tray Multi sheet bypass tray capacity 1 transparency sheet Transparency size 11 x17 8 5 x14 8 5 x11 R 8 5 x11 Interleaving paper source Tray 1 2 3 or 4 Interleaving paper size 11 x17 8 5 x14 8 5 x11 R 8 5 x11 Number of originals number of copies 1 Incompatible Basic Copying Conditions APS 1 2 2 2...

Страница 159: ...nless it is already highlighted 6 Touch OK 7 Make additional Application selections or touch OK to return to the Basic Screen 8 Print quantity is already set to 1 Not available to enter any other number 9 Place original FACE UP in the document feeder or FACE DOWN on the platen glass When using Platen store mode see p 6 28 to p 6 29 When using RADF store mode see p 6 30 Option Press CHECK to view t...

Страница 160: ...y Max image insert 30 locations Original Copy size 11 x17 8 5 x14 8 5 x11 R 8 5 x11 5 5 x8 5 Incompatible Basic Copying Conditions Group Rotation Sort Rotation Group Incompatible Special Originals Mixed Original Resolution Very high SDF Incompatible Applications Sheet Cover Insertion Chapter Combination Transparency Interleave Book Copy Program Job Non Image Area Erase Repeat AUTO Layout Overlay A...

Страница 161: ...then enter the correct page number When setting more than 15 locations touch the arrow key to move to the next page Option Touch Booklet on the Image Insertion Setting No Screen to use this function 5 When all page number entries are made touch OK The Application Selection Screen will be restored 6 Select additional copying features as desired 7 Touch OK to complete the setting and return to the B...

Страница 162: ...cond scan after the first scan copies normally 3 Front Back Cover Full Scan mode Image division starts from the third scan after the first and second scan copy normally Scan and store originals into memory then print all pages collectively Original size Max 11 x17 ledger sheet or open book Copy paper size 8 5 x11 letter Incompatible Basic Copying Conditions APS AMS Rotation Sort Rotation Group Fol...

Страница 163: ...ook or sheet on the platen glass in the right rear corner aligning the edge with the right measuring guide If Full scan is selected and the originals can be loaded in the document feeder RADF store mode is also available If desired position originals into the document feeder Option Press CHECK to view the selection and make a Proof copy then touch EXIT to return to the Basic Screen See p 6 35 to p...

Страница 164: ...ype size setting for Multi sheet bypass tray cannot be changed for another JOB Output mode settings cannot be specified for each JOB The last settings made will be applied to all JOBs Print quantity cannot be specified for each JOB Entered quantity will be the number of complete copied sets and can be changed anytime before printing Program Job settings cannot be stored in Job Memory Incompatible ...

Страница 165: ...want to use then press START to scan 7 When scanning for the current JOB is completed the popup menu will be displayed in the Basic Screen To store the current JOB images touch DECISION To delete the images touch CANCEL 8 Repeat steps 3 to 7 until all JOB originals are scanned IMPORTANT PLACE AND SCAN EACH ORIGINAL SET IN THE CORRECT ORDER OF PAGINATION 9 Select the desired output mode 10 Enter th...

Страница 166: ...desire the Oblique erase mode Copy mode 1 1 mode only when using Store mode 1 2 mode can be selected Use the platen glass only Original size 11 x17 10mm x 10mm Image cutoff width leading end 5mm trailing end 4mm top and bottom 2mm Incompatible Basic Copying Conditions Using RADF APS AMS Rotation 2 2 2 1 Rotation Sort Rotation Group Folding Stapling Folding Incompatible Special Originals Mixed Orig...

Страница 167: ...FACE DOWN on the platen glass IMPORTANT KEEP THE DOCUMENT FEEDER OPEN THROUGHOUT THE PROCEDURE When using Platen store mode see p 6 28 to p 6 29 Option Press CHECK to view the selection and make a Proof copy if desired then touch EXIT to return to the Basic Screen See p 6 35 to p 6 37 7 Press START After copying is completed touch Non image Area Erase on the Application Selection Screen or press A...

Страница 168: ...lay the Application Selection Screen 2 Touch Reverse Image 3 Select additional copying features as desired 4 Touch OK to complete the setting and return to the Basic Screen 5 Enter print quantity 6 Position original s FACE UP in the document feeder or FACE DOWN on the platen glass When using Platen store mode see p 6 28 to p 6 29 When using RADF store mode see p 6 30 Option Press CHECK to view the...

Страница 169: ...mage Area Erase Copy mode 1 1 mode only When selecting 1 2 mode Platen store mode will function automatically Repeat Mode Specifications Magnification ratio 1 00 100 Scanning area 11 x17 10mm x 10mm Repeat image area A portion of the selected copy size equally divided according to the mode 2 4 or 8 Repeat designated on the screen If detected image size is larger than the size figured out as above ...

Страница 170: ...e Shift with 4 8 Repeat Overlay NOTE The Auto Detection and Repeat mode of the Repeat image function may not operate properly if the lighting in the work place is directly over the platen glass In this case consult your service representative about an appropriate place for installation Copy Original Verti width Copy AUTO Copy 8 Repeat Copy 4 Repeat Copy 2 Repeat Original Horiz width Vertical Horiz...

Страница 171: ...e touch 2 Repeat 4 Repeat or 8 Repeat as desired 4 Touch OK to return to the Application Selection Screen 5 Select additional copying features as desired When 2 Repeat mode is selected Page spece function of Image shift can be used to make the desired amount of blank space between the two images on a page See p 9 34 to p 9 37 6 Touch OK to complete the setting and return to the Basic Screen 7 Ente...

Страница 172: ... 1 mm increments Initial fold erasure value 10 mm Original copy paper size 11 x17 8 5 x14 8 5 x11 Incompatible Basic Copying Conditions None Incompatible Special Originals None Incompatible Applications Repeat All Image Area Application Selection Screen Frame Fold Erasure Selection Screen General copying Frame Erasure copying Fold Erasure copying Frame Fold Erasure copying Fold erasure Frame erasu...

Страница 173: ...key to enter the desired amount from 1 30mm 4 Touch OK to complete the setting The Application Selection Screen will be displayed 5 Touch OK to return to the Basic Screen or make additional application selections 6 Select desired Copy Size 7 Enter desired print quantity 8 Position original s FACE UP in the document feeder or FACE DOWN on the platen glass When using Platen store mode see p 6 28 to ...

Страница 174: ... x17 8 5 x14 8 5 x11 R 8 5 x11 5 5 x8 5 Incompatible Basic Copying Conditions APS AMS Rotation Sort Rotation Group Folding or Stapling Folding with Booklet Incompatible Special Originals Mixed Original Z folded Original SDF Incompatible Applications Sheet Cover Insertion Combination Booklet Image Insert Reverse Image Repeat All Image Area Image Shift Overlay NOTE The AUTO layout function may not o...

Страница 175: ...ter the desired print quantity 7 Position original s FACE UP in the document feeder or FACE DOWN on the platen glass IMPORTANT DO NOT CLOSE THE DOCUMENT FEEDER WHEN USING PLATEN GLASS PLACING ORIGINAL OBLIQUELY ON THE PLATEN GLASS MAY CAUSE BLACK COPY MARKS When using Platen store mode see p 6 28 to p 6 29 When using RADF store mode see p 6 30 Option Press CHECK to view the selection and make a Pr...

Страница 176: ...age Area 3 Select additional copying features as desired 4 Touch OK to complete the setting and return to the Basic Screen 5 Select the desired copy size 6 Enter the desired print quantity 7 Position original s FACE UP in document feeder or FACE DOWN on platen glass When using Platen store mode see p 6 28 to p 6 29 When using RADF store mode see p 6 30 Option Press CHECK to view the selection and ...

Страница 177: ...m increments Setting in 0 1 mm increments using up down arrow key is also available by key operator setting To be set collectively for the front and back pages however the shift amount for the back page can be altered in order to position the image exactly the same as on the front page In Reduce Shift mode AMS is automatically selected and cannot be released Page Space functions only when Booklet ...

Страница 178: ... mode 1 2 mode 2 2 mode 2 1 mode 4 3 2 1 4 3 2 1 Originals Copies Originals Copies 4 3 2 1 4 3 2 1 Originals Copies 8 7 6 5 4 3 2 1 8 7 6 5 4 3 2 1 Image Shift Selection Screen Image Shift mode Image Shift Selection Screen Reduece Shift mode Image Shift Selection Screen PAGE SPACE selected ...

Страница 179: ...you to view the binding margin to be created on the printed sheets The following icons will appear to show the currently selected conditions 6 To set shift amount in Reduce Shift 1 Touch FRONT In Reduce Shift mode the BOTH SIDES key appears dimmed to show inactivity The message Select magnification ratio on FRONT side will be displayed when BACK is selected first 2 Touch UP SHIFT DOWN SHIFT or RIG...

Страница 180: ...to the Application Selection Screen 9 Select additional Application functions or touch OK to return to the Basic Screen 10 Enter the desired print quantity 11 Position original s FACE UP in document feeder or FACE DOWN on platen glass When using Platen store mode see p 6 28 to p 6 29 When using RADF store mode see p 6 30 Option Press CHECK to view the selection and make a Proof copy if desired the...

Страница 181: ... in combination A watermark is printed obliquely in the center of the page Watermark numbering prints a number repeatedly over the scanned image Stamp Set numbering Page numbering and Date Time can select printing position from 9 locations for each Image cutoff width leading end 5mm trailing end 4mm top and bottom 2mm Incompatible Basic Copying Conditions None Incompatible Special Originals Resolu...

Страница 182: ...ARK WATERMARK NUMBERING Positions of other stamps STAMP Top Left T Middle T Right Lower Left L Middle L Right Middle Left Middle M Right DATE TIME 00 10 10 10 30AM PAGE NUMBERING 2 5 SET NUMBERING 0002 0005 Confidential TOP SECRET 0001 1000 0001 1000 0001 1000 0001 1000 0001 1000 0001 1000 Application Selection Screen Overlay selected ...

Страница 183: ...rlay continued Stamp Selection Screen Set Numbering Type Selection Screen Page Numbering Type Selection Screen Date Time Type Selection Screen Watermark Selection Screen Watermark Numbering Type Selection Screen Stamp Overlay Selection Screen ...

Страница 184: ...R SET NUMBERING 20pt 36pt PAGE NUMBERING 8pt 10pt 12pt 14pt DATE TIME 8pt 10pt 12pt 14pt 6 Touch PRINTED PAGE on the Stamp Selection Set Numbering Type Selection or Date Time Type Selection Screen to designate whether to print the selected stamp on the cover only or on all pages Touch PRINTED PAGE on the Page Numbering Type Selection Screen to designate whether to print the page numbers on all pag...

Страница 185: ...procedure below 1 Position the overlaying original in the document feeder or on the platen glass then press START to scan 2 The second and subsequent pages are to be overlaid in printing Place them in the document feeder or on the platen glass then press START IMPORTANT PLACE AND SCAN THE ORIGINALS IN REGULAR ORDER OF PAGINATION Option Press CHECK to view selection and make the Proof copy if desir...

Страница 186: ...Job Memory 10 1 Section 10 Job Memory Job Store Job Recall Job Memory Form ...

Страница 187: ...frequently used copying jobs which can be recalled at any time The stored jobs can be given alphabetical names All copying functions can be selected Job No Selection Screen Job Store Check Screen Job Name Registration Screen CHECK JOB MEMORY AUTO RESET HELP Control Panel ...

Страница 188: ...No Selection Screen to display the Job Name Registration Screen If you do not wish to enter a name touch OK The key displays in place of a name 7 Enter a job name in up to 16 characters using the touch screen alphabet keypad To correct an entry touch DELETE repeatedly to delete each character entered then enter the correct job name 8 If the Job name is correct touch OK to resume the Job No Selecti...

Страница 189: ...10 4 Job Memory Job Memory Job Recall Use Job Recall to recall jobs that are already stored in Job Memory Job Recall Check Screen Job No Selection Screen Job No Selection Screen Job Recall ...

Страница 190: ...ing CANCEL on the Job Recall Check Screen returns to the Job No Selection Screen See sample Job Recall Check Screen previous page 5 When the desired Job No key is highlighted touch OK to read the settings of the selected job and to return to the Basic Screen To cancel the job press AUTO RESET 6 Press START NOTES 1 A locked job is indicated by a lock icon on the Job key number 2 Only the key operat...

Страница 191: ...ory Form Make a copy of this form to record frequently used copy jobs stored in Job Memory Update the information when changes are made Make additional copies as needed JOB NUMBER NAME JOB DESCRIPTION 1 2 3 4 5 6 7 8 9 10 11 12 13 14 15 ...

Страница 192: ...Job Memory 10 7 Job Memory Job Memory Form continued JOB NUMBER NAME JOB DESCRIPTION 16 17 18 19 20 21 22 23 24 25 26 27 28 29 30 ...

Страница 193: ...Server Function 11 1 Section 11 Server Function Server Function Image Store Delete Mode To Store Image Data in HDD To Delete Image Data Image Store Output Mode Image Recall Mode ...

Страница 194: ...to built in DIMM memory then store the image data in HDD option so that the data can be recalled to DIMM and then output as needed This function also allows storing the image data in normal copying procedure NOTE Installation of the optional HDD is required HDD DIMM Scan Store Read Output Server Function ...

Страница 195: ...owing three modes q Image Store Delete mode Store the image data scanned from originals in HDD or delete the data stored in HDD w Image Store Output mode Store the scanned image data in HDD after copying is completed e Image Recall mode Recall the image data stored in HDD to built in DIMM for printing ...

Страница 196: ...D for protection Each image data can be given an alphabetical job name Incompatible Basic Copying Conditions 1 2 2 2 AMS Selecting output mode Selecting copy size APS is automatically selected Setting print quantity Rotation Incompatible Special Originals WHOLE AREA in Non STD Size Incompatible Applications Sheet Cover Insertion Chapter Combination Booklet Transparency Interleave Image Insert Book...

Страница 197: ...repeatedly to delete each character then enter the correct password 4 If the password is correct touch OK to display the Job Name Entry Screen Enter the desired job name in up to 8 characters from the touch screen keypad To correct an entry touch 1 CHARACTER DELETE repeatedly to delete each character then enter the correct job name 5 If the job name is correct touch OK to display the Scanner Setti...

Страница 198: ... Screen after all originals are scanned The Image Data Storing Screen will be displayed 9 The machine automatically begins storing data in the HDD The Basic Screen resumes when the storing function is completed NOTE To suspend the storing job touch CANCEL on the Image Data Storing Screen then touch YES on the popup menu to delete the data or touch NO to continue To Delete Image Data Image Data Sto...

Страница 199: ... the password is correct touch OK to display the Job Name Entry Screen 5 Touch the or key on the right side of the job name list to highlight the data to be deleted then touch JOB DELETE The popup menu will appear to confirm that you delete the selected data 6 Touch YES to delete it or touch NO to cancel The popup menu will disappear 7 Touch RETURN TO PASSWORD SCREEN to restore the Image Data Pass...

Страница 200: ...ct an entry touch 1 CHARACTER DELETE repeatedly to delete each character then enter the correct password 4 If the password is correct touch OK to display the Job Name Entry Screen Enter the desired job name in up to 8 characters from the touch screen keypad To correct an entry touch 1 CHARACTER DELETE repeatedly to delete each character then enter the correct job name 5 If the job name is correct ...

Страница 201: ...ed to ask you how to complete the current job Touch CONTINUE to continue the job EXIT to cancel the job and delete the data or EXIT after storing data to HDD to store the data in HDD without printing Image Data Storing Screen Image Data Storing Screen 9 After scanning all the originals the Image Data Storing Screen will be displayed The machine automatically starts to store the data in HDD The Bas...

Страница 202: ...tion of the optional HDD is required to recall data from the HDD To recall data stored in the HDD enter the password specified at the time data was stored then designate it by the job name Recall Job Selection Screen Image Data Password Entry Screen Scanner Server Setting Menu Screen Image Data Recalling Screen from HDD Image Data Recalling Screen from HDD ...

Страница 203: ...hing JOB CHECK displays the Check Screen to allow you to view all the feature selections made for that job NOTE Only one job at a time can be removed from the recall list To cancel the job moved to the list touch b to return the job to the left side key then select again to recall the desired job If the desired job name is displayed in the recall list touch OK The Image Data Recalling Screen will ...

Страница 204: ... RADF Stapling Folding and Folding Mixed Original Sheet Cover Insertion Chapter Combination Booklet Transparency Interleave Image Insert Book Copy Program Job Non Image Area Erase Reverse Image Repeat Image Frame Fold Erasure AUTO Layout All Image Area Image Shift Reduce Shift Stamp Overlay Loading Paper Adding Toner ...

Страница 205: ...de 3 Touch STORE on the Basic screen to highlight the Store mode 4 Press START to scan and store the original image into memory Repeat Steps 1 and 4 until all originals are scanned 5 Touch STORE to exit the Store mode 6 Enter the print quantity amount 7 Press START to begin copying Store Originals Scanned from RADF p 6 30 1 Touch STORE on the Basic screen to highlight the Store mode 2 Make desired...

Страница 206: ...ixed originals face up on the RADF document feeder tray Combine ledger legal letter 5 5 x8 5 or legal letter R letter 8 Press START When copying is completed press AUTO RESET to reset the machine Sheet Cover Insertion p 9 3 1 Touch APPLI to display the Application selection screen 2 Touch Sheet Cover Insertion to display the Sheet Cover insertion screen 3 If desired touch FRONT COPY or FRONT BLANK...

Страница 207: ...OK to return to the Basic screen with AMS automatically selected You may change this setting 7 When all settings are correct enter the print quantity amount 8 Place original s face up on the RADF document feeder tray 9 Press START When copying is completed press AUTO RESET to reset the machine Booklet p 9 12 1 First load 11 x17 or 8 5 x11 R paper in a tray 2 Touch APPLI to display the Application ...

Страница 208: ... 2 Touch APPLI to display the Application selection screen 3 Touch Image Insert to display the Image insertion No setting screen 4 Enter up to 30 page No locations touching SET after each entry 5 When all page No locations are entered touch OK to restore the Application selection screen 6 Make additional copying selections or touch OK to return to the Basic screen The Store mode is automatically s...

Страница 209: ...p 9 21 1 Touch APPLI to display the Application selection screen 2 Touch Program Job to scan multiple sets of originals in different settings called JOBs and then to output them all as a complete set 3 Make additional copying selections for the first JOB 4 Touch OK to return to the Basic screen Store mode is automatically selected 5 Position original s face up in the document feeder or face down o...

Страница 210: ...rase functioning Touch 2 Repeat 4 Repeat or 8 Repeat to allow the max repeats according to the size of the original 4 Touch OK to return to the Application selection screen 5 Make additional copying selections 6 Touch OK to return to the Basic screen 7 Enter the print quantity amount 8 Position original s face down on the platen glass If you selected the AUTO or 2 4 8 Repeat keep the document cove...

Страница 211: ...r tray or face down on the platen glass 6 Press START When copying is completed press AUTO RESET to reset the machine Image Shift Reduce Shift p 9 34 1 First select a copy mode 1 1 1 2 2 1 2 2 and a copy size from the Basic screen 2 Touch APPLI to display the Application selection screen 3 Touch Image Shift to display the Image shift selection screen 4 Touch Image Shift or Reduce Shift if image lo...

Страница 212: ...l copying selections or touch OK to return to the Basic screen 8 When Overlay is selected the Store mode is automatically selected and APS and AMS are released Set the desired Copy mode Copy density Lens mode and Copy size then enter the print quantity amount 9 Position original s FACE UP in document feeder or FACE DOWN on platen glass When Overlay is selected follow the scanning procedure below 1...

Страница 213: ...annot go down any more Do not stack paper above the paper hook level 5 When the stack of paper is seated properly in the tray close the LCT upper door lid NOTE When loading Tab sheets be sure the tab extensions are positioned at the rear side of the tray not at the front where the Paper load button is located and jutting to the right away from the hinged side of the LCT cover Adding Toner p 14 7 C...

Страница 214: ...CM Setting Mode E C M Data Edit 1 E C M All Count Reset 2 E C M Function Setting 3 Lock Delete Job Memory 5 Paper Type Special Size Set 6 Panel Contrast Key Sound Adjustment 7 Key Operator Data Setting 8 Weekly Timer 9 How to Access the Weekly Timer Setting Mode Weekly Timer On Off Setting 1 Timer Setting 2 Timer Action On Off Setting 3 Lunch Hour Off Setting 4 Timer Interrupt Password Setting 5 C...

Страница 215: ...een when the Key Operator mode is being accessed and a key operator password will not be required A service set 8 digit ECM master key code must be entered by the key operator to access the Electronic Copy Monitor functions and a service set 4 digit Weekly timer master key code must be entered by the key operator to access the Weekly timer functions To ensure the security of Key Operator mode it i...

Страница 216: ...y Operator Password Entry Screen is displayed use the keypad on the touch screen to enter your 4 digit key operator password then touch OK to display the Key Operator Mode Screen See note If the key operator password is not valid check with your service representative 4 To display menus 11 to 18 of the Key Operator Mode Screen touch the lower arrow key To return the menu 1 to 10 of the Key Operato...

Страница 217: ...tio setting Userset 1 Userset 2 Userset 3 ratio 0 33 4 00 4 E C M Function 1 E C M data edit Change Add Delete setting 2 E C M all count reset YES NO 3 E C M function setting ECM On ECM Off Immediately After job Warning 5 Lock delete job memory 6 Paper type Paper type Blank Normal Thick 1 Thick 2 Recycle Thin Special Size Set Color TAB Special User Fine Seal Special size STD size STD size special ...

Страница 218: ...y when APS cancel 15 Platen original size detect 16 RADF original size detect 17 Platen orig size detect SMALL 18 Rotation 19 Rotation 180 angle 20 B6R size original type 21 A3 B4 11x17 8 5x14 F4 orig type 22 Staple mode reset function 23 Job offset operating 24 Continuation print 25 SDF Auto start 26 Key click sound 27 1 SHOT indication time 28 Power save screen 29 START key latch function 30 STO...

Страница 219: ...management 1 Job memory list list print 2 User management list 3 E C M management list 4 Font pattern list 16 Side 2 lens adjustment 0 1 0 2 0 3 17 Finisher adjustment 1 Stapling Folding stopper adj 2 Folding stopper adjustment 18 HDD management setting 1 Password list delete 2 JOB auto delete period setting 3 State of HDD capacity ...

Страница 220: ...tial setting to display the System Initial Setting Menu Screen then touch 1 Date Time setting to display the Date Time Setting Screen 3 Adjust the time The time indicated by the copier is displayed in the upper line and ordered by date month year and time in 24 hour expression In the lower line the highlighted section can be changed by using the keypad on the screen Touch SET to move the highlight...

Страница 221: ...Key operator password is entered continue by entering the valid 4 digit password 2 Touch 1 System initial setting to display the System Initial Setting Menu Screen then touch 2 Language select setting to display the Language Selection Screen 3 Touch English 4 Touch OK to complete the setting and return to the System Initial Setting Menu Screen 5 If no further changes are required proceed to step 7...

Страница 222: ...assword is entered continue by entering the valid 4 digit password 2 Touch 1 System initial setting to display the System Initial Setting Menu Screen then touch 3 IP address setting to display the IP Address Setting Screen 3 Make the required setting When customizing the line speed touch Line speed setting to display the Line Speed Setting Screen Touch the desired key then touch OK to restore the ...

Страница 223: ...d by the key operator the new initial settings display when the copier is powered on when Auto Reset timer is reached or when AUTO RESET key is pressed The following initial settings can be changed by the key operator Copy mode RADF 1 1 1 2 2 2 2 1 Copy density AES manual Lens mode AMS ratio 0 33 4 00 Paper tray APS trays 1 2 3 or 4 Output mode non sort group staple sort stapling folding folding c...

Страница 224: ...erator password is entered continue by entering the valid 4 digit password 2 Touch 2 Copier initial setting to display the Copier Initial Setting Screen 3 Make a selection for each mode as initial settings Touch RADF to select or deselect it 4 Touch OK to complete the setting and return to the Key Operator Mode Screen 5 If no further changes are required proceed to step 7 6 If other key operator s...

Страница 225: ...it password 2 Touch 3 User setting mode to display the User Setting Mode Menu Screen then touch 1 User density level 1 setting to display the User Density Level 1 Setting Screen 3 Place the original on the platen glass or in the RADF 4 Touch Darker or Lighter to select the density level to be programmed 5 Touch No 1 1 4 No 2 5 8 No 3 9 12 No 4 13 16 or Set density then press START The density leve...

Страница 226: ...etting mode to display the User Setting Mode Menu Screen then touch 2 User density level 2 setting to display the User Density Level 2 Setting Screen 3 Place the original on the platen glass or in the RADF 4 Touch Darker or Lighter to select the density level to be programmed 5 Touch No 1 1 4 No 2 5 8 No 3 9 12 No 4 13 16 or Set density then press START The density level sample sheet will be outpu...

Страница 227: ...uch Key Operator Mode Enter a 4 digit key operator password then touch OK to display the Key Operator Mode Screen NOTE If an invalid Key operator password is entered continue by entering the valid 4 digit password 2 Touch 3 User setting mode to display the User Setting Mode Menu Screen then touch 3 User lens mode ratio setting to display the User Lens Mode Ratio Setting Screen 3 Touch the USERSET ...

Страница 228: ...hat can be used for billing and recordkeeping The number of users assigned to each account may depend upon the billing system in operation and the number of individuals and departments using the copier When the ECM is activated copying can be performed only after a valid ECM password is entered Copy quantity and copy limit for each account can be visually confirmed on the screen If ECM needs to be...

Страница 229: ...isplays if a code is required 3 Use the keypad on the touch screen to enter your 8 digit ECM master key code then touch OK to display the ECM Setting Menu Screen See note 2 4 Select the desired ECM function and make settings as required To exit the ECM mode touch PREVIOUS SCREEN on ECM Setting Menu Screen 5 To exit the Key Operator mode touch PREVIOUS SCREEN on the Key Operator Mode Screen to rest...

Страница 230: ... to change add or delete the ECM data and to reset the copy count of the individual account ECM No Designated by key operator ECM Password Unique 8 digit numeric code programmed by key operator for user User Name Max 8 characters Copy Limit 0 to 999 999 copies ECM Setting Menu Screen ECM Data Edit Screen Password Duplication Screen Name Duplication Screen ECM Data Change Screen ECM Data Add Screen...

Страница 231: ...each as described below To Change ECM Data 1 Touch or key on the right side of the list to highlight the ECM data to be changed then touch Change The ECM Data Change Screen will be displayed 2 Touch the desired item key to highlight it then enter new data by using the touch screen keypad Password 8 digits max See note 1 Name 8 characters max See note 2 Limit 999 999 copies max NOTES 1 We recommend...

Страница 232: ...plicated The Password Duplication Screen will be displayed Touch YES to re enter new password or NO to create duplicate password NOTE If duplicate password is created the number of copies will be counted only for the ECM password with the smallest No We recommend you do not use duplicate ECM password When a name is duplicated The Name Duplication Screen will be displayed Touch OK to re enter new n...

Страница 233: ...PREVIOUS SCREEN on the ECM Data Edit Screen to return to the ECM Setting Menu Screen Touch desired key from 1 3 6 Touch PREVIOUS SCREEN to restore the Key Operator Mode Screen If other key operator settings are required select the desired menu item from 1 to 18 7 If no further changes are required touch PREVIOUS SCREEN to restore the Basic Screen to perform copying operations ...

Страница 234: ...ll count reset The ECM All Count Reset Screen will be displayed 5 Touch YES to reset all counters to zero and to return to the ECM Setting Menu Screen Or touch NO to cancel Touching PREVIOUS SCREEN will also cancel this function and return to the ECM Setting Menu Screen 6 If other ECM setting changes are required touch desired key from 1 3 7 Touch PREVIOUS SCREEN to restore the Key Operator Mode S...

Страница 235: ...activate ECM The selected key will be highlighted 6 Touch Immediately to stop the machine when the copy limit is reached In this case the paper in process will be completed and Enter ECM password will display after the copier stops Touch After job to stop the machine after the current job is completed when copy limit is reached Touch Warning only to display a warning message when copy limit is rea...

Страница 236: ...k Delete Job Memory Screen To lock unlock a job memory 1 Touch the key on the left side of the desired job number Use arrow keys to scroll to the desired job number if required 2 The lock icon will appear on the touched key to show that the selected job is locked The previously locked job will be unlocked when selected and the lock icon on the touched key will disappear To delete a job memory 1 To...

Страница 237: ...asic Screen This is especially useful when special paper is used on a regular basis and is always placed in a specific paper tray Key Operator Mode Screen Paper Type Setting Screen Special Size Setting Screen STD size Special Size Setting Screen STD size special Special Size Setting Screen Non STD size Special Size Setting Screen Wide size paper Special Size Setting Screen Input size ...

Страница 238: ...t on the tray key Select STD size special to display the popup menu to show available paper sizes to be specified Use arrow keys on the popup menu to select the desired size Select Non STD size to display the popup menu to enter the paper size by using arrow keys or touch screen keypad Select Wide size paper to display the popup menu to show available wide paper sizes to be specified Use arrow key...

Страница 239: ...light contrast dimmer than currently displayed or touch Brighter to make the panel or backlight contrast brighter than currently displayed Touch Small or Big to regulate the buzzer volume of the touch keys 4 Touch OK to complete the setting and return to the Key Operator Mode Screen 5 If other key operator settings are required touch desired key from 1 to 18 6 If no further changes are required to...

Страница 240: ...y Operator Data Setting Screen 3 Touch Name to highlight it then enter the key operator name up to 8 characters from the touch screen keypad 4 Touch Key Operator Tel No to highlight it then enter a 5 digit extension number from the touch screen keypad If the extension number is less than 5 digits use a hyphen to make it five The hyphen added in the beginning will be indicated as a space on the Hel...

Страница 241: ...r needs to be activated on your machine contact your service representative The following Weekly timer settings can be made 1 Weekly timer ON OFF setting Enable and disable the Timer function 2 Timer Setting Specify the times that the copier will turn ON and OFF for each day of the week or the entire week 3 Timer action ON OFF Setting Specify the working days of the machine by the Timer for all Mo...

Страница 242: ...e is required 3 Use the keypad on the touch screen to enter your 4 digit Weekly timer master key code then touch OK to display the Weekly Timer Setting Menu Screen See note 2 4 Select the desired Weekly timer function and make settings as required 5 To exit the Weekly timer mode touch PREVIOUS SCREEN on the Weekly Timer Setting Menu Screen 6 To exit the Key operator mode touch PREVIOUS SCREEN on t...

Страница 243: ... activate Weekly timer or touch Weekly timer Off to de activate Weekly timer The default setting is Weekly timer Off The selected key will be highlighted 5 Touch OK to complete the setting and return to the Weekly Timer Setting Menu Screen 6 If other Weekly timer settings are required select another desired menu item from 1 5 7 Touch PREVIOUS SCREEN to restore the Key Operator Mode Screen If other...

Страница 244: ...ed the ON time of Monday is always highlighted Enter a 2 digit ON hour ex 8 a m is 08 and a 2 digit ON minute ex 7 min is 07 using the touch screen keypad and then touch SET Touching SET repeatedly will shift the input section from Monday ON Monday OFF Tuesday ON Tuesday OFF e g NOTES If ON time and OFF time are the same power will not go on If the setting is 00 00 00 00 you will not be able to se...

Страница 245: ... the ON time and OFF time using the touch screen keypad and then touch SET after each entry 7 Touch OK on the Weekly Timer On Off Time Setting Screen or on the Weekly Timer On Off Time Collective Setting Screen to complete the setting and return to the Weekly Timer Setting Menu Screen 8 If other Weekly timer settings are required select another desired menu item from 1 5 9 Touch PREVIOUS SCREEN to...

Страница 246: ...d then touch OK to display the Key Operator Mode Screen See note 1 2 Touch 9 Weekly timer Enter your 4 digit Weekly timer master key code then touch OK to display the Weekly Timer Setting Menu Screen See note 2 NOTES 1 If an invalid Key operator password is entered continue by entering the valid 4 digit password 2 If an invalid Weekly timer master key code is entered continue by entering the valid...

Страница 247: ...reen will be displayed Touch YES to change the timer action or touch NO to cancel The Timer Action On Off Setting Screen will be restored 7 Touch OK on the Timer Action On Off Setting Screen to complete the setting and return to the Weekly Timer Setting Menu Screen 8 If other Weekly timer settings are required select another desired menu item from 1 5 9 Touch PREVIOUS SCREEN to restore the Key Ope...

Страница 248: ...creen 4 Touch Function Valid to activate the Lunch hour off function Set OFF time and Restart time using the touch screen keypad and then touch SET after each entry Touch Function Invalid to de activate the Lunch hour off function The time setting area will appear grayed out and cannot be selected The Function Invalid setting is the factory default setting 5 Touch OK to complete the setting and re...

Страница 249: ...ntered continue by entering the valid 4 digit password 2 If an invalid Weekly timer master key code is entered continue by entering the valid 4 digit code 3 Touch 5 Timer interrupt password set to display the Timer Interrupt Password Setting Screen 4 Use the touch screen keypad to enter a 4 digit password and then touch OK to complete the setting and return to the Weekly Timer Setting Menu Screen ...

Страница 250: ...of the screen 4 Check that the X coordinate and Y coordinate displayed in the first line of the message area fall within the standard value displayed in the second line 5 Touch the CHECK BUTTONs at the upper left and lower right corners on the screen to check if the buzzer tone functions normally 6 If the coordinates fall out of the range of the standard value in step 4 or the buzzer tone does not...

Страница 251: ...y size setting to display the Tray Auto Select Setting Screen 4 On the left half of the screen touch to highlight each tray key then select OFF or ON to specify whether the selected tray is to be automatically detected or not when ATS APS functions 5 Tray keys specified as ATS APS ON will appear on the right half of the screen Touch to highlight the desired tray key then change its priority by usi...

Страница 252: ... Screen touch Lower arrow key 3 Touch 12 Power save setting to display the Power Save Setting Screen 4 The periods of time currently selected for each power save function are located on the Timer Setting Screen below the Auto Low Power and Auto Shut Off indicators Touch the arrow keys and in each area to select a specific waiting period before activating the Auto Low Power or Auto Shut Off NOTES 1...

Страница 253: ...erential tray Tray 1 Tray 2 Tray 3 Tray 4 Bypass tray No 15 Platen original size detect Only A series Full size AB series Inch series No 16 RADF original size detect Only A series Full size AB series Inch series No 17 Platen orig size detect SMALL A5R B6R 5 5 x8 5 R No 18 Rotation ON APS AMS only ON APS AMS Reduce only ON Always No 19 Rotation 180 angle ON Always According to Rotation OFF tray No ...

Страница 254: ... 18 of the Key Operator Mode Screen touch Lower arrow key 3 Touch 13 Memory switch setting to display the Memory Switch Setting Screen 4 Use the procedure below to select the desired item and change the setting 1 To select the desired item touch the arrow keys and at the right of the Memory Switch Setting Screen 2 To scroll the screen touch the arrow keys and at the lower left 3 Touch Change Setti...

Страница 255: ... when Auto reset is restored This job recall function works only when Job No 30 is registered 5 Finisher mode by Full auto Set the Finisher mode to be recalled when AUTO RESET is pressed 6 Initial by Key counter insert Set the machine to return to the initial state when Key counter is inserted 7 Erasure outside area of original Set the machine to delete the outside area of original 8 RADF frame er...

Страница 256: ... released 15 Platen original size detect Select the series of the original paper size detected from the platen glass 16 RADF original size detect Select the series of the original paper size detected from the RADF 17 Platen orig size detect SMALL Select the minimum original size detected from the platen glass 18 Rotation Select to activate the Rotation function activate Rotation only when APS AMS ...

Страница 257: ... screen to display when pressing the POWER SAVER ON OFF key 29 START key latch function Activate or deactivate the latch function 30 STOP key function Select to display or not to display the confirmation message when STOP key is pressed 31 Auto select of Booklet copy Set the copier with 3 Paper Tray Finisher mounted to automatically select the Booklet mode when Stapling Folding or Folding output m...

Страница 258: ...chine has stopped being out of paper or due to paper misfeed 38 Reserve copy function Set the timing for the reserve job setting 39 Scan stop by a pull out tray Select to stop or continue the scanning job when a tray is pulled out 40 Change page no pos booklet Set the machine to position the page numbers automatically on the outside edges of the copy when using Booklet with Page Numbering in Stamp...

Страница 259: ... to display the Key Operator Mode Screen See note 2 To display menus 11 to 18 of the Key Operator Mode Screen touch Lower arrow key 3 Touch 14 Machine management list print to display the Management List Print Menu Screen 4 Touch the desired item on the screen The Basic Screen will resume automatically 5 Press START to start printing the selected list To suspend printing press STOP The confirmatio...

Страница 260: ...e Screen touch Lower arrow key 3 Touch 16 Side 2 lens adjustment to display the Side 2 Lens Adjustment Screen 4 Touch to highlight the desired tray key then touch arrow keys to select an adjustment data The selected data will be displayed on the highlighted tray key 5 Touch OK to complete the setting and return to the Key Operator Mode Screen 6 If other key operator settings are required select th...

Страница 261: ...reen 4 Touch the desired menu key to display the adjustment screen for each function 5 Make fine adjustment on the screen To go on or back to another adjustment screen touch NEXT or PREVIOUS Touching PREVIOUS SCREEN restores the Finisher Adjustment Menu Screen 6 Touch PREVIOUS SCREEN to restore the Key Operator Mode Screen If other key operator settings are required select the desired menu item fr...

Страница 262: ...e data JOB by deleting the corresponding password from the list JOB auto delete period setting Specify the period of time 1 to 52 weeks to keep each data so that it will be deleted automatically when specified period has passed State of HDD capacity Check the space in percentage Key Operator Mode Screen 2 HDD Management Setting Menu Screen Password List Delete Screen Password List Delete Screen JO...

Страница 263: ...ssword and all the data corresponding to it or touch NO to cancel 4 Touch PREVIOUS SCREEN to return to the HDD Management Setting Menu Screen To delete the password and data automatically 1 Touch 2 JOB auto delete period setting to display the Job Auto Delete Period Setting Screen 2 Touch Auto delete ON to highlight it then enter the number of weeks to keep each data using the touch screen keypad ...

Страница 264: ...Key Operator Mode 13 51 Key Operator Mode Key Operator ECM Form No Password Count Limit No Password Count Limit ...

Страница 265: ...and 3 Loading Paper in Tray 4 Loading Tabbed Sheets in Tray 1 2 or 3 Loading Tabbed Sheets in Tray 4 LCT Adding Toner Inserting a New Staple Cartridge into 2 Paper Tray 3 Paper Tray Finisher Preventive Maintenance Reading the PM Counter Printing the PM Counter Cleaning the Left Partition Glass Cleaning the Document Glass and Cover Service Repairs Supplies ...

Страница 266: ...eets 20lb 430 sheets 24lb Tray 3 1 000 sheets 20lb 860 sheets 24lb Tray 4 4 000 sheets 20lb Multi sheet bypass tray 150 sheets 20lb Do not load above the red line on rear guide Using the HELP Key To learn how to load paper at any time press HELP then touch any tray to display instructions on the touch screen For details on tray position size vs paper size see Section 4 Paper Information Before loa...

Страница 267: ...de turning up Load size 11 x17 8 5 x14 8 5 x11 8 5 x11 R or 5 5 x8 5 user adjustable Do not stack paper above the red line level 2 Move the green levers located at the front and the left side to the edge of the paper 3 When paper is seated properly push the tray back fully into the copier NOTE Do not bump the tray into the main body otherwise machine trouble may be caused ...

Страница 268: ... the paper loading button to lower the bottom plate of the LCT 3 Load the fixed size paper into the LCT with the paper curl turning downward 4 Repeat the steps 2 and 3 until the bottom plate cannot go down any more Load size 8 5 x11 or A4 service adjustable Do not stack paper above the paper hook level 5 Close the LCT upper door ...

Страница 269: ...ued Loading Tabbed Sheets in Tray 1 2 or 3 Load offset tabbed sheets so that the tab extensions are on the left at the rear not front of the tray The top sheet is designated face down as the first tab of the finished set Subsequent offset tab sheets follow in sequence ...

Страница 270: ...inued Loading Tabbed Sheets in Tray 4 LCT Load offset tabbed sheets so that the tab extensions are on the right at the rear not front of the tray The top sheet is designated face up as the first tab of the finished set Subsequent offset tab sheets follow in sequence ...

Страница 271: ...right 3 Pull out the toner cartridge lock lever frontward until it stops Remove the empty toner cartridge 4 Shake the new toner cartridge several times to loosen toner then remove the toner cartridge cap 5 Set the new toner cartridge into the toner unit NOTE Align the hollow part on the toner cartridge with the mark on the toner unit 6 Push the cartridge lock lever backward until it stops 7 Return...

Страница 272: ...artridge housing then remove it while sliding it along the stapler rail 4 Remove the empty cartridge from the cartridge housing 5 Insert the new cartridge into the housing NOTE Do not remove the staples remaining inside the housing otherwise the first sheet output after the replenishment will not be stapled 6 Insert the cartridge housing while sliding it along the stapler rail then push in and dow...

Страница 273: ... the Counter List Screen 2 Press CHECK to display the PM count on the Counter List Screen 3 Touch EXIT to return to the Basic Screen Printing the PM Counter 1 Press P COUNTER to display the Counter List Screen 2 Press CHECK to display the PM counter on the Counter List Screen 3 Touch Counter list output The Basic Screen will be displayed 4 Touch the desired tray key to select the copy size 5 Press...

Страница 274: ...nd the inner surface of the document feeder should be kept clean Otherwise soil marks may be copied Raise the document cover and clean the left partition glass with a clean soft cloth Raise the document cover and clean the glass and inner surface of the document cover with a clean soft cloth NOTES 1 The glass may also be cleaned with a soft cloth dampened slightly with water or with an antistatic ...

Страница 275: ...erial number and your own telephone number If copy quality is the concern bring a sample copy with you to the phone so that it can be described to your service representative Enter the telephone number for Repairs in the space provided below Repairs Tel No Supplies Be sure to use only supplies recommended by our company To maintain your supply inventory check your supplies at regular intervals and...

Страница 276: ...Troubleshooting 15 1 Section 15 Troubleshooting Call for Service Limited Use of the Copier in Trouble Memory Overflow Power OFF ON Screen Clearing Mishandled Paper Copying Hints ...

Страница 277: ...ondition that requires the attention of your service representative 1 Immediately make note of the Report code No indicated in the upper portion of the screen 2 Turn OFF the main power switch 3 Unplug the machine 4 Contact your service representative and report the condition and code No Call for Service Screen ...

Страница 278: ...ilize the limited function only temporarily and arrange for machine repair immediately 1 If limited use of the copier is available the following message is displayed in the message area instead of the Report code Tray 1 failure Press AUTO to select except this tray 2 Press AUTO RESET Please switch ON OFF E 18 2 3 Turn OFF then ON the power switch A copying job can be continued without using the tr...

Страница 279: ...s the only two available options NOTE If the job settings include Booklet mode SCAN STOP will disappear To delete all the scanned data and discontinue the job touch JOB STOP To give up further scanning but print out all the data already scanned into memory touch SCAN STOP When memory overflow occurs during the reserve operation CONTINUE also appears on the active screen In this case the machine wi...

Страница 280: ...Troubleshooting 15 5 Troubleshooting Power OFF ON Screen When any trouble affects the electric signal of the copier the Power OFF ON Screen will be displayed Power OFF ON Screen ...

Страница 281: ...icates the area that should be cleared first To view Help screen instructions touch Illustration explanation when the flashing mishandled paper code displays Be sure to remove paper from each flashing location until all locations are cleared Code Location 1 Tray 1 2 Tray 2 3 Tray 3 4 Tray 4 LCT 5 Multi sheet bypass tray 6 Right side cover of Main body 7 Tray 4 LCT 8 Multi sheet bypass tray and Mai...

Страница 282: ...Take sufficient care when working in this area as there is a danger of getting burned CAUTION The conveyance fixing unit is heavy Use care and drow it out gently otherwise you may be injured CAUTION DO NOT put your hand between the main body and developing fixing unit otherwise you may be injured CAUTION Inside the Booklet mode outlet is the roller drive unit DO NOT put your hand into it when remo...

Страница 283: ... required Check the Density shift COPY IMAGE IS NOT CLEAN OR SHOWS SPOTS Use clean originals since dirt marks may be copied Keep platen glass and inner surface of document cover clean Call for service if Call for service is displayed in the message area Check density indicator and lighten if required COPY PAPER MISHANDLES DURING COPYING Fan copy paper and load it with curl side in proper location ...

Страница 284: ...ADF Check to make sure paper guides meet the width of mixed size originals COPY IMAGE IS SKEWED WHEN BYPASS IS USED Be sure copy paper is inserted straight USING ECM COPIES CANNOT BE MADE AFTER PASSWORD IS ENTERED Check to see if the message EXCEEDS LIMIT is displayed Contact key operator to reset limit FINISHER DOES NOT OPERATE Press Output mode key Check for a paper misfeed and remove it as requ...

Страница 285: ... automatically If this message continues to display after selecting copy size select 1 00 magnification even if it is already indicated then press START If desired ask your service representative to enable the machine to default to 1 00 magnification in this situation SHEET INSERTION RESULT IS NOT AS EXPECTED Blank insertion Be sure manuscript originals do not already include blank sheets in the l...

Страница 286: ...Machine Specifications 16 1 Section 16 Machine Specifications Specifications ...

Страница 287: ... 4 5 min 5 min First Copy Out Time From Platen Glass 3 9 sec for 8 5 x11 Copy Rate 75 cpm 8 5 x11 5 5 x8 5 62 cpm 8 5 x11 R 51 cpm 8 5 x14 43 cpm 11 x17 Continuous Copy 1 9 999 copies Voltage 230V AC14 to 10 6 Current 20A Dedicated line recommended Frequency 50Hz 60Hz Grounding Isolation recommended Termination NEMA Type 6 20R receptacle 250V 2 pole 3 wire grounded Power Consumption Max 3 119 VA f...

Страница 288: ...mode 11 x17 8 5 x14 8 5 x11 5 5 x8 5 or 8 5 x14 8 5 x11 R 8 5 x11 5 5 x8 5 Max 100 sheets 20 lb feed exit capacity Original weight 13 34 lb bond curl max 10 mm or less Transparency Paste up Offset master Labels Intermediate papers unavailable Paper Source Main body trays 1 2 3 500 500 1 000 sheets LCT tray 4 4 000 sheets Multi sheet bypass tray 150 sheets Tray 1 2 3 user adjustable Trays 4 adjuste...

Страница 289: ... Large Capacity Tray Machine Dimensions Main Body with RADF Width 34 9 in 887mm Depth 30 5 in 775mm Height 45 7 in 1160mm Document Feeder RADF Width 25 6 in 650mm Depth 22 4 in 570mm Height 6 7 in 170mm Max open angle 70 5 Stapler Finisher 2 Paper Tray 3 Paper Tray Width 21 4 in 544mm Depth 25 8 in 656mm Height 43 1 in 1095mm Cover Sheet Feeder Width 13 0 in 330mm Depth 18 0 in 456mm Height 4 7 in...

Страница 290: ... sheets Size 11 x17 8 5 x14 8 5 x11 R A4R 8 27 x11 69 210mmx297mm The maximum number of sheets varies depending on pages of a booklet and selecting either the Folding or Stapling Folding See p 4 9 Staple Cartridge 5000 staples cartridge Cover Sheet Feeder Paper size 11 x17 8 5 x14 8 5 x11 8 5 x11 R 5 5 x11 5 5 x11 R A4 A4R 8 27 x11 69 210mmx297mm Paper weight in cover sheet mode 13 110 lb 200g m2 ...

Страница 291: ......

Страница 292: ...y P O Box 57006 Irvine California 92618 7006 TEL 949 457 9000 FAX 949 457 9119 Southeastern Region 1500 Oakbrook Drive Norcross Georgia 30093 TEL 770 729 9786 FAX 770 729 9873 Southwestern Region 2825 West Story Road Irving Texas 75038 5299 TEL 972 550 8987 FAX 972 570 4704 Dallas Parts Distribution Center National Training Center 2825 West Story Road Irving Texas 75038 5299 TEL 972 659 0055 FAX 9...

Отзывы: