Disassembly/Assembly
Opening the PC3x
3-5
Replacing the Top Enclosure
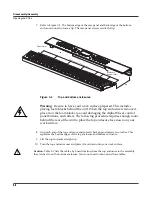
1. Position the top enclosure behind the bottom enclosure.
2. Move the top enclosure so that the bottom edge of the rear panel is positioned under the
bottom enclosure edge. See Figure 3-4 on page 3-4.
Note:
Verify that the cables listed in Table 3-1 are lying
fl
at on the bottom enclosure. Be sure that
all other cables are tucked between the top enclosure and the enclosure support wall.
3. Hold the top enclosure safely in place and move the unit so that one end of the rear panel
edge hangs over the edge of your work surface and install the rear panel screw at that end.
Slide the unit back onto your work surface. Repeat for other end.
Warning
: Perform Steps 3 and 4 separately. Combining these steps could cause the top
enclosure to
fl
ip away from the bottom enclosure or drop off of your work surface.
4. Move the unit so that the rear panel edge of the unit hangs over the edge of your work
surface and install the remaining screws.
Top cover Assembly
Bottom Enclosure
Connector Board, Bass
Keyboard Assembly, Bass
Connector Board, Treble
Keyboard Assembly, Treble
Slider Board
Button Board/Wheels Assembly
Connector Board
Wheels Assembly
Table 3-1
Top and bottom enclosure cables
Содержание PC3x
Страница 14: ...1 6 Introduction PC3x Front Panel...
Страница 24: ...2 10 Diagnostics Description of Tests...
Страница 50: ...3 26 Disassembly Assembly PC3x Keyboard Assembly...
Страница 72: ...4 22 Troubleshooting Maintenance Converting the Voltage...


