3-4
Disassembly/Assembly
Opening the PC3x
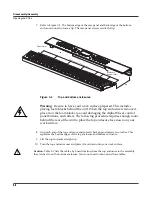
7. Refer to Figure 3-4. The bottom edge of the rear panel and back edge of the bottom
enclosure connect to form a lip. The rear panel screws secure the lip.
Figure 3-4
Top and bottom enclosures
Warning
: Be sure to have your work surface prepared. This includes
placing foam blocks behind the unit. When the top enclosure is removed,
place it on the foam blocks to avoid damaging the Alpha Wheel, control
panel buttons, and sliders. The following procedure requires enough room
behind the rear of the unit to place the top enclosure face down on your
work surface.
8. Grip each end of the top enclosure and rotate it back approximately two inches. This
separates the bottom edges of the top enclosure and bottom enclosure.
9. Lift the top enclosure straight up.
10. Turn the top enclosure over and place it face down onto your work surface.
Caution
: Table 3-1 lists the cables, by board location, from the top enclosure to the assembly
they connect to on the bottom enclosure. You do not need to disconnect these cables.
Rear panel screw locations
Transformer
Lip
Enclosure
Support Wall
Содержание PC3x
Страница 14: ...1 6 Introduction PC3x Front Panel...
Страница 24: ...2 10 Diagnostics Description of Tests...
Страница 50: ...3 26 Disassembly Assembly PC3x Keyboard Assembly...
Страница 72: ...4 22 Troubleshooting Maintenance Converting the Voltage...


