


34
MAINTENANCE
ENGLISH
(1) Plug
(A) ”HIGHEST LEVEL”
(B) ”LOWEST LEVEL”
IMPORTANT:
¡
Connect the charger positive terminal to the
battery positive terminal, and negative to the
negative.
¡
When disconnecting the cable from the battery,
start with the negative terminal first.
When connecting the cable to the battery, start
with the positive terminal first.
If reversed, the contact of tools on the battery may
cause a shortage.
쎱
Direction for Long Term Storage
1.
When storing the generator for long periods of
time, remove the battery, adjust the electrolyte to
the proper level, and store in a dry and dark place.
2.
The battery naturally discharges while it is stored.
Recharge it once a month in summer, and every 2
months in winter.
쎱
Battery Boost Starting
3
DANGER
To avoid serious personal injury.
¡
¡
¡
¡
¡
Battery gases can explode.
Keep cigarettes, sparks, and
flames away from battery.
¡
¡
¡
¡
¡
If generator battery is frozen, do
not battery boost start engine.
¡
¡
¡
¡
¡
DO NOT connect other end of
negative
1
1
1
1
1
jumper cable to
n e g a t i v e
1
1
1
1
1
t e r m i n a l o f
generator battery.
When battery boost starting engine, follow the
instructions below to safely start the engine.
1.
Bring helper battery of the same voltage as
disabled generator within easy cable reach.
2.
Put on safety goggles and rubber gloves.
3.
Ensure the vent caps are securely in place. (if
equipped)
4.
Cover vent caps with damp rags. Do not allow the
rag to touch the battery terminals.
5.
Attach the red clamp to the positive (red,
2
or
pos.) terminal of the dead battery and clamp the
other end of the same cable to the positive (red,
2
or pos.) terminal of the helper battery.
(1) Dead battery
(2) Lay a damp rag over vent caps.
(3) Jumper cables
(4) Engine block or frame
(5) Helper battery
6.
Clamp the other cable to the negative (black,
1
or
neg.) terminal of the helper battery.
7.
Clamp the other end to the engine block or frame
of the generator as far from the dead battery as
possible.
8.
Start the disabled generator.
9.
Disconnect the jumper cables in the exact reverse
order of attachment. (Steps 7, 6 and 5).
10. Remove and discard the damp rags.
IMPORTANT:
¡
This machine has a 12 volt negative
1
ground
starting system.
¡
Use only same voltage for jump starting.
¡
Use of a higher voltage source on generators
electrical system could result in severe damage to
generators electrical system.
Содержание KJ-S130VX
Страница 1: ...G3601 8911 8 ...
Страница 55: ...39 ENGLISH TROUBLESHOOTING 쎱 When Engine must be Stopped Immediately 쎱 When Engine Overheats ...
Страница 56: ...40 ENGLISH TROUBLESHOOTING ...
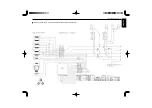
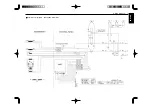
Страница 57: ...41 ENGLISH WIRING DIAGRAM Engine Circuit Diagram for D1703 V2203 ...
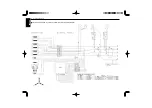
Страница 58: ...42 ENGLISH WIRING DIAGRAM Engine Circuit Diagram for V3300 ...
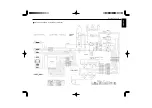
Страница 61: ...45 ENGLISH WIRING DIAGRAM Generator Circuit Diagram KJ T160DX 220 127V 60Hz KJ T210VX 220 127V 60Hz ...
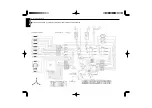
Страница 62: ...46 ENGLISH WIRING DIAGRAM Generator Circuit Diagram KJ T130DX 415 240V 50Hz KJ T180VX 415 240V 50Hz ...
Страница 63: ...47 ENGLISH WIRING DIAGRAM Generator Circuit Diagram KJ S130VX AUS 240V 50Hz ...
Страница 64: ...48 ENGLISH WIRING DIAGRAM Generator Circuit Diagram KJ T130DX AUS 415 240V 50Hz KJ T180VX AUS 415 240V 50Hz ...
Страница 65: ...49 ENGLISH WIRING DIAGRAM Generator Circuit Diagram KJ S240 AUS 240V 50Hz ...
Страница 66: ...50 ENGLISH WIRING DIAGRAM Generator Circuit Diagram KJ T300 AUS 415 240V 50Hz ...


