OPERATION
6
71
SMARTMAC 400
www.krohne.com
07/2022 - 4008875401 - MA SMARTMAC_400 R01 en
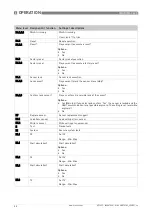
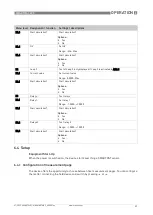
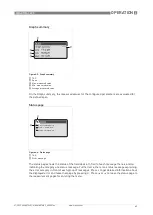
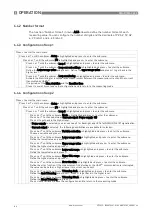
Cleaning mode
Use of relay 1 for sensor cleaning control
6.4.7 Illumination setting
Press > to enter the main menu.
Press
or
until the submenu Setup is highlighted and press > to enter the submenu.
Press
or
until the submenu I/O is highlighted and press > to enter the submenu.
Press
or
until the submenu Relay 1 is highlighted and press > to enter the submenu.
Press
or
until the submenu Mode is highlighted and press > to enter the submenu.
Press
or
until the submenu Cleaning mode is highlighted and press
^
.
Press
or
until the submenu Invert is highlighted and press > to enter the submenu.
Choose between Yes and No when an inversion is required or not and press
^
.
Press
or
until the submenu Cleaning int. unit is highlighted and press > to enter the submenu.
Choose the time unit for the cleaning interval and press
^
.
Press
or
until the submenu Cleaning interval is highlighted and press > to enter the submenu.
Set time span between cleaning cycles with > (selecting position) and
or
(selecting number). Press
^
for confirmation of adjusted value.
Press
or
until the submenu Cleaning lead time is highlighted and press > to enter the submenu.
Set cleaning lead time for delayed cleaning start with > (selecting position) and
or
(selecting number).
Press
^
for confirmation of adjusted value.
Press
or
until the submenu Cleaning duration is highlighted and press > to enter the submenu.
Set cleaning duration with > (selecting position) and
or
(selecting number). Press
^
for confirmation
of adjusted value.
Press
or
until the submenu Cleaning recov. time is highlighted and press > to enter the submenu.
Set sensor recovery time after cleaning with > (selecting position) and
or
(selecting number). Press
^
for confirmation of adjusted value.
Press
or
until the submenu Hold outp. when act. is highlighted and press > to enter the submenu.
Choose between Yes and No when output should be hold or not during cleaning cycle and press
^
.
Press
or
until the submenu Next cleaning cycle is highlighted and press > to enter the submenu.
Press
or
until the submenu Manual cleaning is highlighted and press > to enter the submenu.
Choose between Yes and No to start cleaning manually or not and press
^
.
Press
or
until the submenu Stop cleaning is highlighted and press > to enter the submenu.
Choose between Yes and No to stop cleaning manually or not and press
^
.
Press
^
several times to save the configuration and to return to the measuring mode.
Press > to enter the main menu.
Press
or
until the submenu Setup is highlighted and press > to enter the submenu.
Press
or
until the submenu Display is highlighted and press > to enter the submenu.
Press
or
until the submenu Illumination setting is highlighted and press > to enter the submenu.
Press
or
until the submenu Backlight is highlighted and press > to enter the submenu
Choose between On, Off and Timer when a backlight is required and press
^
.
If Timer was chosen, press
or
until the submenu Timer is highlighted and press > to enter the
submenu.
Define the holding time of backlight without key activation and press
^
.
Press
or
until the submenu Status LEDs is highlighted and press > to enter the submenu.
Choose between Yes and No when the LEDs are required or not and press
^
.
Press
^
several times to save the configuration and to return to the measuring mode.


